.png)

I was given this Anaconda stress ball at PyCon UK by the amazing Dawn Wages.

I think because of having spent so much time working with stress gauges earlier this year as part of my bird feeder project my first thought was “can I add a stress-sensor to this-stress ball to measure how hard it’s being squeezed?” TLDR; yes!
Read on for a guide on how to build your own stress-sensing stress-ball using a force sensitive resistor and a Raspberry Pi Pico (building on this great guide from newbiely.com) and use the data from it to power your own stress-ball desk toy. First though, what is an FSR and how does it work? Skip ahead if you want to get straight into building.
How does a force sensitive resistor work?
A Force Sensitive Resistor or FSR is a type of sensor whose electrical resistance changes when pressure is applied to it. As force is applied to an FSR, its resistance decreases, this relationship isn't perfectly linear, but it's consistent enough for many applications.
Inside the FSR are two layers separated by a small gap. One layer has conductive traces, the other has a special polymer with conductive particles. When you press them together, more contact points form between the layers, creating more paths for current to flow, which lowers the overall resistance.
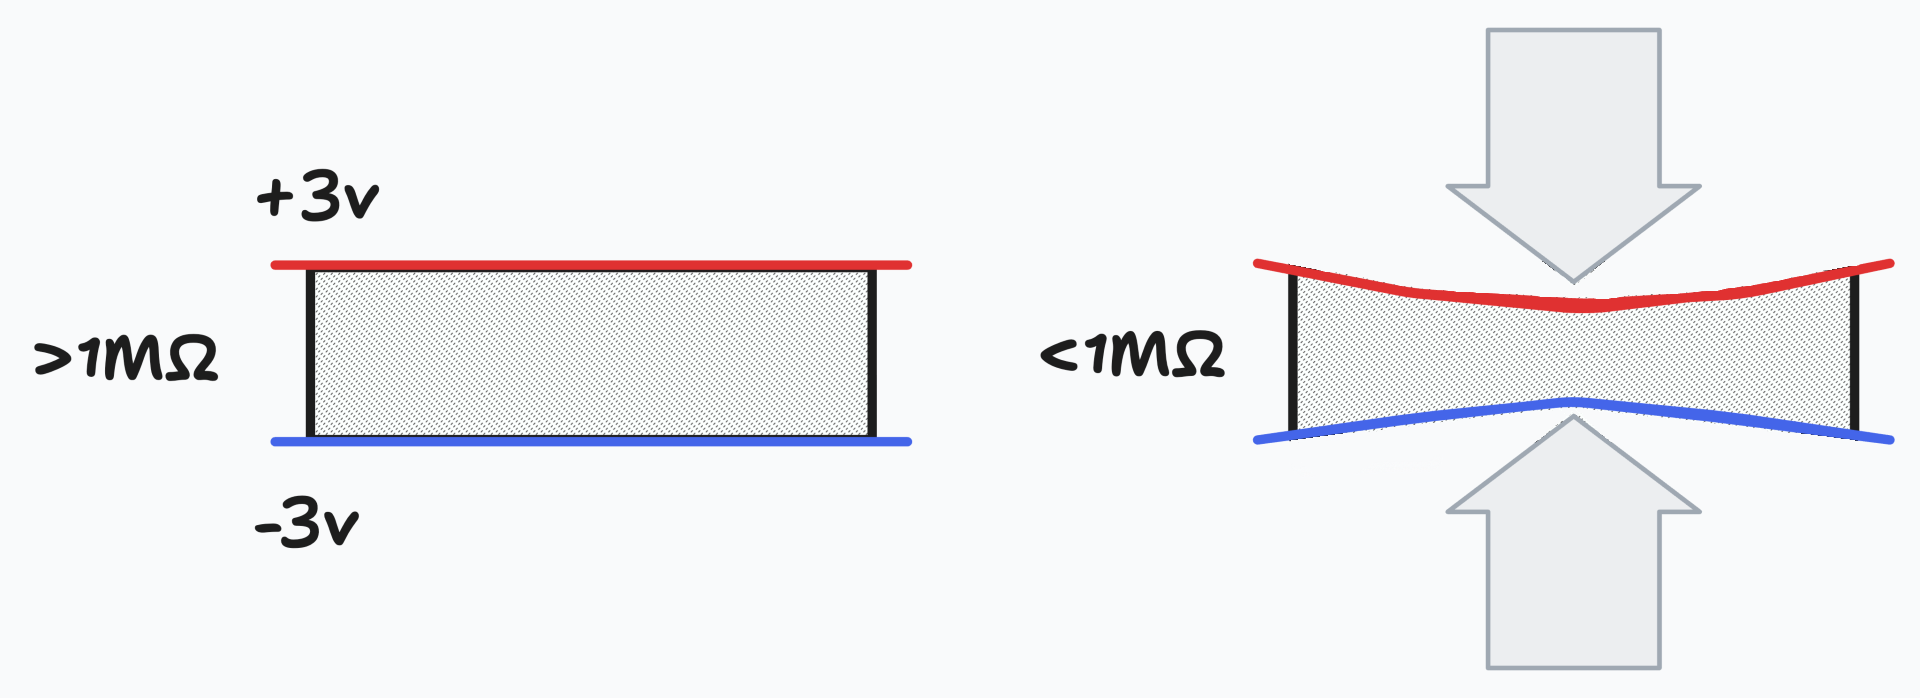
Since most microcontrollers (like our Raspberry Pi Pico) can't directly measure resistance but can measure voltage, we need to use a potential divider circuit:
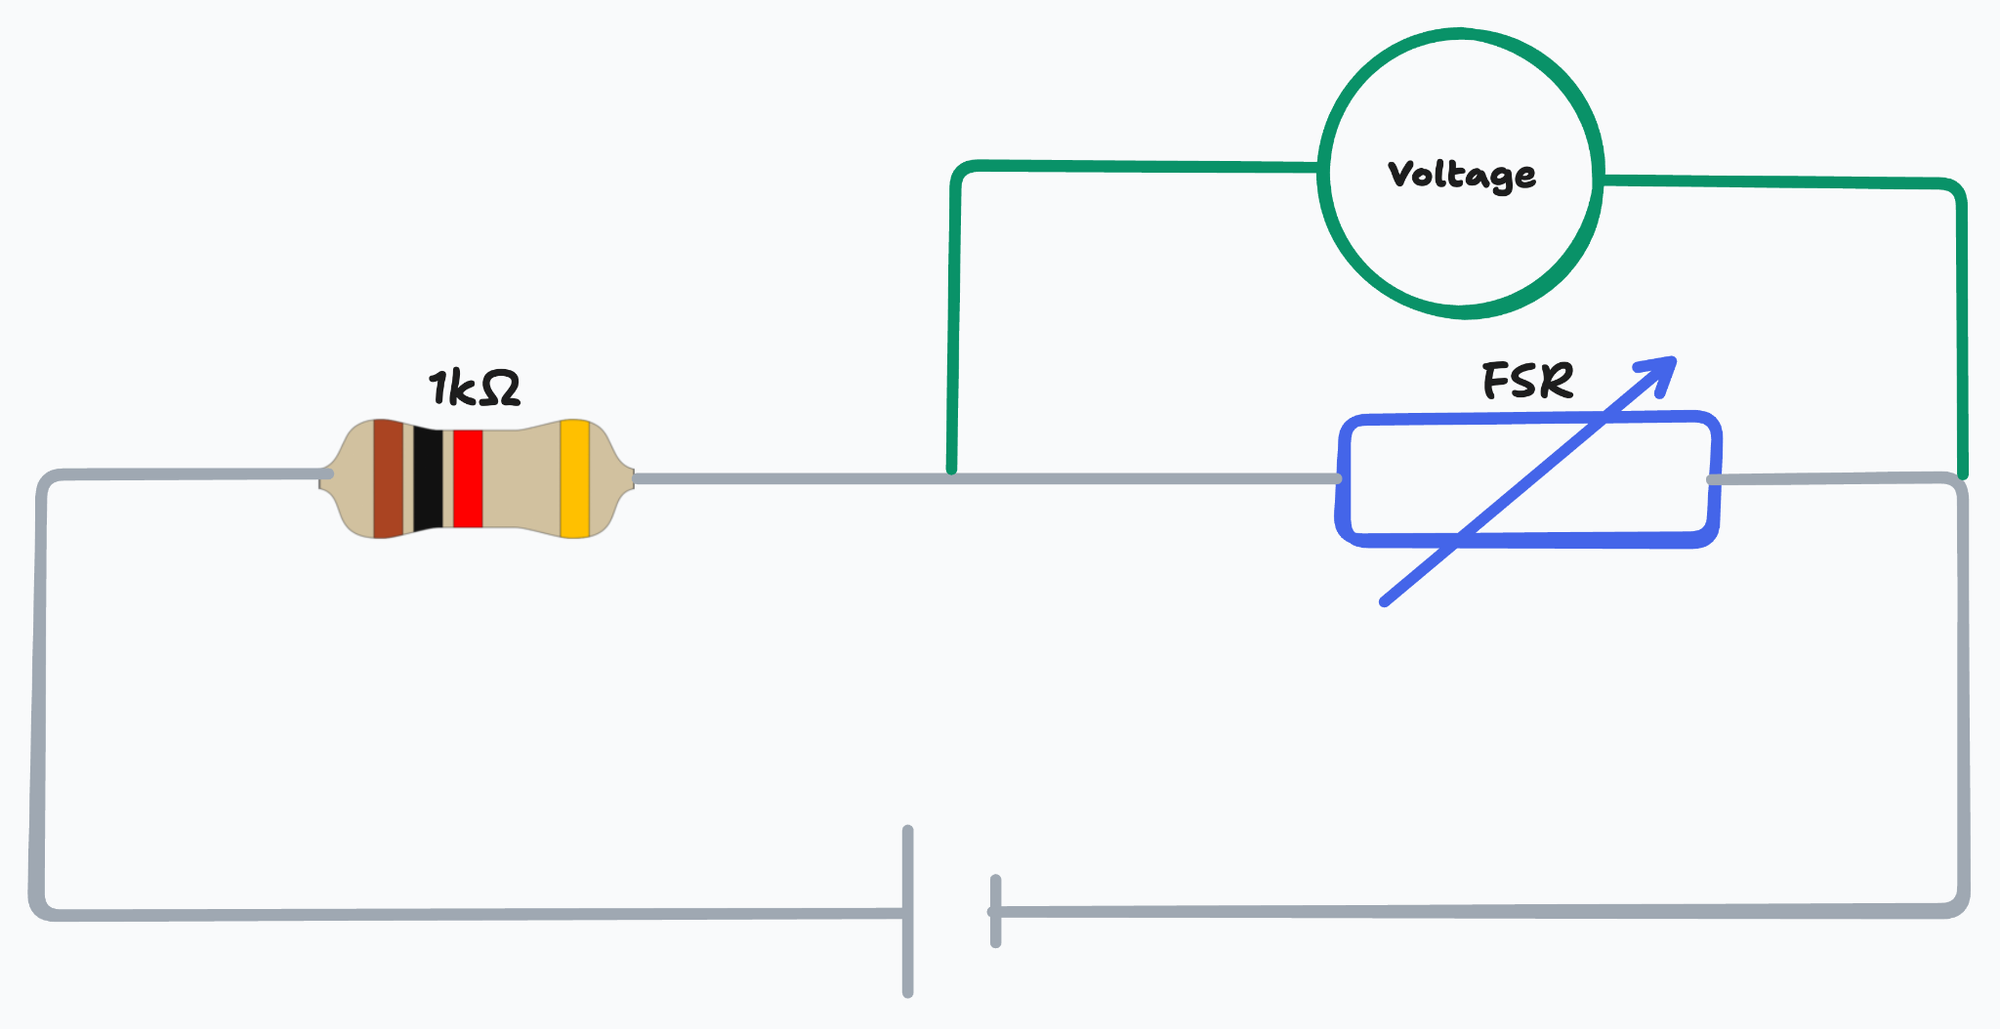
A potential divider is a circuit consisting of two resistors, in this case with one fixed and one with variable resistance (our FSR). The voltage at the middle between the two points is determined by the ratio of the two resistances:
V_out = V_supply × (R_FSR / (R_fixed + R_FSR))The fixed resistor value (typically 10kΩ) is chosen to be somewhere in the middle of the FSR's operating range for best sensitivity.
When there's no pressure, voltage is high; when you squeeze, voltage drops.
Build the stress sensor stress ball
Hardware shopping list
Options below are sorted by price, Amazon links are affiliates to fund my Raspberry Pi habit.
- £3.80 Raspberry Pi Pico (no headers required) Pimorini | The Pi Hut | Amazon
- £4.80 Force Sensitive Resistor The Pi Hut | Pimorini | Amazon
- £1 10kΩ resistor The Pi Hut | Amazon
- £5.87 Wire Amazon | The Pi Hut | Pimorini
- £5 Stress ball (something like this)
- Optional: an Altoid tin / film canister to protect your Pico and tape / heat shrink to insulate connections
All in this project should cost you no more than £20, less if you already have any of the bits and pieces you need and you can put everything together in less than an hour.
Tools
- Soldering iron and solder
- Wire stripper
- Scissors / sharp knife
- Micro USB Cable
- Optional: crocodile clip leads to test circuit prior to soldering
- Optional: Hot glue/ superglue
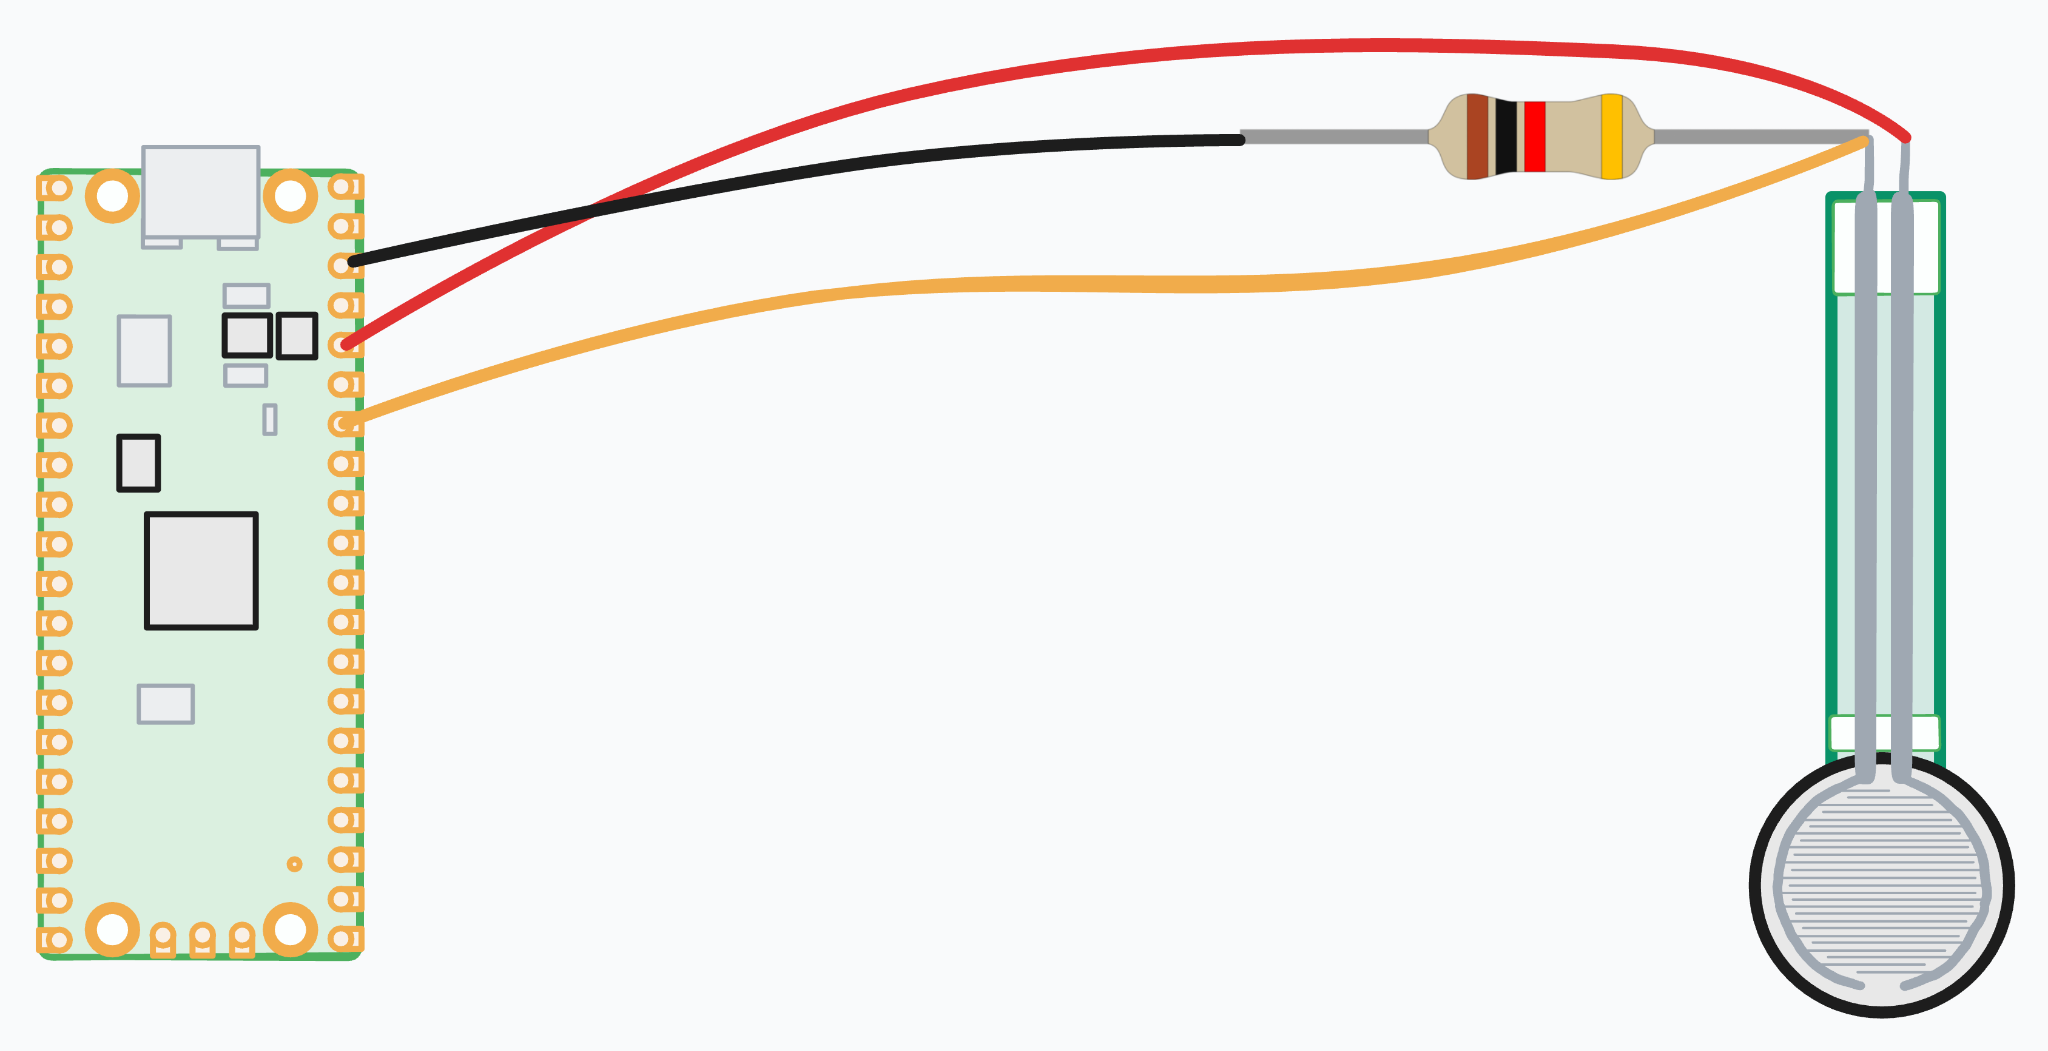
Assembling the FSR circuit
- Cut 3 wires (preferably separate colours to keep things clear) approximately 6cm in length and strip around 3-4mm of insulation at each end.
- Solder a wire to pin 36 (3 volts out) and to one leg of the FSR.
- Solder a second wire to pin 38 (ground) and to one leg of the 10kΩ resistor.
- Solder a third wire and the remaining leg of the resistor to the other leg of the FSR.
- Solder the remaining end of the third wire to pin 34 (GP28 A2 / SPI1 RX)
- Add some tape or heat shrink over the exposed legs on the resistor and the FSR to avoid shorts.
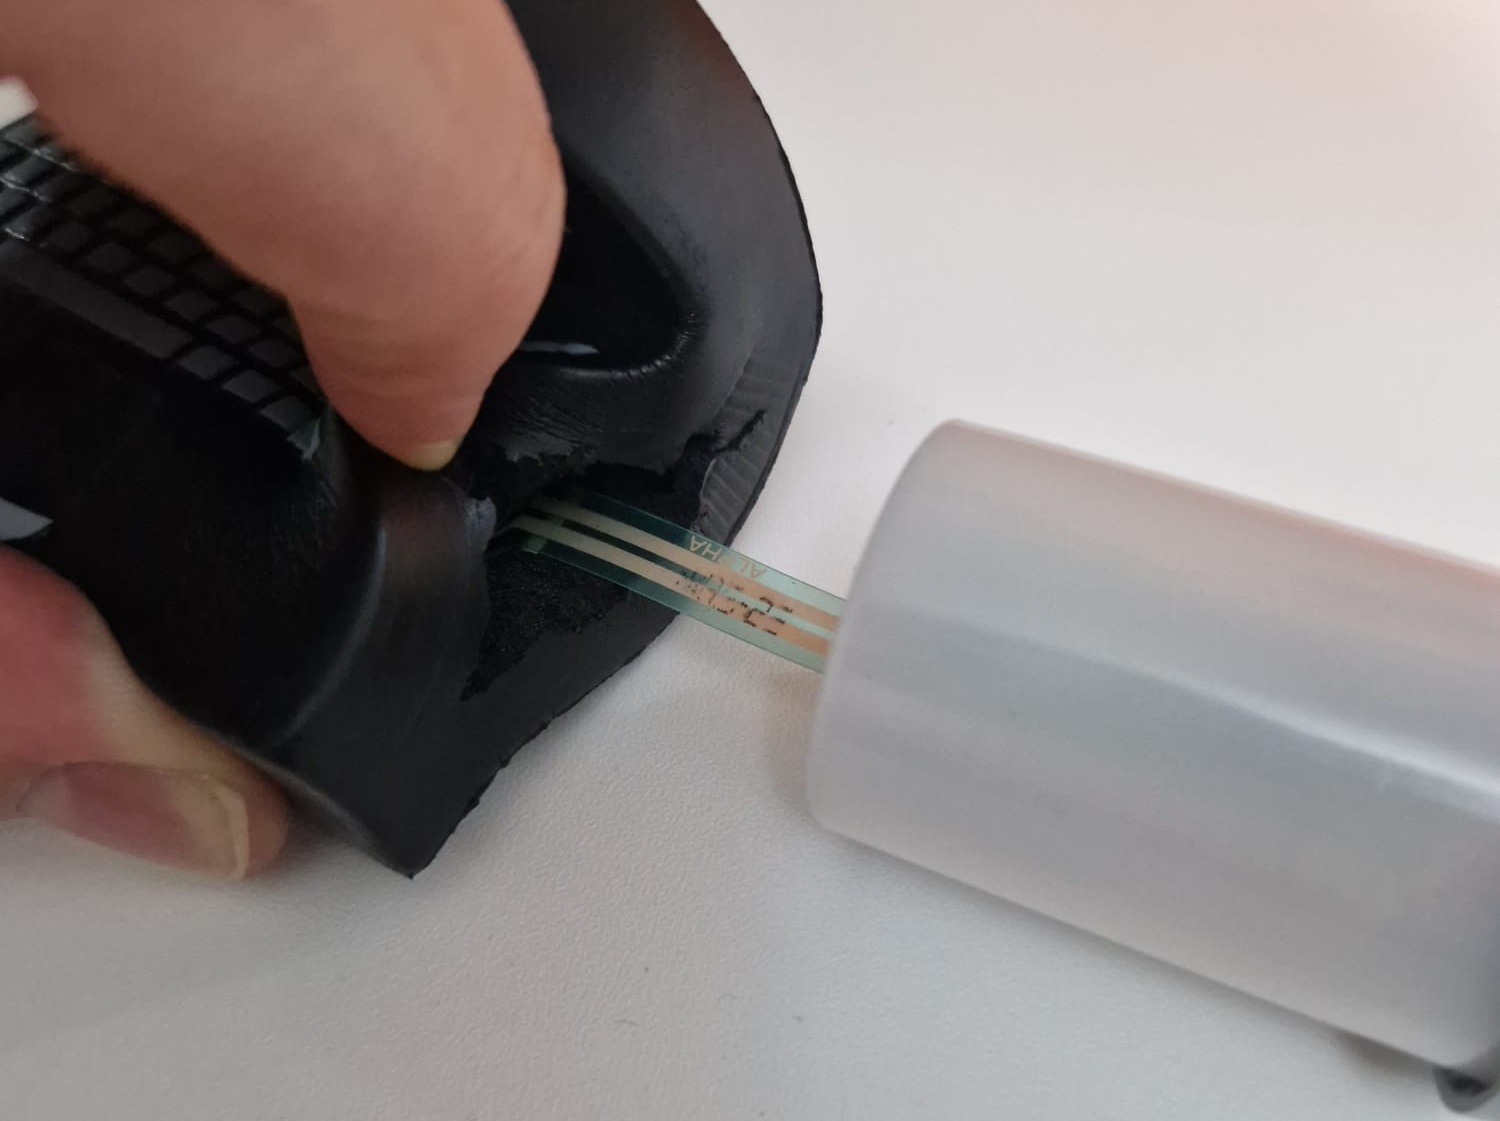
Your finished circuit should look something like this:
Software setup
Now that we have assembled our FSR circuit we can flash some code to our Pico via our Micro USB cable using Thonny, a Python IDE with support for flashing micro controllers like the Raspberry Pi Pico.
- Connect your Pico to a USB port on your laptop with your Micro USB cable.
- Install Thonny and install MicroPython on your Pico, see this excellent guide on the Raspberry Pi foundation website for details on how to do this.
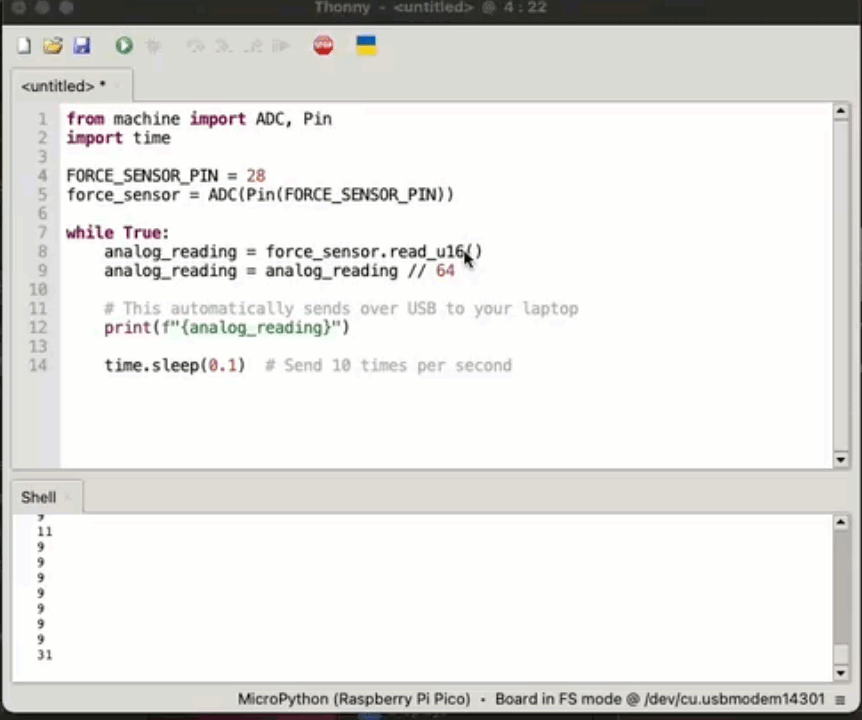
- Copy the following code into the editor in Thonny:
This code reads the voltage from our potential divider circuit as an analogue value before printing it out in the shell as stdout.
4. To test everything is working click the run and give your FSR a poke, you should see something like:
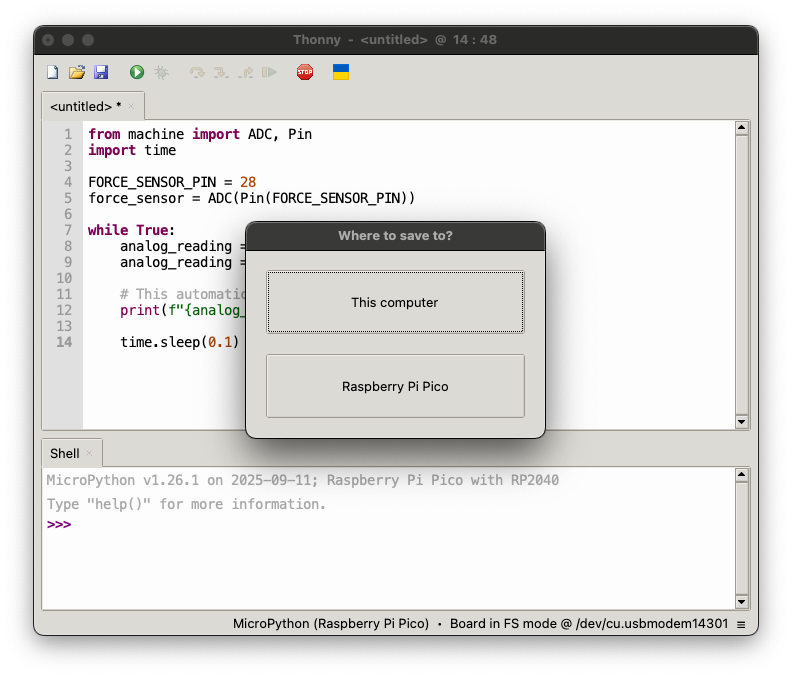
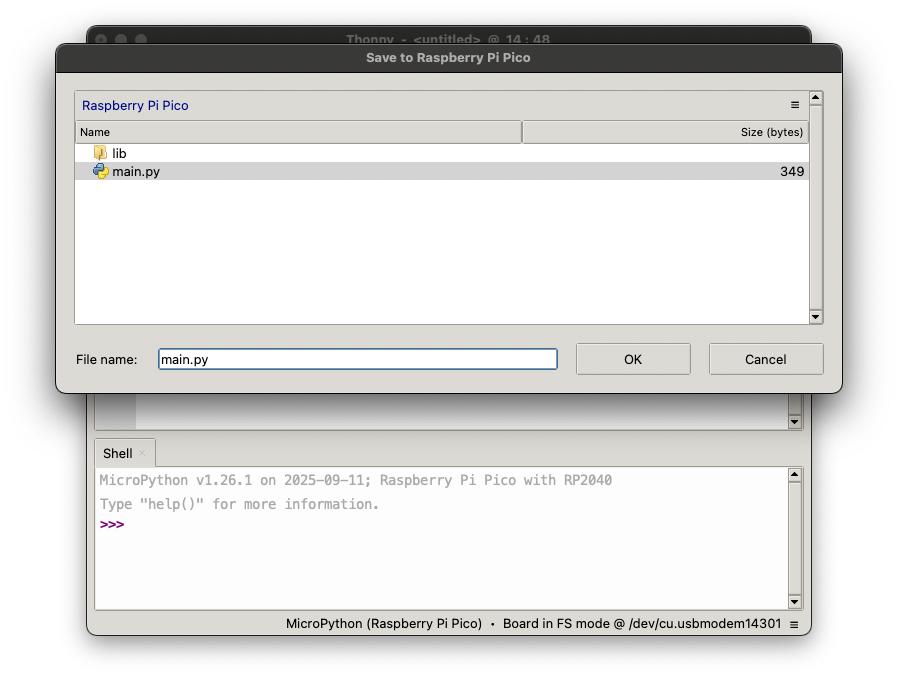
5. Save your code to your Pico as main.py (make sure your Pico is selected in the bottom right):
6. Disconnect your Pico from your laptop and then from the terminal run the following command to list the USB devices connected to your computer:
#macOS ls -l /dev/cu.* #Linux ls -l /dev/ttyACM* #or ls -l /dev/ttyUSB* #Windows: Check Device Manager under "Ports (COM & LPT)"Plug your Pico back in and run the command again, you should see something like:
hugh@Hughs-MacBook-Pro-2 ~ % ls -l /dev/cu.* crw-rw-rw- 1 root wheel 0x9000003 8 Sep 11:17 /dev/cu.Bluetooth-Incoming-Port crw-rw-rw- 1 root wheel 0x9000001 28 Sep 17:07 /dev/cu.debug-console hugh@Hughs-MacBook-Pro-2 ~ % ls -l /dev/cu.* crw-rw-rw- 1 root wheel 0x9000003 8 Sep 11:17 /dev/cu.Bluetooth-Incoming-Port crw-rw-rw- 1 root wheel 0x9000001 28 Sep 17:07 /dev/cu.debug-console crw-rw-rw- 1 root wheel 0x9000005 29 Sep 20:07 /dev/cu.usbmodem1201Keep a note of the line that appears when you plug in your Pico, this is the port your Pico uses to communicate with your laptop - we’ll need this in the next step.
7. On your computer create a python script called listen.py with the following code:
import serial port = '/dev/cu.usbmodem1201' # Your Thonny port - adjust as needed ser = serial.Serial(port, baudrate=115200, timeout=1) print("Reading force sensor data...") try: while True: if ser.in_waiting > 0: line = ser.readline().decode('utf-8').strip() print(f"Received: {line}") except KeyboardInterrupt: ser.close()The script reads the stdout from our main.py code on the Pico over serial via the same Micro USB cable we used to program it. You can press CTRL-C to exit it when you’re done.
Although basic, this script demonstrates how to read serial data from your Pico which can be useful in many microcontroller projects. On Linux/Unix systems, USB devices appear as files (like /dev/cu.usbmodem1201), which is why we can read from them like any other file.
8. Run your new script to start reading data over your USB cable from the Pico by running the following command:
python3 listen.pyNote: you will need the serial module, install this first with your preferred method or alternatively create the prerequisite virtual environment and install serial with the following commands:
python3 -m venv .venv # Activate it: # On macOS/Linux: source .venv/bin/activate # On Windows: .venv\Scripts\activate pip install pyserialOnce you run the script you should start seeing data from your Pico like:
Received: 9 Received: 8 Received: 8 Received: 8 Received: 10 Received: 47 Received: 157 Received: 338 Received: 431 Received: 500 Received: 578 Received: 635 Received: 640Congratulations you’ve successfully set up your FSR and Pico to start measuring force, you can now incorporate this into your own projects or read on to build your own stress-ball desk toy.
Add the FSR to your Stress Ball
- Make a cut in the side of your stress ball big enough to poke your FSR into, you want to make sure it’s deep enough to get the end of the FSR roughly in the center. Be careful not to cut all the way through.
- Optional: DIY a protective case for your Pico to protect the delicate electronics from over enthusiastic squeezes. Take a film canister or an Altoid tin big enough to fit your Pico and make a slit in the side. Put your Pico inside and thread the FSR out through the hole.

- Poke your FSR into the hole you have just made, making the hole wider than you need can make this easier.
- Plug your Pico back into your computer and run the listen.py script whilst giving your stress ball a few squeezes to check everything is still working.
- Optional: glue the FSR into the stress ball around the opening of the hole you made to keep it in place using superglue or hot glue.
Troubleshooting
- Can't find Pico: Make sure your Raspberry Pi Pico is connected and the main.py is uploaded, make sure you’ve updated listen.py with the correct USB port from the ls -l /dev/cu.* command.
- Virtual environment issues: Ensure you've activated the virtual environment before running pip commands
Stress ball desk toy
As I mentioned at the start of this guide I wanted to try adding an FSR to a stress ball, after doing this I decided to build a silly desk toy using Beeware, an awesome app building framework to help visualise the readings from the sensor when the stress ball is squeezed. I ended up with something that looks like this:
Post by @[email protected]
View on Mastodon
Read on for instructions on how to download and run the desk toy, and how to customise it.
Download the Stress Ball Desk Toy
-
Download the desk toy app code from my repo, either:
git clone https://github.com/hevansDev/stress-ball.git cd stress-ball/stress-ball
a. Use git:b. Download the zip:
Go to https://github.com/hevansDev/stress-ball
Click "Code" → "Download ZIP"
Extract and navigate to the stress-ball/stress-ball folder -
Set up your Python environment (I used Python 3.11 in development but anything 3.8+ should be fine) to build and run the app:
# Activate it: # On macOS/Linux: source .venv/bin/activate # On Windows: .venv\Scripts\activate -
Install beeware with
pip install briefcase -
Run the desk toy app in development mode with the following and plug in your stress ball:
briefcase devThe app will automatically detect your Raspberry Pi Pico when you plug it in - no manual port configuration needed! If your Pico isn't detected, make sure the Pico is plugged in via USB and no other program (like Thonny) is currently using the port.
This runs the app directly without building a full package which is great for testing and making quick changes, let’s try making some customizations to the app now.
-
Try replacing the images in stress-ball/stress-ball/src/stress_ball/resources with some of your own images (images should be square PNGs but you can use whatever size image you want). Icon.png is the logo for your app, and each of the levelx.png images are shown for each level of stress. If you run the app again you should now see the new images instead of the original ones, perhaps something like:
Why not try changing the code as well by making some changes to src/stress_ball/app.py? Check out the Beeware docs for help modifying the project and installing your finished project as an app on your computer.
Troubleshooting
- App can't find Pico: The app automatically detects Pico devices. If it's not connecting, close Thonny or any other programs that might be using the USB port, then unplug and replug your Pico.
Final thoughts
This project was a lot of fun building something just for fun and a great excuse to build my first proper Beeware app after participating in the Beeware sprint at PyCon UK. I hope you’ve learned a little bit about FSRs, potential dividers, using serial, and making apps with Beeware that you can use in your own projects.If you build your own stress sensor stress ball please send me some pictures! You can find my socials over at hughevans.dev. Happy building!


