While I’m a big proponent of electric vehicles to help save the planet, one of the best things you can do is continue to drive your current car. The environmental impact of having a new car created for you is pretty high. If you’ve got an older car, but you crave the cool gadgets in the newer cars, I may have an idea for you.
Lindsay, the Daughter, drives a 2014 Subaru Outback. It doesn’t have a lot of miles on it, and she loves her car, so she plans on driving it for a long time. But she has one big problem with it.
The Problem to be Solved
She had an iPhone 14 Pro, which worked great with the Bluetooth in her car. But when I gave her my iPhone 15 Pro, she ran into a very odd problem. When she made regular garden-variety phone calls with it over Bluetooth, her voice was garbled beyond recognition. She discovered that she could make data calls, such as FaceTime audio, and the audio was just fine. This wasn’t an ideal situation, but she lived with it. But then the side button on the iPhone 15 Pro got mushy and unresponsive. It was under AppleCare, so she sent it in for a repair.
And that’s when things got worse. The refurbished iPhone 15 Pro she got back doesn’t work with Bluetooth in her car at all! The interface on the Outback for Bluetooth pairing is simply dreadful. You do everything through voice. She went through the agonizing steps repeatedly, and the new iPhone 15 Pro would never pair with her car. She’s been living with using speakerphone for a few months, and it’s getting really old.
CarPlay Head Unit to Replace the Radio
As I thought about ways to help fix this problem, I wondered whether a good solution would be to replace the entire head unit with a CarPlay system. This would bring her car up to modern days, and I’m sure it would delight her.
I started doing some research and found that head units aren’t all that expensive. Crutchfield sells a Sony model for $350 that would fit her car and really looked nice with a 7” screen. But there’s a catch. This is open heart surgery you need to perform to remove the old radio and connect the new head unit. I assumed Steve would delight in spending his Fourth of July weekend doing this while I played with our grandchildren in the pool. Oddly, he was less excited about this idea than I expected.
The other catch is that for the $350 price, when installed, the new head unit wouldn’t be connected to anything in the car, like controlling the audio from the steering wheel. Crutchfield suggested that I add a $244 cable harness from iDatalink to make it fully compatible. While $350 is a fair bit of money, when you’re talking $600 plus tax, it just doesn’t make sense for an 11-year-old car. Also, don’t forget Steve’s enthusiasm level for this project.
CarPlay Screen Instead
And then I had another idea. I had heard that it was possible to connect a screen to your existing system that would provide the CarPlay experience. I asked ChatGPT to help me find some options, and what it found was dreadful. One had 1.5 stars on Amazon, and all of them mounted on top of the dash, where the screen would obstruct Lindsay’s line of vision. I’m kind of a fan of being able to have greater visibility while driving, not less.
And then I found the LAMTTO Wireless Apple CarPlay Screen for $40 (on sale at Amazon down from $80). The LAMTTO screen does not mount on top of the dash. Its 7” screen comes with two mounts: a vent mount and a suction cup mount.
Lindsay’s Subaru has two small vents on either side of her radio, and she lives where it gets super hot in the summer, so the last thing she’d want would be something 7” diagonally blocking one of her air vents. The suction cup mount that comes with the LAMTTO screen is an interesting idea, but I was worried that with the high temperatures in her area, the suction cup would fall right off in the first heat wave. It might also look pretty janky.
How to Mount the Screen
I kept searching for solutions and found a fabulous product. A company called Course Motorsports creates vehicle-specific mounts for just this purpose. I chose the Direct Fit Phone Mount – Subaru Outback/Legacy (2010-2014). I’ll explain how cleverly it connects to the car in a moment. Before you purchase, you get to decide what mounting head to buy. You can choose a plain magnetic head, a cradle head that clamps the sides of a phone, or a MagSafe head that can support wireless charging.
Since the LAMTTO screen supports magnetic mounting, from Course Motorsports, I chose the plain magnetic head. After tax, shipping, and less a 5% welcome discount, the total cost out the door was only $56. If I’d gone full MagSafe, it would have cost $90 before tax and shipping.
As I mentioned, the Course Motorsports mount is tailored for your specific vehicle. The installation video explained that the face plate of Lindsay’s car stereo pops off with a little bit of spudger work. Under that, there’s a mounting screw on the right side of the radio. You loosen that screw, and then slide the bracket of the phone mount under the screw head and retighten the screw.
The mount has a metal bracket that is bent to hug the side of her specific radio, so that when you put the faceplate back on, you only see the little ball head mount sticking out. To the ball head mount, you add whichever head you purchased, in our case, the magnetic head.
 Course Motorsports Mount on Subaru Radio
I had a couple of questions about the mount, and customer service got back to me within an hour or two each time with a clear answer. I hope I need more things from this company because so far it’s been a great experience.
Playing With the CarPlay Screen at Home
When the CarPlay screen arrived at our house a week before we’d be seeing Lindsay, we could not resist the temptation to open it up and play with it. The screen is very bright, very crisp, and as a touch screen is very responsive. It supports wireless CarPlay after an initial handshake with Bluetooth. On top of that, it was super easy to set up.
The LAMTTO screen comes with a USB-C to 12-volt (cigarette lighter) adapter to power the device, but you can also power it with USB-C directly to the car’s USB if you have it. We plugged the screen into power, and it came on, asking what language we preferred. Next, it came up with a screen showing many options. It has a play pause section, then buttons for CarPlay, Android Auto, AirPlay, Super Link, Audio output, and Settings.
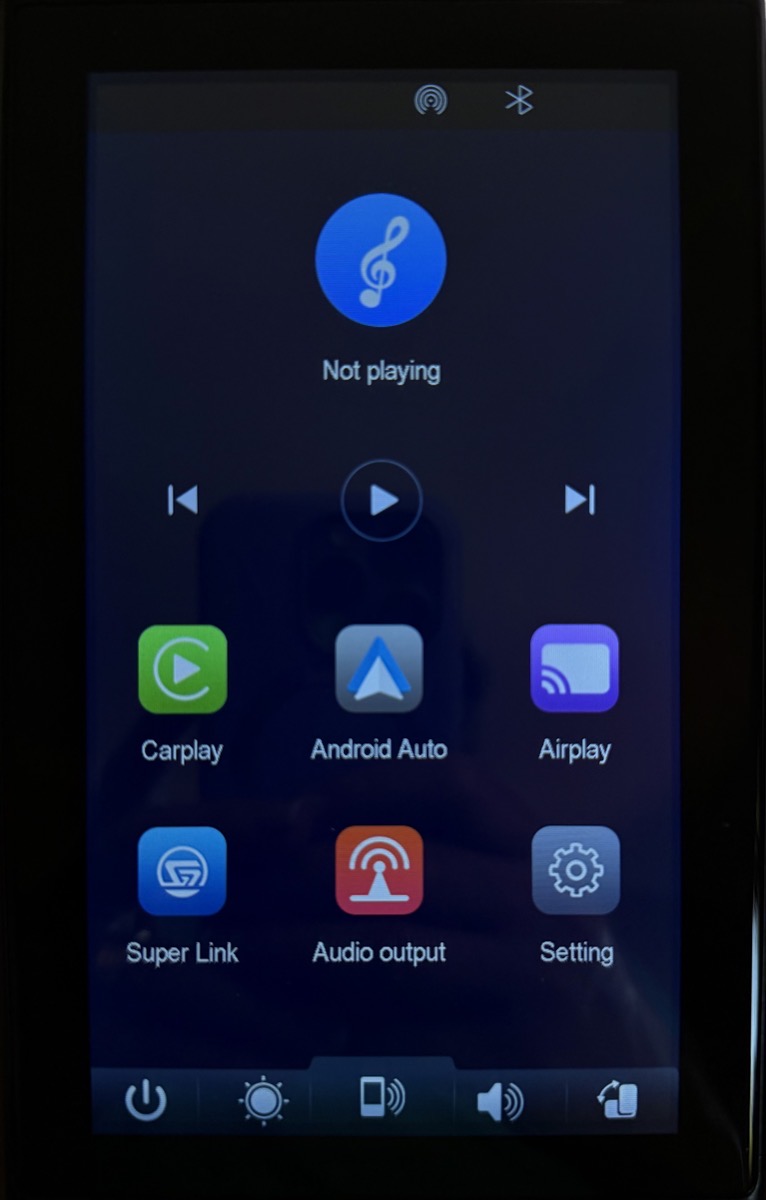 LAMTTO Screen First Setup Screen
Tapping on CarPlay brought up the Bluetooth handshake screen. You’ve seen these instructions before, where you open Bluetooth on your phone, look for the new device, tap connect, and verify that the number you see is the same on both screens. Oddly, no number shows on the LAMTTO screen, but the device name in Bluetooth was the correct.
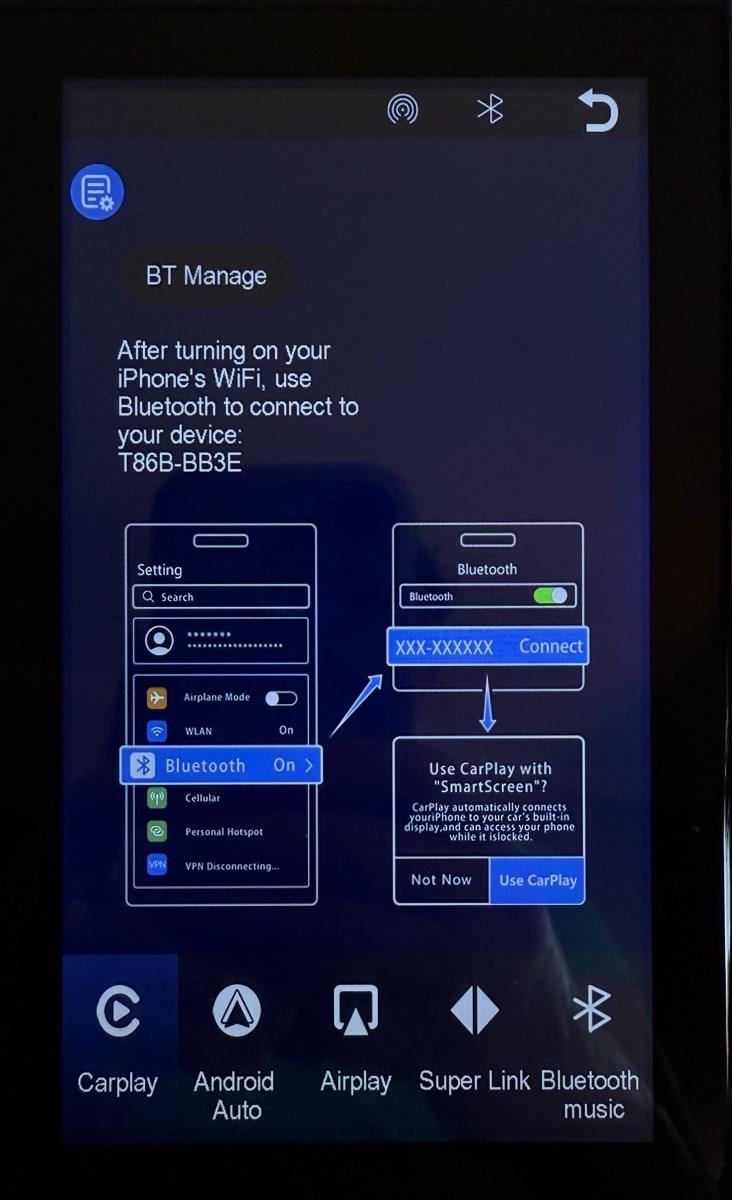 CarPlay screen instructions for Bluetooth connection
When you select Pair, it asks if you want to sync your contacts and favorites, which I declined. I saw no reason to give this device that information since it would be controlled by my phone. I have no specific reason to distrust this company, but it’s really a made-up brand name of a Chinese supplier, so why take a chance?
Instantly, you get a pop-up in Bluetooth on the phone that says, “Connect to CarPlay” with the familiar green button.
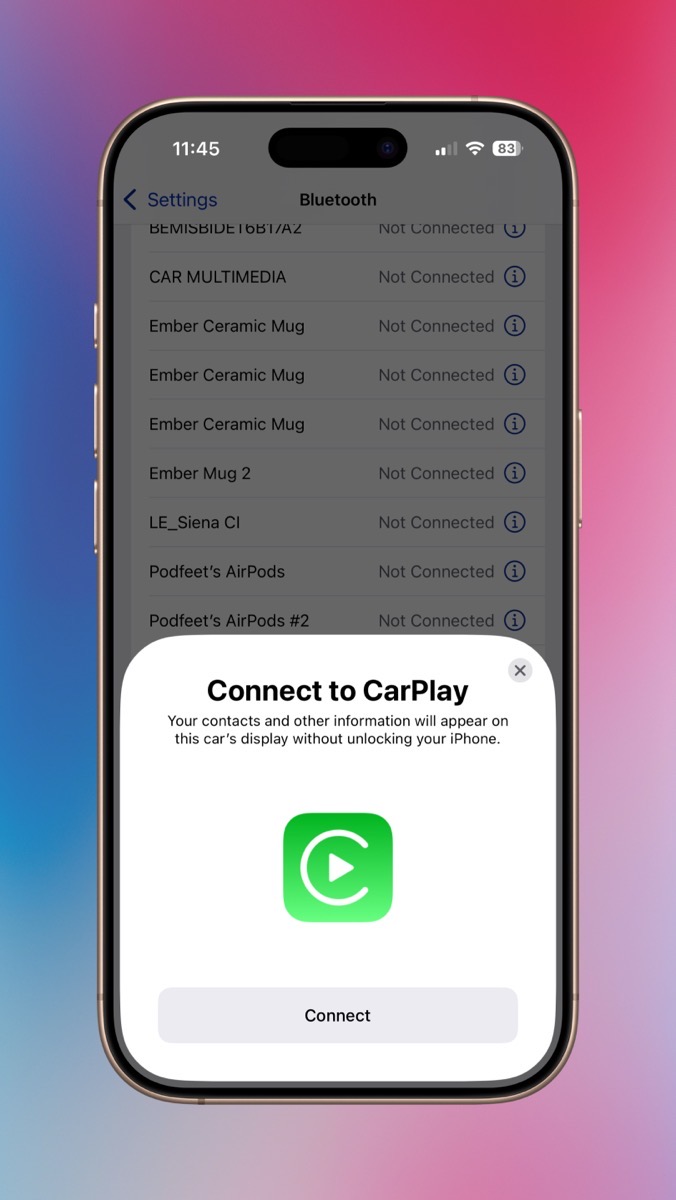 Connect to CarPlay from Bluetooth Settings
And then, in another split second, the LAMTTO screen is showing CarPlay. It is MAGICAL.
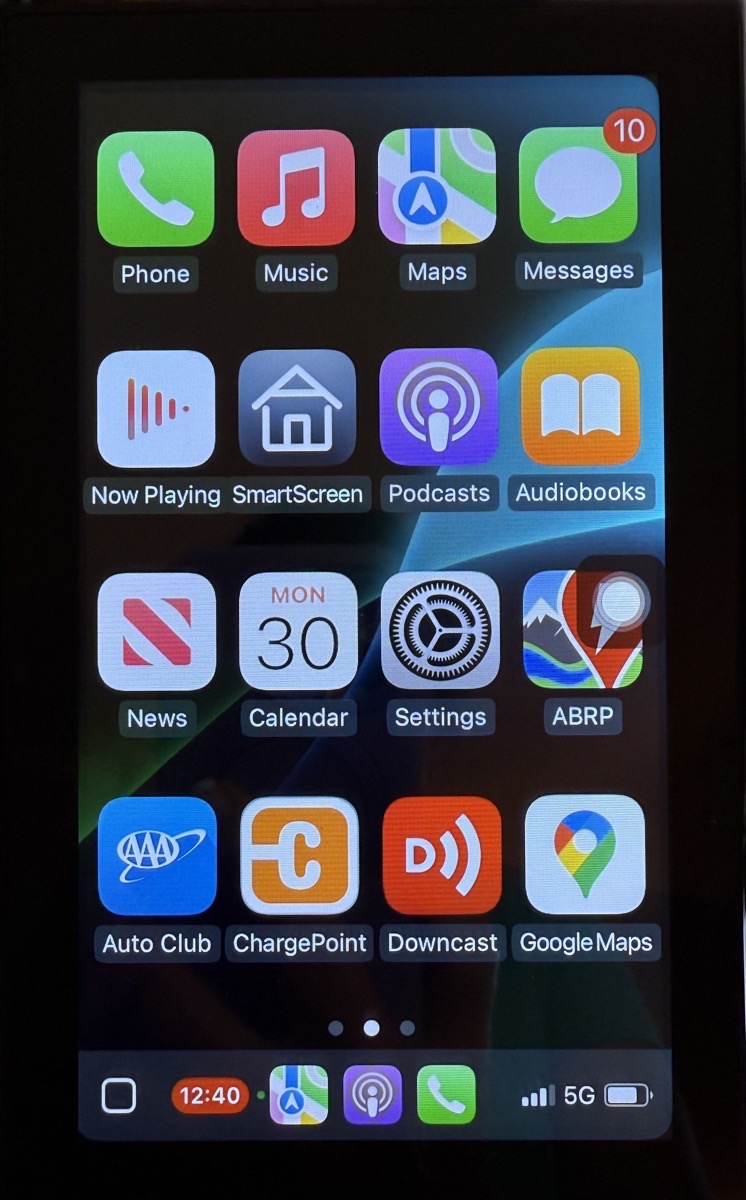 CarPlay is Ready to Go
By default, the screen is in Portrait mode with the familiar grid of CarPlay-appropriate apps. I was surprised to see Apple News (audio news stories), Libby (audio books from the public library), Target (only shows the screen you select when telling them you’re there to pick up an order), and Zoom (for audio calls).
On the screen, you’ll also see the Assistive Touch button. On iPhone, you turn this on in Accessibility → Touch, and it gives you access to various commands like Siri, Notifications, and it acts as a home button (especially helpful when they used to break all the time). On the LAMTTO screen, the Assistive Touch button is there to give you quick access to controls for brightness and volume, along with a home button that takes you back to the built-in interface of the display that we saw at the beginning.
In Portrait mode, I can see Apple Maps in the top 2/3rds with the bottom 1/3 showing my podcast playing in Overcast, distance to my destination in Maps, and even my HomeKit-compatible garage door opener as a dedicated button. Maps is maybe a little washed out, but the text for the roads is fairly high contrast, so it’s easy to read.
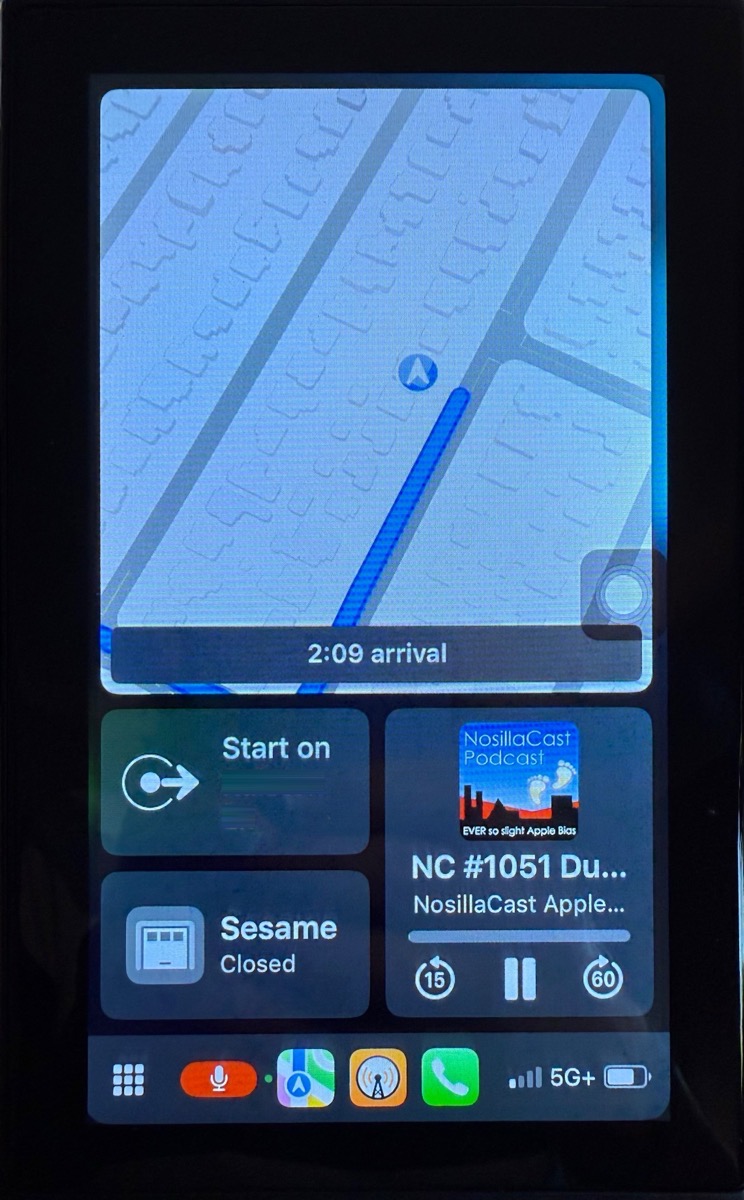 Navigation, Garage Door Opener, and the NosillaCast
Google Maps, on the other hand, is quite a bit harder to read. It’s very washed out, and the text is smaller and less bold. Maybe you’re used to it, but I wouldn’t choose it. Some blame does go to the display for having contrast that’s a bit lower than optimal.
On the home screen of the device, you can toggle the screen to be in landscape mode. It does a very quick reboot, and you’re in business. I have a feeling that with the relatively small 7” screen, it might work best in portrait mode, but it’s nice that Lindsay will have options.
Audio on CarPlay Screen
In addition to the USB-C port for power, the LAMTTO display includes an AUX jack, also known as a 3.5mm audio connector. They include an AUX cable so you can plug it right into your stereo system. Lindsay’s car has an AUX jack, so this will work perfectly for her. Sadly, Teslas don’t have AUX jacks, so we couldn’t test it in our cars.
Instead, we tested out the audio by plugging it into an old Jambox speaker, and it worked. Without being plugged into any kind of speaker, the internal speakers were passable. Wouldn’t want to listen to music on them, or probably even a podcast, but you could stand to listen to a phone call on it. Speaking of phone calls, the LAMTTO has a microphone on the front of the screen. Steve said I was understandable on his end when I made a test phone call to him.
Heck, you can even say, “Hey S-Lady!” and the screen gets the little animation around the edges and listens to your commands. She doesn’t obey any better than she does on the phone, but she does listen.
We did experience a problem when playing with the display at home. We noticed a ticking sound coming from the speaker at one point. We did a bunch of experiments, like swapping out the speaker and changing out the AUX cable, and eventually it just went away. We weren’t quite sure what we did that made it stop. Remember this point for later.
Installation in Lindsay’s Car
Select the Correct Input
All this fooling around with the display was great fun at home, but we still wondered if it would work in Lindsay’s car.
Before messing around with the mounting options, we plugged the CarPlay display into a powered USB port in her car and connected the audio cable to her AUX jack. When we played some audio, we heard the same ticking we heard before. In Lindsay’s car, it was pretty bad.
Steve is an electrical engineer, and he pondered whether the AUX cable was acting like an antenna. As I moved my iPhone around the cable, it seemed to be having an effect on the intensity of the static. We also noticed that the audio was coming out of both the display and the car’s speakers, but if we turned down the volume on the display, the volume of the car’s speakers turned down too. We tested the display in Lindsay’s husband Nolan’s car, and we heard the same ticking. But there was another big problem – the audio only came out of the left speakers of Nolan’s car.
Where at home it had been this kind of soft ticking, it was terrible in both cars and made it unlistenable. Steve ordered a shielded AUX cable to arrive same day, hoping this would fix the problem.
But later, we came back to the car and started messing around with the display again and essentially stumbled onto the solution. You know how on a stereo you can change the input from AM to FM to CD player to Bluetooth? One of the input options was AUX. As soon as we switched the input to AUX, the audio came out loud and clear with no static at all.
We were able to independently turn down the display’s volume and turn up the stereo in the car, and it sounded fantastic. Testing it in Nolan’s car, the audio came out clearly from all of the speakers. Luckily, Steve was able to cancel the order for the shielded AUX cables.
Installing the Car Mount
I was very excited to use my spudgers from my iFixit Toolkit to pry off the faceplate of Lindsay’s car stereo to install the form-fit mount from Course Motorsports. Once you pull off the faceplate, you simply back off one screw just far enough to slide the mount’s bracket under the head and then retighten the screw.
But for the life of us, we could not loosen that screw. I’m a big ol’ weakling in terms of hand strength, but Steve is quite strong. He tried three different screwdrivers. We tried WD-40. He tried banging on the end of the screwdriver with a hammer to break it loose. He tried hitting the sides of the screw head with a hammer and flat-head screwdriver. Finally, Nolan pulled out his impact screwdriver. I’m sure you’ve guessed by now that our efforts were rewarded with a stripped screw head.
While Nolan does have one of those bits that lets you drill out a screw, we decided to abandon that whole path for now.
We decided to try one of the other mounting options. The vent mount, as expected, wouldn’t work in Lindsay’s car, so we were left with the suction cup. The mount comes with a round metal disk with adhesive on the back, which we were able to adhere to a sort of coin tray right above her radio. Once we waited the 24 hours for it to cure, we were able to put the suction cup on in a way that the arm put the display down in front of her radio. We hoped that the arm resting on the edge above the radio would relieve some of the tension on the suction cup.
The angle isn’t quite ideal, but it’s better than all of the other options. Because Lindsay’s USB port and AUX jack are under the armrest on the center console, Steve had the fun task of using some cable management thingys to neatly route the cables so they are as much out of sight as possible.
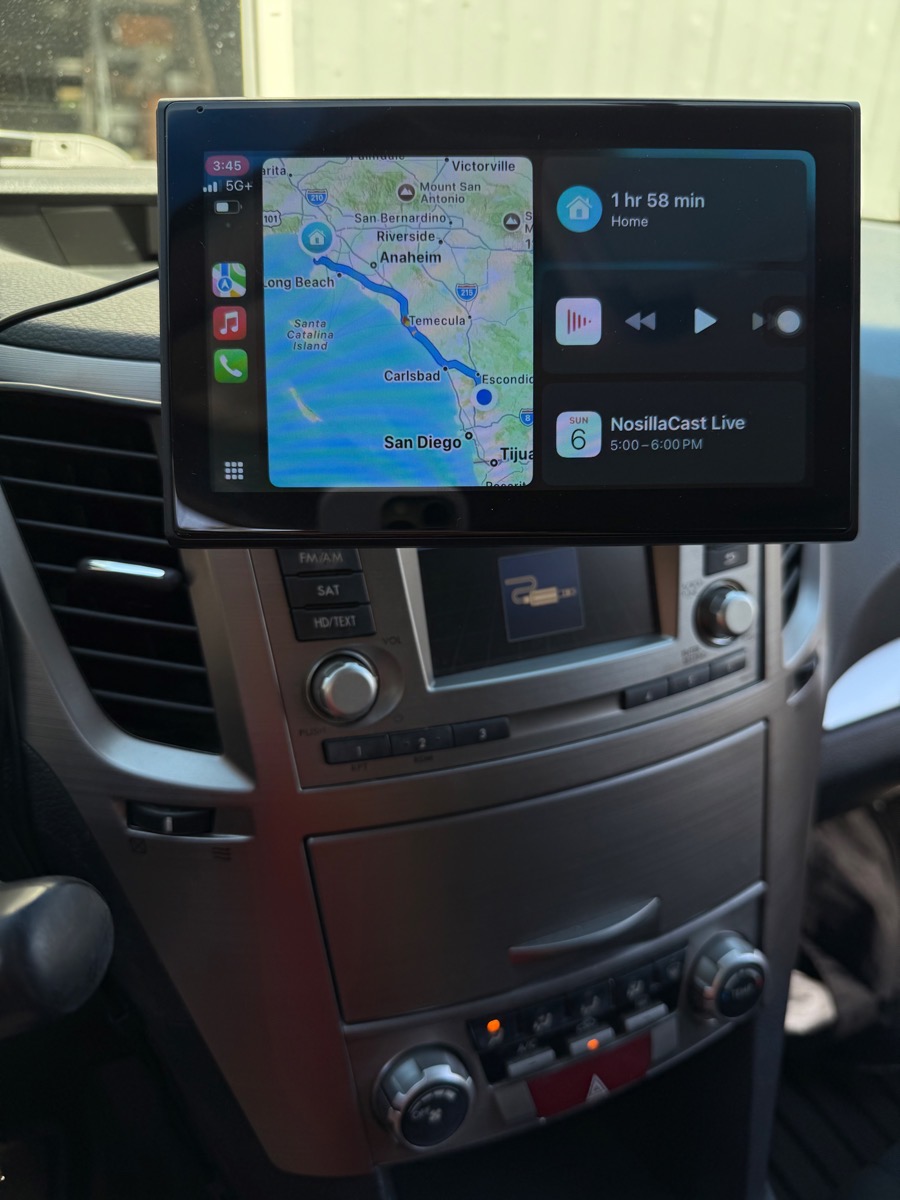 All Mounted & Cables Managed
Luckily for Nolan, the vent mount works perfectly, and his AUX and USB ports are directly below the radio, so it was a much easier job to tidy up the cables.
On both cars, we were happy to see that the volume controls on their steering wheels were able to control the volume of the audio from CarPlay. Siri worked great for both Lindsay and Nolan to do things like ask it to provide navigation.
We Returned the LAMTTO
I’m afraid this entire project took a turn for the worse in real-life use.
Remember when I said I worried the suction cup wouldn’t work if the car got hot? Yeah, it fell off on the first day Lindsay drove to work. When it fell off, it also nicely ripped off all of the cable management thingys Steve so painstakingly arranged to make it look nice.
And the ticking came back with a vengeance. No amount of fiddling with the controls would make it stop.
Oh, and the screen locks up if she switches to Apple Music using Siri.
And wireless CarPlay introduces a huge lag when talking on the phone. I’d say it’s a good second or more from when you stop talking till the other person replies. I did a bit of the Googles and it seems that this is a common issue with wireless CarPlay. It must not be with every wireless CarPlay, though, or I would have heard everyone complaining about wireless CarPlay rather than raving about it.
Nolan’s car experiences the same phone call lag, but he doesn’t actually make many phone calls in the car. I did some reading, and I think since his car’s Bluetooth works, he can also route calls directly that way if he really cares. His LAMTTO doesn’t make the ticking noise, nor does it lock up when he asks Siri to change applications to Music. With a firm vent mount, he’s happy with the device, and he’s going to keep it.
We’ve initiated a return of Lindsay’s LAMTTO CarPlay screen for all of the above reasons. I haven’t given up on this idea of adding CarPlay to Lindsay’s car. I was able to find a couple of screens from other manufacturers that had wired CarPlay, but so far, I haven’t found any that also will accept a magnetic mount. I’ll probably take a risk on a different manufacturer with wireless CarPlay that works with a magnetic mount, and Nolan has agreed to drill out the screw so she can use the Course Motorsports.
Bottom Line
For $40, some may say that you get what you pay for. I’m sad because this seemed so promising through most of the exercise. It felt like we were really close to a great solution for Lindsay. I definitely can’t endorse the LAMTTO 7″ CarPlay display with a 50% failure rate and significant lag in phone calls, but I hold out hope there’s another, better solution. I’m willing to go higher than $40; even $100 would be a good price for this kind of solution for her.
Stay tuned to this channel to find out if I find a good solution or if we’re forced to give up.
.png)

