.png)

This article shows how to use GDB over a serial connection for debugging the kernel on a Pixel 8.
The instructions cover building and flashing a custom Pixel 8 kernel to enable KGDB, breaking into KGDB either via ADB by relying on /proc/sysrq-trigger or purely over a serial connection by sending the SysRq-G sequence, and attaching GDB to the Pixel 8 kernel.
The instructions should be adaptable to other Pixels as well.
⬅ Note the interactive table of contents on the left.
🎬 Introduction
During my Exploiting the Linux Kernel training course, we heavily rely on debugging the Linux kernel via GDB when implementing kernel exploits. While debugging the Linux kernel running in a virtual machine is pretty straightforward, people keep asking me: “But what about using GDB to debug the Android kernel running on a physical device?”. This article is an answer to that.
While I do prefer using printk-debugging for debugging the kernel on the code level, using GDB is useful for instruction-level debugging and also for dumping the state of the kernel memory while implementing various memory shaping strategies in kernel exploits.
This article shows how to connect GDB to the kernel running on a Pixel 8. This includes breaking into KGDB over serial without relying on /proc/sysrq-trigger (and taking up the Pixel’s USB port) and also getting Ctrl+c in GDB to just work. Besides the GDB-specific parts, I also document how to obtain the kernel log from the Pixel over its UART interface and flash a custom kernel.
Android 15 vs 16. I initially documented the instructions in this article while using Android version 15. Starting from Android 16, Google apparently stopped publishing the device tree files for Pixels in the AOSP repository. This is supposed to be a problem for building custom Pixel kernels. However, when I retested the instructions with Android 16, everything still worked, including building and flashing the kernel. Perhaps, the mentioned problem is not applicable to older Pixels.
🐞 GDB servers and KGDB
If you want to debug the Linux kernel with GDB, besides the GDB client that you would use to run GDB commands, you also need a GDB server connected to the kernel.
VMs. Virtual machine hypervisors (QEMU, VMware, etc.) usually implement a GDB server internally and have it connected to the system running inside the virtual machine. Thus, to debug the kernel, you would typically instruct the GDB client to connect to the hypervisor’s GDB server over the network.
Physical devices. Debugging the kernel running on a physical device with GDB also requires a GDB server connected to that kernel. For this, there is KGDB — a Linux kernel module that implements a GDB server connected to the kernel itself. Connecting the GDB client to KGDB requires having a serial connection to the device being debugged (aka KGDB over serial).
You can also connect to KGDB over the network (aka KGDB over Ethernet) via the out-of-tree kgdboe kernel module, but I have not tried doing this myself.
🔌 Serial connection to Pixel
Gadget-based approach. One way to obtain a serial connection to a Pixel is to rely on the USB serial gadget driver. With this approach, the Pixel emulates a USB device that provides a serial connection between the Pixel and the machine to which the Pixel is connected. This approach requires no special hardware, just a normal USB cable.
The downside of this approach is that the gadget driver fully takes up the Pixel’s USB port and forces it to operate in the USB peripheral mode. Thus, you cannot run ADB over USB, and, more importantly, you cannot connect malicious USB devices to the Pixel for debugging USB exploits.
UART-based approach. Another approach is to rely on the serial UART interface Pixels expose via their USB Type-C connector. This approach does not have the mentioned downsides, but it does require using special hardware. This is the approach that I will describe.
🧰 Required hardware
 Left to right: 1. USB-Cereal fabricated based on original Google design;
2. 0xDA's version of USB-Cereal; 3. Private version of USB-Cereal
Pixels expose a serial UART interface on the SBU1/2 pins of its USB Type-C connector. Accessing that serial interface requires special hardware.
Custom adapters. For years, people have been building custom adapters to expose the UART connection over USB by relying on USB Type-C breakout boards and USB-UART converter chips.
Google’s USB-Cereal. Luckily, not so long ago, Google open-sourced USB-Cereal — a neat adapter that splits the single Type-C port on a Pixel into two: one that acts as a passthrough port for USB communication, and the other that exposes the UART interface via a USB-UART converter.
Unfortunately, this original USB-Cereal device is not up for sale. Nevertheless, the PCB design files are public, so you can order the boards to be fabricated yourself. Which is what I did at some point.
Note that due to the chip shortage, the FT232R* chips used in this board were quite expensive a few years ago; not sure about nowadays. The PCB design also has some issues (components not perfectly matching the pads on the PCB, etc.), so fabricating these boards required some back-and-forth with the manufacturer. On top of that, about half of the boards ended up being broken. The most common problem was the improperly soldered Type-C connectors.
0xDA’s USB-Cereal. Instead of using the original USB-Cerial, you can use the fork developed by 0xDA. This version can be bought via Crowd Supply.
But note that the 0xDA version of USB-Cereal might not work for breaking into KGDB over serial. Some editions of that board use the CP2102N USB-UART chip, which does not support sending break sequences to break into KGDB unless appropriately wired, which it apparantely is not.
📱 Obtaining kernel log and building custom kernel
In this section, I will explain how to obtain the kernel log via USB-Cereal and build a custom Pixel kernel. There’s nothing novel about this part, so I’ll just document this as step-by-step instructions with some comments. These instructions are combined from the Flash with Fastboot and Build Pixel kernels Android documentation pages.
🪵 Obtaining kernel log via USB-Cereal
First, let’s set up the Pixel 8 device to enable the UART interface on the Type-C connector and expose the kernel log.
1. Enable USB debugging
Go to Settings ➡️ About phone and click 7 times on Build number. This unlocks the Developer options menu.
Go to Settings ➡️ System ➡️ Developer options and enable USB debugging. This enables ADB to be used with the phone.
2. Set up udev rules
This step is optional but allows running ADB and Fastboot without root.
Assuming you’re running Ubuntu on your machine, create /etc/udev/rules.d/51-android.rules (the filename can be arbitrary) with the following contents:
And run:
Now, the USB device file created when you plug in a Pixel should be accessible to non-root users.
3. Flash latest public release
This step is optional but might be required if you previously flashed some custom image onto the Pixel.
Connect the Pixel to your machine (either via a normal USB cable or via the passthrough port of a USB-Cereal) and use flash.android.com to flash the latest public release.
If you proceed with this step, you will need to enable USB debugging once again.
Note that at this step, I initially flashed the latest public release for Android version 15. Later, I retested everything with Android 16, and the instructions still appear to work.
4. Enable OEM unlocking
Go to Settings ➡️ System ➡️ Developer options and enable OEM unlocking.
This will allow unlocking the bootloader later.
Note that the Pixel will be wiped and you will need to enable USB debugging once again.
5. Install ADB and Fastboot
Download and extract SDK Platform-Tools. You should now have the adb and fastboot binaries.
I recommend downloading these Plaform Tools instead of getting ADB and Fastboot from a package manager, as the latter can be outdated.
6. Test ADB
Connect the Pixel to your machine and run adb devices.
You will get an Allow USB debugging? prompt on the Pixel. Mark Always allow from this computer and accept.
You should see your device in the list:
7. Unlock bootloader and enable UART
Reboot the Pixel into the Fastboot mode:
Unlock the bootloader:
Choose Unlock the bootloader on the Pixel with the volume control buttons and confirm via the power button. This allows changing a few Fastboot options, including the one for enabling UART.
Enable UART:
You can run fastboot oem list-oem-cmds to list various oem commands the Pixel supports and whether they require unlocking the bootloader.
Pixel 8 outputs logs from multiple internal systems over its UART interface; run fastboot oem uart list to see them. Output from most of them is enabled by default, but the output from the kernel needs to be enabled explicitly.
8. Get kernel log via USB-Cereal
Set the 1.8V mode on the USB-Cereal device and connect the USB-Cereal UART port to your machine.
Some older Pixels used the 3.3V UART voltage, but the newer ones use 1.8V.
The orientation of how USB-Cereal is plugged into the Pixel matters. For Pixel 8 and both the Google’s USB-Cereal and the 0xDA’s USB-Cereal, plug them in LEDs-up.
You should now see a /dev/ttyUSB0 or a similarly-named device file on your machine:
Install minicom:
And run it to start comminucating over UART:
Pixels use the 115200 UART baud rate, which should be the default in minicom. To check this, run sudo minicom -s and go into Serial port setup. If you change any settings, choose Save setup as dfl to save the changes.
Now, reboot the Pixel:
You should see the kernel log (along with the bootloader and other logs) in minicom.
To exit minicom, press Ctrl+a, then x, and then Enter.
You can run sudo usermod -a -G dialout $USER and relogin to avoid having to run minicom with sudo.
You can also use screen or any other serial communication software instead of minicom.
🌰 Building and flashing custom kernel
Enabling KGDB on a Pixel requires rebuilding the kernel with CONFIG_KGDB and a few other configuration options enabled (as they are not enabled by default).
So as the next step, let’s first learn how to rebuild and flash the Pixel kernel as is.
Note that I wrote these instructions while my Pixel was running Android version 15. Later, I retested them with Android 16, and everything still appears to work.
1. Get kernel source
Install the repo source code manager:
Get the kernel source code for Pixel 8 (refer to GKI supported Pixel kernel branches for choosing the right branch for other Pixels):
For me, this repo sync command took about 1 hour to complete, and the checkout took up ~80 GB of disk space.
2. Add custom log message
Optionally, to later make sure that a custom kernel was indeed flashed, you can add custom log-printing code into the kernel.
One option is to arbitrarily modify the the Stack Depot is disabled message in aosp/lib/stackdepot.c — this is one of the first messages that gets printed when the Pixel kernel boots.
The core parts of the AOSP kernel (without some external OEM drivers) are in shusky-kernel/aosp/.
3. Build custom kernel
In shusky-kernel, run:
Here:
- build_shusky.sh is main the script for building the shusky (Pixel 8) kernel;
- parameters="--kernel_package=@//aosp" instructs the script to build the kernel from the AOSP sources (used to be expressed via BUILD_AOSP_KERNEL=1 with the older build system);
- --config=pixel_debug_common forces the kernel to be rebuilt (instead of using the pre-built GKI binaries) and enables a few other custom kernel–related things;
- --lto=none disables Link Time Optimization to reduce the build time.
You can check private/devices/google/common/device.bazelrc and private/devices/google/common/debug/debug.bazelrc to see what exactly --config=pixel_debug_common does and which other build options are available.
Building the Pixel kernel is surprisingly fast and takes only a few minutes (but this depends on your machine’s performance, of course).
The resulting files get saved to out/shusky/dist/ and take up ~100 GB of disk space.
4. Flash custom kernel
Reboot into Fastboot:
Now, you might need to wipe the device via:
Note that after this, you will need to enable USB debugging once again.
The official instructions say this is only required “if there is a security patch level (SPL) downgrade associated with the new kernel”. But with the combination of the latest public release and the latest kernel sources, I had to run it either way. Otherwise, the kernel refused to boot.
Disable the image verification (required for flashing a custom unsigned kernel):
Flash the kernel partitions:
And reboot:
Now, check the kernel log messages in minicom and make sure that the modified message is printed.
You can also connect via adb shell and check that the kernel version has the -dirty part:
For whatever reason, the date does not reflect the actual build date though.
When flashing another kernel build later, you do not need to run the -w and disable-verification commands again.
🏗 Setting up KGDB
From this point, we’re entering somewhat uncharted territory. I suspect many people have figured out how to use KGDB to debug the Pixel kernel, but I failed to find any public instructions for newer Pixels.
Story time. Rather than just documenting the step-by-step instructions for this, I will describe the approach I used to figure them out and the issues I encountered. This will hopefully be useful for people who are trying to enable KGDB on devices other than Pixel 8.
KGDB requirements. The general instructions for enabling KGDB are detailed in the corresponding Linux kernel documentation page. Based on them and my general understanding, to get KGDB to work, I needed to:
- Build the kernel with KGDB configuration options enabled;
- Set the kernel command-line parameters to configure KGDB;
- Stop the kernel execution in runtime to break into KGDB;
- Deal with the watchdogs rebooting the device while debugging.
🚧 Building kernel with KGDB
As the first step of enabling KGDB on a Pixel, I needed to rebuild the kernel with CONFIG_KGDB and the other related configuration options enabled. And I also wanted to integrate this nicely into the existing build system.
Discarded approach of adding fragments
First, I will show an approach that I ended up not using, as it does not seem to allow building the Linux kernel GDB scripts easily.
Finding build configs. By grepping for pixel_debug_common in the kernel checkout, I found out that the Pixel build configuration files were located in private/devices/google/common.
Adding fragment. I modified debug/debug.bazelrc in private/devices/google/common to include a new --config=kgdb build option based on --config=pixel_debug_common:
Then, I added a fragment that enables CONFIG_KGDB and CONFIG_KGDB_SERIAL_CONSOLE (CONFIG_VT and CONFIG_HW_CONSOLE are dependencies for the latter):
CONFIG_DEBUG_INFO, CONFIG_FRAME_POINTER, and other useful debugging options had already been enabled, as I could see in out/shusky/dist/.config.
Building. And I built the kernel with KGDB support via the newly added --config=kgdb option:
Worked OK. This approach of enabling KGDB worked and I managed to connect GDB to the Pixel kernel; the steps are described later in the article.
Want GDB scripts. However, later, I realized that I also wanted to have the support for the Linux kernel GDB scripts. Enabling this feature required enabling CONFIG_GDB_SCRIPTS and also running make scripts_gdb to build the script files. Enabling CONFIG_GDB_SCRIPTS was easy with the approach I used, but making the Android kernel build system run make scripts_gdb was not.
So instead, I used a different approach.
Used approach of modyfing kleaf
KGDB support exists. After grepping for kgdb throughout the kernel checkout, I found out that the Android kernel build system actually already had support for KGDB; see build/kernel/kleaf/docs/kgdb.md and build/kernel/kleaf/impl/kgdb.bzl.
This support could be enabled by providing the --kgdb build option to ./build_shusky.sh. Internally, this enabled CONFIG_KGDB along with a few other options and also made the build system run make scripts_gdb.
Issue. Building the kernel with --kgdb as is produced a few build errors:
The reason for this was that --kgdb disabled CONFIG_WATCHDOG, which in turn disabled a few Pixel-specific watchdog options. And the build system expected these options to be enabled.
Modyfing kleaf. Instead of changing the expectations of the build system, I decided to adjust the --kgdb behavior to avoid this issue and also match my requirements:
Here, I removed the disablement of CONFIG_WATCHDOG; later, I will show how to disable the Pixel watchdogs without relying on the kernel configuration options. I also dropped the change that disabled CONFIG_RANDOMIZE_BASE: KASLR could instead be disabled via the nokaslr command-line parameter. And I also dropped enabling CONFIG_KGDB_KDB, as I did not need it.
You can also notice that I dropped disabling CONFIG_STRICT_KERNEL_RWX. The KGDB documentation states that this might break software breakpoints, but I have not encountered any issues yet. Also, note that even if you keep _config.disable("STRICT_KERNEL_RWX") in kgdb.bzl, CONFIG_STRICT_KERNEL_RWX will not actually be disabled for some reason.
Building. And I built the kernel via:
This appoach ended up working and produced the Linux kernel GDB scripts in bazel-bin/private/devices/google/shusky/kernel/gdb_scripts.
There does not seem to be an out-of-the-box way to test whether KGDB actually gets enabled at this point without running GDB: KGDB does print any information into the kernel log during boot. So for now, you’ll just have to blindly trust that the KGDB’s functionality is enabled. Just flash the kernel, reboot the Pixel, and make sure that it boots successfully.
🫡 Adjusting kernel command line
My goal was to run KGDB over the UART interface provided by the Pixel (aka KGDB over serial). One side of this serial UART connection is exposed on the SBU pins of the Type-C connector. The other side is exposed to the Pixel kernel and likely has a corresponding device file.
Serial device filename. Configuring KGDB to work over a serial connection requires providing the kgdboc kernel command-line parameter. This parameter accepts the filename of the serial device that is meant to be used for KGDB over serial. So as the next step, I had to find out this filename.
Finding out serial device filename
By booting the Pixel twice: once with fasboot oem uart disable and once with fastboot oem uart enable and checking the kernel log, I could see that enabling UART changes the console=null command-line parameter to earlycon=exynos4210,mmio32,0x10870000 earlycon=exynos4210,0x10870000 console=ttySAC0,115200n8.
The Linux kernel prints its command-line parameters into the log: Kernel command line: ....
I had to get the kernel logs here via adb bugreport, as the log lines got cut off at around 1000 characters when getting the log over UART.
No idea why earlycon= gets added twice; likely a harmless mistake.
From this, I could tell that the serial device onto which the kernel logs were printed was /dev/ttySAC0:
So /dev/ttySAC0 was also the serial device I wanted to use for KGDB.
Setting KGDB command-line parameters
To set the kgdboc command-line parameter, I used the oem cmdline Fastboot command:
Besides specifiying the serial device filename and the baud rate, I also disabled KASLR to make debugging the kernel easier later.
I booted the Pixel and checked that the kernel printed the added parameters.
You will likely see the Unknown kernel command line parameters "nokaslr", will be passed to user space. message in the kernel log when booting the Pixel. This is expected, as the nokaslr parameter gets parsed in a special way during early boot. KASLR should still get disabled despite this message.
🥷 Breaking into KGDB
Before GDB can be attached to the kernel, the kernel execution must be stopped and instructed to wait for a GDB connection.
This can be done in a few ways:
- Add kgdbwait to the command line to stop the kernel execution during early boot;
- Modify the kernel code to explicitly call kgdb_breakpoint() at a certain point;
- Trigger SysRq-G via /proc/sysrq-trigger;
- Or send the SysRq-G sequence via a serial connection.
I have not tried using the first two methods, but I did test the other two.
The last two methods require CONFIG_MAGIC_SYSRQ=y to be enabled, and it is enabled by default in Pixel kernels.
✈️ Breaking into KGDB via ADB
Using /proc/sysrq-trigger is a traditional way to break into KGDB with Android kernels. By writing g into this file, we can trigger SysRq-G, which stops the kernel execution and instructs KGDB to wait for a connection from the GDB client.
Cannot access. The caveat with this method is that /proc/sysrq-trigger is not accessible to the ADB shell session. The two things that prevent writing into the file are SELinux and DAC (aka file permissions):
Not rooting. One way to work around these limitations is to root the Pixel. In the context of Pixel kernel debugging, this usually means building and flashing the userdebug flavor of the whole Android system. However, based on my experience, this approach is slow and prone to breakage.
Patching kernel
Aren’t we kernel hackers after all?
As I didn’t want to bother with rebuilding the whole Android, I decided to instead just modify the kernel to allow accessing /proc/sysrq-trigger from the ADB shell.
Disabling SELinux. First, I changed the enforcing_enabled function to always return false to make the rest of the system believe that SELinux was disabled:
After rebuilding the kernel, I could at least see the permissions on the file but could not write to it yet:
You can also modify the kernel to skip SELinux checks only for /proc/sysrq-trigger. This would be a cleaner way that avoids setting SELinux to the permissive mode. Avoiding this might be useful for kernel exploit developers, who might want to check whether their kernel exploit disables SELinux properly instead.
Unrestricting chmod. Then, I patched the capability check that is used for checking the chmod syscall to allow changing file permissions without restrictions:
Now, I could mark /proc/sysrq-trigger as writable for all users:
Trigerring SysRq-G via ADB
Finally, I could write g into /proc/sysrq-trigger:
At this point, the Pixel froze and the kernel printed:
If you leave the Pixel in this state, after about 20 seconds, a watchdog will force-reboot it; we will deal with this later.
🚀 Breaking into KGDB via serial
Before we get to connecting GDB to the kernel via KGDB, I will show another way to break into KGDB without relying on ADB and without taking up the passthrough USB-Cereal port. This method is particularly useful for debugging USB exploits: the passthrough port can be used for attaching a malicious USB device.
Requirements. This other way of breaking into KGDB works by sending the SysRq-G sequence over the serial connection to the debugged device. Sending SysRq-G over a serial connection requires both hardware and driver support for sending and recognizing break sequences.
Need USB-Cereal that supports break sequences
0xDA’s USB-Cereal did not work. Unfortunately, the 0xDA’s USB-Cereal edition that I have did not appear to support sending break sequences. The likely reason is that it uses the CP2102N USB-UART chip, which needs to be wired in a proper way to support this. I believe there are other editions of this board that use the FT232R* chips, and those should work.
You can check whether your USB-Cereal edition uses CP2102N or FT232R* by connecting it to your machine and checking the kernel log. For CP2102N, the used driver will be cp210x. For FT232R*, it will be ftdi_sio.
The first edition of a customized USB-Cereal we developed with Sergey Korablin also used CP2102N and sufferred from this issue.
Original USB-Cereal worked. Nevertheless, the original USB-Cereal by Google uses FT232R*, which does support break sequences out-of-the-box. This is what I used for this method.
If you happen to have acquired this USB-Cereal version from me a few years ago, use that — it will work.
Unless you explicitly want to break into KGDB over serial (e.g., for debugging USB exploits), you can just use any edition of the 0xDA’s USB-Cereal and rely on /proc/sysrq-trigger.
Getting UART driver to work
Even with a proper USB-Cereal, when I first tried sending the SysRq-G sequence via minicom (Ctrl+a, then f, then g), nothing happened 😢
Driver ignores breaks? At that point, my guess was that either the break sequence did not reach the Pixel UART driver or the driver just ignored it. Even with hardware that supports sending break sequences, the UART driver needs to recognize them and call the appropriate kernel handlers. Thus, the next step was to analyze the driver and see whether it saw the break sequence at all.
Another reason for this could have been that any data sent over UART never reached the kernel due to the way the UART hardware components were wired within Pixel. However, at this point, I had actually already successfully connected GDB by relying on /proc/sysrq-trigger and could send GDB commands without issues. So I knew the data sent over UART did reach the kernel.
Analyzing driver. By grepping the kernel checkout for ttySAC, I found the source code of the Pixel UART driver in private/google-modules/soc/gs/drivers/tty/serial/exynos_tty.c.
The driver did contain a call to uart_handle_sysrq_char — the common kernel function that handles SysRq sequences:
This was promising, as this meant the driver did support recognizing break sequences.
However, for some reason, sending SysRq-G via minicom did not work.
Forced receiving. While playing around with the driver, I decided to check what would happen if I started reading the /dev/ttySAC0 from userspace:
Once I ran these commands, suddenly sending SysRq-G via minicom partially worked 😮:
It did not work fully: the driver printed its registers via uart_sfr_dump() but did not make the kernel break into KGDB via uart_handle_break(). But this was already exciting.
Enabling SysRq. The reason the kernel did not break into KGDB was easy to figure out: the SysRq functionality was not activated in the kernel:
Luckily, providing sysrq_always_enabled onto the kernel command line fixed the issue:
Having 0 in /proc/sys/kernel/sysrq only affects triggering SysRq via a SysRq sequence. /proc/sysrq-trigger is not affected by this setting.
UART driver modes. Understanding why I could not send SysRq-G without reading from /dev/ttySAC0 first was harder. But after a long session of printk-debugging and a bit of ChatGPT’ing around, I figured out the reason.
As it turned out, many UART drivers can operate in two modes: the polling mode and the interrupt mode.
The polling mode needs less UART hardware configuration and requires the kernel to explicitly call the UART-related functions to receive and send characters (via uart_ops->poll_put/get_char). This mode is actually what KGDB uses to communicate with the GDB client.
The interrupt mode requires more hardware configuration but makes the UART driver asynchronously deliver the received characters to the kernel via interrupts and also recognize break sequences.
exynos_tty. Without any active users, the exynos_tty driver operates in the polling mode. This is enough to run KGDB, but not enough to recognize break sequences: the exynos_serial_rx_drain_fifo function mentioned above only gets called in the interrupt mode.
Thus, to make exynos_tty recognize break sequences, I had to make it believe it had an active user (to make it call uart_ops->startup to set up the interrupts).
If you ever happen to debug the exynos_tty driver yourself, note that on Pixel 8, this driver handles two devices: 155d0000.serial — some internal serial interface; and 10870000.uart — the UART driver that we care about. It puzzled me for a while why I was seeing some baseband/Bluetooth communication while tracing the driver.
Patching exynos_tty. As I still didn’t want to bother with flashing custom userspace components, I decided to write some kernel code to trick the exynos_tty driver into starting to operate in the interrupt mode.
The code I wrote just opened the /dev/ttySAC0 device file from the kernel itself (and actually retried this multiple times until the opening succeeded, as /dev/ only got mounted at some point during boot):
During boot, this code did need a few attempts before it could open /dev/ttySAC0:
Success. With this patch, the exynos_tty driver started operating in the interrupt mode and I could send the SysRg-G sequence via minicom (Ctrl+a, then f, then g) without any issues 🥳
And the previous aosp/ patches that disabled SELinux and unrestricted chmod could be reverted.
📲 Attaching GDB
Now that I could break into KGDB (either via /proc/sysrq-trigger or via serial), I had to figure out how to attach GDB. There’s plenty of public information about this, so I’ll just document the instructions.
☎️ Attaching GDB via serial device
The first way to attach GDB is directly via /dev/ttyUSB0.
One downside of this approach is that we don’t get to see the kernel log via minicom, as /dev/ttyUSB0 will be fully taken up by GDB. But for completeness, I will document this approach nevertheless.
Another downside is specific to breaking into KGDB over serial: Ctrl+c in GDB does not send the SysRq-G sequence for some reason (with set remote interrupt-sequence BREAK-g).
1. Break into KGDB
Either via echo g > /proc/sysrq-trigger or by sending SysRq-G via minicom (Ctrl+a, then f, then g).
2. Disconnect minicom
Disconnect minicom (Ctrl+a, then x, then Enter) if you have it connected.
If you still have minicom connected, you will likely get Remote connection closed in the next step, and the Pixel will freeze. Press the power button for 30 seconds to force-reboot.
3. Connect GDB
Set the UART baud rate in GDB and instruct it to connect to /dev/ttyUSB0:
$ gdb-multiarch -q out/shusky/dist/vmlinux Reading symbols from out/shusky/dist/vmlinux... (gdb) set serial baud 115200 (gdb) target remote /dev/ttyUSB0 Remote debugging using /dev/ttyUSB0 arch_kgdb_breakpoint () at arch/arm64/include/asm/kgdb.h:21 warning: 21 arch/arm64/include/asm/kgdb.h: No such file or directoryIf you stay in the breakpoint for about 20 seconds, a watchdog will force-reboot the Pixel. If you continue in GDB after staying in the breakpoint for some time, another watchdog might force-reboot the Pixel. We will deal with both of these watchdogs later.
The No such file or directory warning can be resolved by specifying the right source directory.
👮 Attaching GDB via agent-proxy
The problem of not seeing the kernel log while having GDB attached is not novel, and there is a tool that helps with it. This tool is called agent-proxy, and it was developed specifically to allow using KGDB along with maintaining a text serial connection for getting the kernel log.
agent-proxy splits the communication over a serial connection into two TCP connections and forwards the data appropriately. It also knows to send the SysRq-G sequence over serial to break into KGDB (assuming you have set up breaking over serial), both when running target remote and when pressing Ctrl+c in GDB.
1. Download and build agent-proxy
2. Run agent-proxy
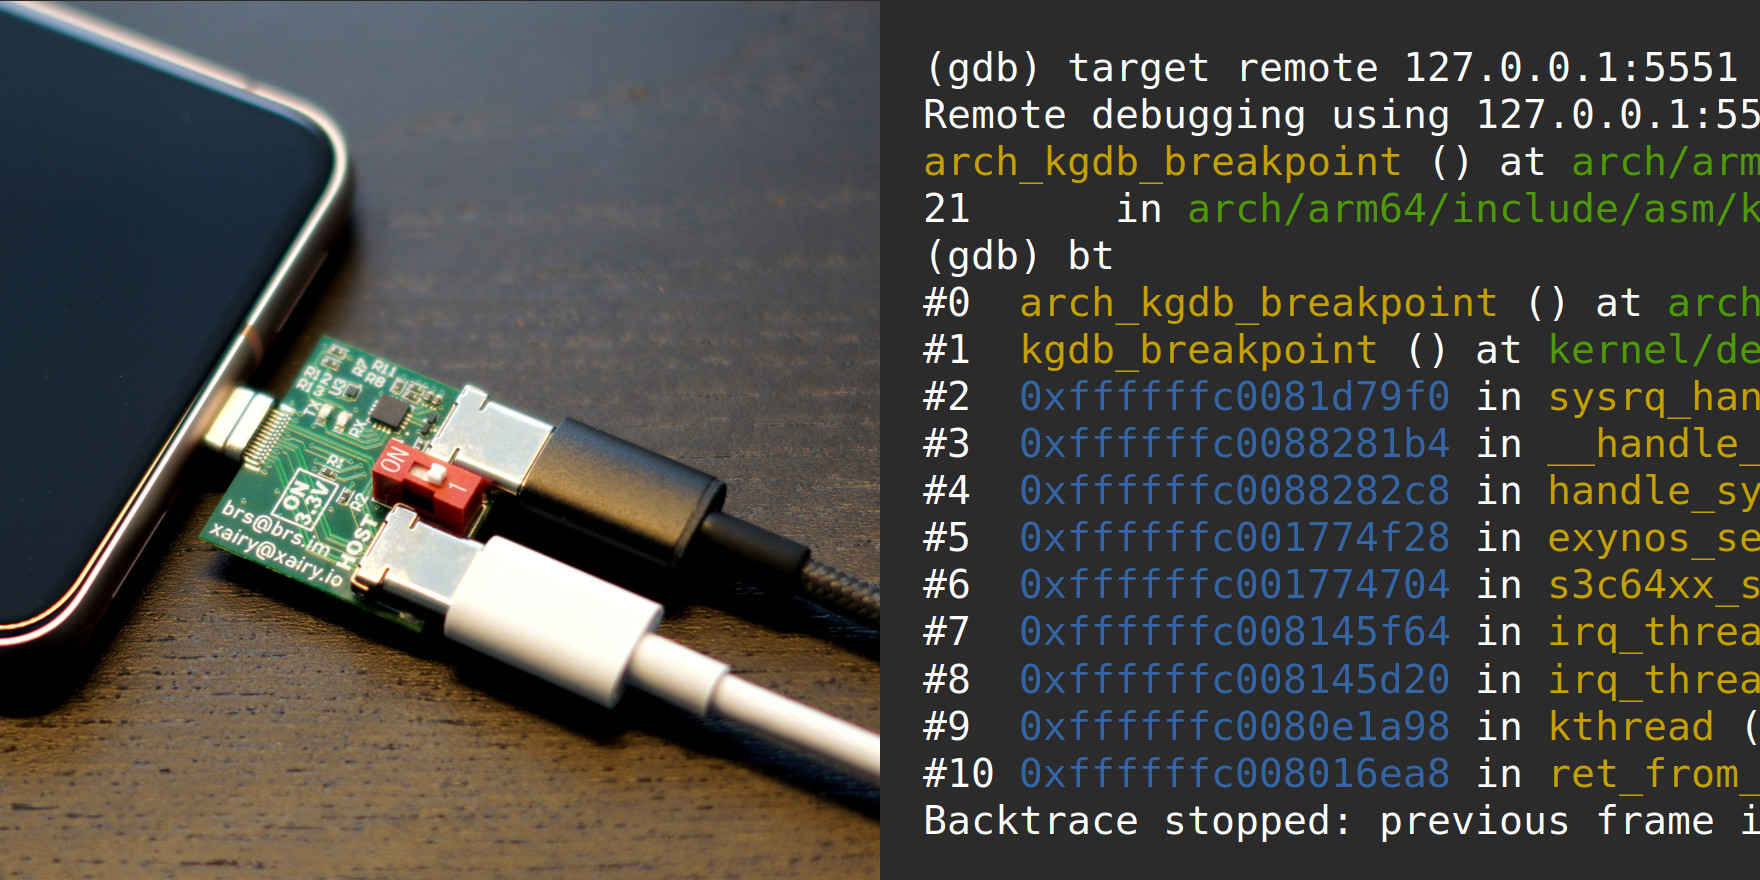
Split the /dev/ttyUSB0 into two TCP connections on ports 5550 and 5551:
3. Get kernel log
Use nc to connect to port 5550 to see the kernel log:
4. Break into KGDB via ADB
If you have not set up breaking into KGDB over serial, do echo g > /proc/sysrq-trigger to break into KGDB via ADB. If you have set it up, agent-proxy will break into KGDB automatically by sending the SysRq-G sequence over serial.
5. Connect GDB
Use port 5551 to connect GDB to the Pixel kernel:
At this point, you will also see the GDB communication in the nc session with the kernel log. This is expected: GDB shares the same serial connection as the one that it used for getting the kernel log.
Might need to connect twice
Sometimes, the target remote command fails to connect to the Pixel on the first try. I’m not sure why this happens, but you can just rerun the command:
To detach GDB from the kernel and let it continue the execution normally after a breakpoint, you can run detach in GDB.
If you set up breaking into KGDB over serial, you can press Ctrl+c in GDB and agent-proxy will send the SysRq-G sequence. This is, however, flaky and sometimes works with a delay or does not work at all; I’m not sure why.
🐩 Dealing with watchdogs
After successfully connecting GDB to the Pixel kernel, I had to deal with the watchdogs that killed the Pixel and all the fun of debugging its kernel with it.
🐶 EHLD Watchdog
Crash log. The first watchdog I encountered was the one that got triggered after continueing in GDB. It rebooted the Pixel after producing the following in the kernel log:
Analyzing code. By grepping the kernel for the related function names, I found out that this watchdog was set up in private/google-modules/soc/gs/drivers/soc/google/debug/exynos-ehld.c.
Disabling watchdog. After skimming through the code, I found a way to disable it: provide ehld.noehld=1 onto the kernel command line.
🐺 APC Watchdog
Crash log. The second watchdog I encountered triggered only when I either stayed in a breakpoint for ~10 seconds and continueed, or just stayed in the breakpoint for ~20 seconds.
If I conitinueed after a breakpoint, this watchdog produced quite a lot of kernel crash messages. First, I tried chasing these down, but they turned out to be false leads.
However, if I stayed in a breakpoint for a long time, I only got this bootloader reset message:
And this turned out to be the important part of the logs.
Analyzing code. By grepping for WDTRESET, I found out that this other watchdog was set up in private/google-modules/soc/gs/drivers/watchdog/s3c2410_wdt.c.
Disabling watchdog. Disabling it was also easy: provide s3c2410_wdt.soft_noboot=1 onto the kernel command line.
Command-line parameters. The command-line parameters I added at this point were:
But there will be one more.
Success. Having disabled these two watchdogs, I could stay in breakpoints and continue without any major issues 😌
Even with these two watchdogs disabled, I occasionally get other lockup-related messages in the kernel log. However, these are infrequent enough not to bother me.
While hunting for watchdogs, I also found the hardlockup_watchdog.hardlockup_panic=0 command-line parameter and the fastboot oem watchdog disable command. But these turned out to be not required, having disabled the two watchdogs mentioned above.
If your Pixel ever gets stuck with the watchdogs disabled, press the power button for 30 seconds to force-reboot.
🍾 Final tests
The final step was to test various GDB commands.
🛠 Fixing backtraces
When running bt in GDB, I noticed that the stack trace was corrupted:
(gdb) bt #0 kgdb_breakpoint () at kernel/debug/debug_core.c:1221 #1 0xffffffc0081d79f0 in sysrq_handle_dbg (key=<optimized out>) at kernel/debug/debug_core.c:986 #2 0xb9bdcd40088281b4 in ?? () Backtrace stopped: previous frame identical to this frame (corrupt stack?)The cryptic 0xb9bdcd40088281b4 value puzzled me for a bit, but then I realized: PAC.
Disabling PAC was easy: provide arm64.nopauth onto the kernel command line.
Final command line. Alltogether, the final command-line parameters I provided were:
💾 Loading modules
After I disabled PAC and ran bt, I noticed another issue:
(gdb) bt #0 arch_kgdb_breakpoint () at arch/arm64/include/asm/kgdb.h:21 #1 kgdb_breakpoint () at kernel/debug/debug_core.c:1221 #2 0xffffffc0081d79f0 in sysrq_handle_dbg (key=<optimized out>) at kernel/debug/debug_core.c:986 #3 0xffffffc0088281b4 in __handle_sysrq (key=103, check_mask=true) at drivers/tty/sysrq.c:607 #4 0xffffffc0088282c8 in handle_sysrq (key=19) at drivers/tty/sysrq.c:639 #5 0xffffffc001775f28 in ?? () #6 0x00000000ffffffff in ?? () Backtrace stopped: previous frame identical to this frame (corrupt stack?)The last frame did not have a symbol name.
Module not loaded. This made sense: I was breaking into KGDB over serial, and the SysRq-G handler was being called from the exynos_tty kernel module, which was not loaded into GDB.
Loading a kernel module into GDB requires providing its section addresses. Even with KASLR disabled, loadable modules get loaded at different addresses every reboot. Thus, I needed to find out the address of exynos_tty.
Module address. One way to get the exynos_tty module address was from userspace by reading /sys/module/exynos_tty/sections/.text. But as I wanted to avoid rooting the Pixel, I relied on the Linux kernel GDB scripts instead. Getting kernel module addresses was one reason I wanted to enable building these scripts in the first place.
Fixing GDB scripts. When I tried sourceing the Linux kernel GDB scripts, I encountered an error:
The problem was that I was using a newer Python version that required properly annotating raw strings. Replacing ".*/{0}\.ko(?:.debug)?$" with r".*/{0}\.ko(?:.debug)?$" in symbols.py fixed the issue.
Finding address. After successfully sourceing the scripts, I ran the lx-lsmod command, which dumped the addresses of all loaded kernel modules, and found the address of exynos_tty:
Then, I loaded exynos_tty.ko into GDB:
And ran bt again:
The stack trace was displayed properly.
Other kernel modules can be loaded in the same way.
As you can notice, the frames that come from exynos_tty do not have the filename and line debug information. Looks like the debug information got stripped from the external modules during build. However, as I did not need this information, I did not try to figure out how to fix it.
🚦 Testing breakpoints
Next, I tested breakpoints.
Normal breakpoints. Normal breakpoints worked fine:
Conditional breakpoints. However, a conditional breakpoint with a rarely-satisfied condition crashed GDB 😅:
(gdb) b *kmalloc_trace if $x2 == 128 Breakpoint 2 at 0xffffffc0082fba28: file mm/slab_common.c, line 1027. (gdb) c Continuing. /build/gdb-1WjiBe/gdb-15.0.50.20240403/gdb/infrun.c:6706: internal-error: finish_step_over: Assertion `ecs->event_thread->control.trap_expected' failed. A problem internal to GDB has been detected, further debugging may prove unreliable. ...But this only happenned after a while of GDB triggerring the breakpoint and checking the condition.
Running the kernel with a frequently-triggered conditional breakpoint enabled is quite slow. Every time the breakpoint gets triggered, the kernel execution stops and GDB queries KGDB to check whether the condition is satisfied.
Potential solution. While looking for a solution, I found a kernel patch by Akashi Takahiro that supposedly addressed this issue. I applied the patch, and my subjective feeling was that the GDB crashes started happening less often. But they still did occur.
I still have not figured out a proper solution to this issue.
More conditional breakpoints. However, conditional breakpoints with a more frequently–satisfied condition worked just fine:
(gdb) b *kmalloc_trace if $x2 > 0x100 Breakpoint 1 at 0xffffffc0082fba20: file mm/slab_common.c, line 1027. (gdb) c Continuing. [Switching to Thread 5262] Thread 2316 hit Breakpoint 1, kmalloc_trace (s=0xffffff8002402600, gfpflags=gfpflags@entry=3520, size=size@entry=448) at mm/slab_common.c:1027 (gdb) i r $x2 x2 0x1c0 448👣 Fixing stepping
The next command I tested was stepi (aka si) for stepping over a single instruction.
Problem. This did not work as expected: running si after a breakpoint dropped me into an interrupt handler:
Technically, this made sense: after continueing, all the pending interrupts had to execute first. So, the next instruction to be executed was the first instruction of one of these interrupts.
But this was not what I wanted to get for instruction-level debugging.
Solution. Luckily, the same patchset by Akashi Takahiro offered a solution: use a custom stepping macro that avoids stepping into interrupts:
define my-si set $instr = *(int *)$pc set $opsr = $cpsr set $cpsr = $cpsr | 0x80 stepi # If interrupt was enabled before stepi, restore the I flag. if !($opsr & 0x80) # msr daifset, <val> if (($instr & 0xfffff0ff) == 0xd50340df) if !($instr & 0x200) set $cpsr = $cpsr & ~0x80 end else # msr daif, <reg> if (($instr & 0xffffffe0) == 0xd51b4220) eval "set $val = $x%d", $instr & 0x1f if !($val & 0x80) set $cpsr = $cpsr & ~0x80 end else set $cpsr = $cpsr & ~0x80 end end end endUsing this macro worked:
(gdb) b *kmalloc_trace Breakpoint 2 at 0xffffffc0082fba20: file mm/slab_common.c, line 1027. (gdb) c Continuing. [Thread 11231 exited] [Switching to Thread 50] Thread 56 hit Breakpoint 2, kmalloc_trace (s=0xffffff8002402200, gfpflags=gfpflags@entry=3264, size=size@entry=56) at mm/slab_common.c:1027 (gdb) my-si 0xffffffc0082fba24 1027 in mm/slab_common.c (gdb) disas $pc Dump of assembler code for function kmalloc_trace: 0xffffffc0082fba20 <+0>: paciasp => 0xffffffc0082fba24 <+4>: sub sp, sp, #0x50 0xffffffc0082fba28 <+8>: stp x29, x30, [sp, #16] ...Done. The combination of partially working conditional breakpoints and working stepping was enough for me, so this is where I stopped.
🎩 Testing GEF
I also tested the favorite GDB extension of the Linux kernel hackers — the bata24’s GEF work.
With this extension enabled, I could connect to the kernel over KGDB, but there was a crash coming from the extension’s internals. However, this crash did not prevent the use of the extension commands.
Click the switch to see the crash.
But unfortunately, the slub-dump command provided by this extension did not work in the KGDB mode:
I hope this command will be implemented for the KGDB mode at some point.
📝 Summary and afterword
Summary. In this article, I documented the instructions and my approach for:
-
Enabling the UART interface on Pixels and obtaining the kernel log through that interface via USB-Cereal;
-
Building and flashing a custom Pixel 8 kernel;
-
Building the Pixel 8 kernel with KGDB support and setting the kernel command-line parameters to enable KGDB over serial;
-
Two ways of stopping the kernel execution to break into KGDB: over ADB via /proc/sysrq-trigger and over serial by sending the SysRq-G sequence. The latter allows keeping the passthrough USB-Cereal port free for connecting malicious USB devices for debugging USB exploits;
-
Attaching GDB to the kernel either via the serial device file or by relying on agent-proxy. The latter allows seeing the kernel log while debugging the kernel with GDB and also allows using Ctrl+c to interrupt the kernel execution;
-
Disabling the EHLD and APC watchdogs on Pixel 8 to avoid them force-rebooting the kernel while debugging;
-
Finally, fixing a few encountered issues while running common GDB commands.
Remaining issues. While debugging the Pixel 8 kernel with GDB largely works, there are still a few things to address:
-
Figure out why the target remote GDB command sometimes fails and needs to be run twice;
-
Check if there is a way to speed up GDB communication over serial. Both the kernel console and GDB share the same UART connection, but the console is fast and GDB is slow;
-
Resolve GDB crashes when using conditional breakpoints;
-
Fix GEF crashes and implement slub-dump for the KGDB mode.
Afterword. Hopefully, these instructions will be useful for people wishing to debug the Android kernel with GDB on Pixel 8 or another Android device. Be that just for kernel debugging purposes or for developing kernel exploits.
💜 Thank you for reading!
🐵 About me
I’m a security researcher and a software engineer focusing on the Linux kernel.
I contributed to several security-related Linux kernel subsystems and tools, including KASAN — a fast dynamic bug detector, syzkaller — a production-grade kernel fuzzer, and Arm Memory Tagging Extension — an exploit mitigation. I also wrote a few Linux kernel exploits for the bugs I found.
Occasionally, I’m having fun with hardware hacking, teaching, and other random stuff.
Follow me @andreyknvl on X, @andreyknvl.bsky.social on Bluesky, @[email protected] on Mastodon, or @xairy on LinkedIn for notifications about new articles, talks, and training sessions.