.png)

Do you like macOS’s sleek interface but hate its closed ecosystem and limited customizability? Are you wondering if there’s a way to enjoy Linux’s freedom and control while making it look and feel like macOS? These are the steps I took to make Linux feel more like macOS using KDE Plasma.
Step 1: Set Up a Two-Panel Layout
macOS uses a two-panel layout with the menu bar at the top and the dock at the bottom. To replicate this in KDE Plasma, we'll need to add an extra panel. Right-click on your existing panel and select "Show Panel Configuration." In the desktop edit mode, click on "Add Panel" on the desktop preview window and choose "Empty Panel" from the dropdown list.
Once the new panel appears, select it and use the Panel Position configuration tool to move it to the bottom. Then, reposition your original panel to the top following the same method.
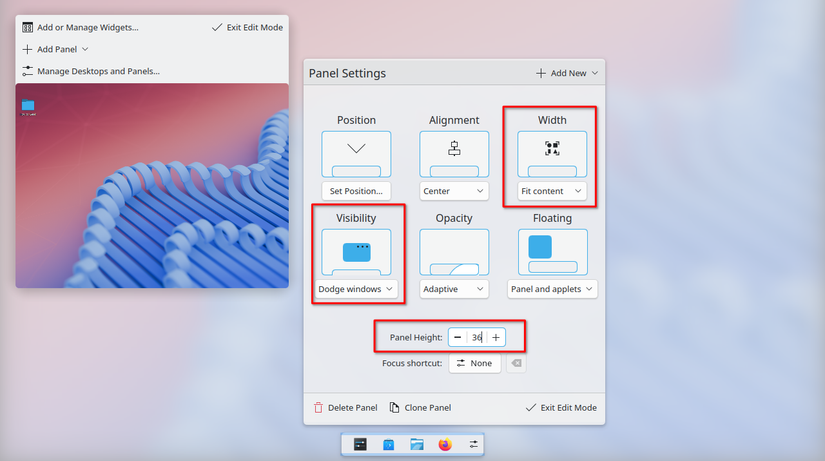
Step 2: Turn the Bottom Panel into the Dock
Now, our new bottom panel is empty, and you should see a button called Add Widget. Click it to open the Widget sidebar and search for Icons-Only Task Manager. As the name implies, this widget adds a sleek icon-only task manager, much like macOS’s Dock, to the panel. Next, search for the Disks & Devices widget and add it to display all mounted drives.
Now, from the panel settings, change the Width option to "Fill Content". This will shrink the panel so it only takes up as much space as the icons in the task manager. Then, tweak the Visibility setting to "Dodge Windows", which hides the dock when a window comes into contact with it. Alternatively, if you prefer it always visible, select "Always Visible" instead. You can also adjust the size of the dock here. I personally keep it at the default 36 units, but increasing it to 48 units gets you closer to macOS’s default Dock size.
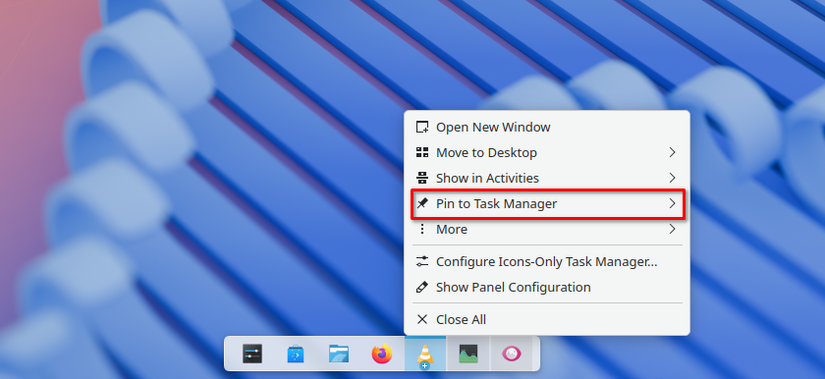
Now, open all the apps you want to pin to the new dock. You’ll see each app appear on the panel as you open it. Right-click on an app and choose Pin To Task Manager > On Current Activity.
That’s it—you’ve recreated the macOS Dock in KDE Plasma. Unfortunately, there’s no reliable way to replicate macOS’s hover animation effect. While there are KWin scripts and Desktop Effects that attempt it, I’ve found them too buggy to recommend.
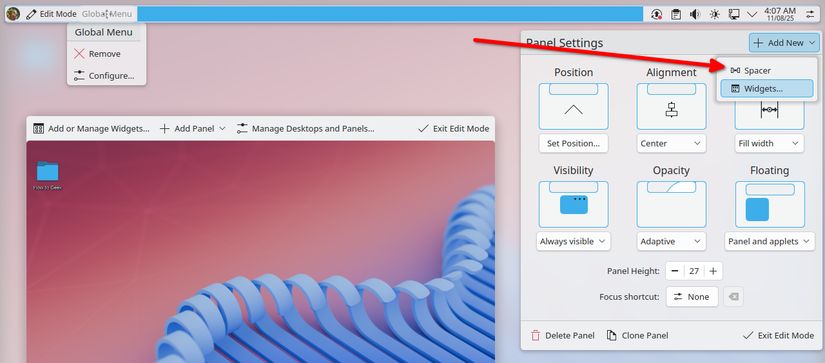
With the Dock ready, let's create the menu bar. Right-click on the top panel and select "Show Panel Configuration". From the Panel Settings, choose "Delete Panel" to remove it. Now click on "Add Panel" and select "Application Menu Bar"—this adds a panel with the Global Menu widget, which works like macOS’s current app menu, showing all menu options for the currently selected app.
Next, add five more widgets:
- User Switcher: The closest thing to the Apple Menu, where you can change user accounts or shut down/restart your PC.
- Window Title (by dhruv8sh): Shows the current active window.
- System Tray: Similar to macOS status icons.
- Plasma Control Hub (by zayronXIO): Similar to macOS control center.
- Digital Clock: Displays time and date.
Most of these widgets are available by default except Window Title and Plasma Control Hub, which can be installed from the Plasma widget store. To install, click "Get New" Widgets in the widget sidebar, search for the name, and install them.
Once all widgets are added, exit edit mode. Right-click on the panel again, choose "Show Panel Configuration", and arrange them in this order: User Switcher, Window Title, Global Menu, System Tray, Control Hub, Digital Clock. To add space between the Global Menu and System Tray, use the Spacer widget. It's hidden inside the Add New option in Panel Settings.
Next, we need to customize each of the widgets so that they look and behave similar to the interface elements on macOS. To do this, simply right-click on the widget, and click on the option titled "Configure [widget-name]". Here are all the optimal settings for the widgets we just added:
- User Switcher: Change Show to "User Picture" for a cleaner look. You can even set your profile picture to an Apple logo in Settings > Users.
- Window Title: In the Appearance tab, set "When Title Available" to %a and leave "When Title Unavailable" as blank. Enable Bold text and uncheck Visible for Icon.
- Global Menu: Keep the default settings—nothing to change here.
- System Tray: In Entries, set the following to "Always Shown": Audio Volume, Network, Power and Battery (for laptops), Media Player, and Weather Report.
- Plasma Control Hub: Keep default settings.
- Digital Clock: In Appearance, set Show Date to "Always Beside Time" and use custom format MMM dd.
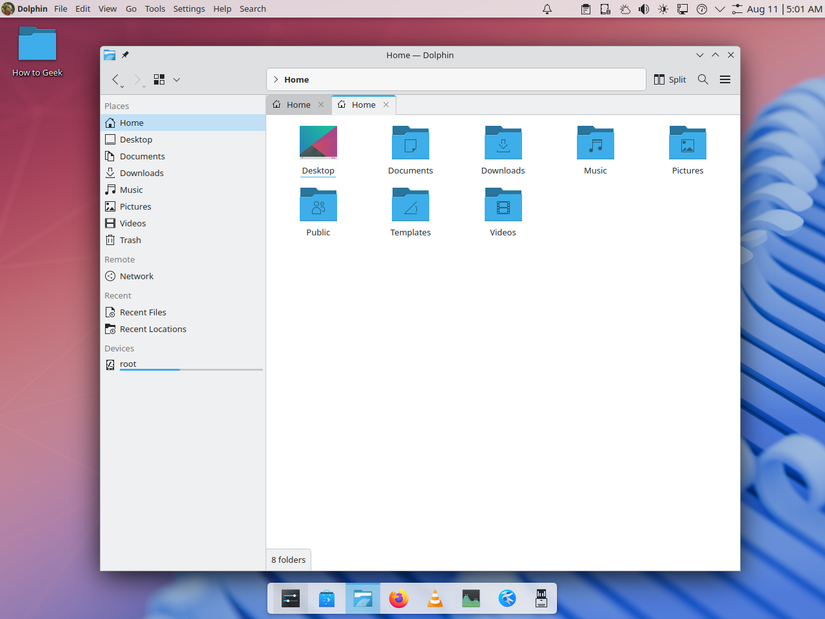
Finally, set the panel Opacity to "Translucent" and disable "Floating". And that’s it—after this setup, your KDE Plasma desktop looks much closer to macOS!
Step 4: Change to macOS-Like Icon Packs
With the above tweaks, we have already nailed the macOS layout. To make KDE Plasma look even more like macOS, the next step is changing the icon packs. To do this, go into Settings > Colors & Themes > Icons. Here you'll find all the preinstalled icon packs on your system.
Now, by default, you're unlikely to have any macOS-style icon packs, so you'll need to download them. To do this, click the "Get New" button, and in the new window, search for "macOS". I personally like the Mkos Big Sur icon pack, but feel free to pick any that you prefer and work well for your setup. Install it and click "Use," and the icons on your system will change immediately.
If you see some broken icons, restarting your PC can fix it.
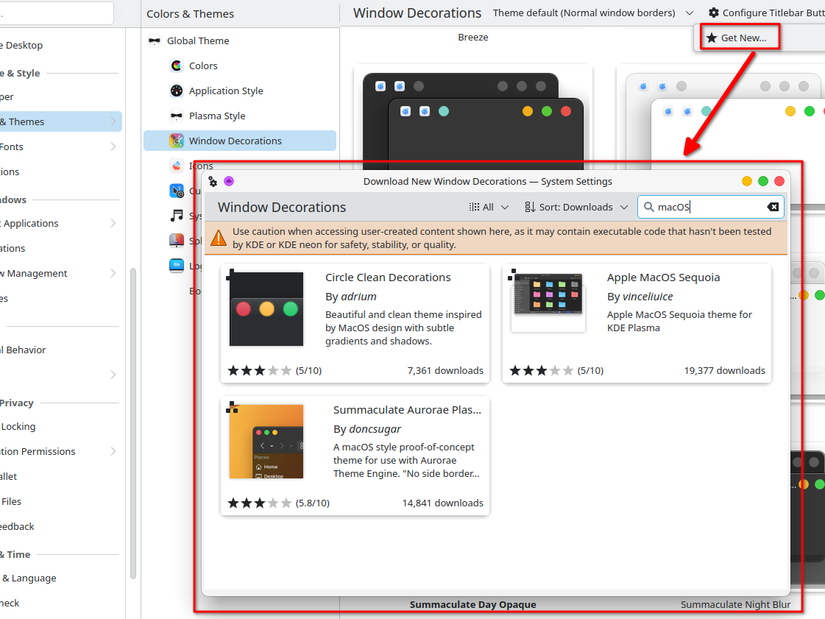
Next, we have the colored window buttons to close, maximize, and minimize our windows. To do this, head to Settings > Colors & Themes > Window Decorations. Click "Get New," search for a macOS-style window decoration, and install it. I like Summaculate Aurorae by doncsugar, but again, choose whichever design you like. Once applied, your window buttons will look much closer to macOS.
Step 5: Move Window Buttons to the Left
By default, KDE Plasma positions all window buttons on the right, similar to Windows. To match macOS, we’ll need to move them to the left. To do this, go to Settings > Colors & Themes > Window Decorations and click "Configure Titlebar Buttons".
From here, you can drag and drop the buttons to any position you like. Don’t get overwhelmed by the many available options—just remove the buttons from the right by dragging them into the field below. Then move your desired buttons to the left in the macOS order (or any order you personally prefer). Click "Apply" and that's it!
KDE Plasma Desktop Now Looks and Feels like macOS
Congratulations, your KDE plasma distro now mirrors the look and feel of macOS remarkably well. You get a clean top menu bar, a functional bottom dock, macOS-style icons, and the window controls positioned on the left—making it instantly familiar to macOS users. If you want to make it look even more like macOS, simply install one of the staple macOS wallpapers, and you're good to go!
To push the resemblance further, you can also take advantage of built-in KDE tools that echo macOS features. KRunner, for example, is similar to Spotlight Search—just press Alt+Space to launch the search bar and search for apps, files, system settings, or even perform calculations and conversions. Another great feature is Screen Edges, which is similar to macOS's Hot Corners. You can assign specific actions when moving your mouse to the screen corners and edges.
Why I Didn’t Install a Theme
Instead of manually doing all of these steps, you can install a global theme on your KDE Plasma system that will automatically set up the layout, widgets, and design options for you. For example, you can go to Settings > Colors & Themes > Global Theme, click "Get New", and download the Apple macOS theme by Vincelluice. Once downloaded, return to the Global Theme page, select the theme and click "Use". Check both boxes for "Apply Appearance Settings" and "Desktop Layout". This will instantly transform your desktop to resemble macOS without any manual work.
On paper, this might seem like the perfect shortcut, but I’ve found that full global themes—especially macOS-like or Windows-like ones—can be buggy and sometimes break after system updates. That’s why I prefer customizing the layout myself.
That said, if you’re up for experimenting, I recommend browsing the Global Theme catalog to download a bunch of designs you like. You can then go back to Settings > Colors & Themes > Global Theme and mix and match Application Style and Plasma Styles to tweak how windows and interface elements look. It might not perfectly mirror macOS, but it’s a great way to learn customization and familiarize yourself with KDE Plasma’s flexibility.
Alternatively, Just Use a macOS-Like Distro
If you’d rather skip manual customization entirely, you can install a Linux distribution that comes with a macOS-like interface out of the box. There are at least three distros that capture the macOS look and feel pretty well. Another interesting option is Garuda Linux (which I use personally), where you get a macOS-style layout with a vibrant neon cyberpunk aesthetic.
![Carding, Sabotage and Survival: A Darknet Market Veteran's Story – Godman666 [video]](https://www.youtube.com/img/desktop/supported_browsers/chrome.png)

