.png)

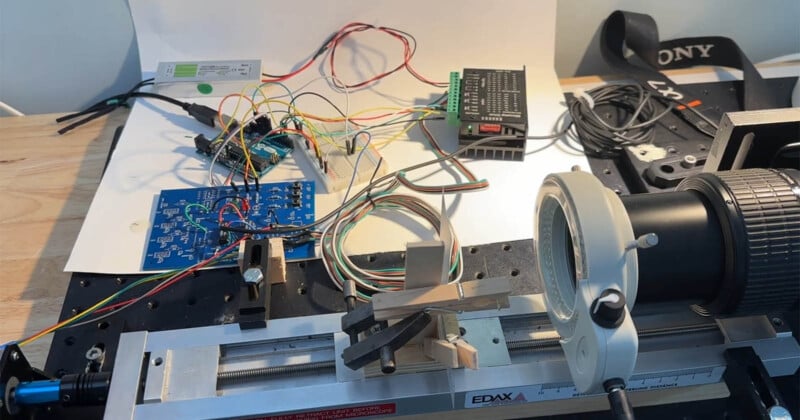
Each year, my photographic instrumentation students build very simple focus stacking systems. After several years, I decided to construct a more advanced version that could move a stepper-motor-driven stage to precise positions, automatically collect a series of images, and then manually use a stacking program for combination into a single high-depth-of-field image.
Focus stacking is a powerful digital imaging technique used to achieve greater depth of field (DOF) in photography, macro photography, and microscopy. It involves capturing multiple images at different focus points and combining them into a single sharp image. This technique is essential for situations where a single exposure cannot keep the entire subject in focus, such as macro photography.
 The tongue of a red-bellied woodpecker (Melanerpes carolinus) The tongue of a red-bellied woodpecker has evolved specialized barbs for pulling insects from holes. Photographed with the author’s system at 4.5× using a Canon 65 mm macro lens. Here, 35 images were combined into one with enhanced depth of field using the program Helicon Focus (depth map render method).
I am always surprised to discover that many photographers do not know what focus stacking is and how it is used. In the simplest form, as applied to macro photography, focus stacking is the art of collecting an image, moving the subject a fraction of the depth of field, and taking another image until the region of interest is covered. Each image is collected at the highest resolution that the lens can collect. The resulting stack of images is combined into one image using special tools in programs like Photoshop, Helicon Focus, or Zerene Stacker. My favorite program for this application is Helicon Stacker, which is fine-tuned for this application.
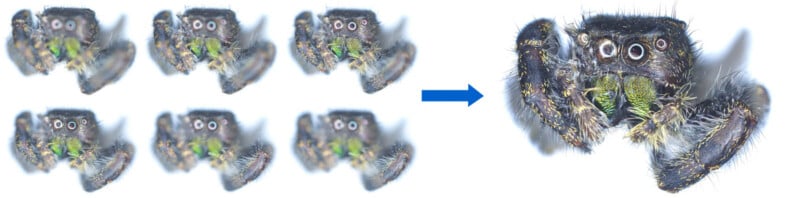 An example of the focus stacking process where numerous images are combined into one image with a large depth of focus.
There are focus stacking systems on the market, but each of these has limitations, whether it is the stability of the rail over long distances, the price tag, or the fact that there are desired features that are missing. When you build your own system, you can design it any way you want.
My system is designed around the Canon MP-E 65mm f/2.8 1-5x Macro Photo Lens that covers a magnification of 1x to 5x. The lens is very well documented by the manufacturer, and this information is provided in the lens user guide.
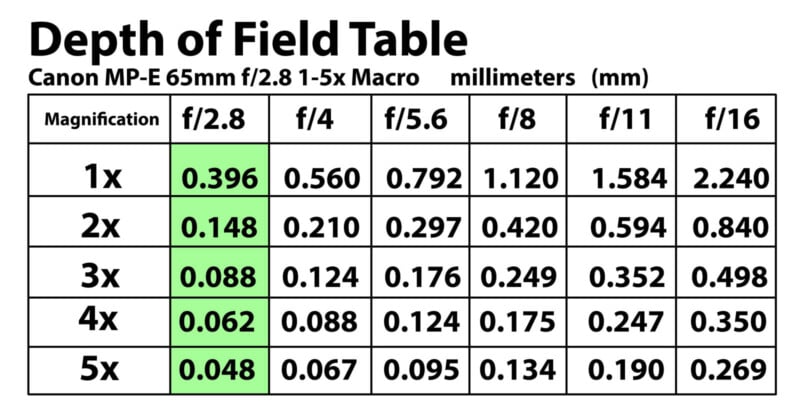
This data is from the Canon lens manual and has been reformatted in Photoshop. The Green areas are the areas of highest resolution, and the rest of the chart is not used for high-resolution focus stacking. A photographer can go to a higher f-number to get a larger depth of field, but this will cause a loss of resolution. There are times when a photographer moves to a higher f-number to decrease the number of required images to cover an area and thus decrease photography time and decrease the use of computer memory.
To set the depth of a focus stacking stage, a general rule of thumb is to take the Depth of Field (DOF) and cut the distance in half. One example for the 2X setting at f/2.8 would be to have the focus stacking rail move a distance of 0.074 mm.
Focus stacking can yield excellent results with the right subjects. For example, fuzzy subjects with many overlapping hairs often produce confusing images, while smooth objects like insect eyes combine cleanly in software to create sharp, detailed results.
The use of focus stacking is often a balance between time investment and the intended purpose of the final image. It is easy to spend far too much time perfecting an image that may ultimately be reduced to the size of a postage stamp.
This project begins with obtaining a reliable positioning rail. I recommend buying a used rail, and recently I discovered that automated pipette machines contain very high-quality rails as well as two excellent stepper motors. These machines are frequently updated, so their components are currently flooding eBay. The directions provided here are designed around an Adafruit 12-volt stepper motor, which is inexpensive, widely available, and an excellent choice for learning.
 To control the stepping motor a TB6600/TB6660 stepper driver using the AccelStepper library. This controller can operate a number of different stepping motor configurations and is very versatile. The stepping motor controller is very reasonably priced at around ten dollars.
The resolution of the linear stage is a combination of the pitch of the drive thread and the steps per revolution of the stepping motor. My stage has a pitch of 20 threads per inch, which means the thread must turn 20 times to move 1 inch. The stepping motor takes 200 steps to make one revolution, so one inch is 4000 steps, or each step is .00025 inches or 6.35um per step. This system is designed for macro photography, where the lens f# and magnification will determine the depth of field. This resolution of the stage will work well for my applications.
The advantage of the 12VDC stepping motor supplied by Adafruit is that the wiring pattern is well known, and the experimenter will not waste a lot of time trying to figure out what wire is connected to what. The motor is a Bipolar Stepper Motor Hybrid Frame Size 17 200.0 Step per revolution and uses 350 mA at 12VDC and costs around 14 US dollars.
The stepping motor controller is a modern marvel. The side of the controller has several switches that will tell the controller the steps per revolution of the motor as well as the current requirements. Gone are the days of making controllers on your own. The controller takes a command and will automatically move the stepping motor forward or backward.
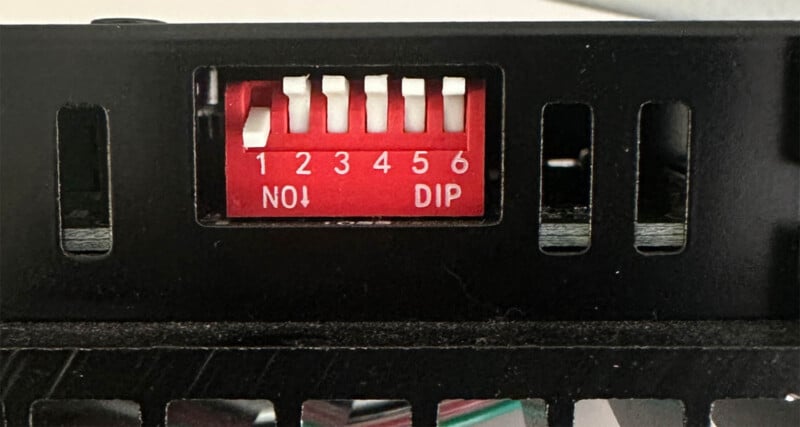 The TB6600/TB6660 stepper driver has setup switches on the side. Here the switches are set for the 12VDC Adafruit 200 pulse/rev stepping motor.
The 12 VDC power supply used here is a common unit sold for LED lighting and is very reasonably priced. The push buttons to control forward, reverse, and start are standard Arduino components.
The requirement for this project was to create a simple focus stacking system that any student could build. To interface with the Arduino, I decided to use as few buttons as possible.
The step distance between each image, the pause time for capturing each photograph, and the total number of images must all be entered directly in the Arduino code. After the sequence is complete, the stage automatically returns to its home position. The Arduino program provided below serves as a good starting point for designing more complex control code.
The intended workflow is straightforward: the user moves the stage to the starting focus position, presses the Start button, and lets the Arduino handle the rest. The stage moves away from the camera as the sequence of focus stacking images is collected.
The Buttons
1 The Start Button → Saves the home position, starts the step sequence. The stepper moves forward stepDistance for NumberOfPictures steps → Waits a time in seconds between each picture. After sequence completion → Automatically returns to home (original position).
2 Manual forward button works independently when sequence is not running.
3 Manual return button works independently when sequence is not running.
Forward and Backward LEDs indicate direction of stage.
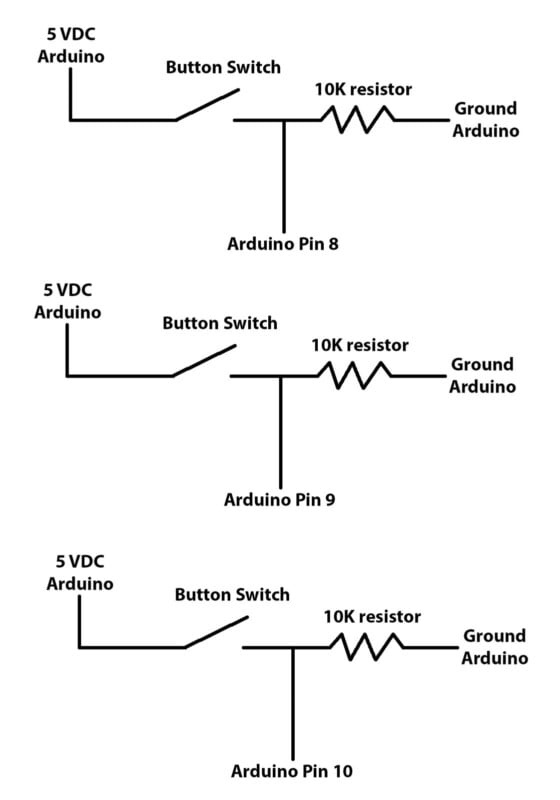 Each of the buttons use a 10kilo ohm pull down resistor, to allow current to flow to ground. This allows the code to be triggered by a pin going high to 5 volts.
Circuit to Trigger the Camera Shutter
The camera shutter triggering uses two reed solenoids.
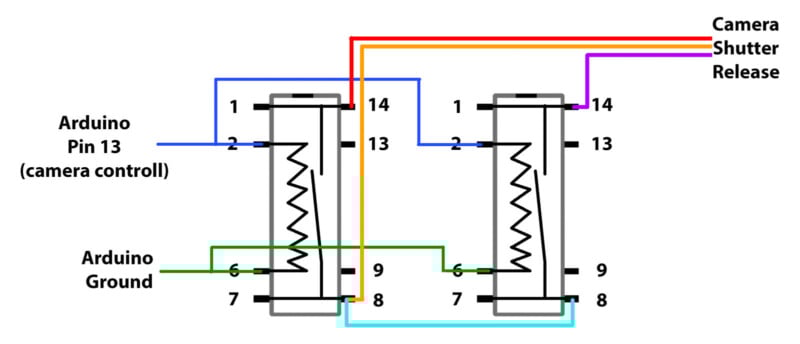 The reed solenoids are not super-fast, but work well at creating total electrical isolation between an expensive camera and the Arduino circuit. The majority of cameras look for a focus trigger and a shutter trigger, but if all three control wires are connected around the same time, the camera will trigger. This circuit works well for standard Canon, Nikon, and Sony cameras. The reed relays here are MEDER DIP05-1A57-BV350.
To get visual feedback that the circuit is doing what it should, I use several LEDs. These signal the forward, backward motion, and the focus stacking program is running.
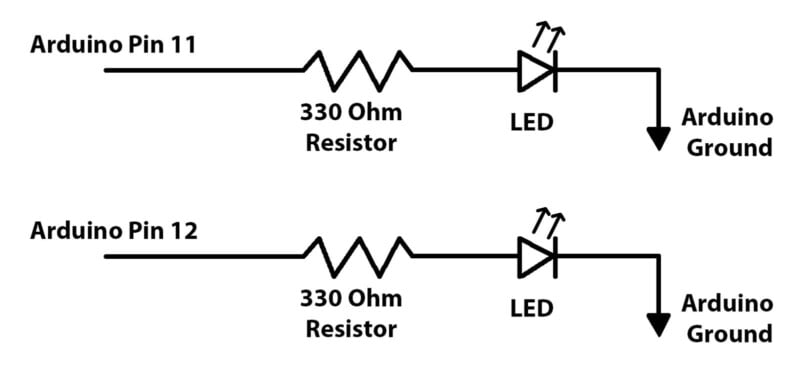
I like to use a green LED for forward and a red LED for reverse motion. Here, the current through the LEDs is limited by a 330 ohm resistor. If the LEDs are
Program for Arduino
/*
2025FinalFocusStacking.ino
Stepper1 is 200 steps per rev.
Each step is a sequence of 8 pulses controlled by a
TB6600/TB6660 stepper driver using the AccelStepper library.
This represents a distance of 6.3um with a standard Adafruit stepping motor.
Modified:
- StartButton triggers a focus stacking sequence.
- Forward and Backward buttons control movement directly.
- Home position is recorded when StartButton is pressed, and the stepper returns to that position after the sequence.
Author: Ted Kinsman (August 2025, [email protected])
*/
// Include the AccelStepper library for smooth motion control
#include
// Define button pins for manual and automatic control
#define ForwardButton 8 // Button for moving forward on Arduino pin 8
#define BackButton 9 // Button for reversing on Arduino pin 9
#define StartButton 10 // Button to start the focus stacking on Arduino pin 10
#define ShutterTrigger 13 // Camera trigger on Arduino pin 13
// Define LED indicators
#define ForwardLED 11 // LED to indicate forward movement on Arduino pin 11
#define BackLED 12 // LED to indicate reverse movement on Arduino pin 12
// Define stepper motor connections
#define dirPin1 3 // Stepper direction pin on Arduino pin 3
#define stepPin1 2 // Stepper step pin on Arduino pin 2
#define enPin 4 // Enable pin for TB6600 driver on Arduino pin 4
// Motion parameters
const int moveSpeed = 2000; // Maximum speed (steps per second)
const int accel = 1000; // Acceleration (steps per second^2)
// Stepper movement variables
int stepDistance = 50; // Distance the motor moves for each image
int NumberOfPictures = 25; // Total number of images to capture
bool sequenceRunning = false; // Flag to track if sequence is running
long homePosition = 0; // Variable to store the dynamic home position
// Create an instance of AccelStepper class
AccelStepper stepper1(AccelStepper::DRIVER, stepPin1, dirPin1);
void setup() {
// Configure pin modes
pinMode(enPin, OUTPUT);
pinMode(ForwardLED, OUTPUT);
pinMode(BackLED, OUTPUT);
pinMode(ShutterTrigger, OUTPUT);
pinMode(ForwardButton, INPUT);
pinMode(BackButton, INPUT);
pinMode(StartButton, INPUT);
// Enable stepper driver (LOW = enabled for most TB6600/TB6660 drivers)
digitalWrite(enPin, LOW);
// Configure stepper motor properties
stepper1.setMaxSpeed(moveSpeed);
stepper1.setAcceleration(accel);
// Start serial communication for debugging
Serial.begin(9600);
Serial.println("Stepper motor ready. Press Start button to begin sequence.");
}
void loop() {
// Check if StartButton is pressed and sequence is not running
if (digitalRead(StartButton) == HIGH && !sequenceRunning) {
delay(50); // Debounce delay
if (digitalRead(StartButton) == HIGH) { // Double-check if still HIGH
sequenceRunning = true; // Mark sequence as running
// Set the current position as the home position
homePosition = stepper1.currentPosition();
Serial.print("Start button pressed. Setting home position to: ");
Serial.println(homePosition);
// Ensure button is released before continuing
while (digitalRead(StartButton) == HIGH);
// Execute focus stacking sequence
executeStepSequence();
// Return the stepper to the starting position after sequence is completed
returnToHome();
sequenceRunning = false; // Reset flag after sequence completes
Serial.println("Focus stacking sequence completed. Returned to start position.");
}
}
// Allow manual movement only when no automated sequence is running
if (!sequenceRunning) {
if (digitalRead(ForwardButton) == HIGH) {
moveForward(); // Move forward while button is held
}
else if (digitalRead(BackButton) == HIGH) {
moveBackward(); // Move backward while button is held
}
else {
stopMotor(); // Stop motor if no button is pressed
}
}
}
// Function to execute the focus stacking step sequence
void executeStepSequence() {
digitalWrite(enPin, LOW); // Enable motor current
for (int i = 0; i < NumberOfPictures; i++) { Serial.print("Capturing Picture "); Serial.println(i + 1); // Trigger the camera shutter digitalWrite(ShutterTrigger, HIGH); delay(10); // Allow the camera time to respond digitalWrite(ShutterTrigger, LOW); // Move stepper forward by stepDistance stepper1.move(stepDistance); digitalWrite(ForwardLED, HIGH); // Wait until the stepper completes the movement while (stepper1.distanceToGo() != 0) { stepper1.run(); } // Turn off LED after movement is completed digitalWrite(ForwardLED, LOW); Serial.println("Waiting 3 seconds before next step..."); delay(3000); // Wait 3 seconds before next step } } // **Function to return to the recorded home position** void returnToHome() { Serial.print("Returning to home position: "); Serial.println(homePosition); // Move stepper back to stored home position stepper1.moveTo(homePosition); digitalWrite(BackLED, HIGH); // Indicate returning motion // Wait until the stepper reaches home position while (stepper1.distanceToGo() != 0) { stepper1.run(); } digitalWrite(BackLED, LOW); // Turn off LED after reaching home Serial.println("Stepper returned to starting position."); } // Function to move forward continuously while button is held void moveForward() { digitalWrite(enPin, LOW); // Enable motor current digitalWrite(ForwardLED, HIGH); digitalWrite(BackLED, LOW); stepper1.setSpeed(moveSpeed); stepper1.runSpeed(); } // Function to move backward continuously while button is held void moveBackward() { digitalWrite(enPin, LOW); // Enable motor current digitalWrite(BackLED, HIGH); digitalWrite(ForwardLED, LOW); stepper1.setSpeed(-moveSpeed); stepper1.runSpeed(); } // Function to stop the motor void stopMotor() { digitalWrite(ForwardLED, LOW); digitalWrite(BackLED, LOW); stepper1.stop(); // Ensures stepper stops completely digitalWrite(enPin, HIGH); // Turn off current to the motor Serial.println("Motor Stopped, current disabled."); }
Notes on the Program and the Circuit
The use of stepping motors can be very perplexing to a novice. The stepping motors typical take a lot of current, and high torque motors can get very hot. If the motor does not take a load, like in this application, the motor coils can be turned off, and this keeps the motor from overheating and also conserves energy if the application is running on a battery. The correct sequences of when to turn a stepping motor on and off can be confusing.
The logic in this code uses HIGH values so that when a push button is used the Arduino pin will look for a voltage of 5 volts. I have attached a schematic of the circuit here to help you understand the wiring.
The triggering of the camera is always problematic for my students. Many modern cameras have three wires that control the camera. When two are connected, the camera will focus, and when all three are connected, the camera will take a picture. To easily control the camera, this circuit uses two reed relays. A single pulse will shut both switches and connect all three wires on the camera remote trigger. The reed relays also ensure electrical isolation from the Arduino and the camera.
Project Video
Conclusion
Focus stacking is an essential technique for overcoming depth of field limitations in photography and microscopy. Whether you're capturing microscopic structures or intricate macro shots, this method provides unparalleled image clarity and sharpness. With the help of automated stacking systems and specialized software, focus stacking has become an accessible and indispensable tool for professionals and enthusiasts alike.
About the author: Ted Kinsman is the 2019 recipient of the Schmidt Laureate for outstanding contributions to the progress of biocommunications. Kinsman has worked as an optical engineer, a physicist, and a physics instructor before joining the Photographic Sciences Dept. at RIT. His work has appeared on The Discovery Channel, Crime Scene Investigations (CSI), The X-Files, South Park, The Tyra Banks Show, and The Frozen Planet series. Kinsman is currently an Associate Professor in the School of Photographic Arts and Sciences (SPAS) where he teaches Photographic Instrumentation, Scanning Electron Microscopy, and High-Speed Imaging.

