What if you could turn Claude from a conversational assistant into a development partner that actually does things—safely, securely, and without touching your local machine?
If you’ve been exploring Claude Desktop and wondering how to connect it with real developer tools, Docker MCP Toolkit is the missing piece you’ve been looking for.
Here’s the reality: Today’s AI assistants are brilliant at reasoning and explaining concepts. But when it comes to acting on that knowledge? They’re stuck. They can’t deploy containers, manage repos, or analyze data without trusted tools to bridge that gap.
That’s where Docker MCP Toolkit comes in.
Think of it this way:
- Claude is the reasoning engine—the brain that understands what you want
- Claude Desktop is the translator, turning your requests into actionable commands
- Docker MCP Toolkit is the hand that safely executes those actions in isolated containers
Together, they transform Claude from something that just talks to something that builds alongside you—all through Docker’s trusted, security-hardened workflow.
In this guide, I’ll walk you through setting up Claude Desktop as an MCP client, connecting it to MCP servers running in Docker Desktop, and automating real developer tasks securely and reproducibly.
What if you could turn 4 hours of work into 10 minutes? Imagine taking a screenshot of any app UI—a Stripe checkout page, a dashboard component, anything—and watching Claude recreate it as a fully-tested, production-ready React component, complete with Jest tests, GitHub repo, and deployment. That’s exactly what we’ll build together
What is Model Context Protocol (MCP)?
Before we dive into the setup, let’s clarify what MCP actually is.

Model Context Protocol (MCP) is the standardized way AI agents like Claude connect to tools, APIs, and services. It’s what lets Claude go beyond conversation and perform real-world actions—like deploying containers, analyzing datasets, or managing GitHub repositories.
In short: MCP is the bridge between Claude’s reasoning and your developer stack. And Docker? Docker provides the guardrails that make it safe.
Why use Docker MCP Toolkit with Claude Desktop?
I’ve been working with AI tools for a while now, and this Docker MCP setup is one of the most impressive things I’ve seen. Docker MCP Toolkit bridges Claude’s intelligence with Docker’s trusted developer workflow.
Docker MCP Toolkit doesn’t just connect Claude to your tools—it creates a secure, containerized environment where Claude can work without any risk to your local machine. Every action happens in an isolated container that gets torn down when you’re done. No mess, no security risks, complete reproducibility.
Once connected, Claude Desktop can tap into Docker’s curated MCP servers to automate developer tasks that used to eat up hours of your day. Here’s what that looks like in practice:
- GitHub Integration: Want to create a repo, push some code, or review a pull request? Claude’s got you covered. No more switching between tabs constantly.
- Kubernetes Management: If you’re into K8s (and let’s be honest, who isn’t these days?), Claude can deploy pods, manage services, and even handle Helm charts.
- Data Analysis: Upload a CSV file and watch Claude analyze it, create visualizations, and give you insights you didn’t even know you needed.
- Web Scraping: With Firecrawl integration, Claude can go fetch data from websites and bring it back to you, all formatted and ready to use.
Each of these MCP servers can be enabled directly through the MCP Toolkit in Docker Desktop. The setup is straightforward, the execution is secure, and the results are reproducible every single time.
Setting up Claude Desktop with Docker MCP Toolkit
Prerequisites
Before you begin, make sure you have:
- A machine with 8GB RAM minimum, ideally 16GB
- Install Docker Desktop
Step 1: Install and sign in to Claude Desktop
Head over to claude.ai/desktop and download Claude Desktop if you haven’t already. The installation is pretty straightforward – just follow the prompts. Once it’s installed, sign in with your Anthropic account.
Step 2: Enable Docker MCP Toolkit
Open Docker Desktop and enable the MCP Toolkit from the Settings menu.

Step 3. Connect Claude Desktop as MCP Client
Click “MCP Toolkit” in the left sidebar of Docker Desktop and click on “Connect” under Claude Desktop.
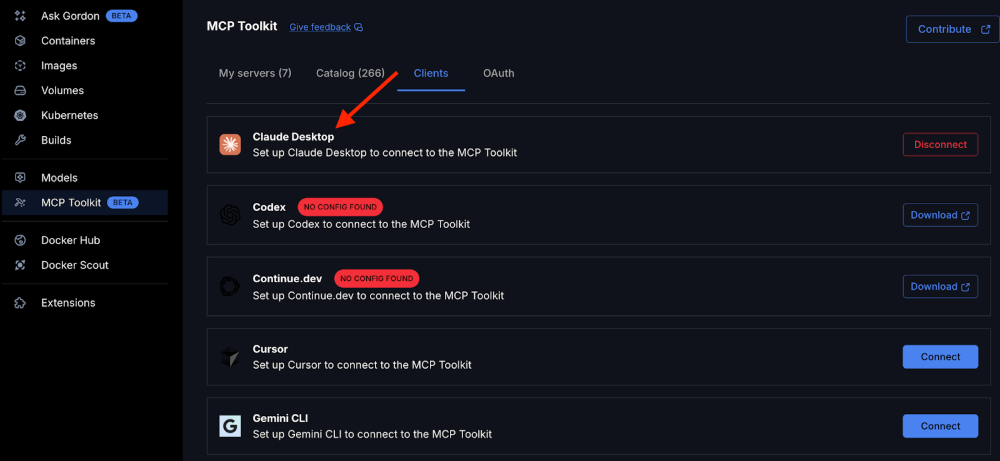
Step 4. Verify the MCP_DOCKER connection
Restart Claude Desktop and verify that the MCP_DOCKER connection appears under the Claude Desktop menu.

Step 5. View the Claude Configuration
You can view the Claude configuration file claude_desktop_config.json accessible via Claude > Settings > Developers > Edit Config.
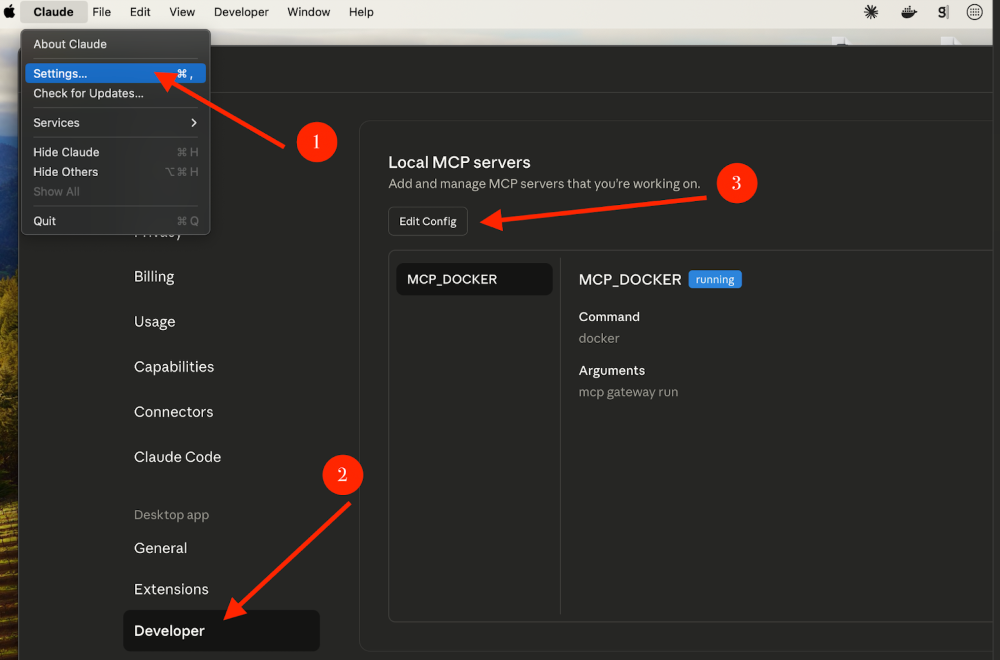
Click “Edit Config” and open it via Visual Studio Code or your preferred IDE.
How it works
When you connect Claude Desktop to Docker MCP Toolkit, this configuration gets added to Claude Desktop’s claude_desktop_config.json file:
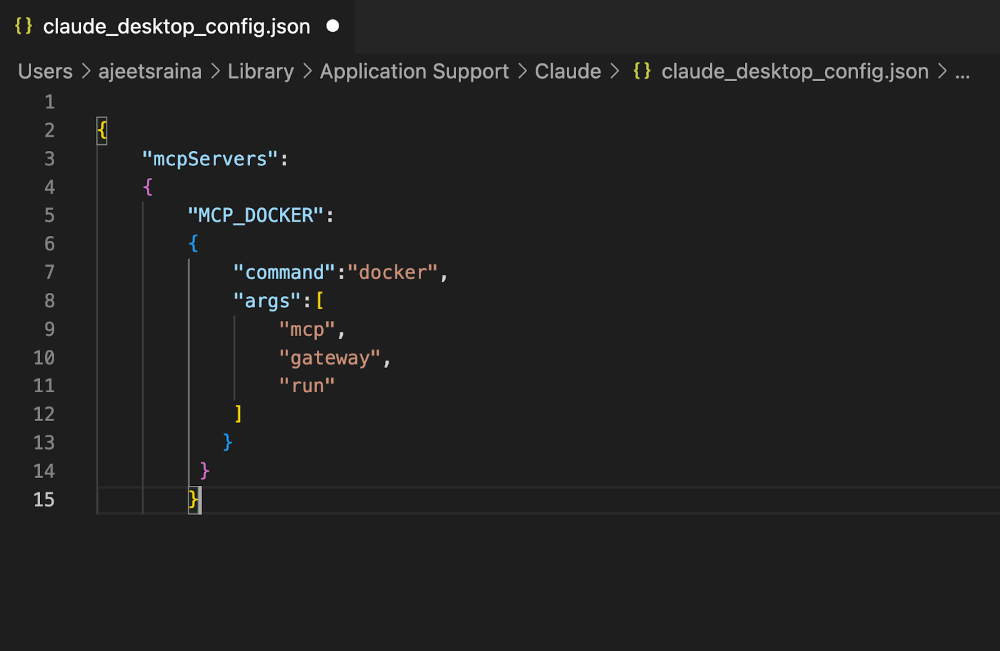
Here’s what each part does:
- mcpServers: The parent object that defines all MCP server connections available to Claude Desktop
- “MCP_DOCKER”: The name identifier for this connection. This is what you’ll see referenced in Claude Desktop’s settings and logs
- “command”: “docker”: Tells Claude Desktop to use the Docker CLI as the execution command
- “args”: [“mcp”, “gateway”, “run”]: The arguments passed to Docker, which translate to running:
What this actually does
When Claude Desktop needs to access MCP tools, it executes docker mcp gateway run, which:
- Starts the Docker MCP Gateway – This acts as the central router/bridge
- Connects Claude Desktop (MCP client) to all enabled MCP servers in Docker Desktop
- Routes tool requests from Claude → Gateway → Appropriate MCP Server → Back to Claude
- Runs everything in isolated containers for security and reproducibility
In simple terms:
Think of it like this:
- Claude Desktop = Your AI assistant (the client)
- Docker MCP Gateway = The switchboard operator (the router)
- MCP Servers = The actual tools (GitHub, Firecrawl, Node.js Sandbox, etc.)
This one configuration line is what makes all the magic happen—it’s the handshake that lets Claude safely access and execute all those containerized developer tools.
Where to find this file:
- macOS: ~/Library/Application Support/Claude/claude_desktop_config.json
- Windows: %APPDATA%\Claude\claude_desktop_config.json
Note: When you click “Connect” in Docker Desktop’s MCP Client settings, this configuration gets added automatically—you don’t need to edit it manually.
Real-World Demo: From Screenshot to Deployed App (With Tests!)
Now that you’ve connected Claude Desktop to Docker MCP Toolkit, let’s see it in action with a practical example. What if you could take a screenshot of any app, and have Claude recreate it with working code AND full test coverage in minutes?
The Problem
Right now, the typical workflow looks like this:
- Designers create mockups
- Developers manually rebuild them in code
- QA writes and runs tests
- Repeat until it works
It’s slow, manual, and riddled with back-and-forth communication gaps.
The Solution
Claude Desktop + Docker MCP Toolkit automates all three steps. You provide a screenshot, and Claude handles the rest—analysis, code generation, testing, debugging, and deployment.
What You’ll Build
A functional React component from a screenshot, complete with:
- Jest unit tests
- A GitHub repo (basic structure)
- Configuration files (package.json, babelrc.js, gitignore)
- Files ready for download
Note: This is a code foundation, not production deployment. Does NOT include: CI/CD, live deployment, Playwright tests, or a11y validation.
The Demo Setup
For this demonstration, we’ll use five MCP servers:
- Firecrawl – Captures and analyzes screenshots
- Node.js Sandbox – Runs tests, installs dependencies, validates code (in isolated containers)
- GitHub – Handles version control and deployment
- Sequential Thinking – Debugs failing tests and optimizes code
- Context7 – Provides code documentation for LLMs and AI code editors
The Walkthrough (Step-by-Step)
|
Phase 1: Screenshot to Component |
– You provide a screenshot, could be a Stripe checkout page, a dashboard card, whatever UI you need. – Claude analyzes the layout, identifies components, measures spacing, captures colors, and generates a React/Next.js component that matches the design. |
|
Phase 2: Generate Test Suite |
– Jest unit tests for component logic (41 tests covering rendering, interactions, filters and state management). |
|
Phase 3: Run & Debug with Node.js Sandbox |
This is where Docker really shines – The Node.js Sandbox MCP spins up an isolated container, installs all dependencies safely, and runs your test suite. – Everything happens in a sandboxes environment; nothing touches your local machine. – If tests fail? Sequential Thinking kicks in. Claude iterates, fixes the code, spins up a fresh container, and runs the tests again. It repeats this loop until everything passes. |
|
Phase 4: Deploy to GitHub |
Once tests are green: – Claude creates a GitHub repo with proper structure – Pushes the code |
The Results:
- Before: A screenshot of a UI
- After: A fully tested, deployed, production-ready component
Time saved: What used to take 4 hours now takes 10 minutes.
Why This Matters
- Security First
Code runs in isolated containers, not on your machine. No risk of malicious code affecting your system. Every execution has an audit trail. - Reproducibility
Same Docker image = same results, every time. Works on your machine, your teammate’s machine, and in CI/CD. No more “works on my machine” excuses. - Speed + Safety
Test potentially dangerous AI-generated code without fear. Iterate quickly in isolated environments. Roll back instantly if something breaks. - Visibility
See exactly what’s running and where. Monitor resource usage in Docker Desktop. Access full logs and debugging capabilities.
Configure MCP Servers
Assuming that Docker MCP Toolkit is already configured with Claude Desktop, follow the below steps to configure and add MCP servers.
Click “MCP Toolkit” and select “Catalog” to search for the following MCP servers and add them one by one.
- Firecrawl (web scraping, screenshots)
- GitHub Official (repo management, PRs, issues, commits)
- Sequential Thinking (systematic problem-solving)
- Context7 (up-to-date code documentation for LLMs and code editors)
Note:
The Node.js Sandbox MCP server implements Docker-out-of-Docker (DooD) pattern by mounting /var/run/docker.sock, giving the sandbox container full Docker daemon API access. This allows it to spawn ephemeral sibling containers for code execution – when Claude requests JavaScript execution, the sandbox container makes Docker API calls to create temporary Node.js containers (node:lts-slim, Playwright, etc.) with resource limits (512MB RAM, 0.75 CPU cores), executes the code in isolation, and auto-removes the container.
The Docker socket mount is a privilege escalation vector (effectively granting root-level host access) but enables dynamic container orchestration without the overhead of true Docker-in-Docker. Files are persisted via volume mount to ~/Desktop/sandbox-output, mapped to /root inside execution containers. This architecture trades security for flexibility – acceptable for local development but requires Docker Scout vulnerability scanning and careful consideration for production use. Hence, you’ll require a separate entry for Node.js Sandbox MCP server in the Claude configuration file. You’ll see how to configure later in this article.

Configure Firecrawl MCP Server
The Firecrawl MCP server gives Claude Desktop the ability to add powerful web scraping and search capabilities. To setup a Firecrawl MCP server, you’ll need Firecrawl API key via https://www.firecrawl.dev/app/api-keys. Create a new account if you’re visiting the https://www.firecrawl.dev/ portal for the first time. Click “API Keys’ on the left sidebar to get the new API keys created.
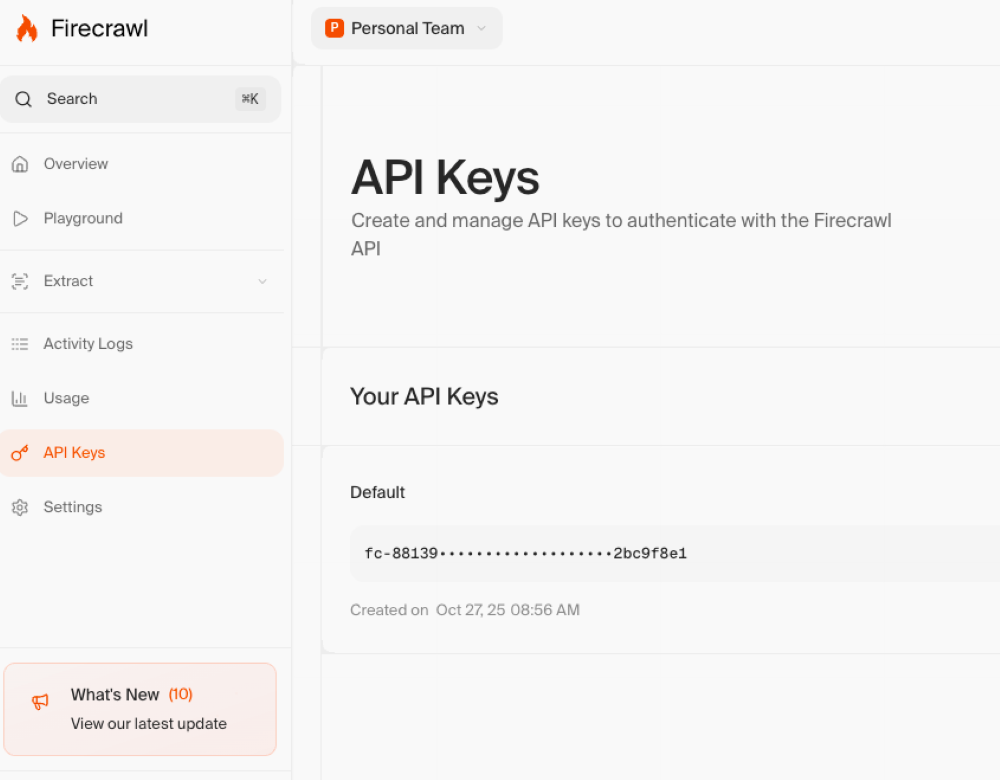
In Docker Desktop:
- Open Docker Desktop → MCP Toolkit → Catalog
- Search for “Firecrawl”
- Find Firecrawl in the results
- Select Configurations
- Add Firecrawl API Keys (firecrawl.api_key) that you created earlier
- Leave all the other entries blank
- Click Save and Add Server
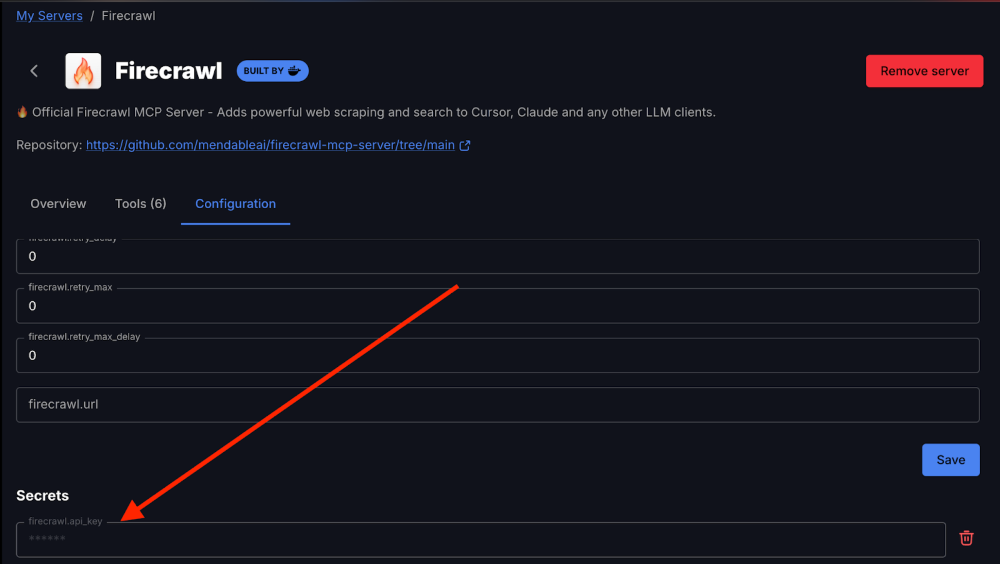
The Firecrawl MCP server should now appear under “My Servers” in Docker MCP Toolkit.
What you get:
- 6+ Firecrawl tools including:
- firecrawl_check_crawl_status – check the status of a crawl job.
- firecrawl_crawl – Starts a crawl job on a website and extracts content from all pages.
- firecrawl_map – Map a website to discover all indexed URLs on the site
- firecrawl_extract – Extract structured information from web pages using LLM capabilties.
- firecrawl_scrape -Scrape content from a single URL with advanced options.
- firecrawl_search – Search the web and optionally extract content from search results.
Configure GitHub Official MCP Server
The GitHub MCP enables Claude Desktop to create issues, PRs, and manage repositories on your behalf.
Option 1: OAuth Authentication (Recommended – Easiest)
- In MCP Toolkit → Catalog, search “GitHub Official”
- Click + Add
- Go to the OAuth tab in Docker Desktop
- Find the GitHub entry
- Click “Authorize”
- Your browser opens GitHub’s authorization page
- Click “Authorize Docker” on GitHub
- You’re redirected back to Docker Desktop
- Return to Catalog tab, find GitHub Official
- Click Start Server
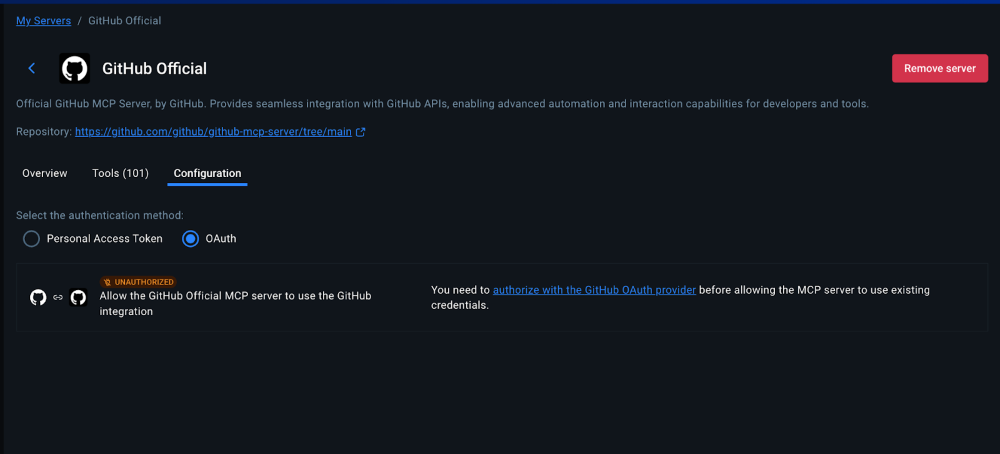
Advantage: No manual token creation. Authorization happens through GitHub’s secure OAuth flow with automatic token refresh.
Option 2: Personal Access Token (For Granular Control)
If you prefer manual control or need specific scopes:
Step 1: Create GitHub Personal Access Token
- Go to https://github.com and sign in
- Click your profile picture → Settings
- Scroll to “Developer settings” in the left sidebar
- Click “Personal access tokens” → “Tokens (classic)”
- Click “Generate new token” → “Generate new token (classic)”
- Name it: “Docker MCP Browser Testing”
- Select scopes:
- repo (Full control of repositories)
- workflow (Update GitHub Actions workflows)
- Click “Generate token”
- Copy the token immediately (you won’t see it again!)
Step 2: Configure in Docker Desktop
- In MCP Toolkit → Catalog, find GitHub Official
- Click + Add (if not already added)
- Go to Configuration tab
- Select “Personal Access Token” as the authentication method
- Paste your token
- Click Start Server
Or via CLI:
Configure Sequential Thinking MCP Server
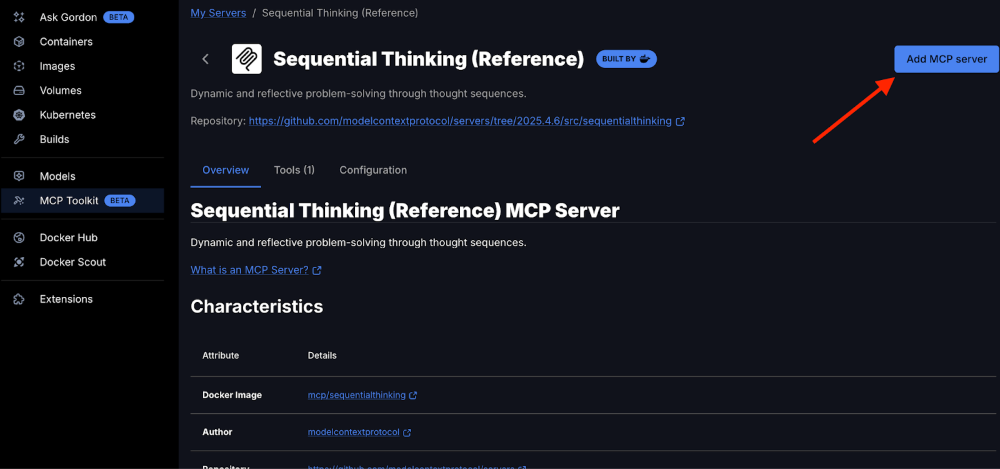
The Sequential Thinking MCP server gives Claude Desktop the ability for dynamic and reflective problem-solving through thought sequences. Adding the Sequential Thinking MCP server is straightforward – it doesn’t require any API key. Just search for Sequential Thinking in the Catalog and get it to your MCP server list.
In Docker Desktop:
- Open Docker Desktop → MCP Toolkit → Catalog
- Search for “Sequential Thinking”
- Find Sequential Thinking in the results
- Click “Add MCP Server” to add without any configuration
The Sequential Thinking MCP MCP server should now appear under “My Servers” in Docker MCP Toolkit.
What you get:
- A single Sequential Thinking tool that includes:
- sequentialthinking – A detailed tool for dynamic and reflective problem-solving through thoughts. This tool helps analyze problems through a flexible thinking process that can adapt and evolve. Each thought can build on, question, or revise previous insights as understanding deepens.
Configure Node.js Sandbox MCP Server
The Node.js Sandbox MCP enables Claude Desktop to spin up disposable Docker containers to execute arbitrary JavaScript. To get it added to the Claude Desktop, replace the contents of the Claude Desktop configuration file with the following JSON structure. This configuration tells Claude Desktop to start the Node.js Sandbox with access to specific directories:
Before you restart your Claude Desktop, make sure that the /Users/YOUR_USERNAME/Desktop/sandout-output directory exists on your local system and this directory is made available to containers via Docker Desktop > Settings > Resources > File Sharing.
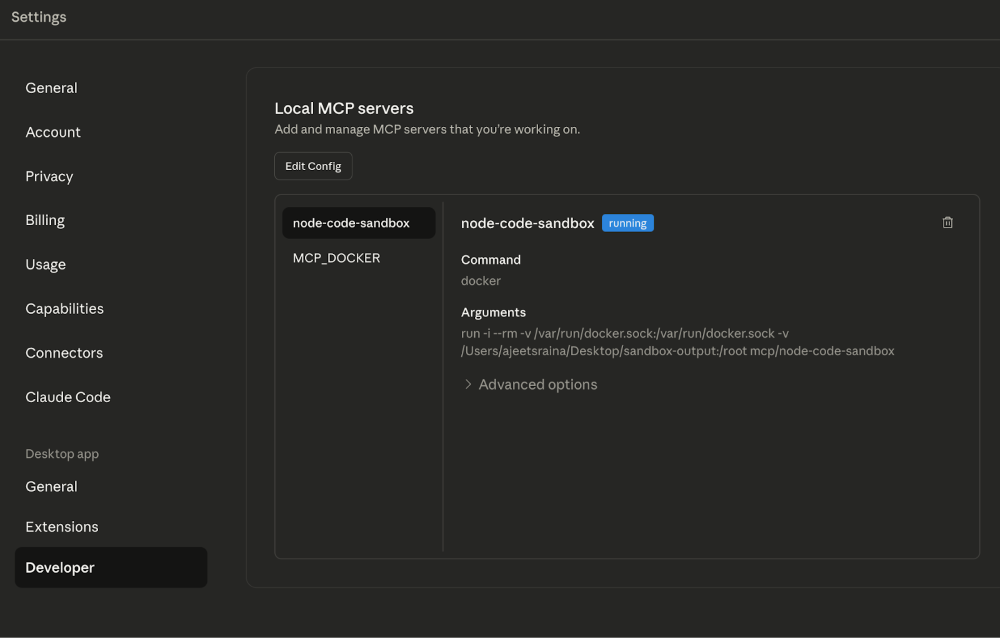
What you get:
- 7 Node.js Sandbox tools including:
- get_dependency_types – Given an array of npm package names (and optional versions), fetch whether each package ships its own TypeScript definitions or has a corresponding @types/… package, and return the raw .d.ts text. Useful whenwhen you’re about to run a Node.js script against an unfamiliar dependency and want to inspect what APIs and types it exposes.
- run_js- Install npm dependencies and run JavaScript code inside a running sandbox container.
- run_js_ephermeral – Run a JavaScript snippet in a temporary disposable container with optional npm dependencies, then automatically clean up.
- sandbox_exe – Execute one or more shell commands inside a running sandbox container. Requires a sandbox initialized beforehand.
- sandbox_initialize – Start a new isolated Docker container running Node.js. Used to set up a sandbox session for multiple commands and scripts.
- sandbox_stop – Terminate and remove a running sandbox container. Should be called after finishing work in a sandbox initialized with sandbox_initialize.
- search_npm_packages – Search for npm packages by a search term and get their name, description, and a README snippet.
Configure Context7 MCP Server
The Context7 MCP enables Claude Desktop to access the latest and up-to-date code documentation for LLMs and AI code editors. Adding Context7 MCP server is straightforward. It doesn’t require any API key. Just search for Context7 in the Catalog and get it added to the MCP server lists.
In Docker Desktop:
- Open Docker Desktop → MCP Toolkit → Catalog
- Search for “Context7”
- Find Context7 in the results
- Click “Add MCP Server” to add without any configuration
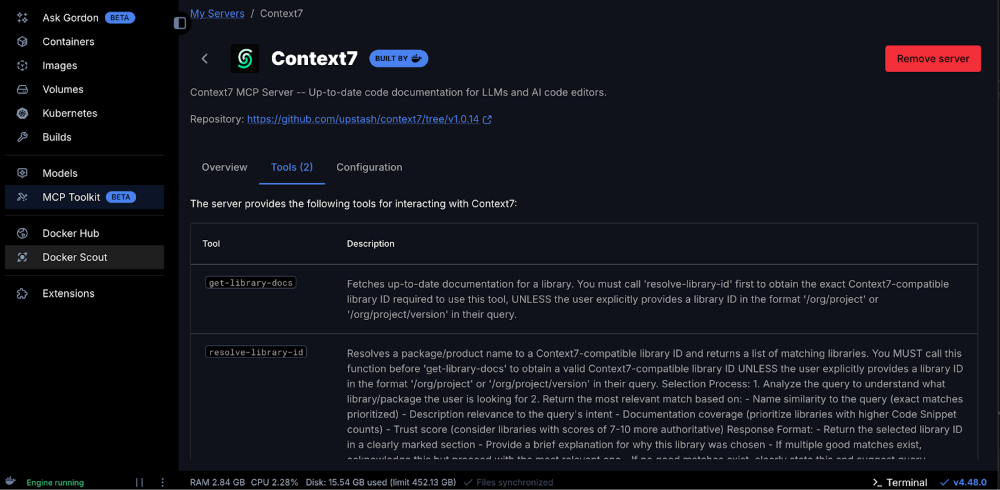
The Context7 MCP server should now appear under “My Servers” in Docker MCP Toolkit
What you get:
- 2 Context7 tools including:
- get-library-docs – Fetches up-to-date documentation for a library.
- resolve-library-id – Resolves a package/product name to a Context7-compatible library ID and returns a list of matching libraries.
Verify the available tools under Claude Desktop
Once you have added all the MCP servers, click “Disconnect” and “Connect” so as to see the various MCP tools under MCP_DOCKER.
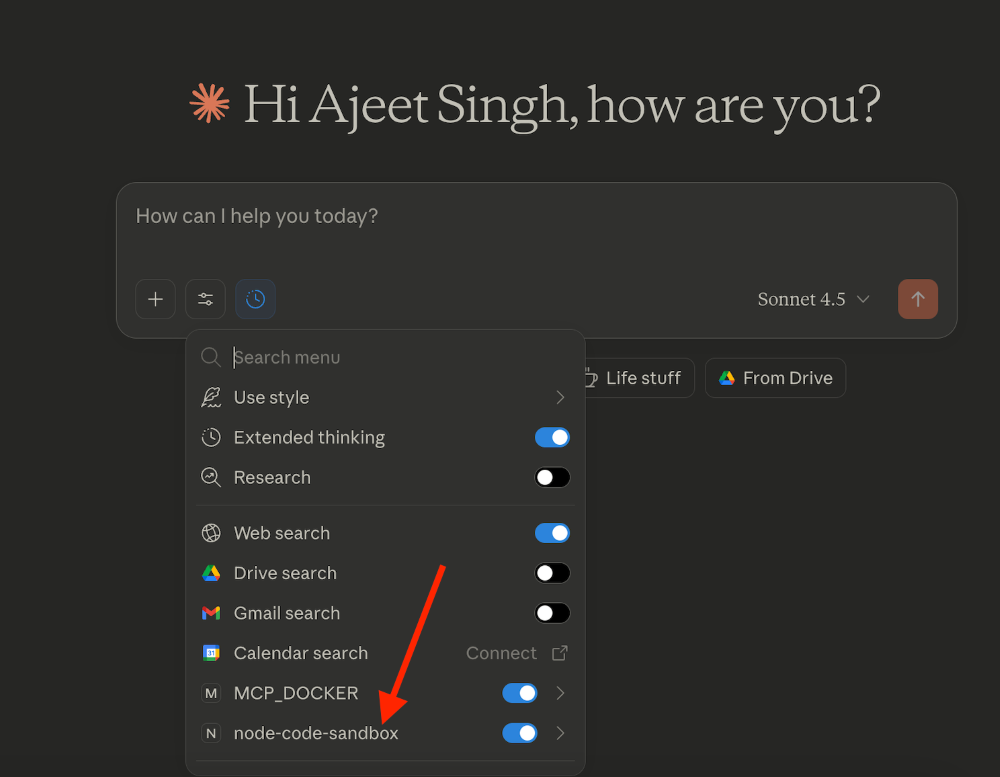
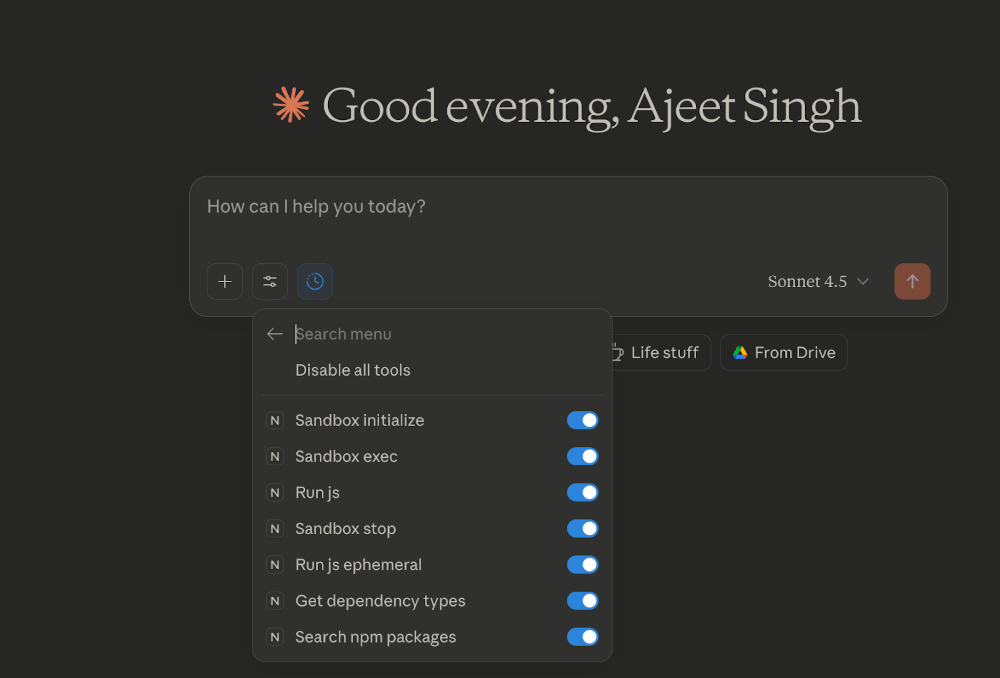
That’s it. It’s time to start interacting with your MCP servers and tools.
Let’s Test it Out
Prompt 1:
Ensure that you upload the screenshot

Here’s how Claude Desktop responds.
Within minutes, Claude will:
- Analyze the design
- Generate the component
- Write comprehensive tests
- Run them in an isolated Docker container
- Debug any failures
- Push the final code to GitHub with a live repo link


Example Result: https://github.com/ajeetraina/resources-browser-component

You should be able to verify if Node.js Sandbox container is running or not using Docker Dashboard. The logs show the MCP (Model Context Protocol) server successfully initializing inside a Docker container. The container starts a scavenger process that will automatically clean up after 1 hour of inactivity (checking every 60 seconds). It then performs a handshake announcing it supports MCP Protocol 2025-06-18 and server version 1.3.0.
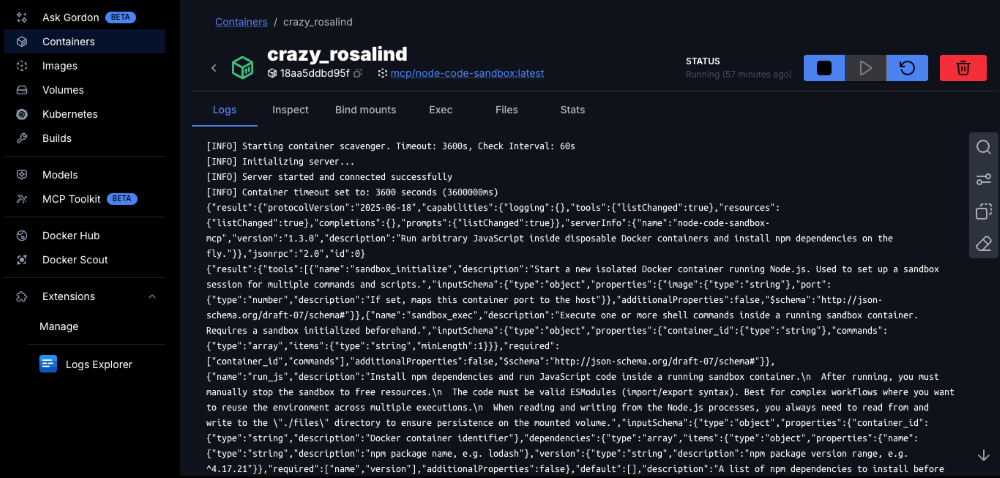
The server registers 7 tools for JavaScript execution:
- sandbox_initialize (create persistent containers),
- sandbox_exec (run shell commands),
- run_js (run JS in persistent container),
- run_js_ephemeral (one-shot JS with auto-cleanup),
- sandbox_stop (cleanup),
- get_dependency_types (fetch TypeScript definitions), and
- search_npm_packages (search npm registry).
All tools that execute JavaScript require ESModules syntax and use the ./files directory for file persistence. The server is fully operational and ready to execute code!
Wrapping Up
You’ve just witnessed how Docker MCP Toolkit transforms Claude Desktop from a chat assistant into a genuine development partner.
What used to require hours of manual work—analyzing designs, writing code, creating tests, debugging failures, setting up repos—now happens in minutes with a single prompt.
This is the new paradigm for AI-assisted development. You’re not just using AI anymore. You’re collaborating with it in a way that’s secure, reproducible, and production-ready.
Ready to try it? Open Docker Desktop to get started with MCP Toolkit (requires v4.48 or newer to launch automatically).
Learn more
- New to Docker? Download Docker Desktop today.
- Explore the MCP Catalog: Discover containerized, security-hardened MCP servers.
- Get started with the MCP Toolkit: Run MCP servers easily and securely.
- Read our MCP Horror Stories for real-life MCP security cases.
.png)

![The Last Messiah by Peter Wessel-Zapffe [pdf]](https://news.najib.digital/site/assets/img/broken.gif)


