.png)

Preparing for System Design Interviews? Join ByteByteGo now for a more structured preparation. They are also offering a rare 50% discount now on their lifetime plan.
Hello guys, If you’ve ever been asked “How would you design a rate limiter?” in a system design interview, you’re not alone. This question is a classic — it tests your ability to reason about scalability, data structures, distributed coordination, and performance bottlenecks all at once.
I’ve personally been asked this question twice at mid-to-senior-level interviews, and both times, the discussion went deep — including follow-ups like:
“How would you handle rate limits per user or per URL?”
“How would this work in a distributed environment?”
“How can you ensure consistency between multiple servers?”
In this article, we’ll explore how to design a Rate Limiter step by step — from simple in-memory implementations to scalable distributed architectures.
I’ll also share what worked for me during interviews and what follow-ups you should be prepared for.
If you want to dive even deeper into system design patterns like this, I highly recommend checking out ByteByteGo’s System Design Course — it’s one of the best and most visual ways to master these concepts. They’re currently offering a 50% lifetime discount, which makes it an excellent investment for serious interview prep.
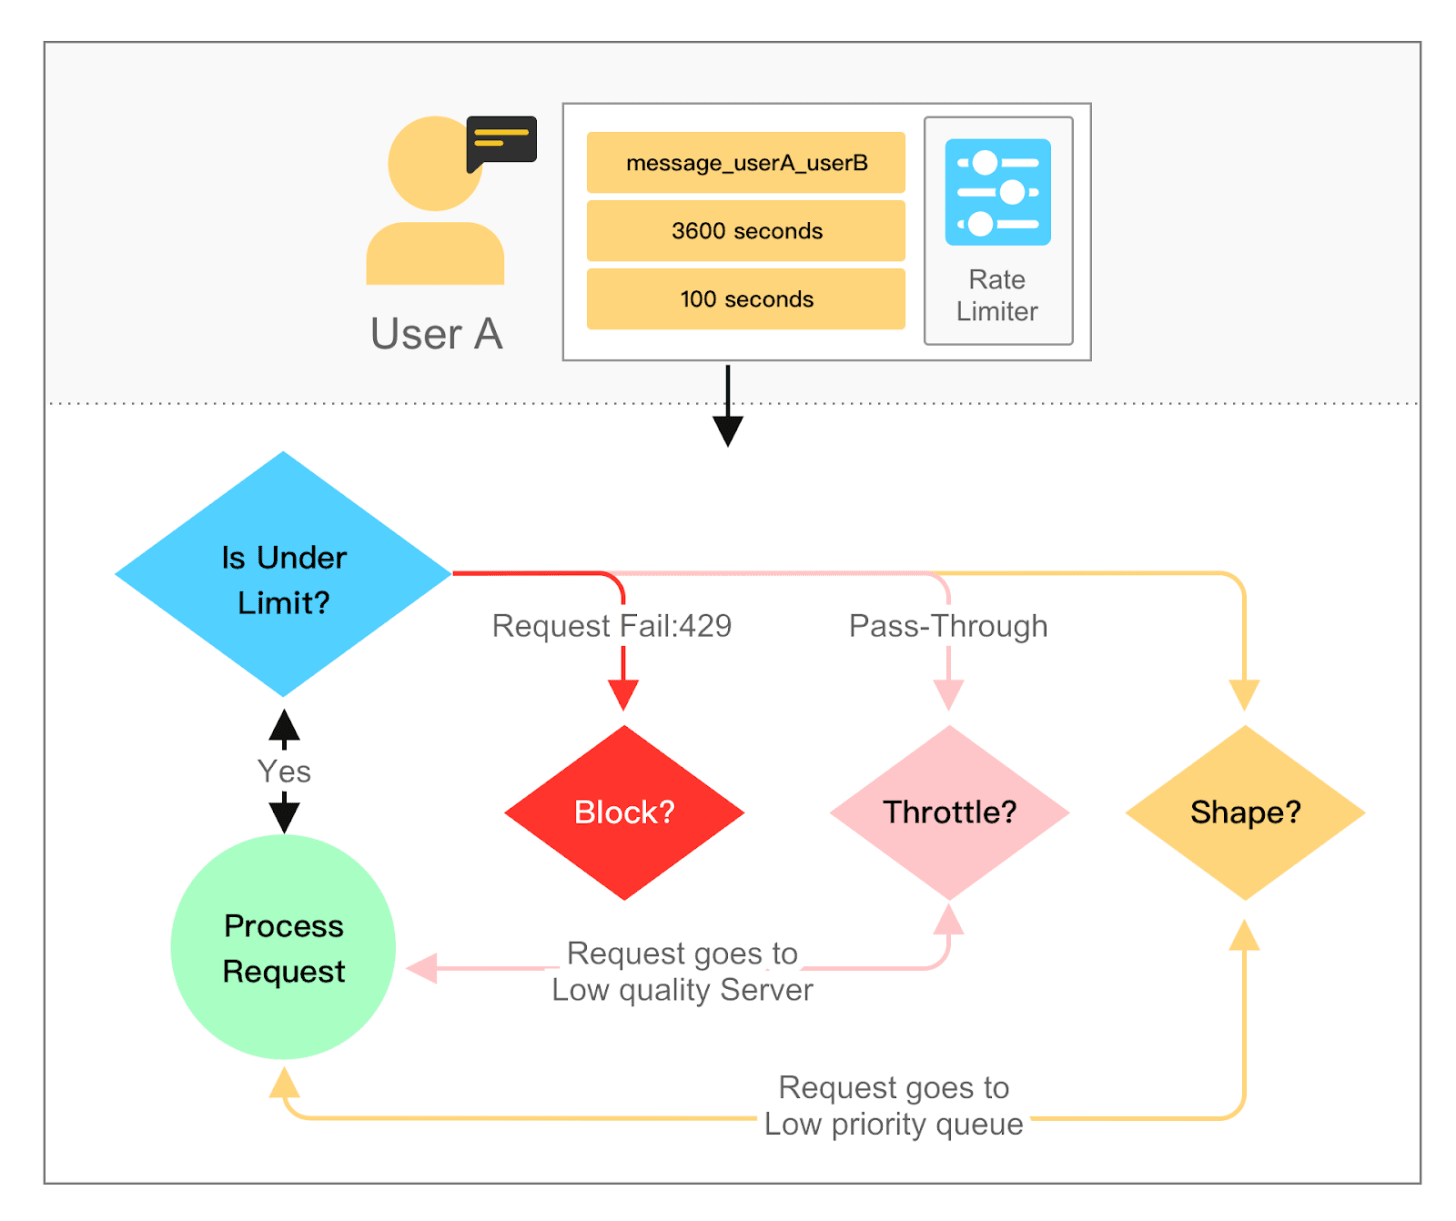
A Rate Limiter controls how many requests a user or client can make within a given time window.
For example:
A user can make at most 100 requests per minute.
An IP can send 10 login attempts per 10 seconds.
The goal is to prevent abuse, maintain system stability, and ensure fair use of resources.
Here is how it looks like and work:
When I first encountered this question, I proposed an array-based sliding window approach. The idea is simple:
Maintain a fixed-size array (or queue) of timestamps for each client.
When a new request arrives:
Remove timestamps older than the current window (e.g., 60 seconds).
Check the current length of the array.
If it’s below the allowed limit, accept the request and append the timestamp.
Otherwise, reject the request.
Example:
import java.util.ArrayDeque; import java.util.Deque; public class RateLimiter { private final int limit; private final long windowSizeInMillis; private final Deque<Long> timestamps; public RateLimiter(int limit, long windowSizeInSeconds) { this.limit = limit; this.windowSizeInMillis = windowSizeInSeconds * 1000; // convert to ms this.timestamps = new ArrayDeque<>(); } public synchronized boolean allowRequest() { long now = System.currentTimeMillis(); // Remove old timestamps outside the window while (!timestamps.isEmpty() && now - timestamps.peekFirst() > windowSizeInMillis) { timestamps.pollFirst(); } if (timestamps.size() < limit) { timestamps.addLast(now); return true; } return false; } public static void main(String[] args) throws InterruptedException { RateLimiter limiter = new RateLimiter(3, 5); // 3 requests per 5 seconds for (int i = 0; i < 10; i++) { System.out.println(”Request “ + i + “: “ + limiter.allowRequest()); Thread.sleep(1000); } } }This approach works perfectly for single-server, per-user rate limiting.
But in interviews, this is just the start. Expect the interviewer to follow up with:
“What happens if you have multiple URLs or distributed servers?”
If different APIs or URLs require separate rate limits — say /login allows 10 req/min but /search allows 100 req/min — you can extend your in-memory structure into a hash map of rate limiters.
rate_limits = { “/login”: RateLimiter(10, 60), “/search”: RateLimiter(100, 60), }When a request comes in, you simply look up the appropriate rate limiter by endpoint.
In interviews, you can describe this as “a per-key rate limiter” — where the key could represent:
A user ID
An API key
An endpoint path
Or a combination (e.g., user + endpoint)
This demonstrates your ability to scale the solution logically without overcomplicating it.
At scale, most production systems use more efficient algorithms like:
Token Bucket: Tokens are added at a fixed rate; requests consume tokens. If no tokens are left, the request is denied.
Leaky Bucket: Requests are queued and processed at a fixed rate (smooths out bursts).
These are O(1) operations — no timestamp cleanup required — making them ideal for high-throughput systems.
A simple token bucket example:
public class TokenBucket { private final int capacity; private double tokens; private final double refillRate; // tokens per second private long lastRefillTimestamp; public TokenBucket(int capacity, double refillRate) { this.capacity = capacity; this.tokens = capacity; this.refillRate = refillRate; this.lastRefillTimestamp = System.currentTimeMillis(); } public synchronized boolean allowRequest() { long now = System.currentTimeMillis(); double elapsedSeconds = (now - lastRefillTimestamp) / 1000.0; // Refill tokens tokens = Math.min(capacity, tokens + elapsedSeconds * refillRate); lastRefillTimestamp = now; if (tokens >= 1) { tokens -= 1; return true; } return false; } public static void main(String[] args) throws InterruptedException { TokenBucket bucket = new TokenBucket(5, 1); // 5 tokens capacity, 1 token/sec refill for (int i = 0; i < 10; i++) { System.out.println(”Request “ + i + “: “ + bucket.allowRequest()); Thread.sleep(500); // simulate requests every 0.5 sec } } }This model is widely used in API gateways, cloud services, and CDNs.
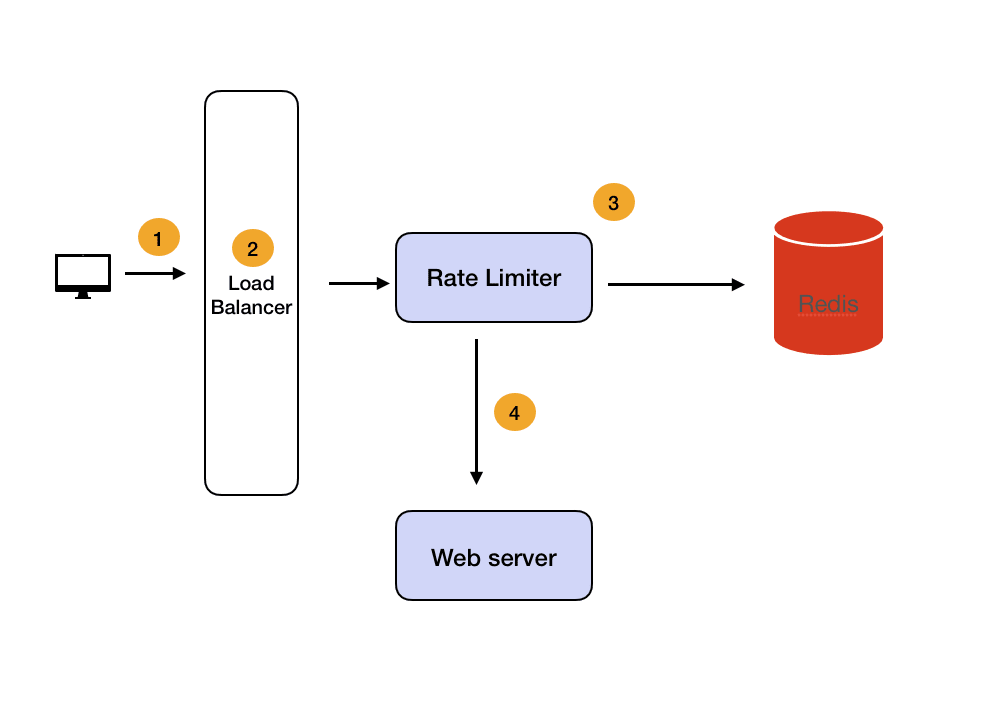
In large systems, requests can be served by multiple servers, so maintaining consistent limits becomes tricky.
Here’s how to handle distributed rate limiting:
Centralized Data Store: Use Redis or Memcached to store counters or tokens.
Redis’ INCR and EXPIRE commands make this simple.
Example: INCR user:123:minute to count requests within a window.
Atomic Operations: Ensure updates are atomic to prevent race conditions.
Sharded Approach: If one Redis node is overloaded, shard by user ID or endpoint hash.
Local Caching: Cache counters locally for frequent users to reduce Redis load.
Bonus: Redis even has built-in support for rate limiting patterns using Lua scripts for atomic control.
Interviewers love follow-ups. Here are common ones:
How would you design different limits for different tiers (e.g., free vs premium)?
How would you monitor and alert if rate limiter is misconfigured?
What happens if Redis goes down?
How would you rate-limit background jobs or internal APIs?
These questions are designed to assess your system thinking — not just code-level design.
Here is a quick revision list for you to remember when to use which rate limiting algorithms?
Algorithm: Fixed Window
- Pros: Simple to implement
- Cons: Allows burst traffic at window edge
- Best Use Case: Low traffic systems
Algorithm: Sliding Window
- Pros: Smooth traffic distribution
- Cons: More memory overhead
- Best Use Case: API gateways
Algorithm: Token Bucket
- Pros: Handles bursts effectively
- Cons: Slightly complex implementation
- Best Use Case: Real-time systems
Algorithm: Leaky Bucket
- Pros: Smooth consistent flow
- Cons: Queue management needed
- Best Use Case: Streaming systems
Rate limiting is one of those core patterns that appears in API Gateway, Microservices, Caching, and Traffic Control questions.
If you want to build mastery across these topics, I highly recommend these courses:
ByteByteGo System Design Course (50% Off) — perfect for mastering concepts visually and preparing for FAANG-level interviews.
DesignGuru System Design Masterclass — another structured resource by ex-FAANG engineers.
Exponent Interview Prep — for mock interviews and feedback.
Educative’s Grokking Modern System Design — classic text-based learning for self-paced learners.
AlgoMonster — for mastering the coding side alongside design interviews.
These platforms complement each other — combining visual learning, coding practice, and mock interview simulation — and ByteByteGo’s lifetime deal in particular is an unbeatable value in 2025.
Designing a rate limiter isn’t just about writing code — it’s about reasoning through trade-offs, scalability, and reliability. You should start simple with an array-based sliding window, then discuss how you’d scale it using token buckets and Redis-based distributed counters.
That’s exactly what interviewers want to see — clarity, evolution, and system-level thinking.
If you’re preparing for your next System Design Interview, now’s the perfect time to invest in yourself. Check out ByteByteGo’s Lifetime Plan (50% Off) — it’s a one-time investment that can dramatically boost your system design confidence and help you ace interviews at top tech companies.
Other System Design articles you may like