.png)


Hi, I’m Xor. As a graphics programmer, my job is essentially to make pixels prettier using math formulas. I work on video effects like lighting, reflections, post-processing, and more for games and animated backgrounds in software.
For fun, I like to unwind by writing compact little shader programs that fit in a “tweet” (280 characters or less). You may have seen some of these posted on X/Twitter. The process of shrinking code while maintaining its functionality is called “code golfing.”
Here’s an animated galaxy I wrote in just 197 characters of GLSL code:
"Milky" #つぶやきGLSL
for(float i=-fract(t/.1),j;i++<1e2;o+=(cos((j=round(i+t/.1))*j+vec4(0,1,2,3))+1.)*exp(cos(j*j/.1)/.6)*min(1e3-i/.1+9.,i)/5e4/length((FC.xy-r*.5)/r.y+.05*cos(j*j/F4+vec2(0,5))*sqrt(i)));o=tanh(o*o); pic.twitter.com/CUTpGGvTH1
This little piece of code runs in real time for every pixel on the screen and generates a unique output color using some fancy math and logic. I build these demos using a tool called Twigl.app , an online shader editor designed for sharing mini-shaders. It makes exporting videos super easy, and in its “geekiest” mode, it also takes care of the generic header code and shortens built-in variable names.
I even managed to fit a voxel DDA raytracer with edge detection into just 190 characters:
Down to 190 characters! #つぶやきGLSL
vec3 p=vec3(t/.1,cos(t+r)),d=r.x/(r.xxy-round(FC.zxy)*2.),a;for(;o.w++<9e2&&snoise3D(a=ceil(p)/28.)+1.>length(a.yz);p+=min(a=fract(-p*sign(d))*abs(d)+1e-4,min(a.y,a.z)).x/d);o.rgb=fwidth(p); pic.twitter.com/odgQhI5Smw
Today, I’d like to explain why I make these, share my creation process, and show you how you can try it yourself if you’re interested. Let’s start with the “why.”
Motivation
Why do I write these? Well, there are several factors. Since I like lists, I’ll go ahead and present them in order of relevance:
- Curiosity and Passion : Sometimes I get struck by a new idea and just want to play around with it. I like Twigl because it helps lower my expectations and lets me start doodling. There’s less room for overplanning, and it’s super easy to jump in.
- Learning and Discovery : Working within constraints forces me to think through problems differently. By optimizing for code size, I often find ways to simplify or approximate. It doesn’t always lead to more performant code (but often it does) and I’ve learned how to squeeze the most out of every byte. Having very little code makes it easier to experiment with formulas and variations without getting overwhelmed.
- Challenge : Writing tiny code is both challenging and stimulating. It keeps my brain sharp, and I’m constantly developing new skills. It’s basically become a game for me. I’ve accidentally learned a ton of math while trying to solve these technical problems.
- Community : I’ve connected with so many interesting people through this process—artists, designers, math folks, game devs, engineers, tech enthusiasts, and more. Sharing my work has led to some exciting encounters. (More on some notable people later!)
So, in short, it’s fun, thought-provoking, and engaging, and it’s a great way to spark interest in graphics programming. Now, what even is a shader?
Shader Introduction
In case you haven’t heard of shaders before, they are programs that run on the GPU (Graphics Processing Unit) instead of the CPU (Central Processing Unit). CPUs excel at complicated or branching operations, which are computed sequentially, one at a time (I’m simplifying here). GPUs are designed to process billions or trillions of predictable operations per second in parallel. This sounds like a lot, but a 4K screen at 60 frames per second outputs nearly 500M pixels per second. Each pixel could have 100s or 1,000s of operations, not to mention anything else the GPU might be used for.
There are several different types of shaders: vertex shaders, fragment shaders, compute shaders, and more, but these tweet shaders are specifically fragment shaders, also known as “pixel shaders,” because they run on every pixel. In essence, fragment shaders take the input fragment coordinates and output a color and opacity (or alpha). Fragment coordinates give you the position of the center of each pixel on screen, so (0.5, 0.5) is the bottom-left (or top-left). One pixel to the right is (1.5, 0.5), and so on to (width – 0.5, height – 0.5). The coordinates variable is called “FC” in Twigl. The output color, “o”, has 4 RGBA components: red, green, blue, and alpha, each ranging from 0.0 to 1.0.
(1.0, 1.0, 1.0, 1.0) is pure white, (0.0, 0.0, 0.0, 1.0) is opaque black, and (1.0, 0.0, 0.0, 1.0) is pure red in the RGBA color format. From here, you can already make simple color gradients:
o = vec4(0.0, FC.y/100.0, 0.0, 1.0) ;
Remember, this is run on every pixel, so each pixel will have a unique Fragment Coordinate. That formula makes a simple gradient that starts black at the bottom of the screen (FC.y = 0.0), and the green output value reaches 1.0 when FC.y reaches 100.0.
So you have an output color “o”, the input fragment coordinates “FC”, and four “uniform” inputs which are shared among all pixels: “r” is the shader screen resolution in pixels, “t” is the time in seconds, and also the less commonly used mouse position “m” and the backbuffer texture “b”. And that’s the core of it! From there, it’s a lot of math and logic to control the output colors and generate cool images.
I’m going to skip ahead a bit, but if you’re interested in learning more, try starting here !
My Process
People often ask me whether I write my shaders in a compact form from the start or if I write them expanded and then reduce the code afterward. The answer is the former. I’ve practiced code golfing so much that I find it easier to prototype ideas in compact form, and I tend not to get lost in tiny shaders. Code golfing shaders requires finding the right balance between code size, render performance, artistic appeal, design, and mathematical function. It’s a delicate balance that definitely challenges both sides of my brain. I’ve learned a ton about math, art, and design through writing these!
To start one, you need an idea. When writing the “Milky” stars shader, I knew I wanted to create some kind of galaxy, so that was my initial spark.
My shaders typically start with centering and scaling so that they look good at various resolutions and aspect ratios. For the stars, I looped through 100 point lights revolving around the center. I love glowing effects, and they are pretty easy to create. You just need to know the distance from the current pixel to the light source and use the inverse for the pixel brightness (close pixels are brighter, far pixels are darker).
I played around with the positions of the particles using some trigonometry and gave the disk a slight skew. For the coloring, I love to use some sine waves with a phase shift for the RGB channels. Sine waves are also useful for picking pseudo-random numbers, so that’s how I select the colors for each star. Using the sine formula, you can get palettes like these:

I ended up with a slight alteration of the one second from the left. It has a nice range of temperatures and brightness. I also added some variation to the star brightness, which made the image much more interesting to look at.
Next, I applied some tonemapping with the hyperbolic tangent function for size. Tonemapping prevents the harsh overexposure and hue shifts that happen when a color channel hits its maximum brightness value (left is original, right is with tonemapping):
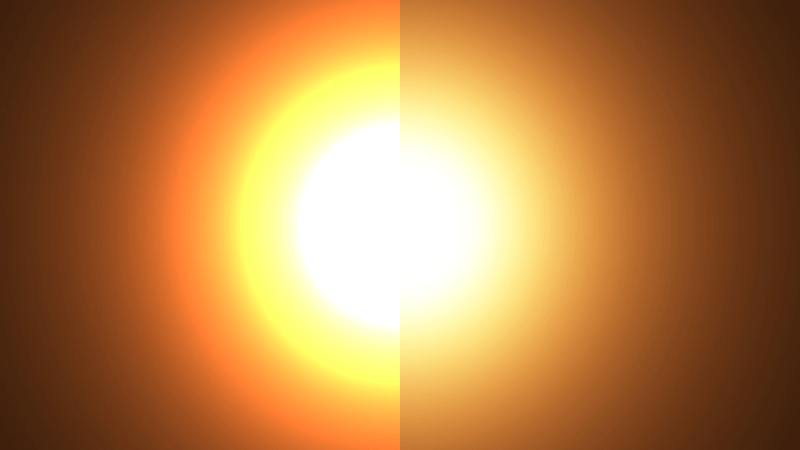
Any good shader that has High Dynamic Range lighting should apply some tonemapping, and tweet shaders are no exception! Finally, I played with animation. It could have revolved or twisted, but in the end, I liked the contraction effect most. I also created a loop so that new stars faded in when the old stars reached the center. You can read about my design process in more detail here !
Code Golfing
As you can imagine, there are hundreds of little techniques that I have developed (and continue to discover) in the process of shrinking the code down, but I can give you the abridged version! My generalized code-golfing process can be listed like so:
- Reduce names: It may be challenging initially, but you can get used to single-letter variables and function names. You may sometimes forget what variables are for, but this is actually helpful for code golfing. It forces you to reread your code, and you’ll often find better ways to write it when doing so. Like anything else, your memory will improve with practice, and over time you will establish some standards (for me: p = position, c = color, O = frag output, I = input, etc.).
- Reduce numbers: This is pretty self-explanatory. 1.0 == 1. , 1000.0 == 1e3 . Don’t forget that with vector constructors, you can use any data type as an input, and it gets converted (“cast”) to the new type: vec4(1.0, 1.0, 1.0, 1.0) == vec4(1) . If you’re multiplying by 10.0 , you could instead divide by .1 .
- Minimize initializations: If you have two floats, “x” and “y”, try to initialize them together like so: float x = 0., y = 1.; Look for opportunities to share data types. If you have a color vec3 and a vec4, make them both vec4s. Avoid float/int conversions.
- Avoid ifs: If statements in GLSL take up a bit of space, especially if you need an else if . Try using a ternary instead. For example: if (x>y) O = vec4(1,0,0,1); else O = vec4(0,1,0,1); becomes O = x>y ? vec4(1,0,0,1) : vec4(0,1,0,1); . Much shorter, and there’s a lot you can do with it. You can even set multiple variables between ? and : .
- for(;;) > while(): for and while use the same number of characters, but for has a spot for initializing (before the first semicolon) and a spot for the final step after each iteration (after the last semicolon). These are free slots that can be used for lines that would otherwise have to end with a semicolon. Also, avoid using break , and use the condition spot instead! You can also remove the brackets if each line ends with a comma (so it doesn’t work with nested for -loops).
Beyond that, I use some function substitutions to reduce the code further. More on that over here !
I’ve put together a ShaderToy demo with some additional variables, formatting, and comments for clarity. Every shader is different and requires using different techniques, approximations, and concepts, but that is precisely what makes it so fun for me! I’m still learning new stuff nearly every day!
Questions and Answers
Here are some questions I was asked on X.
Do you have a favorite “trick” or “technique”? If so, what is it?
I go through phases. I loved Bokeh DoF , then volumetric shadows and fractals , but currently, my favorite has to be ” turbulence .” It can be used for some awesome magic effects , clouds , or fire .
How did you develop the intuition for related maths?
It takes lots of time and patience. I had to push through many times when I thought a topic was over my head. If you take it in small pieces, take breaks, and sleep on it, you can learn a lot! I wrote about some of the conceptualization techniques that I’ve picked up over the years. That might save you some time!
Do you start writing the shader in code-golfing mode, or is it a process until you reach the most optimized code? Which is the best editor for normal shaders and for code-golfing shaders?
Yes, I write in code-golfing mode because I’ve developed an intuition for it, and it feels faster to prototype at this point. I still have to refine the code when I find a look that I like, though. I’m a big fan of Twigl.app, but ShaderToy is great too. ShaderToy is best for its community and wealth of knowledge. I try to use it when explaining my tweet shaders.
How did you start writing cool shaders, and what did you use to learn it?
Well, I’ll explain more about my background later, but it started with an interest in game development. Shaders have tons of applications in video game graphics—that’s what sparked my curiosity to learn.
Do you have regrets related to sacrificing readability?
Nope. I’m more concerned with size optimizations that lead to slower code, but I don’t mind the unreadable code. To me, that’s part of the magic of it.
What’s your background that got you to the point where you could effectively learn the material?
It’s story time…
My Story
Growing up, I was interested in video games, especially those with “fancy” 3D graphics. When I was around 10, my friend showed me a tool called GameMaker. I tinkered around with it and learned some of the basics of drag ‘n’ drop programming, variables, and conditionals.
Over time, I started experimenting with 3D graphics in GM, even though it was (and still is) primarily a 2D game engine. It was enough to learn the basics of how 3D rendering works and the render pipeline. Later, GameMaker introduced this thing called “shaders,” which allowed developers to create more advanced effects. At the time, there weren’t many resources available, so it took a while for me to pick it up. I started posting my shaders on the GameMaker forums and got some helpful feedback from the community (shoutout to “xygthop3” for his helpful examples)!
Game development was a great place to learn about shaders because you have performance constraints (you don’t want a game to stutter), and you learn a lot about the entire rendering process in that context. In 2014, I started posting my earliest shader tutorials, sharing techniques as I learned them. The early tutorials weren’t great, but I’m glad I wrote them. In 2015, I started exploring ShaderToy, and that’s where my skills really developed.
There were so many great examples to learn from, and it was a good place to get feedback on my ideas. In 2021, I launched a new introductory tutorial series for GameMaker with GLSL 1.00. Now I post more generalized tutorials on all kinds of graphics topics, ranging from math to art to design to code and more. This is definitely my best series yet, and they continue to get better. If you are interested in video games and graphics, I highly recommend starting with GameMaker or Godot. They are relatively easy to learn while still powerful enough to teach you the ropes. If software or web dev is more your thing, you can’t go wrong with ShaderToy or compute.toys.
Here are some of the great people who have helped me, directly or indirectly, along the way:
xygthop3 – This guy’s free shader examples were probably the greatest help along the way. His examples were a pivotal point in my understanding of a variety of graphics techniques, so thanks, Michael!
Inigo Quilez – Inigo is the author of ShaderToy and the king of raymarching. His Signed Distance Field functions are still foundational to this day. An absolute legend!
Fabrice Neyret – Fabrice is probably the best shader code golfer there is, and many shaders are inspired by his work. He has taught me so many techniques over the years.
Yonatan “zozuar” – Another major inspiration for me. Yonatan’s work convinced me to try code golfing for real on Twitter, and his brain is amazing.
Yohei Nishitsuji – This guy is a legend when it comes to tiny fractals. Love his work. Yohei also wrote Rendering the Simulation Theory: Exploring Fractals, GLSL, and the Nature of Reality here on Codrops.
I’m sure there are many others whose names are eluding me at the moment, but I want to thank the entire shader community for their feedback and encouragement.
Arsenal
I’ll wrap this up with a few of my favorite tweet shaders so far:
"Quantum" #GLSL
vec3 p,q;for(float i=1.,j,z;i>0.;i-=.02)z=p.z+=sqrt(max(z=i-dot(p=vec3(FC.xy*2.-r,0)/r.y,p),-z/1e6)),p/=2.+p.z,p.xz*=rotate2D(t),o+=pow(
z*z,.2)*i*pow(cos(j=cos(j)*dot(cos(q+=p),sin(q.yzx))/.3)*.5+.5,8.)*(sin(i*3e1+vec4(0,1,2,3))+1.)/8.;o*=o; pic.twitter.com/v0J1RNFMsd
vec2 p,q;for(float i,a;i++<3e1;o+=5e-3/(abs(length(q=p*mat2(1,-1,2,2)/(r.y-p-p.yx))-i/4e1)+1./r.y)*clamp(cos(a=atan(q.y,q.x)*ceil(i*.1)+t*sin(i*i)+i*i),.0,.6)*(cos(a-i+vec4(0,1,2,0))+1.))p=FC.xy-r*.6;
"Origami" #つぶやきGLSL
o++;vec4 h;vec2 u;for(float A,l,a,i=.6;i>.1;i-=.1)a-=sin(a-=sin(a=(t+i)*4.)),u=(FC.xy*2.-r)/r.y,l=max(length(u-=rotate2D(a/=4.)*clamp(u*rotate2D(a),-i,+i)),.1),A=min((l-.1)*r.y*.2,1.),o=mix(h=sin(i/.1+a+vec4(1,3,5,0))*.2+.7,o,A)*mix(h/h,h+.5*A*u.y/l,.1/l); pic.twitter.com/mhjsN3xuV9
195 chars of #GLSL
vec2 p=(FC.xy*2.-r)/r.y,l,v=p*(1.-(l+=abs(.7-dot(p,p))))/.2;for(float i;i++<8.;o+=(sin(v.xyyx)+1.)*abs(v.x-v.y)*.2)v+=cos(v.yx*i+vec2(0,i)+t)/i+.7;o=tanh(exp(p.y*vec4(1,-1,-2,0))*exp(-4.*l.x)/o); pic.twitter.com/YUqUcsinlg
"Vortex"
for(float i,z=fract(dot(FC,sin(FC))),d;i++<1e2;o+=(sin(z-t+vec4(6,2,4,0))+1.5)/d){vec3 p=z*normalize(FC.rgb*2.-r.xyy);p.z+=6.;for(d=1.;d<9.;d/=.8)p+=cos(p.yzx*d-t)/d;z+=d=.002+abs(length(p)-.5)/4e1;}o=tanh(o/7e3); pic.twitter.com/iFh2HNj8xt
If you want to see more, you can find hundreds on my personal website, my X , Bluesky, or Instagram. To learn more about shaders, try my tutorials , and if you want to hire me for custom work, go here.
Thank you for reading! Have a great day!
-Xor