.png)

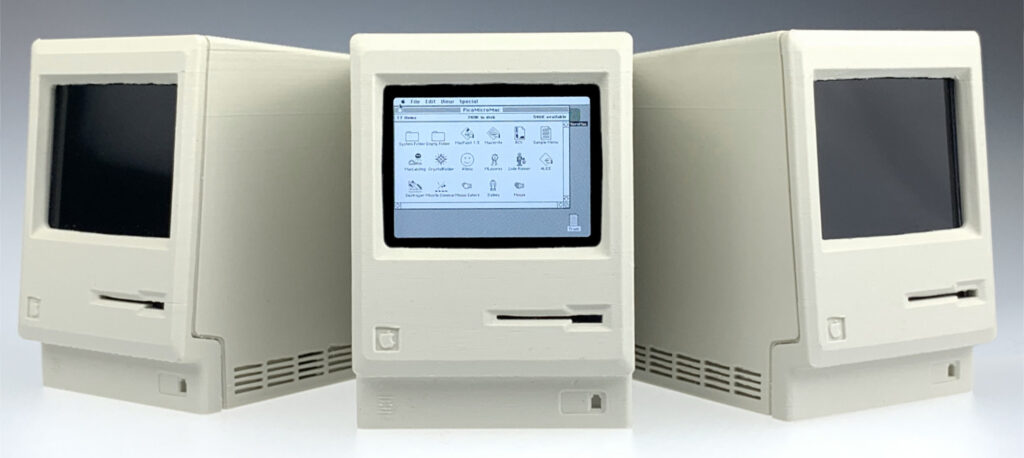
pico-mac-nano is a miniature, functional, scale replica of the original 1984 Apple Macintosh. It is 62mm high (no, that’s not a typo) and has USB keyboard and mouse support. Below is a journal of the journey but if you just want to see it in action, start building one yourself, buy any of the parts or just order one, here are all the links.
It all started with me stumbling across the crazy cheap Raspberry Pi Pico and taking my first foray into micro-controllers. Searching for what others had done with the Pico led me to pico-mac; a project by fellow Brit and super-clever-fella, Matt Evans. In a nutshell he created a stripped back emulator for the original Macintosh running Macintosh System 3 on a Pico with USB keyboard and mouse support and VGA out. This was no mean feat and took a lot of ingenuity (its a great read) due to the limitations of the Pico such as only having 264k of RAM.
The pico-mac project inspired me. To me it echoed the early days of computers like the first Macintosh when pioneers achieved remarkable things within the technological limitations of the day. Needless to say I set about building a pico-mac and am not ashamed (slightly ashamed) to say I giggled like a little girl when that black & white, 512 x 342 pixel Macintosh desktop appeared on my VGA monitor and I launched Lode Runner.
OK, but cool as it is, how much cooler would it be (I thought) if pico-mac could drive a small LCD panel in a miniature replica Macintosh case. Thus started my own quest to add LCD panel support and see how small I could make a working Macintosh using currently available, cheap components.
The LCD

The final size was always going to be determined by the LCD panel which needed to be able to display the 512px x 342px screen buffer. I eventually settled on the smallest 640x480px LCD I could find at a sensible price which was a 2″ TFT panel . Unfortunately it transpired it was technically 480x640px i.e. portrait. I assumed using in landscape would be trivial but I was wrong. The driver being used on the panel (the ST7701S) offers no image rotation function so the only option would be to rotate the frame buffer on the Pico. The problem was that the Pico was already being seriously overclocked to make pico-mac responsive so there just weren’t a lot of processor cycles to spare.
I looked at using one of the spare PIO state machines to rotate the frame buffer but I couldn’t find a way to make that work. In the end I took a step back and looked at a different approach. In its native portrait orientation, the LCD panel I had was 480px across. This was only 32px (1/16) less than the Macintosh screen width of 512px, which might be an acceptable compromise, so I tried getting the PIO that outputs the image data to drop every 16th pixel. This worked … sort of … but the result was unsatisfactory due to the common use if 1px wide vertical lines on the Mac interface such as window borders which would completely disappear at times. What I needed to do was make the emulator output a 480px wide image natively and this meant altering the Macintosh ROM file it uses.
I went about this all the wrong way but eventually managed it and compiled a version of pico-mac that outputs 480x342px … I was back in business. This compromise on resolution had a silver lining. Because I was now running the Mac screen across the full width of the LCD in portrait orientation, it meant the visible screen area was now smaller and that meant the Macintosh could be slightly smaller. It also solved the problem of having to factor in space for wide black margins on either side of the LCD which would have been necessary had I put a 512px wide image on a 640px wide LCD. It also meant the LCD flex cable was located at the bottom, not the side of the LCD so I would not have to bend it tightly.
Apart from an SPI interface to configure the LCD driver, the panel uses RGB565 (5 bits for the red and blue, and 6 for green) for the image data. That’s 16 data bits which was way more than I had available on the Pico. Fortunately, the original Macintosh had a black and white screen. It did not even support shades of grey. So I actually only needed to send one of two signals; all data bits high or all data bits low, and this could be done using the existing RGB data line provided for the pico-mac VGA out. I ran this past Matt but he said he didn’t think a single GPIO could drive that many inputs without using buffers so I began working on adding logic buffers to my PCB design.
In the end I didn’t need to because the backlight on the LCD panel is so bright, I found that only setting the most significant bit of each colour high still produced a bright enough image. Due to the asymmetry of RGB565, I found this gave a reddish tint but this disappeared if I drove the top two bits of each colour and gave be 50% more brightness. That is what I settled on and I have experienced no problems driving these 6 input lines from the same GPIO.
Actually getting the image to display on the LCD took me way longer than it should have but after hours of poring over the driver data sheet, adding code to the pico-mac source to configure the LCD panel via SPI, and playing around with the signal timings … result!
The Case

Now I had the final screen image size, I could work backwards to calculate the size of the Macintosh. Drum roll … (OK, I know I already told you) … 62mm high. But that assumed I could fit everything I needed inside a Macintosh case that small. The first issue was that using a standard Pico board was not practical; it was just too long. Fortunately, those clever people at WaveShare had produces a much smaller version called the Pico Zero at only a small price premium. That fitted nicely where the Macintosh logic board would have been with its USB-C port presented on the rear casing where the ports would be … sweet!
I would probably have sacrificed inclusion of a micro-SD slot but fortuitously, there was just enough room to fit one next to the Pico Zero with its slot also where the Mac ports would be. Ideally I would have liked to put the micro-SD slot behind the floppy disk drive slot but due to the orientation of the LCD panel, this was covered by the LCD so was not possible. Shame … but the primary goal was the smaller Macintosh.
One of the things I’ve enjoyed most about this project is all the new skills I’ve learned and things I’ve done for the first time. One purchase of a shiny new Bambu Lab A1, much help from my 3D modelling and 3D printing gurus (thanks Matt G & Spencer S), and a heap of failed prints and revisions later, I had a basic case.
The front panel has a slot for the LCD panel and a bracket to hold the internal components much as they are in the original Macintosh. I embossed the 1-bit rainbow logo on the inside of the rear case where the original Macintosh team’s signatures were. I created a separate click-in actuator piece that allows use of the reset and boot-select button on the Pico. The internal void was refined to minimise the amount of support material needed to 3D print.
The PCB
So I knew I could fit all the components in my 62mm high case, as long as I could connect them together. The problem was the sheer number of interconnections.

Time to learn about designing a printed circuit board and having it manufactured; more firsts for me. I 3D modelled and 3D printed a dummy of the PCB to the size and shape that would fit in the case and allow all the connections, and set about designing. To my surprise, the first prototypes worked!

By the time I got them, I had predictably already changed the PCB design to allow for possible options such as audio and battery power so there have already been several versions. As of writing, the latest was version 3.2.
The Extras
There are other details I implemented along the way. Micro-SD card support is implemented. See the pico-mac project documentation on Github for instructions on how to prepare an SD card with a bootable image on. Note that I opted to mount the micro-SD card reader upside down to align the slot with the USB-C port so cards must also be inserted upside down.
The pico-mac source code was amended to make use of the Pico Zero Neo-pixel RGB LED and this is used to show activity of different peripherals and to confirm that the emulator is running. It can be seen through the right hand side vents. If the LED stops flashing and the screen locks up, press the ‘R’ button on the base of the Mac briefly to reset. Holding down the ‘B’ button while connecting the pico-mac-nano to a USB port on your computer puts the Pico into boot select mode and it should appear as a mounted volume on your desktop. From here, new firmware files can be dragged to the Pico.

One of the idiosyncratic aspects of the original Macintosh were the black T15 bolts that were recessed so far into the handle recess that you needed a special extra-long tool to open the Mac up. I thought it would be fun to replicate this so I designed the front case to accommodate heat-insert, knurled brass M2 screw mounts allowing the case to be screwed together with tiny M2 1.5mm hex bolts.

Pico-mac makes use of the single USB port on the Pico (USB-C on the Pico Zero) for both power and to connect a USB keyboard and/or mouse. This requires the use of a special splitter cable (unless you are using the optional internal battery module) that provides a USB-A port for peripherals, and a USC-C for power. Unfortunately, many of these ‘OTG’ cables seem to include some form of hub circuitry that does not work in this configuration. I have tested quite a few types and these, along with all the parts in the pico-mac-nano, are available on the 1-bit rainbow web store.
ou_big")
The Collectors Edition
I just couldn’t resist creating a matching, tiny version of the iconic ‘Picasso’ box that the original 128K Macintosh shipped in. After finally finding a manufacturer (in India!) and having the first batch back, I’m super-happy with the result; a white, full colour printed, corrugated cardboard box.
All well and good, but the Macintosh and accessories can’t just rattle around inside. It needed versions of the top and bottom polystyrene inserts the original Macintosh had. I settled on 3D printing them in white TPU which is flexible and so won’t scratch the Macintosh. To finish it off I added a 3D printed white plastic accessory case that sits next to the Macintosh in the box, just like the original. It’s big enough to fit the OTG cable and hex key.
The pico-mac-nano collectors edition is the fully assembled and tested machine shipped to you in this limited edition box with inserts and accessory case.
If you would like one of these, you can order one here.
The Future
Well, I’m hoping for world peace and the criminalisation of nuts in brownies, but until then I’m working on an option to run pico-mac-nano from an internal battery so you can whip it out of your pocket (no sniggering at the back, Jenkins!) and wow your friends at parties. [update : this is now finished and available, Yay!]
As of the time of writing, the UMAC emulator Matt Evans created for pico-mac does not support sound. Matt says he may add it at some point but in reality, sound was pretty primitive on the original Macintosh so it’s not a big loss. However, the absence of one sound did bother me and that was the beep when you turn the original Mac on.
While I am not clever enough to add sound support to UMAC, adding code to output a beep as part of the pico-mac startup code seemed achievable. Having that simple beep when you turn it on adds another dimension of realism (for me, at least).
I looked at playing a sound sample of the actual Macintosh beep but given the lack of analog support on the Pico and the tiny speaker I would have to use, I opted to just play a tone of the correct frequency and duration (1 second at 600Hz if you’re interested). I didn’t want to add a digital to analog converter or an amplifier to the internal components and so opted for simply turning a GPIO on and off using a PIO state machine to generate a square wave. Using a small speaker, this gave a very quiet beep so I switched to using two GPIOs programmed to be the inverse of each other which gave a differential signal of twice the amplitude. This is now a reasonable volume and I’m currently experimenting with different low pass filter options to soften the ‘buzzy’ nature of a square wave, so watch this space.

The Caveats
Both pico-mac and pico-mac-nano were designed as fun proofs of concept, not as finished products. Pico-mac is an open source project with the single goal of seeing if an RP Pico could run a computer emulator. It is not guaranteed to run all early Macintosh software. It relies on a significantly overclocked RP2040 chip and the tolerance of any given Pico board to run at that speed may vary leading to stability issues.
Pico-mac-nano is also open source and simply builds on the pico-mac goal by creating the smallest functional scale replica. It uses reduced horizontal screen resolution so any software that was hard coded to assume 512px may behave unpredictably. The LCD is so small that for most people (certainly over-50s, sigh), it is not practical to actually use the Macintosh for any practical purpose.
If you choose to buy a fully assembled pico-mac-nano, you are paying for the components, materials and time taken to produce it. You are NOT paying for a ‘product’ as the pico-mac and pico-mac-nano are open source, therefore no guarantees are offered.
All this is to say, if your pico-mac or pico-mac-nano is unstable or does not run the software you want, please don’t get upset with the those that worked on it!
The Last Word
If you build or buy a pico-mac-nano, I hope you will have as much fun as I have had working on it (but hopefully less frustration!). I’d love to hear from you if you have any feedback, cool photos of your pico-mac-nano in interesting place, running great programs or 3D printed in cool colours. I’ll add the best to the Gallery. If you put together a custom boot image, send a copy so I can share the most interesting.
You can email me at [email protected]
One last shameless plug; if you are the owner or collector of ‘real’ vintage Apple computers, check out 1bitrainbow.com, a web store offering fully tested spare parts and accessories for Apple computers that are 25 years or older.