.png)

SUMMER SALE: a quick reminder to use discount code 25SUMMER through June 17 for 25% off all courses/bundles, Lumenzia, and Web Sharp Pro.
 Smart phone cameras are incredible tools. They’re easy to use, lightweight, you always have it with you, and the image quality is very good. At the same time, a dedicated mirrorless or DSLR camera typically offers simpler manual control and higher image quality. Adobe has a new camera app called “Project Indigo” which is absolutely incredible. It offers breakthrough advances in image quality for smart phones, simple manual controls, and it’s free! I am stunned at how great this app is for serious photography, and it’s just the first release.
Indigo is already available for iPhone (12 Pro or regular 14+, 15 Pro+ recommended for best results), and an Android app is coming soon.
What are the benefits of Indigo?
Indigo has many very unique and interesting capabilities, including:
- Optimizations for HDR capture designed to help provide a more natural look, as well as support HDR even when capturing JPG.
- Super resolution (SR) offers a dramatic improvement in image detail for digital zoom levels (2x and 10x on my iPhone which only has optical lenses for 0.5x, 1x, and 5x).
- This clever technology automatically combines multiple frames to take advantage of the natural pixel shifting that occurs from hand held shooting.
- The results are vastly better than traditional upscaling normally use for digital zoom.
- Zero Shutter Lag: the app is constantly capturing image data and records the image as soon as click the shutter in photo mode.
- Electronic image stabilization (EIS) offers a more stable preview in the viewfinder (with the minor tradeoff that field of view is reduced by 10% for a 5x zoom).
- Multi-short merging enables:
- long exposures (up to 32s)
- significantly reduced noise
- Direct integration of technology previews, currently including:
Indigo offers simple and powerful manual controls for:
- shutter: from 1/64,000 to 1s in day mode (and up to 32s in night mode with the multi-shot capabilities)
- ISO: This varies by camera and even lens, but I see values ranging from ISO 20 to 12,500
- exposure compensation: available whenever you have not set full manual shutter and ISO, effectively giving you shutter priority mode and an easy way to lock ISO while still using the camera’s meter.
- focus: auto-focus, tap to focus on a specific point, or set a manual focus distance.
- white balance: temperature, tint, or presets for cloudy / sunny /, fluorescent / tungsten lighting
There are several visual aids you may enable to help you make critical decisions, including:
- Zebra stripes to assess blown highlights, which allows you to quickly “expose to the right” (shoot as bright as possible to minimize noise while avoiding clipped highlights).
- composition overlays for the golden ratio, rule of thirds, or center lines (which are helpful for shooting symmetrical compositions).
- A zoomed in window to help you assess sharpness for manual focus
- A level to ensure straight horizons and avoid key stoning
- A shake indicator to help assess potential problems when shooting without a tripod
There is a self-timer mode (for 3, 5, or 10 second exposures). And of course RAW (DNG) capture is supported to enable the best results.
How is the image quality?
I highly recommend this camera app. These are the best images I’ve ever seen from my iPhone. I’m seeing numerous benefits:
- The manual controls are easy to set and allow you to get the best possible exposure
- Noise is significantly better
- Resolution for digital zooms is significantly better
- The manual controls make it easy to are powerful and easy to use, noise levels are great
- long exposures look great.
Will it offer the same quality as your mirrorless camera? Of course not, but that’s not the point. This is an incredible step forward in image quality from the one camera you always have with you.
Below is a comparison of a 10x zoom from Indigo vs the native camera app. Note the resolution and field of view are not necessarily the same as the native iOS app. When I use 10x, Indigo captures 11% wider but about 1/2 the linear resolution. While lower resolution sounds like a negative, it’s not at all. This is a classic example where better pixels are much more important than resolution. There is much more detail in the 2016 x 1512 image from Indigo than the 4032 x 3024.
Given the higher resolution of the native iOS capture, it was scaled down by 55% to align with the Indigo capture (which is shown with 100%, i.e. actual pixels). You would expect the original higher resolution would yield a result as good or better, but the image from Indigo is clearly better.
Note that both are RAW captures which were opened as SDR in Lightroom. The only edits were small changes to exposure (to match approximately as the native app offers no direct control over shutter/ISO and inherently does not optimize exposure as you can manually).
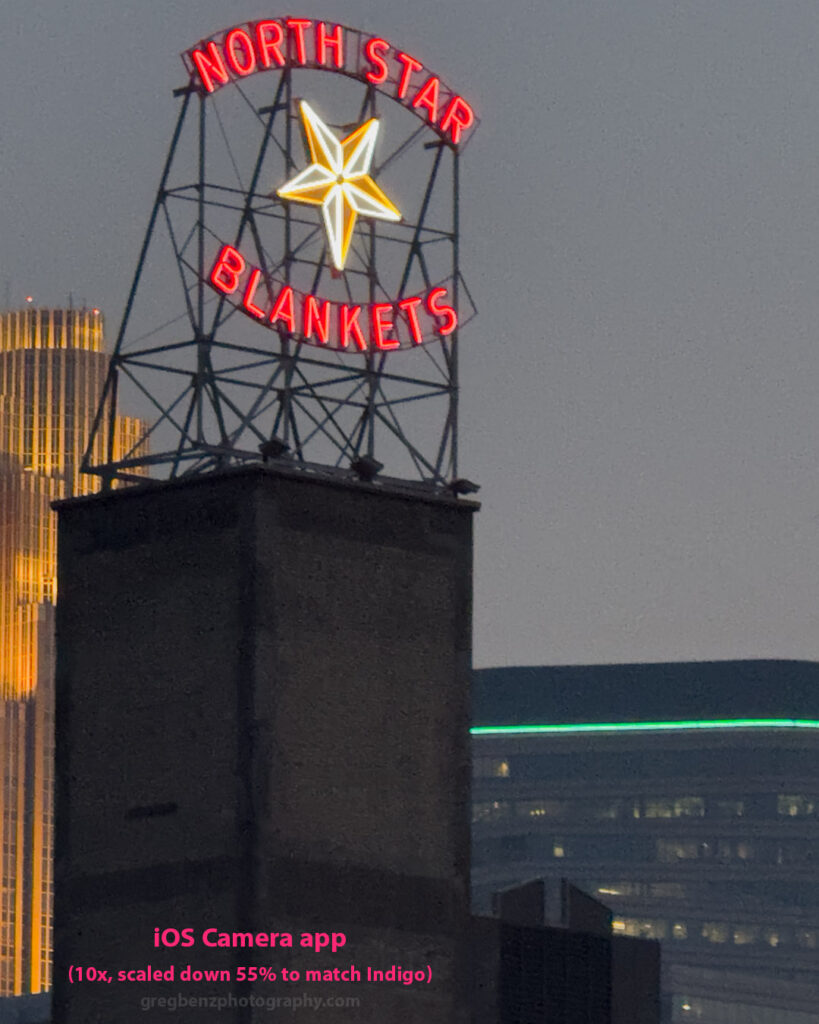
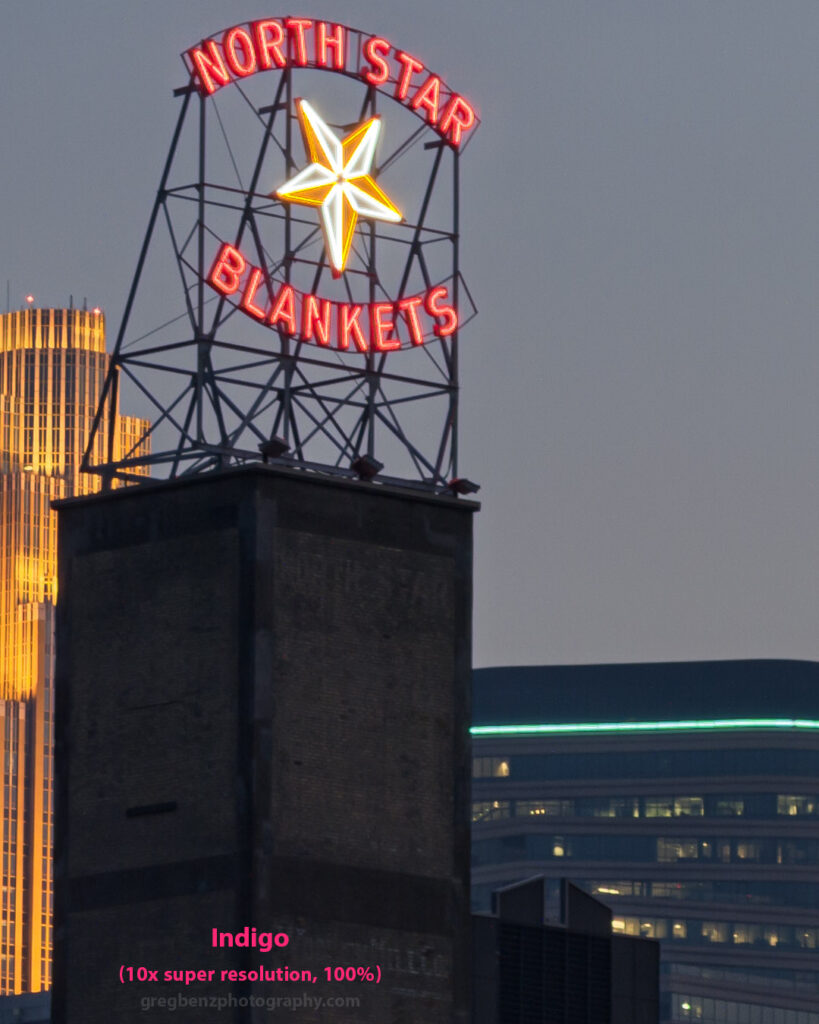
Note all the areas where Indigo shows an improved result:
- the building at bottom right has far more detail.
- individual bricks are visible in the middle building
- sky noise is virtually eliminated
- faint lights on the distant yellow building are much more visible
I consider the Indigo result good enough to print at 10 x 12″, which is outstanding for a 10x digital zoom after sunset from a mobile phone. I could probably even get a pretty decent 20 x 24″ canvas print.
One might see this and get the impression that the native app is not good. I think that would be the wrong conclusion. These apps are built for very different purposes. I was able to achieve this result by using a tripod and manual exposure settings in Indigo, features which the native app is not optimized for (given most people would not do either) – and supporting these features would compete with goals for the native app to be as easy to use as possible for people who are not serious photographers.
That said, Indigo creates stunning images in auto mode when handheld, and has some tremendous advantages in image quality even if you use it casually. Indigo is a great example of computational photography done extremely well.
How to setup and use Indigo:
The user interface is organized into a few key areas:
- The top of the app:
- file type:
- you may choose JPG only, or JPG + DNG (there is currently no option for DNG only).
- Both formats support HDR (JPGs will be saved with a gain map).
- histogram: in auto mode, you may tap to choose between a larger histogram or to show the shutter / ISO
- swipe the histogram left to see important options including:
- self timer
- composition overlays
- level
- zebra stripes (highlight warning)
- gear icon for advanced settings: use this if you need to disable super resolution (SR) or electronic image stabilization (EIS)
- Note: there is a dot and dash under the histogram area to indicate which page you’re viewing (ie these “breadcrumbs” suggests the potential more options may be visible in the future by swiping more than once).
- photo mode vs night mode
- (this is redundant with the bottom controls in auto mode, but the only way to switch when in manual mode)
- Note that you cannot change night mode when manual setting sliders are open at the bottom (just close focus, exposure, etc and then you can change this). I’ve also found it’s hard to click when you’re viewing top settings, so swipe to show the histogram if needed (this seems like a possible bug).
- file type:
- Focal lengths:
- These vary based on the focal lengths in your phone. Options labeled with “SR” are digital zooms using super resolution.
- The circular arrow icon at the right lets you switch between the back and front cameras.
- If you get very close, you may see an option offering macro mode (which may use super resolution on the 0.5x lens to achieve high quality 1.0x zoom).
- Photo / Night mode controls some key behaviors
- You can change this any time via top-right icon (or when in auto mode via text buttons at bottom of the preview).
- Photo mode is optimized for brighter conditions and offers:
- Zero shutter lag (night mode will have a bit of lag)
- Ready faster for the next shot (night is not as immediately ready to take another shot)
- May produce better “super resolution” (SR) results as the camera is not using image stabilization.
- Night mode is optimized for darker conditions and offers:
- Longer shutter times (up to 32s vs a maximum 1/8s in photo mode)
- Optical Image Stabilization (OIS)
- Note that I need to play more with things like light trails in night mode. Capturing a long exposure by combining frames does not guarantee there will be gaps for fast moving subjects (such as light trails from cars)
- When in manual mode (which is enabled by clicking the settings toggle at the bottom right), you’ll be able to control:
- focus:
- tap on the image to autofocus on a specific area
- drag the slider to adjust manually. This works best if you click the magnifying glass icon to see a zoomed in preview for critical sharpness.
- exposure let’s you control shutter and ISO.
- exposure compensation (disabled if you’ve manually set both shutter and ISO)
- white balance
- you may select presets for cloudy, sun, fluorescent, or tungsten lighting.
- you may slider to set temp and tint.
- Tap on the image to automatically set white balance on a target area.
- click “auto” if you no longer need manual control
- The grey card wheel (ring with different shades of gray) shows a grey reference over the image to help set temp and tint manually. It is just a visual aid and does not change anything on its own.
- When in night mode, you’ll see a 5th icon for control over multi-shot features:
- set the “frames to merge” from 1-32 to help create long exposures and reduce noise
- “merge method” may be set to “align and merge” (for sharp handheld shots) or “long exposure” (for best results on a tripod)
- click the active section (such as focus) again to hide the options when you wish to see more of the composition.
- focus:
- When playing back images (by clicking the thumbnail at bottom left):
- The top will show whether the image is “HDR” and the file type.
- The top-right 4 dots icon will open the iOS Photos app (which is ideal if you wish to delete multiple images at once by clicking and dragging to multi-select, which you can’t do in Indigo – all images captured with this app are in the native photos roll, unlike the LR app).
- The bottom row contains icons for:
- sharing (this will use the JPG not RAW)
- info (just swipe up on the image instead to get this more quickly)
- the beaker icon for technology previews like AI Denoise and Remove Reflections (keep an eye on this area for cutting edge features, even Lightroom mobile does not have remove reflections yet)
- the “LR” icon will open the image in Lightroom.
- the trashcan will delete the current image (if also open in LR, it will keep showing there for the moment – even though it really is gone)
- shortcuts:
- swipe down on the image to exit back to the camera (instead of clicking “<” at top left)
- swipe up on the image to see info (instead of clicking “i” at the bottom)

I recommend the following setup:
- Turn on zebra stripes (by swiping the histogram as shown in the clip to the right).
- This is the simplest way to easily get an ideal manual exposure, and is more informative than the histogram.
- For manual exposure, set the best ISO and then adjust shutter speed while watching the zebra stripes.
- Use the golden ratio overlay.
- Enable the level.
- Switch the histogram view to show shutter speed when in auto mode (this helps warn you of potential motion/shake problems and the histogram isn’t necessary when you aren’t controlling exposure).
- How to launch Indigo quickly (three options):
- You can add an icon on the lock screen (the native camera is defaulted to the bottom right icon, but you can change it).
- Do a long hold on the lock screen, choose “customize”, click the lock screen shown at left, click the “-” if you need to remove an existing icon widget, click the “+” and search for “Indigo”.
- You can assign the “action button” (the one on the top left that mutes the phone by default)
- Go to Settings / Action Button, slide to “controls”, click the blue button and search for “Indigo”.
- If you have a newer iPhone with a “Camera Control” button:
- Go to iOS Settings / Camera / Camera Control and set the “launch camera” to Indigo.
- You can then click that button to launch Indigo (as long as you are not in the iOS camera app, which will take priority).
- If you leave the “require screen on”, then you can click the button once to wake the phone and then a second time to launch the app. There will be slightly awkward delay as the phone takes a second to use FaceID to unlock the phone to use the app (but the total time to launch is just as fast as waking the phone to click the icon for the native iOS app).
- Note that you can also use this button to trigger the shutter when the app is open. That’s handy in the day if you are not looking at the screen, but it’s probably better to use the digital button on screen to capture any long exposures (as you’ll be less likely to shake the camera).
- You can add an icon on the lock screen (the native camera is defaulted to the bottom right icon, but you can change it).
- Shooing DNG (RAW).
- When processing in LR / ACR, you’ll see the “Indigo Embedded Profile”.
- See the tips below for transferring the RAW to your computer, as it isn’t obvious.
Other workflow tips and things to know:
- The Zebras are slow to update and may be misaligned with image content when you are moving the camera.
- You might wish to disable them if shooting moving action
- Be sure to hold the camera steady when using them to gauge exposure.
- This is probably an inherent limitation (time to preview slow shutter speeds, computational limits to preserve battery life, etc). It’s just a little odd the first time you see it, and is a non-issue when used with this understanding.
- To achieve long exposures in manual mode:
- enable night mode
- set the shutter to 1s
- go to the “frames to merge” icon (just right of white balance) and select a number of frames (in auto, it seems to use a maximum of 5s)
- Use “align and merge” if handheld (this mode can correct for some movement) or “long exposure” if on a tripod.
- The night mode icon will show the total exposure time (shutter x number of frames), rounded to the nearest second.
- Either be careful not to shake the camera when clicking the shutter or turn on the 3s delay timer.
- When you click “i” in playback, you will see the shutter time for a single frame if multi-shot was used. So a very long exposure probably just shows 1s (as you might be combing 32 exposures which were 1s each).
- During playback, do a long hold on an image to see the SDR version (the HDR is shown by default).
- Note that in bright ambient light, there may be no HDR headroom. This does not affect the recorded image, it just means you may not see the HDR benefit under some conditions. You can confirm the actual headroom in the phone by looking at the histogram in Lightroom for an image with HDR mode enabled.
- And Adobe cautions that headroom may be limited if the phone gets hot (which it certainly can if you are using the app heavily).
- It’s important to remember that each lens on a smart phone is a different camera with its own sensor. They are all different!
- For example, on my iPhone 16 Pro the minimum ISO varies between 20 and 64 depending on focal length.
- You may also see zebra strips get better or worse when you change lenses due to different dynamic range (the iPhone 16 Pro 5x camera isn’t as good as the primary sensor for example).
- So remember to think about your exposure / settings when you change focal length.
- Try not to exit the before your image has saved, as you can lose it under some (rare) conditions. When you see your last image shown as a thumbnail without any number at bottom left, it’s done processing.
- Note: I have occasionally seen the viewfinder go black (some kind of bug in this app or iOS). Opening the iOS camera and switching back seems to resolve the issue (so does restarting the phone if app switching doesn’t fix it).
Tips for shooting manually:
While there are certainly advantages to using a tripod for long exposures, you don’t need it with Indigo. The shake detection in the phone will limit exposures to 6s hand held (while the maximum exposure goes up to 32s when the app detects the phone is perfectly stable). In manual mode, you’ll see a stability indicator at the top left of the app. That indicator is not shown in the automatic modes, but you may notice that the automatic shutter speed gets much longer if the phone has been perfectly still for a couple seconds.
The handheld experience is just like using the native iPhone app. You’ll see a crosshairs target to help you keep the phone relatively stable for long exposures and the final result is similarly very good.
If you want to capture much longer exposures (or get the slightly wider composition the “long exposure” merge method offers), you should definitely consider a tripod. But if you don’t own one or haven’t brought it with you, consider stabilizing the phone against a railing, wall, etc to get the most stable conditions possible.
Shooting with a tripod
You do not need a tripod, but you can get some very unique long exposure shots if you use one. I highly recommend considering some simple options to help take advantage of it. There are a few tools that I think work very well for stabilizing a phone.
The Neewer phone SP-02 tripod mount is an absolute no-brainer for $20. It’s offers numerous benefits:
- Can be used without a tripod on a wide variety of surfaces (the ground, hand-braced against a railing, etc).
- Is small enough to fit in your pocket
- Works on any tripod as its base supports attaching to just about anything (an Arca Swiss mount, 1/4″, or 3/8″ mounting threads).
- Holds the phone firmly with a spring loaded arm that makes it easy to connect or remove the phone
- Can rotate between portrait and landscape orientation (with notches so that you will remain perfectly level after swiveling).
- Two cold shoes mounts in case you’d like to attach a microphone, lights, etc.
You can use this mount with your regular tripod, or you might consider a table top tripod to keep things very simple.
The Neewer TP29 table top tripod offers:
- Ballhead to easily optimize composition
- Three heights for the legs to set the base between 3-7″
- Light weight ( 9 ounces) and compact (just over 7.6″ long x 1.8″ wide folded)
I’m a big fan of the Really Right Stuff Ascend-14-PF tripod, which offers:
- The height can be be adjusted via legs and center column to go as low as 3.7″ or as high as 58″.
- If you invert the center column (which is very easy to do), you can actually put your camera all the way down to the ground.
- folds down to 17.1″ to easily fit in your carry-on luggage.
- Relatively lightweight at 3 lb and suitable for loads up to 30lb (making it great for everything other than potentially very long lens shots).
- There is a version of this with an integrated ball head, which is ideal if you want the most compact and lightweight setup (I prefer the flexibility of a separate ball head so I can swap out for a leveling base for panos).
- There is also a version with longer legs, but I prefer the more compact model.
This tripod is certainly not cheap, but very well made. You wouldn’t get it just for shooting with a phone, but I think it works well for traveling light and shooting with a mix of camera and phone (offers obvious height advantages over a table top tripod). I like using this tripod with the Really Right Stuff BH-25 ball head (strong but compact).
Disclosure: This section contains affiliate links. See my ethics statement for more information. When you purchase through such links, you pay the same price and help support the content on this site.
How to get the DNG (RAW) to your computer:
Likely due to limitations of 3rd party camera apps under iOS, there are a few quirks. When capturing DNG, a JPG is also captured and you may find that you only see the JPG when sending the image to your computer (such as via AirDrop).
Here are options for sending the RAW to another device:
- Open the image in LR on the phone and make any edit.
- If you’ve enabled cloud syncing with Lightroom, it will automatically sync there (this works with Lightroom Classic too, not just the cloud version).
- Connect the phone via USB and import normally.
- You will see both JPG and DNG and the file names are not the same, so this is a bit messy.
- You should probably only import the DNG to keep things simple. Changing the sort order to “file type” should make this a bit easier.
- Share via AirDrop via the iOS Photos app with a special option
- When you share, do not immediately click the AirDrop icon as the default is to transfer the JPG.
- Click the “Options>” button near the top of the sharing interface and toggle on the option for “all photos data“. This will send over a folder with both the DNG and JPG. You must do this every time, the setting is not sticky.
- This option is not available in Indigo.
As you’re probably already thinking, the file transfer experience could be improved. I imagine this is tricky within the options allowed in iOS, but hopefully we’ll see some simplifications in the future (at least an option for the LRC import dialog to not show JPG from Indigo when there is a corresponding DNG).
When you capture RAW, the profile will show in LR / ACR as “Indigo” or “Indigo Embedded Profile“. This is optimized for the mobile capture, but also includes a slider. Move the profile slider left for higher contrast (deeper shadows and brighter HDR highlights) or to the right to compress tonal range. I find that the best range is around the default or perhaps down as far as halfway to the left (for more contrast and pop). Pushing right tends to make shadows too light.
What could be better?
This is a truly stunning app, especially for an initial release.
Of course, there’s always room for improvement and I think the following would be valuable updates to consider in the future:
- Leave manual settings as they were. Currently, when you switch out of the app and back in, it goes back to automatic settings. So you may frequently need to change to manual, set the shutter, turn on 3s delay, etc.
- Capture notes of all special settings in XMP. Just human readable notes to record self-timer, merge mode, and all other key manual controls would be very helpful. These kind of notes help make it easy to review images to learn and find the best settings for future photo shoots.
- Simpler file management to get DNGs from the phone to a computer.
- Allow longer shutter speeds in brighter light (ie use the extra exposures to average values rather than build the exposure), kind of like a digital ND filter.
- Auto bracketing. Let me pick 3 or 5 frames and automatically do a burst of shutter speed brackets with a single click.
- Cleaner traffic trails for long exposures. The headlights look great via “align and merge” but are short (maximum 1s). They show nice long streaks under “long exposure”, but a very strange dim purple result.
- Shorter self-timer delay or a way to star the shutter as soon as the camera shake has ended, in order to get sharp photos on a tripod with the least delay.
- Pano mode – I would love to have this level of quality in my panos.
- Portrait mode – while not as important, I’d still prefer to consistently use one app for all photos. And this app would be ideal for portraits in tricky light.
What would you like to see next? Please share your thoughts in the comments below.
I’d like to extend a huge congratulations and thanks to Boris Ajdin, Marc Levoy, Florian Kainz, and the rest of the team at Adobe responsible for this incredible app! Learn more from Adobe’s announcement and support pages.