.png)

07 Jun 2025 by dzlab
The allure of AI coding assistants like Zed is undeniable. They promise streamlined workflows and enhanced productivity, but their inner workings often remain shrouded in mystery. This article details how to reverse engineer Zed using mitmproxy, providing insights into its System prompt, prompting strategies and API interactions with Large Language Model (LLM) providers.
Motivation
Before integrating any AI tool deeply into our workflow, understanding its underlying mechanisms is crucial. All existent AI assistants abstract away the complexities of prompt engineering, which simplifies our lifes as end user as we won’t need to craft sophisticated prompts to get the outcome we wants. But not understanding the inner working of these assitants, we end up relying on a complex system without fully grasping its process and logic, hindering our ability to optimize or troubleshoot effectively.
Enter the realm of HTTP(s) proxies, just like any networked-program, in fact by simply intercepting and observing the API calls made by the assistant, we can demystify its functionality, assess its efficiency, and potentially identify areas for improvement. Furthermore, this allows us to:
- Necessity of the framework: Assess if the framework truly essential, or could a simpler approach achieve similar results?
- Prompt optimization: Analyzing the prompts sent to the LLMs to Identify patterns, structure, and any special formatting or instructions. Are they efficient? Can we craft more efficient or effective prompts than those used by the assitant?
- API call efficiency: Examine the parameters included in the API requests. This might include model names, temperature settings, maximum token limits, and other factors affecting the LLM’s behavior. Also, is the number of API calls made optimal, or are there redundancies?
- Response Handling: Observe how the assitant processes the LLM’s responses. Is there any post-processing, error handling, or validation?
Setting Up mitmproxy
mitmproxy is a powerful tool for intercepting and inspecting network traffic, including HTTP and HTTPs requests. By setting up mitmproxy as a proxy, as depicted in the following diagram, we can capture all of Zed’s communication with the LLM provider.
graph LR A[AI assistant] --> B(mitmproxy); B --> C[LLM Provider]; subgraph "Self-Hosted" B end style B fill:#ccf,stroke:#333,stroke-width:2pxLet’s setup mitmproxy
- Installation: Follow the installation instructions on the mitmproxy website. On MACOS, simply do:
- Interactive UI: Start the interactive UI by running mitmweb in your terminal. Note the URL of the interactive UI (e.g., http://127.0.0.1:8081/).
- Proxy Configuration: Configure your system to route traffic through mitmproxy, listening on http://localhost:8080.
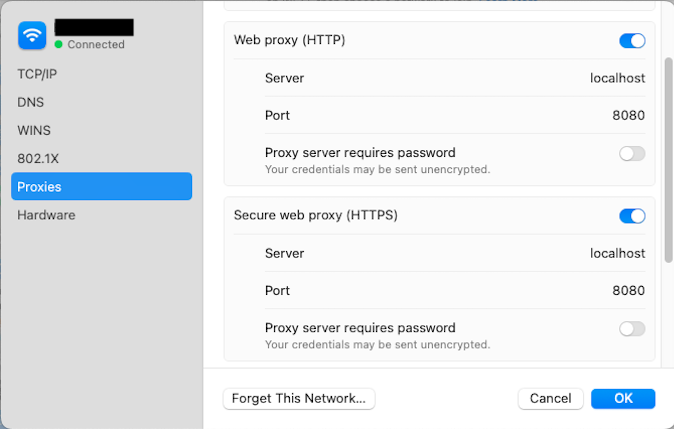
For instance on MACOS, open System Settings, in the sidebar click on Network, then choose the network you’re connectred to on the right panel, and click Details, then click Proxies.
In the HTTP(s) proxy configuration, set the host to localhost and the port to 8080 as depicted below:
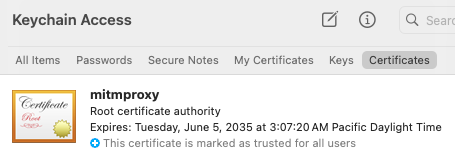
- CA Certificate: To be able to intercept HTTPS requests, we need to install the mitmproxy Certificate Authority (CA) certificate. This certificate is generated as part of the installation of mitmproxy, on MACOS it’s available under the ~/.mitmproxy folder. To install it, simply run:
Then you can confirm the certificate was added successfully by checking Keychain Access
If you need to setup mitmproxy to intercept HTTP(s) traffic from python programs (e.g. to use with requests), you can simply setup the following Environment Variables:
Intercepting Zed’s API Calls
Once mitmproxy is configured, we can launch Zed and perform typical coding tasks.
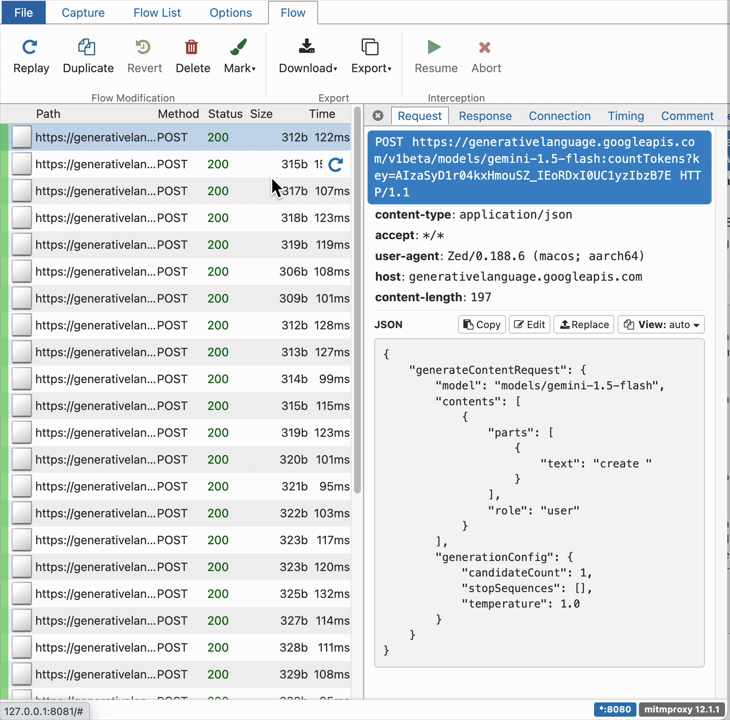
Analyzing the traffic
mitmproxy’s interactive UI will display Zed’s API calls, including the requests and responses. The intercepted API calls should reveal how Zed constructs its prompt by concatenating the current code context, the user’s partial input, and specific instructions for code completion. Further details on Zed’s logic that we should expect learn more about from the traffic includes:
- Contextual Awareness: how Zed incorporates surrounding code to provide relevant completions.
- Instruction Specificity: how Zed uses clear instructions to guide the LLM’s response towards valid and helpful code.
The following GIF illustrates the traffic generate by Zed in one session:
Some interesting observations:
- Zed sending too many countTokens API calls to the LLM provider (in this case Gemini). Almost, an API call is sent every time the user types a character.
- When the user click the submit button on Zed’s UI, an API call is sent to streamGenerateContent API containing the user prompt as well as Zed’s System Prompt.
- A final following API call is made to streamGenerateContent to generate a title for the user thread.
Analyzing Zed’s System Prompt
As we saw in the previous section, when Zed’s sends a request for the LLM to answer the user prompt, it also includes a System Prompt, which you can find the full content below.
This system prompt is designed to guide the LLM, in how to interact with a user and utilize specific tools. It can be breaking down into the following key aspects:
I. Role and Responsibilities:
The prompt establishes the assistant role as a highly skilled software engineer, emphasizing expertise in various programming aspects. It dictates a professional yet conversational communication style and strict adherence to truthfulness. The prompt strongly discourages apologies for unexpected outcomes, focusing instead on problem-solving and explanation.
II. Tool Usage:
This section provides rigorous guidelines for using provided tools. It mandates:
- Adherence to schemas: must correctly use the APIs provided, including supplying all necessary parameters.
- Contextual awareness: shouldn’t use tools to access information readily available in the context.
- Availability checks: Only available tools should be utilized. This implies dynamic tool availability; the prompt suggests tools can be enabled or disabled.
- Process management: is explicitly forbidden from running long-running background processes like servers or file watchers.
III. Searching and Reading:
This section details the assistant’s approach to file system navigation and code searching. It emphasizes:
- Proactive information gathering: When unsure, it should use tools to acquire information.
- Project structure awareness: understands the project’s root directories (kvwc in this case).
- Path specificity: Paths provided to tools must originate from one of the root directories. No guessing of paths is allowed.
- Tool preference: The grep tool is preferred for code symbol searches, while find_path is used for path-based searches.
IV. Code Block Formatting:
This section enforces a very specific format for code blocks: ` path/to/Something.blah#L123-456 (code goes here). The path is mandatory, even for example code not directly related to the project. This rigid format is likely necessary due to limitations in the Markdown parser being used, implying the system has specific constraints not directly defined in the system prompt itself.
V. Diagnostics Handling:
This section outlines the assistant’s approach to fixing software diagnostics (errors, warnings):
- Limited attempts: should attempt to fix diagnostics only a couple of times before seeking user input.
- Code preservation: should not unnecessarily simplify or modify generated code to resolve diagnostics.
VI. Debugging:
The prompt encourages best practices for debugging: addressing root causes, adding logging, and employing test functions.
VII. External API Usage:
This section directs the assistant on how to use external APIs. It includes:
- Proactive usage: should use suitable external APIs without explicit user permission.
- Version selection: must choose API versions compatible with the project’s dependency management; otherwise, it must choose the latest version available.
- API key handling: is cautioned about secure API key management.
VIII. System Information:
This provides basic system information like operating system and shell, which might be relevant for certain tool invocations.
Zed’s System Prompt
Conclusion
We have seen how reverse engineering Zed’s AI coding assistant using mitmproxy provides valuable insights into its internal workings. This approach can be used to analyze other assistants. By analyzing the API calls, we gained a better understanding of the prompt engineering strategies, the API interactions with the LLM provider, and potential areas for enhancement. Furthermore, it empowers us developers to make agents of our own that are inspired by the approach and strategies employed by such AI coding assistant, potentially leading to more efficient and effective workflows.
I hope you enjoyed this article, feel free to leave a comment or reach out on twitter @bachiirc.