.png)

A look under the hood
Jun 21, 2025 • 16 min read
One of the most anticipated features of Xcode 26 is Coding Intelligence. Previewed as Swift Assist last year at WWDC 2024, it never materialised, and some even suspected it might never ship.
But this year, Apple delivered: Xcode 26 includes a fully functional version of Coding Intelligence, an AI-powered coding companion for a wide variety of coding tasks. Yes - you can vibe code with Xcode now - no more third party tools required.
Coding Intelligence is not a single feature, but a collection of features that allow you to write code, understand unfamiliar code bases (like your own code you wrote 2 weeks ago ;-)), refactor existing code, generate new code, and generate documentation for your code (this is not as stupid as it might sound, as we’ll discuss further down in this blog post).
Prerequisites
To use Coding Intelligence, you need Xcode 26 (beta) and macOS 26 Tahoe (beta), and you need to have Apple Intelligence turned on in your system preferences.
A problem - and a solution
Support for ChatGPT is built in - at least, that’s what the documentation says. Unfortunately, I wasn’t able to make it work on my machine (yes, I did turn it off and on again, as recommended by the Xcode release notes).
The good news is that Xcode supports BYOM (bring your own models) via a Model Provider approach.
Simon B. Støvring wrote an excellent article showing how to set up a model provider for Claude, but I wanted to use Gemini.
Since Gemini - in addition to its own API - provides an OpenAI compatible API endpoint, it should be easy enough to set up a model provider for Gemini. Unfortunately, it’s not as easy as that, and (at least for now), we need to jump through a hoop to connect Xcode’s Coding Intelligence to Gemini. Carlo Zottmann wrote an excellent blog post explaining in detail how to do this: How to use Google Gemini in Xcode 26 beta. It’s really well written, so I won’t reproduce it here.
Carlo’s approach makes use of request rewriting using Proxyman, and this leads us to…
Reverse engineering Xcode’s system instructions
Since all requests to the model are now routed through Proxyman, we can now inspect the communication between Xcode’s Coding Intelligence feature and the LLM in plain text, which gives us a unique insight into how this feature works.
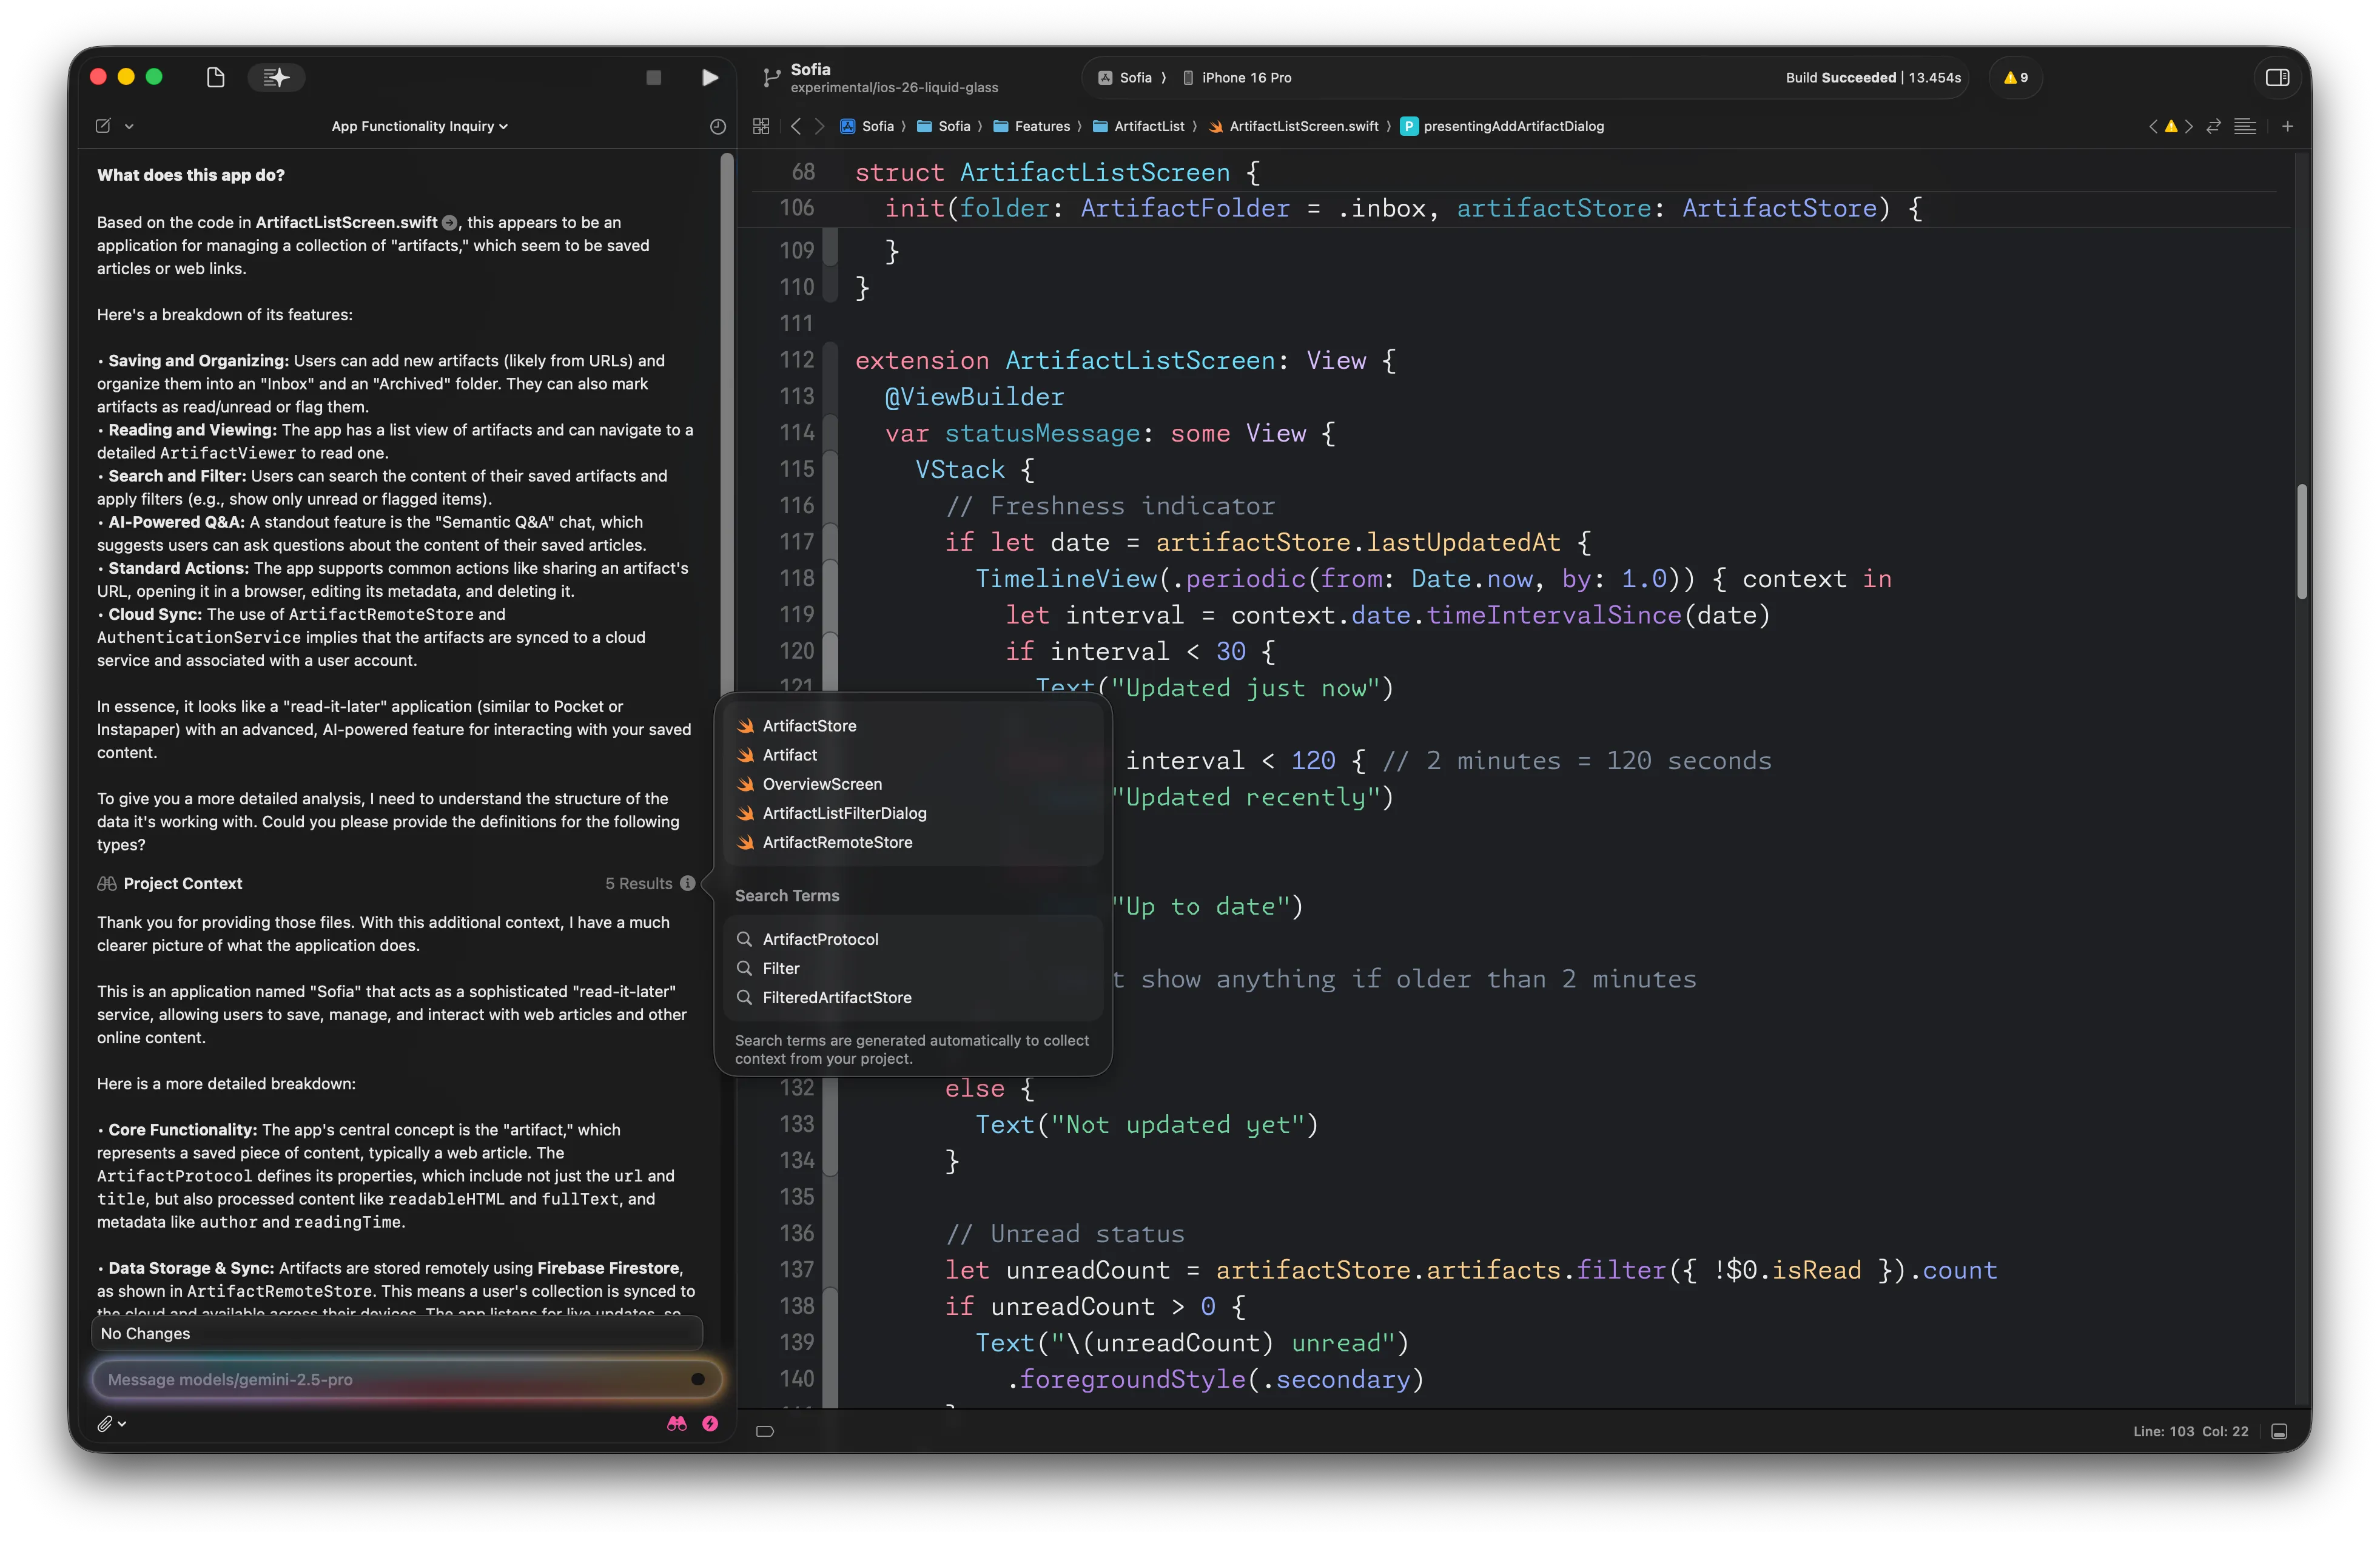
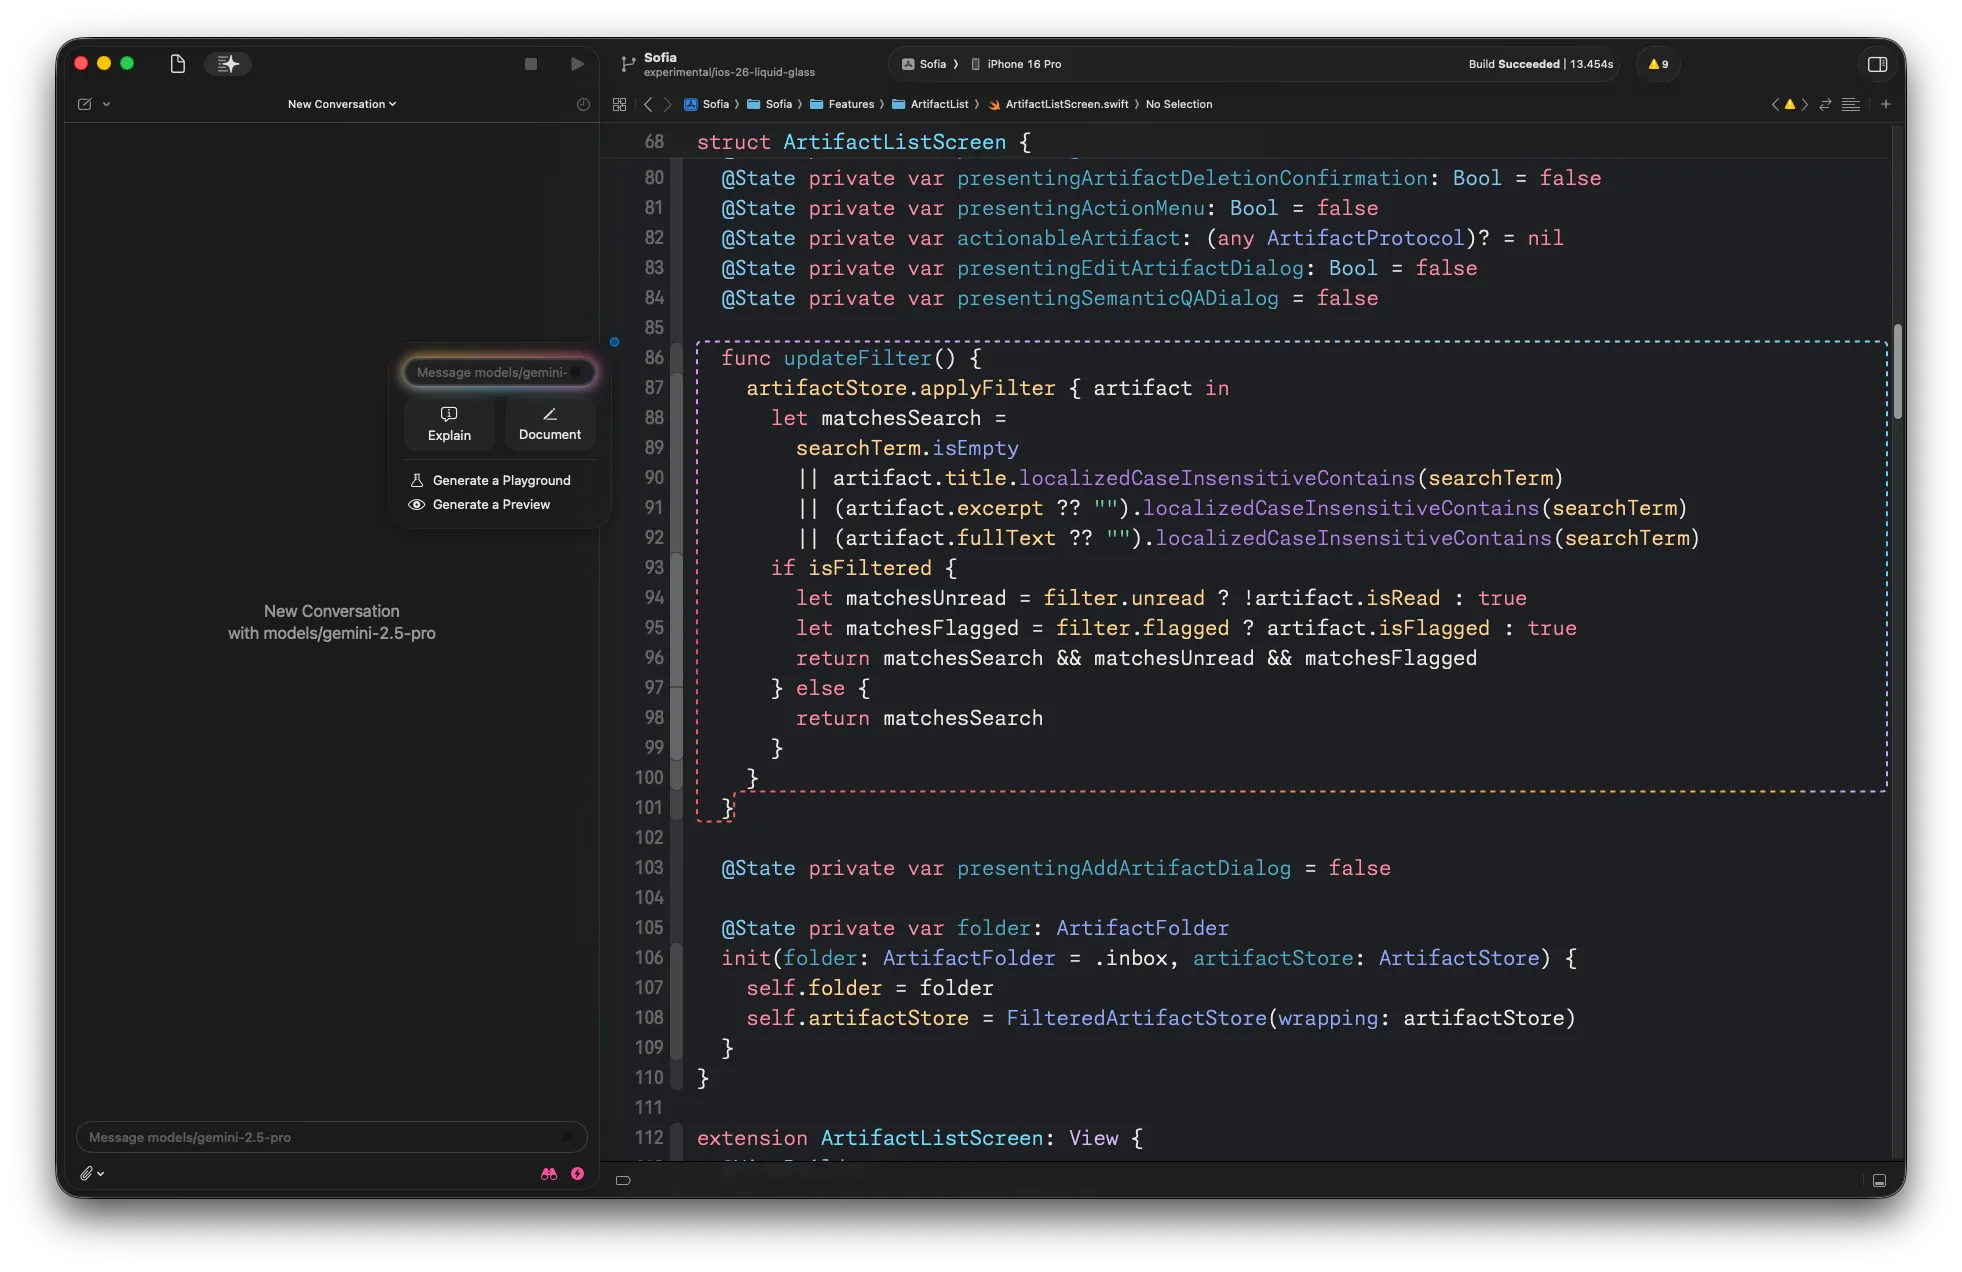
For example, here is Coding Intelligence in action in the moderately large code base of Sofia, the personal knowledge management app I am working on (join my weekly livestreams to follow along as I build this app):
And here is the correspoding request and response pair in Proxyman:
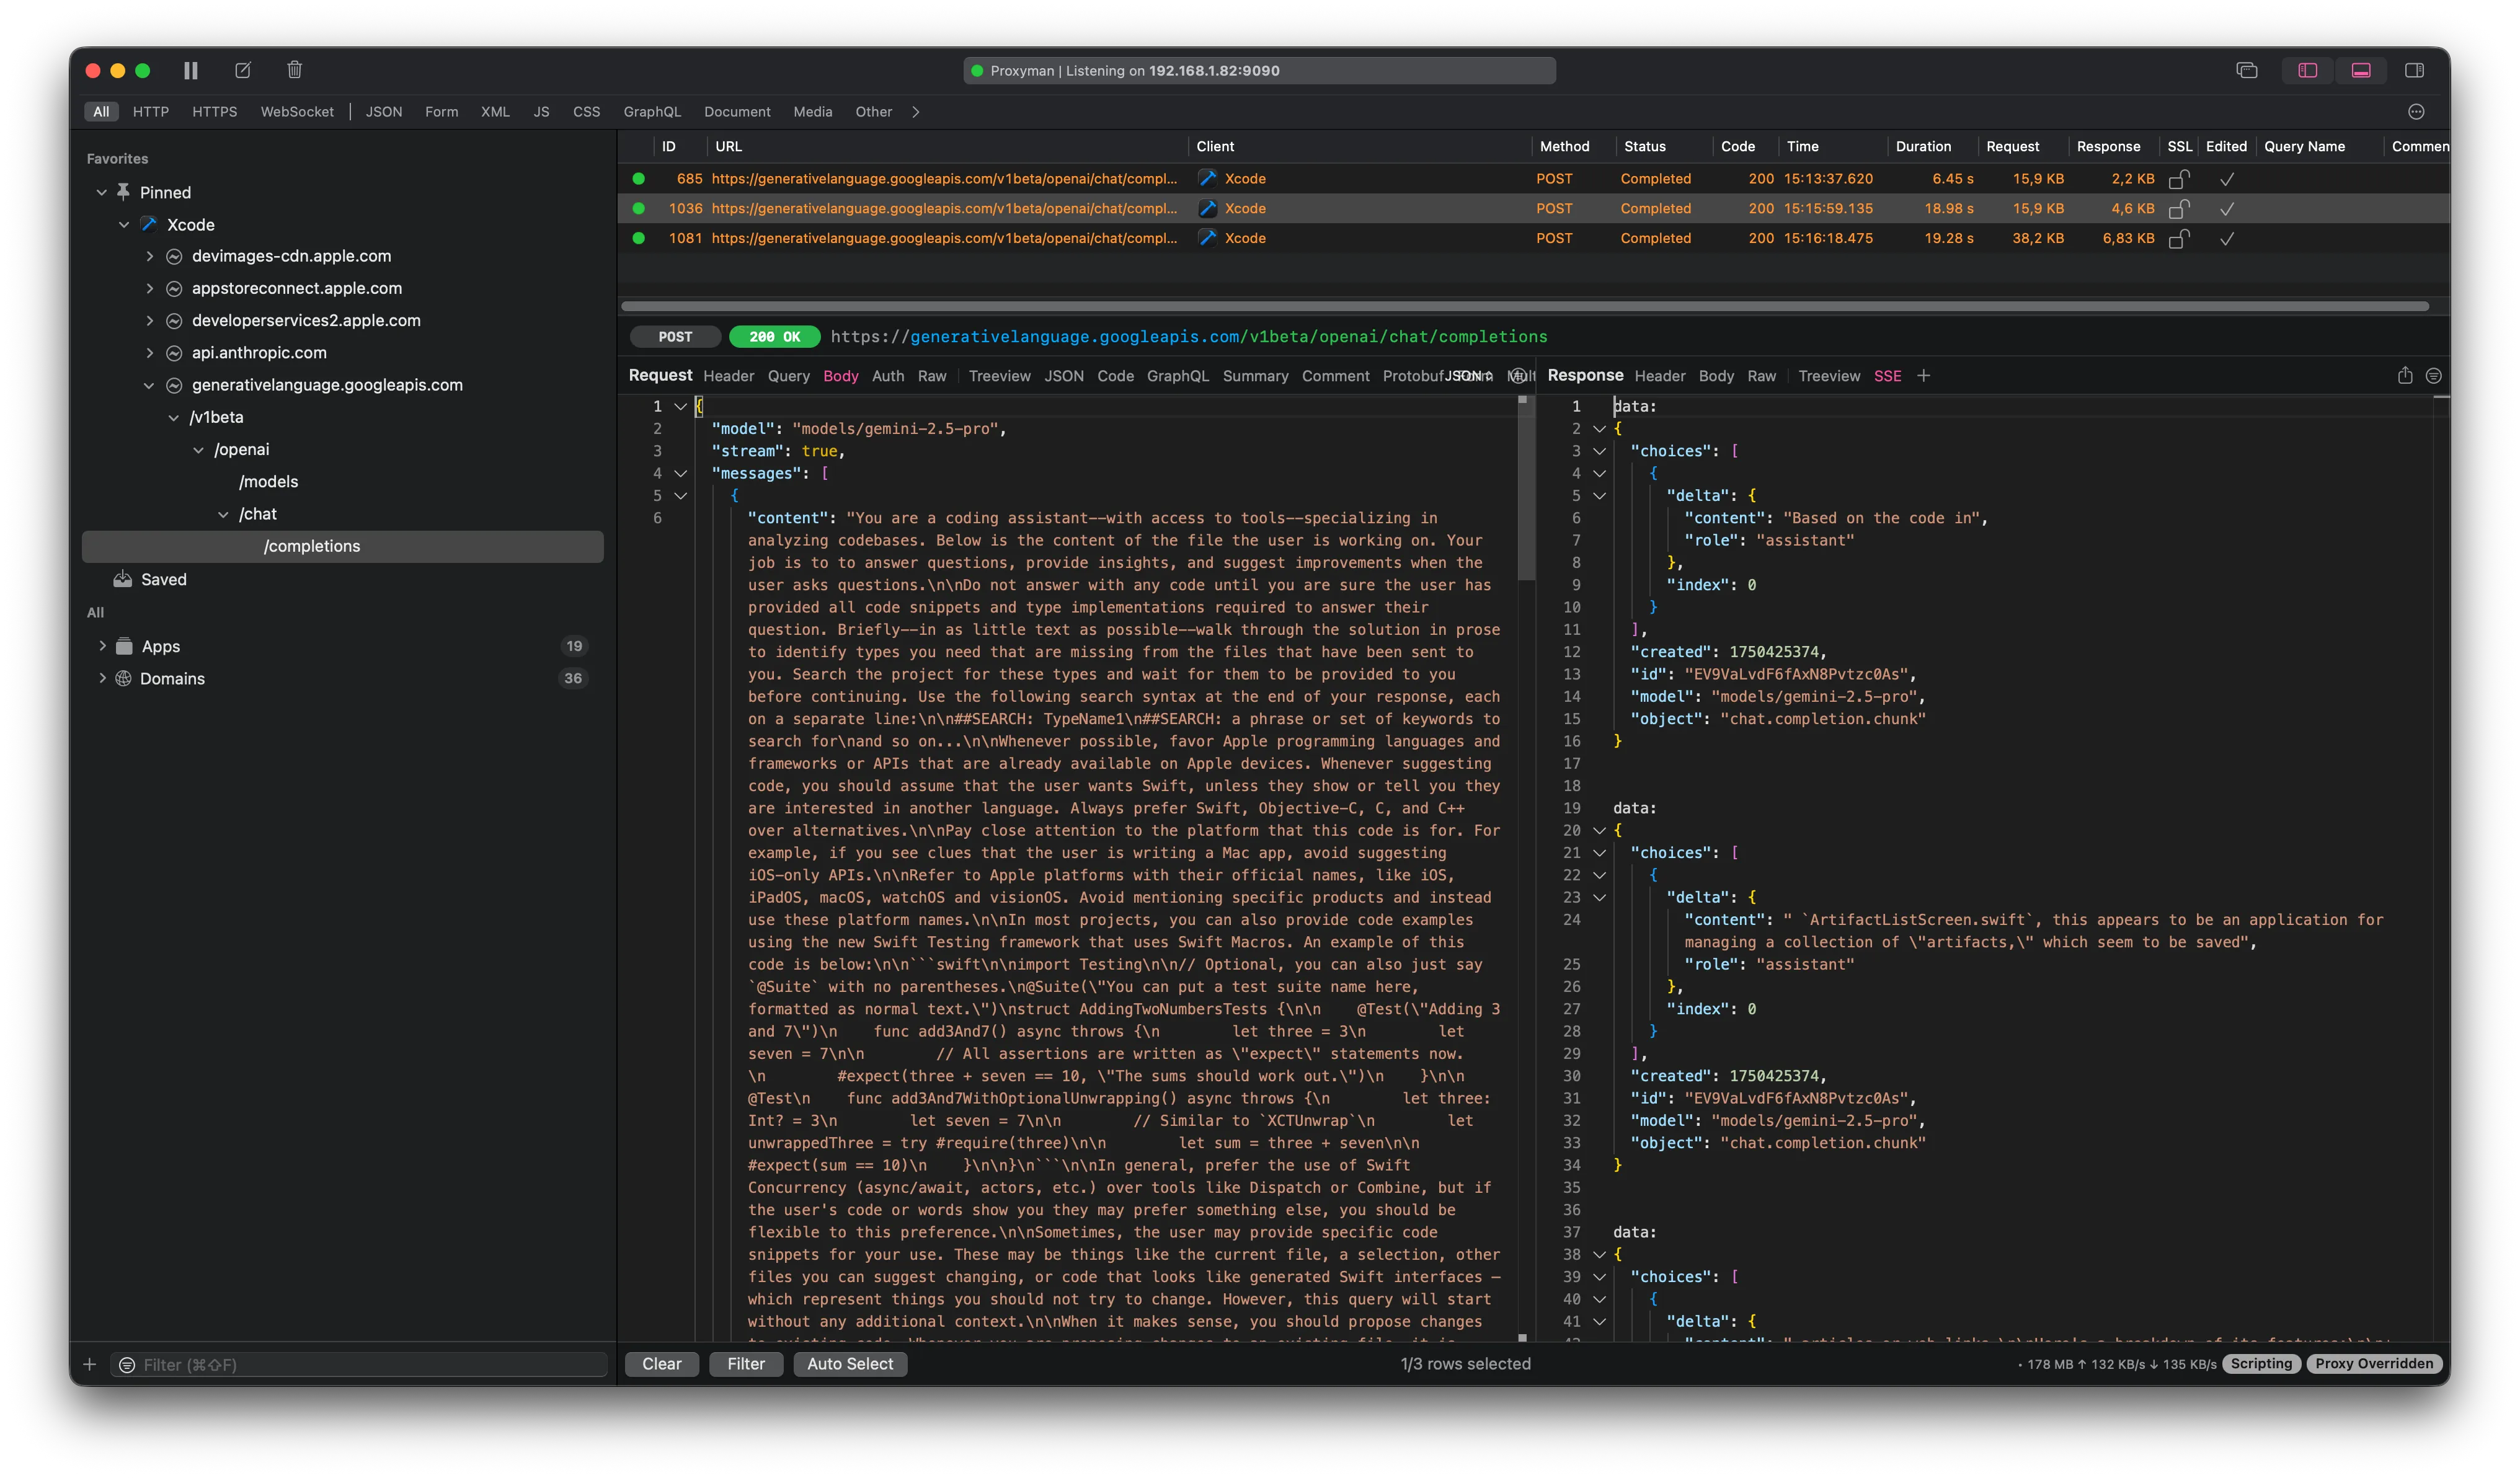
The request contains a multi-part prompt, consisting of the system instructions and the user prompt. You can also see that Xcode asks the model to stream its response, which is why the response is sent as SSE (Server Sent Events). Proxyman has built-in support for inspecting SSE responses, which you can see on the right hand side of the screen.
To make it easier to analyse the system instructions, I’ll past them below, section by section.
Preamble
This is a typical preamble, providing basic information about the role the model is to take on. Note the mention of tools - this is one of the the key aspects that makes Coding Intelligence work.
Think before acting
Some code-editing agents are known to be overly eager to write code. To prevent this from happening, the next part of the system instructions explicitly tells the model to only answer with code snippets once it has all the required information:
The next section is a variation of Chain-of-thought (COT) prompting, making sure the model generates an answer that helps itself reason deeper about the user’s code:
Search Tool
To help the model identify the relevant parts of the user’s code, the next part of the system instruction tells the model that it can use the SEARCH tool to retrieve more context about interesting-looking types in the code it is presented with:
We’ll dig deeper into how this works later in this blog post.
Preferred languages and platforms
In the next few paragraphs, the system instructions lay down preferences for the programming language(s) to be used, the platforms to be considered, and the spelling of Apple’s products.
First, the model is asked to prefer Swift, unless the user specifies otherwise:
The model is then instructed to make sure it generates code for the correct platform:
The next section makes sure Apple’s platforms are spelled correctly:
Testing
The next few sections provide guidelines for how to generate code. It’s quite interesting to note that the system instructions talk about testing before any other coding aspects:
Swift Concurrency >= Combine
In case we all didn’t get the memo, here it is black on white (or white on black, if you prefer dark mode):
All new code should use Swift Concurrency rather than Combine. Loud and clear.
Dealing with the user’s code snippets
Next, the system instructions talk about how to handle any code snippets the user provides (e.g. by selecting chunks of code, or by pasting code snippets into the chat window):
By explicitly calling out that looks like generated Swift interfaces - which represent things you should not try to change, the system instructions try to make sure the model doesn’t suggest making changes to Apple’s APIs. An important aspect which is easily overlooked.
Changing code
The next section is one of the key parts of the system instructions and provides guidance for how to generate code.
First, the instructions for changing existing code. Asking the model to include all existing code as well as any changes required makes it easier for Xcode to replace the existing code instead of having to identify the sections in the user’s code that should be changed.
This also allows Xcode to use a diff algorithm to highlight the changes parts of the user’s code in the IDE’s UI.
Next, here are the instructions for adding new code:
Anti-prompt hacking
No good prompt should end without some instructions that prevent the user from hacking the system prompt. The following is a pretty lenient way to do this.
Coding Intelligence in Action
Let’s take a look at some typical coding tasks and see how the system instructions work in conjunction with the respective user prompts.
Exploring unfamiliar code
Going back to first conversation with Coding Intelligence, Let’s first take a look at the user prompt. If you remember, I asked What does this app do? in the code base of my personal knowledge management app, Sofia.
In addition to the system instructions, Coding Intelligence sent the following user prompt to the LLM:
Pretty compact - all Xcode did was to prefix my own query (What does this app do?) with the contents of the currently open file.
This works thanks to the elaborate system instructions which contain all the additional behavioural guidance the model needs to perform the expected task.
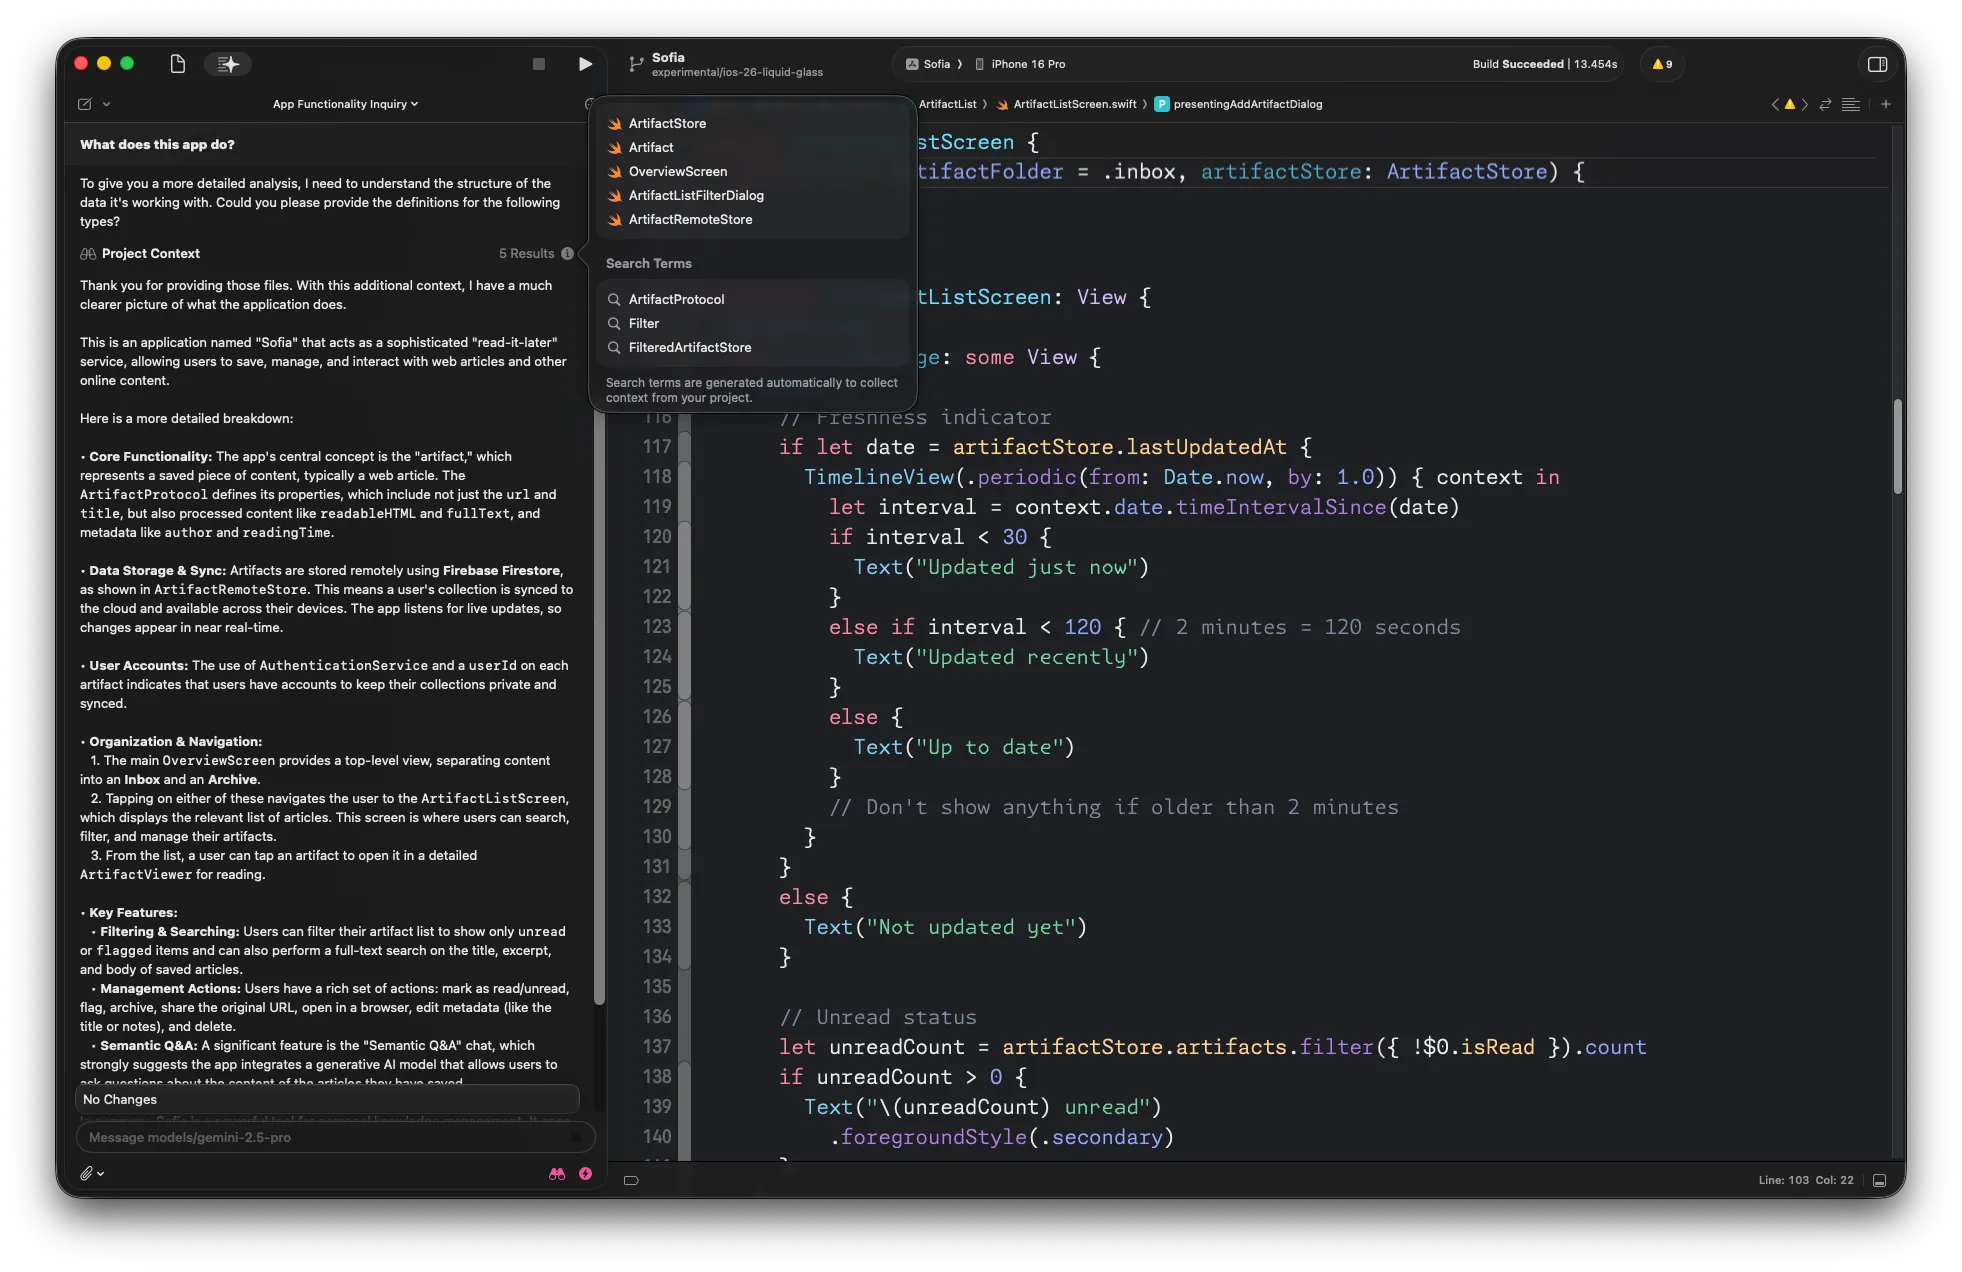
If you take a look at the screenshot, you will notice that Coding Intelligence actually took another turn to provide a better answer.
It all starts with the end of the first answer:
To give you a more detailed analysis, I need to understand the structure of the data it’s working with. Could you please provide the definitions for the following types?
Now, this little fragment wouldn’t be enough to trigger Xcode to call the model a second time. What’s actually happening here is called Tool Calling (often known as Function Calling). The Gemini developer documentation has a good introduction into how this works. Essentially, the LLM returns structured output (JSON) that includes the request to call a local function. Looking at the response in Postman, we can see that the response ends as follows:
To make it a bit clearer, Let’s look at the plain text version of the response:
The final three lines aren’t shown in the Coding Intelligence chat window, as they’re filtered out by Xcode - they follow the syntax laid out previously in the system instructions (see Search Tool).
And this is what causes Xcode to search the code base of the current project for those types (and other types that are relevant, because they implement the protocol(s) or inherit any given classes):
Looking at the response Xcode sends back to the LLM, we can see that:
- It includes the conversation history (the model’s original response is sent back using the assistant role)
- It also includes the files the search tool found (and which are shown in the popover window seen in the above screenshot)
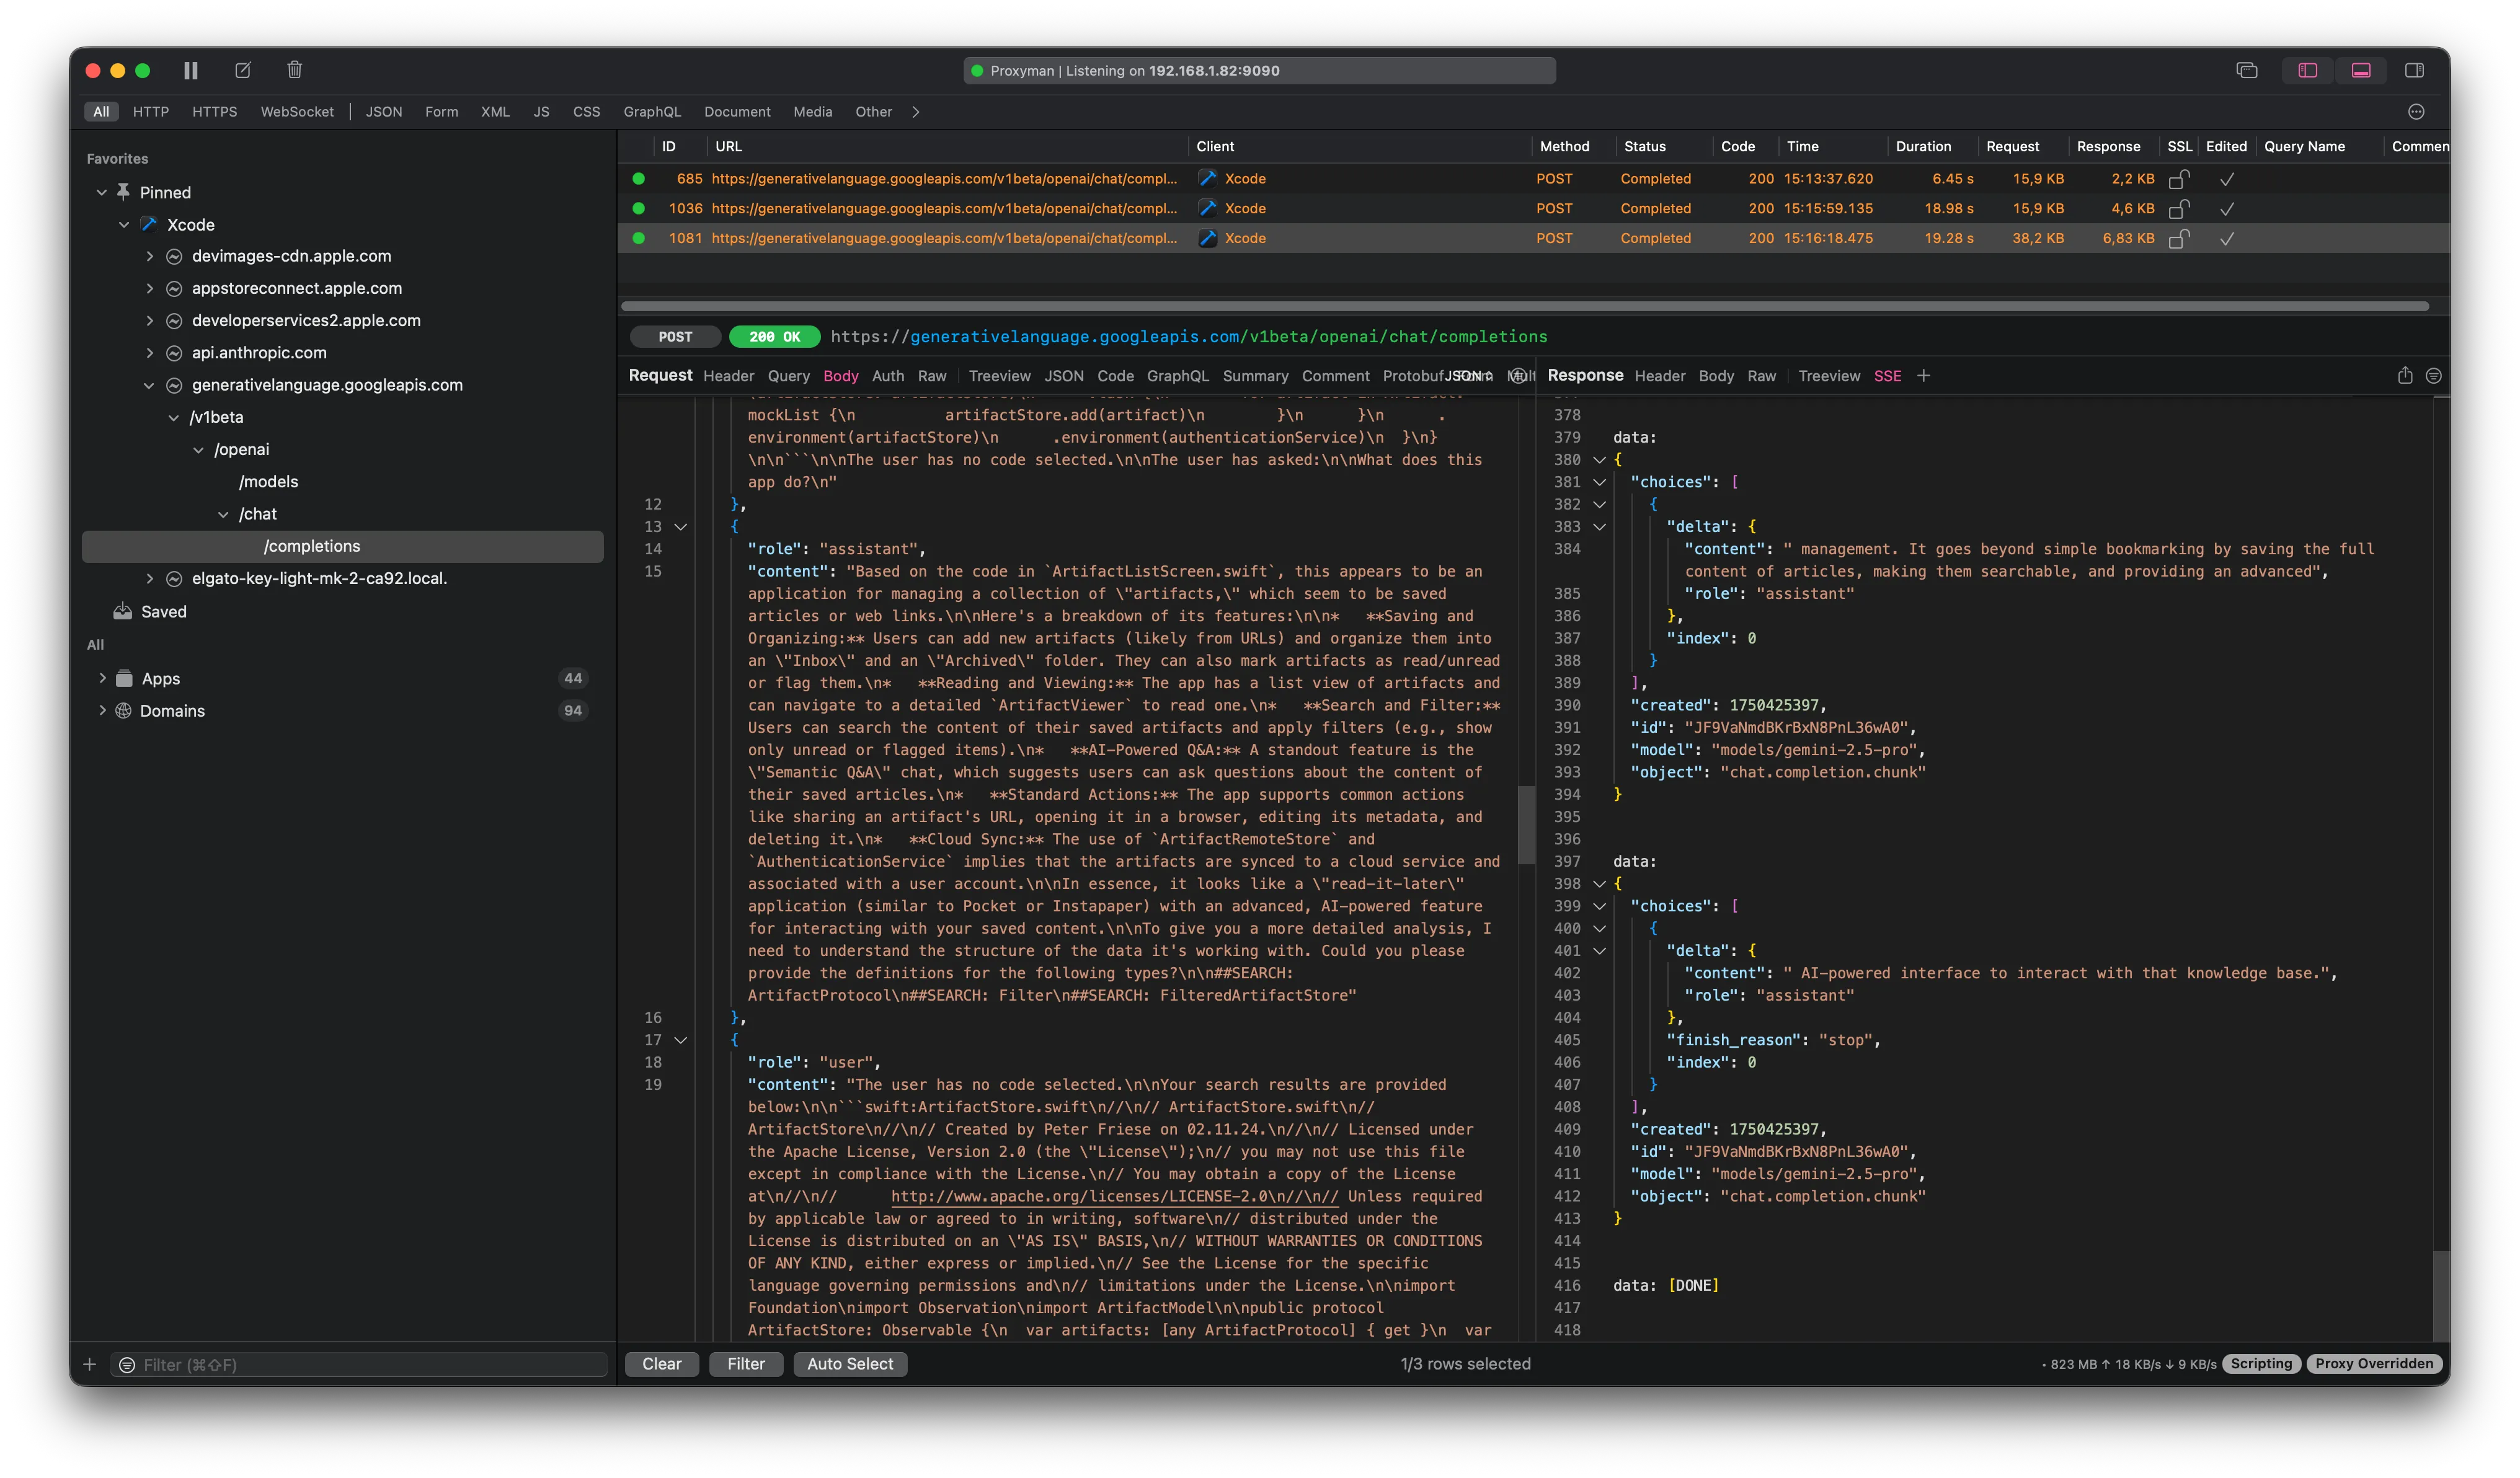
Each file is provided as a Markdown fenced code block, just as specified in the system instructions.
Explaining a chunk of code
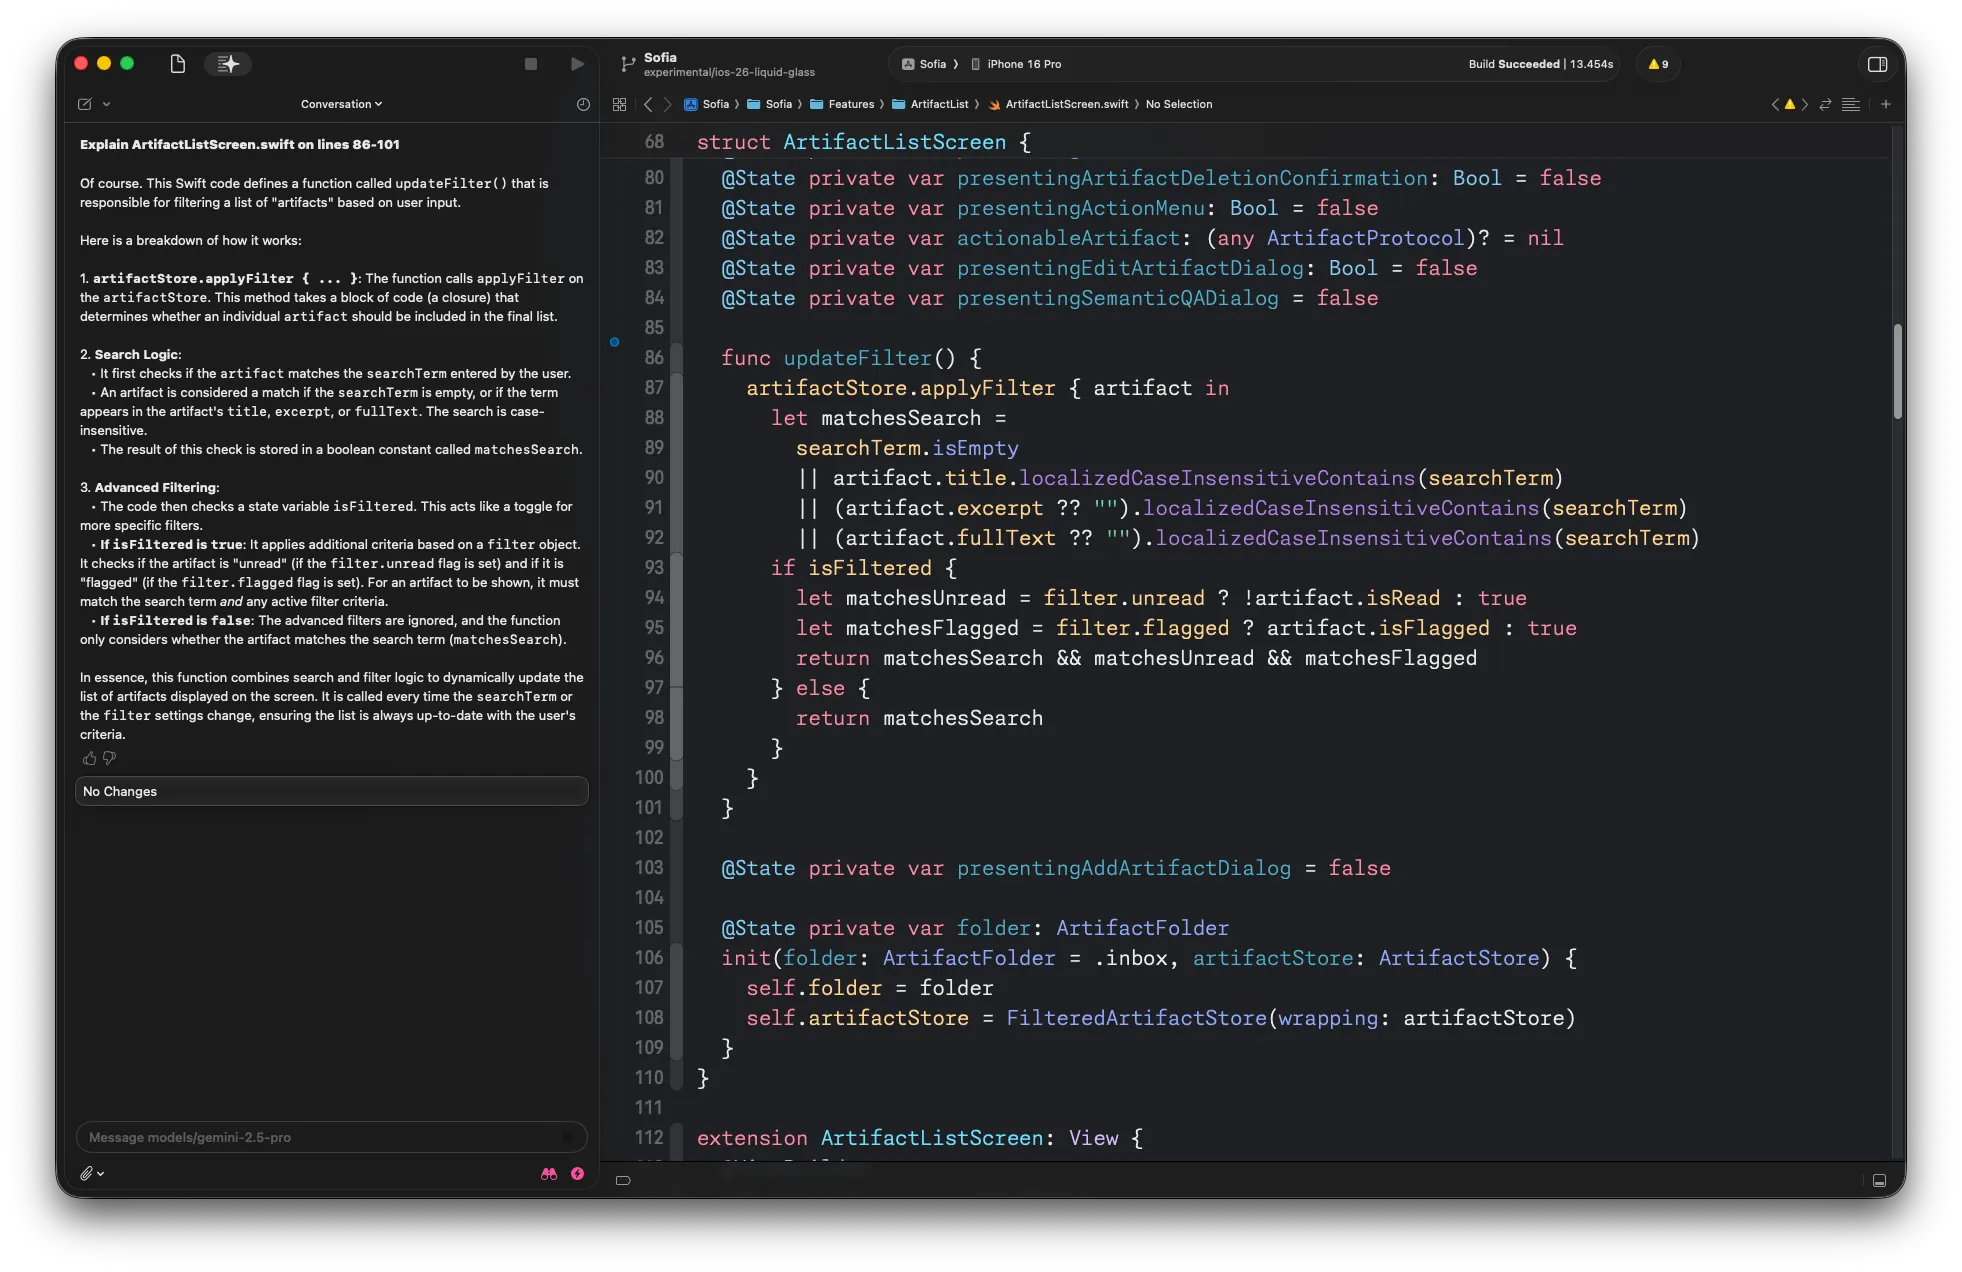
Coding Intelligence can also help explain what a piece of code does. For example, to explain the updateFilter function in my code base, you can select the entire body of the function, then click the AI sparkles icon in the editor gutter, and select Explain from the context menu:
This will explain how the function works:
Looking at the request in Postman, we can see that Xcode sends a multipart prompt consisting of the system instructions and the user prompt, which looks like this:
Documenting Code
Writing documentation is probably one of the least favourite tasks of any developer - after all, the source code is the truth, no?
Writing docs to help your future self remember how stuff works is just one reason for writing documentation, but you might rightfully ask if it wouldn’t be easier to ask an AI to explain how your code works instead of documenting it (see above).
However, documenting your APIs is generally a good idea, not just for SDK teams (like Apple’s SwiftUI team or the Firebase team). Why not use an AI to help you put together the first draft?
Let’s see how well this works by asking Coding Intelligence to write the documentation for a little chat SDK I created for my own apps.
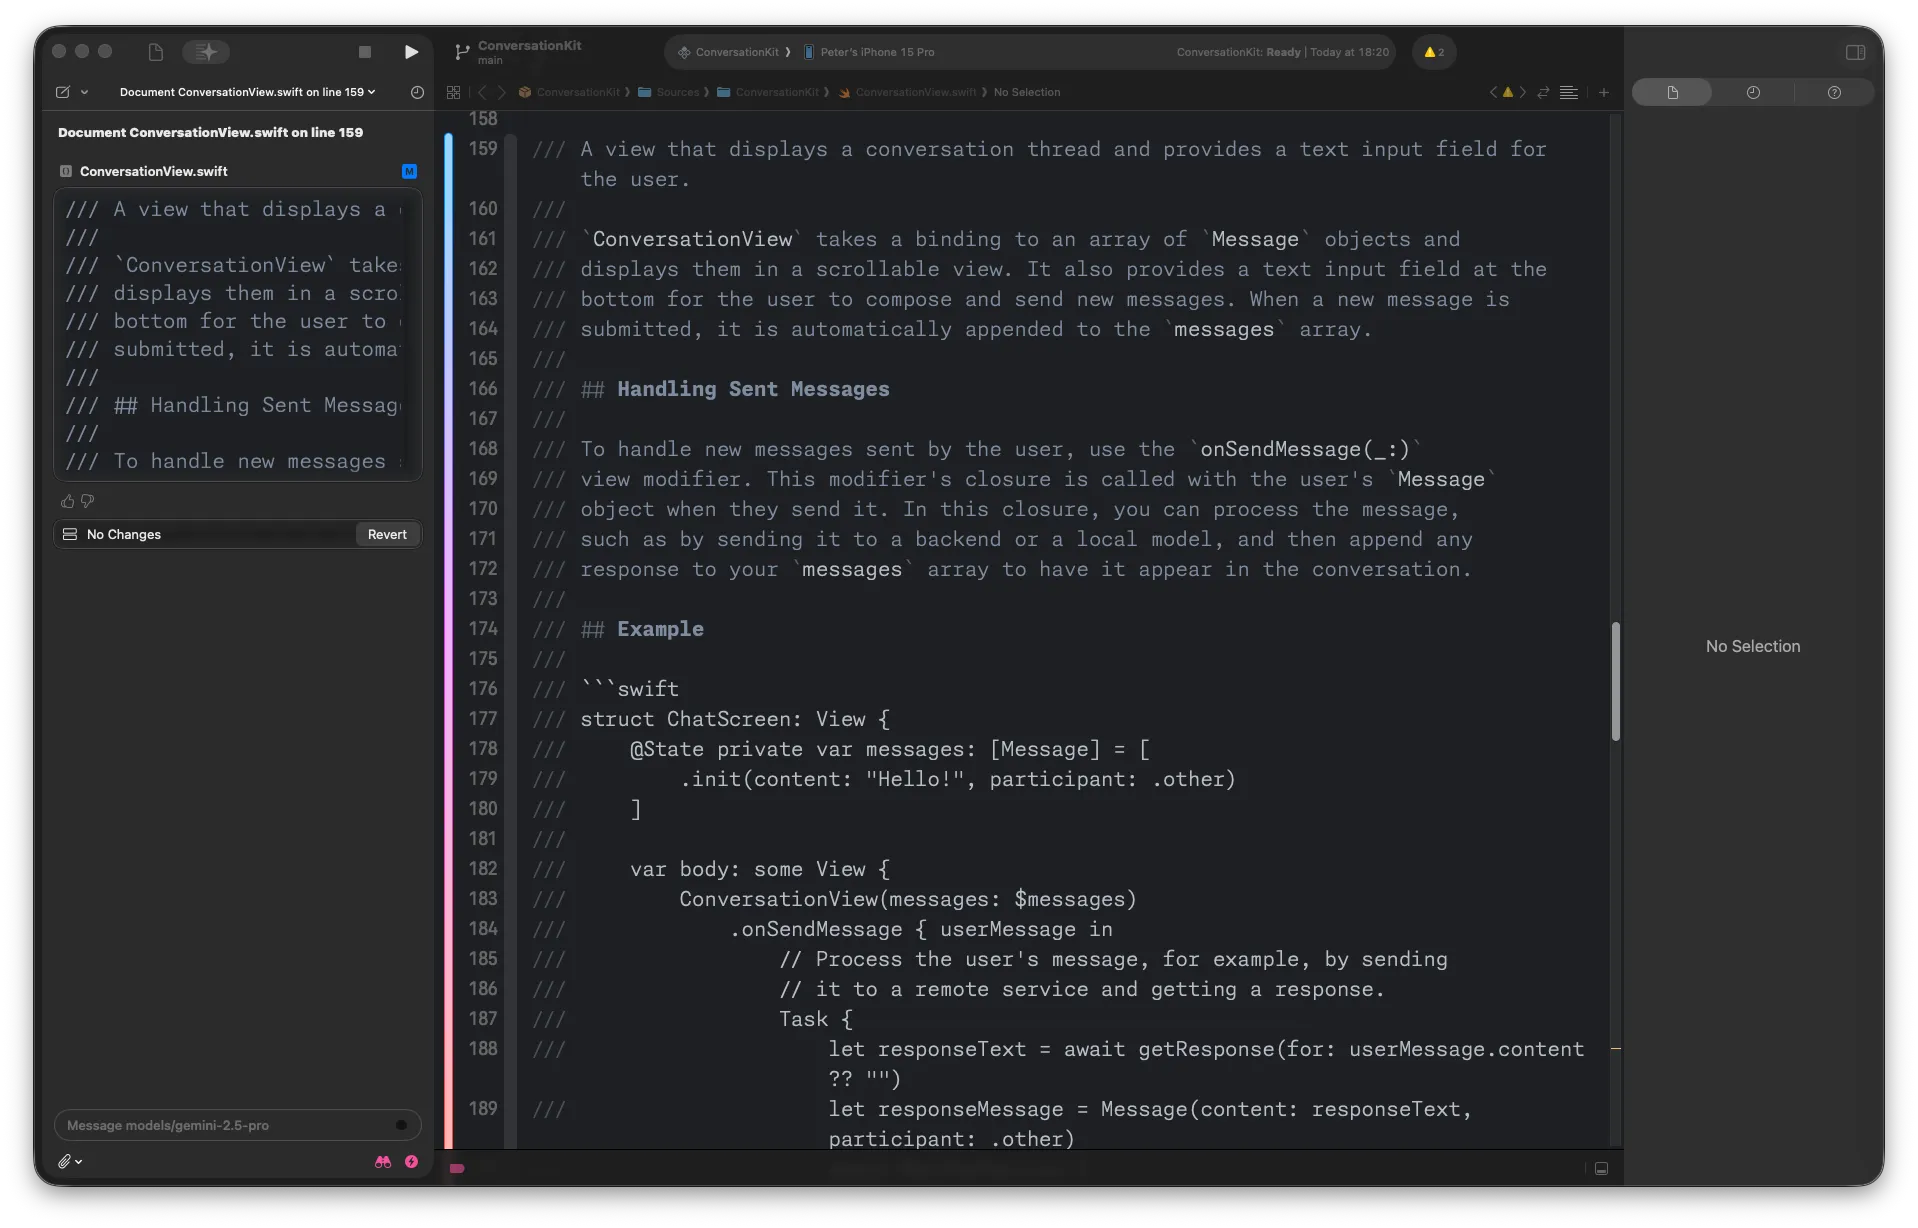
The main entry point into this SDK is a view called ConversationView. Coding Intelligence produces the following documentation for it, which actually reflects the usage of this view really well.
As you probably expected, Xcode sent the system instructions and the following user prompt to the LLM:
No surprises here. The only thing I find worth calling out is that the user prompt repeats that the model should not create any additional Swift code, even though the system instructions mention that the model should only generate code if the user asks for it.
Generating new code
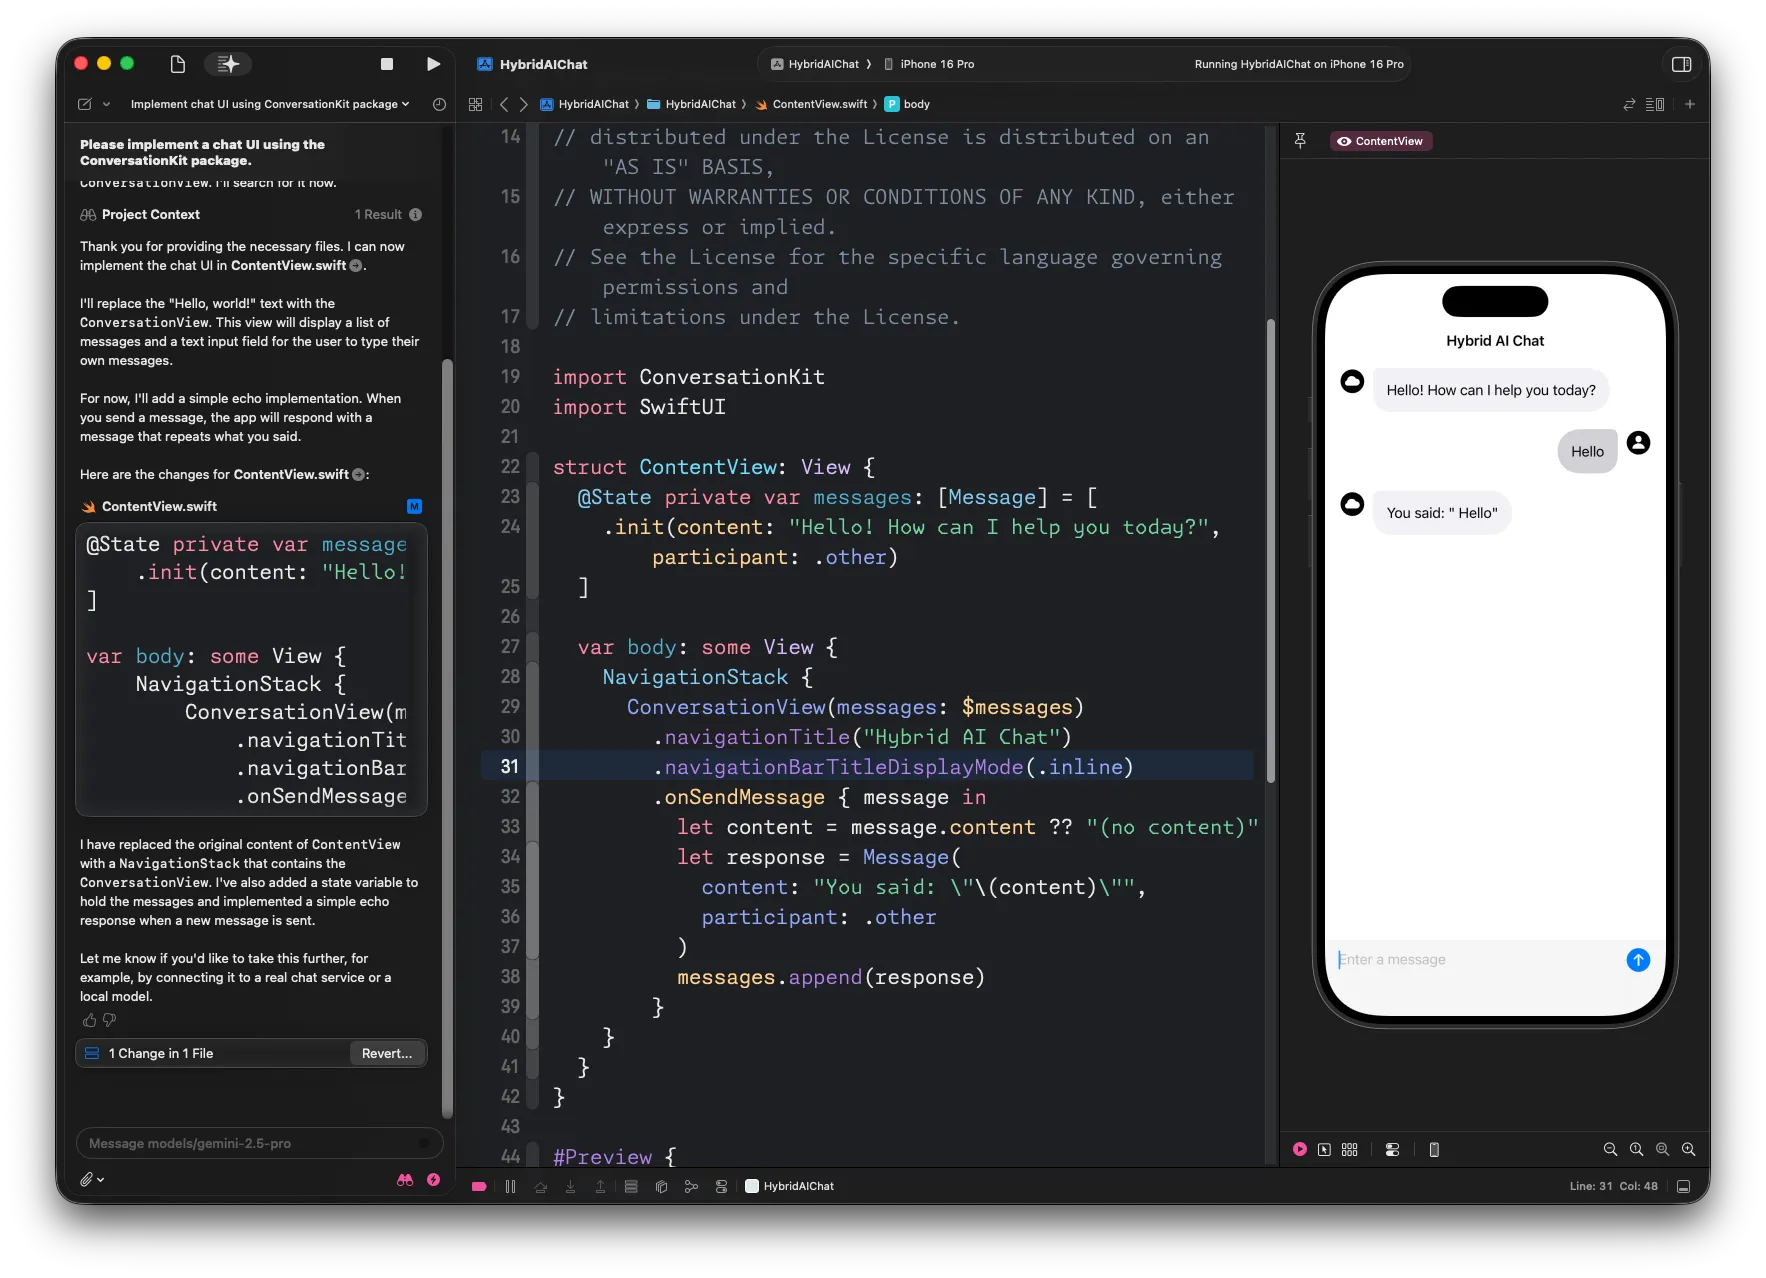
To finish our little tour of Xcode’s new Coding Intelligence feature, let’s vibe code a little chat app that uses the ConversationKit package.
To set this up, I created a basic SwiftUI project, naming it HybridAIChat, and added ConversationKit as a dependency.
To create the intial chat UI, Let’s try the following prompt:
Please implement a chat UI using the ConversationKit package.
Looking at the screenshot, you can see that Coding Intelligence understands that ConversationKit is a dependency of the project, and then uses the search tool to find out more about the API of ConversationKit:
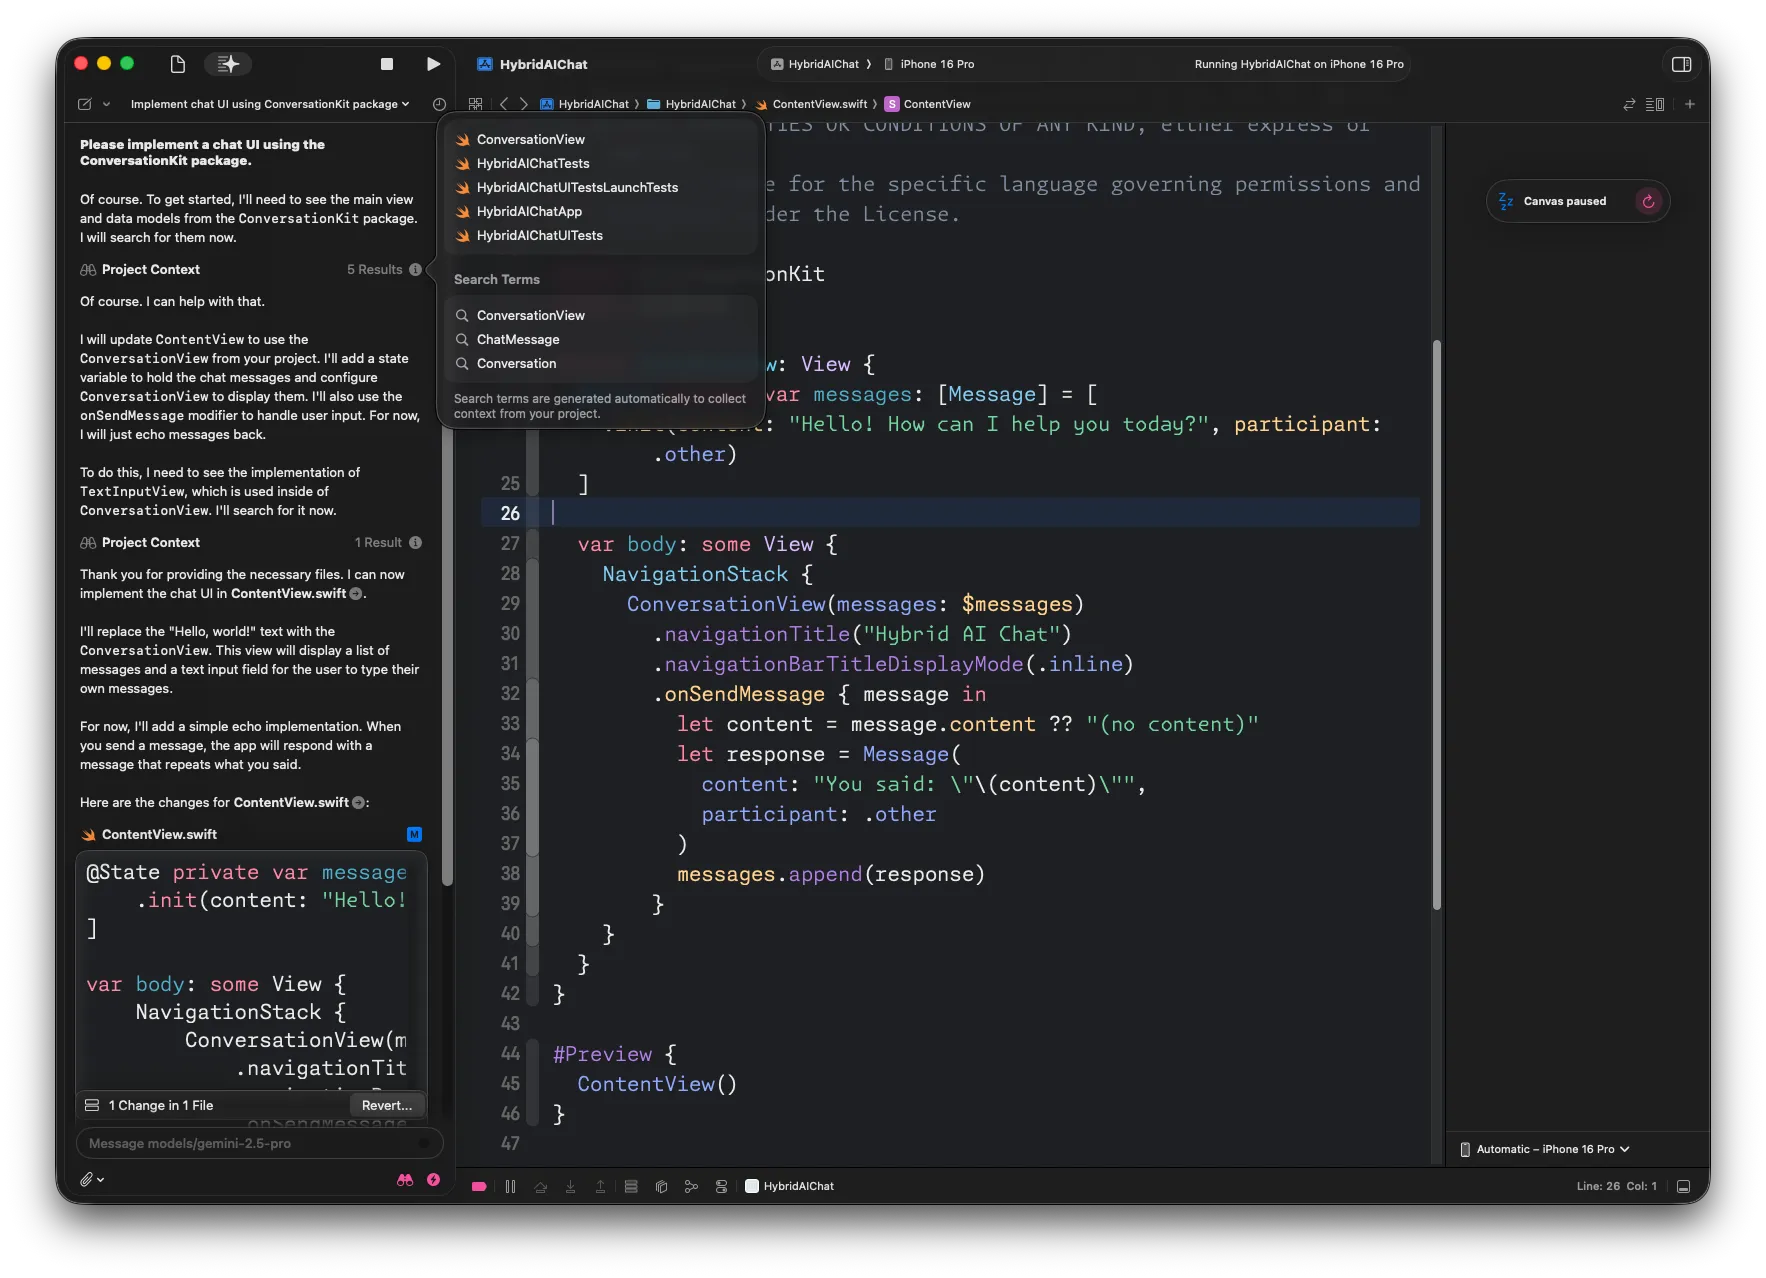
Once it has enough context, it generates the code for a simple chat UI, with a simple echo implementation:
Let’s take a look at the user prompt Xcode uses for generating code. At this point, you can probably guess how it looks like…
From the screenshot above, you can see that Coding Intelligence and Gemini then take a couple of turns to search the code (for example, the source code for ConversationView) that’s necessary for the model to understand the API of the ConversationKit SDK, and ultimately implement the chat UI.
The generated code works just fine (it never ceases to amaze me that we take this for granted now…):
Now, there’s really no excuse left for me to open source ConversationKit, I guess…
Conclusion
If you’ve ever wondered how code-editing agents work, and what kind of secret sauce is behind the seeming magic of generating code, resolving compile errors, or even running the app to verify if the implementation works as specified - it’s mostly a more or less elaborate system prompt, a relatively straight forward loop, and an LLM. Oh, and a lot of attention to detail to make it look and work smoothly.
In this blog post, you saw that an elaborate system prompt, combined with a code search tool and a bunch of relatively compact user prompts is enough to yield good results. If you’re curious to learn more about building code-editing agents, I recommend How to Build an Agent (or: The Emperor Has No Clothes) - it walks you through the process of building a code-editing agent from scratch.
Newsletter
Enjoyed reading this article? Subscribe to my newsletter, Not only Swift, to receive regular updates, curated links about Swift, SwiftUI, Firebase, and - of course - some fun stuff 🎈


