.png)


📆 Fri Oct 03 2025 by Jacek Galowicz
(11 min. reading time)
This is part one of a four-part article series in which we have a closer look at how easy it is to create GNU/Linux systems with NixOS that are:
- Small: no unnecessary parts, built with Nix, but contains no Nix itself.
- NixOS is not designed to be small up front, but provides great facilities to make system configurations and packages minimal.
- We will use systemd-repart to create minimal raw system images.
- Self-inflating: Hardware disk size is not always known at image build time, but the image can inflate itself at the first boot to use the whole disk.
- We will again use systemd-repart to repartition the disk at early boot time.
- Auto-updating: systemd-sysupdate provides powerful mechanisms to make systems self-updatable over network.
- NixOS already provides system switching capabilities. These necessitate Nix being installed on that system to manage system generations, which is not what we want on a minimal appliance.
- systemd-sysupdate helps us create and swap immutable A/B system partitions instead
In the different parts, we handle the following topics step by step:
- NixOS appliance images with systemd-repart (this article)
- Minimizing NixOS images (TBD)
- Immutable A/B system partitions with NixOS for over-the-air updates (TBD)
- Cross-compiling the image for other platforms (TBD)
A bootable self-inflating disk image with NixOS
The goal of the article is to implement the following scenario:
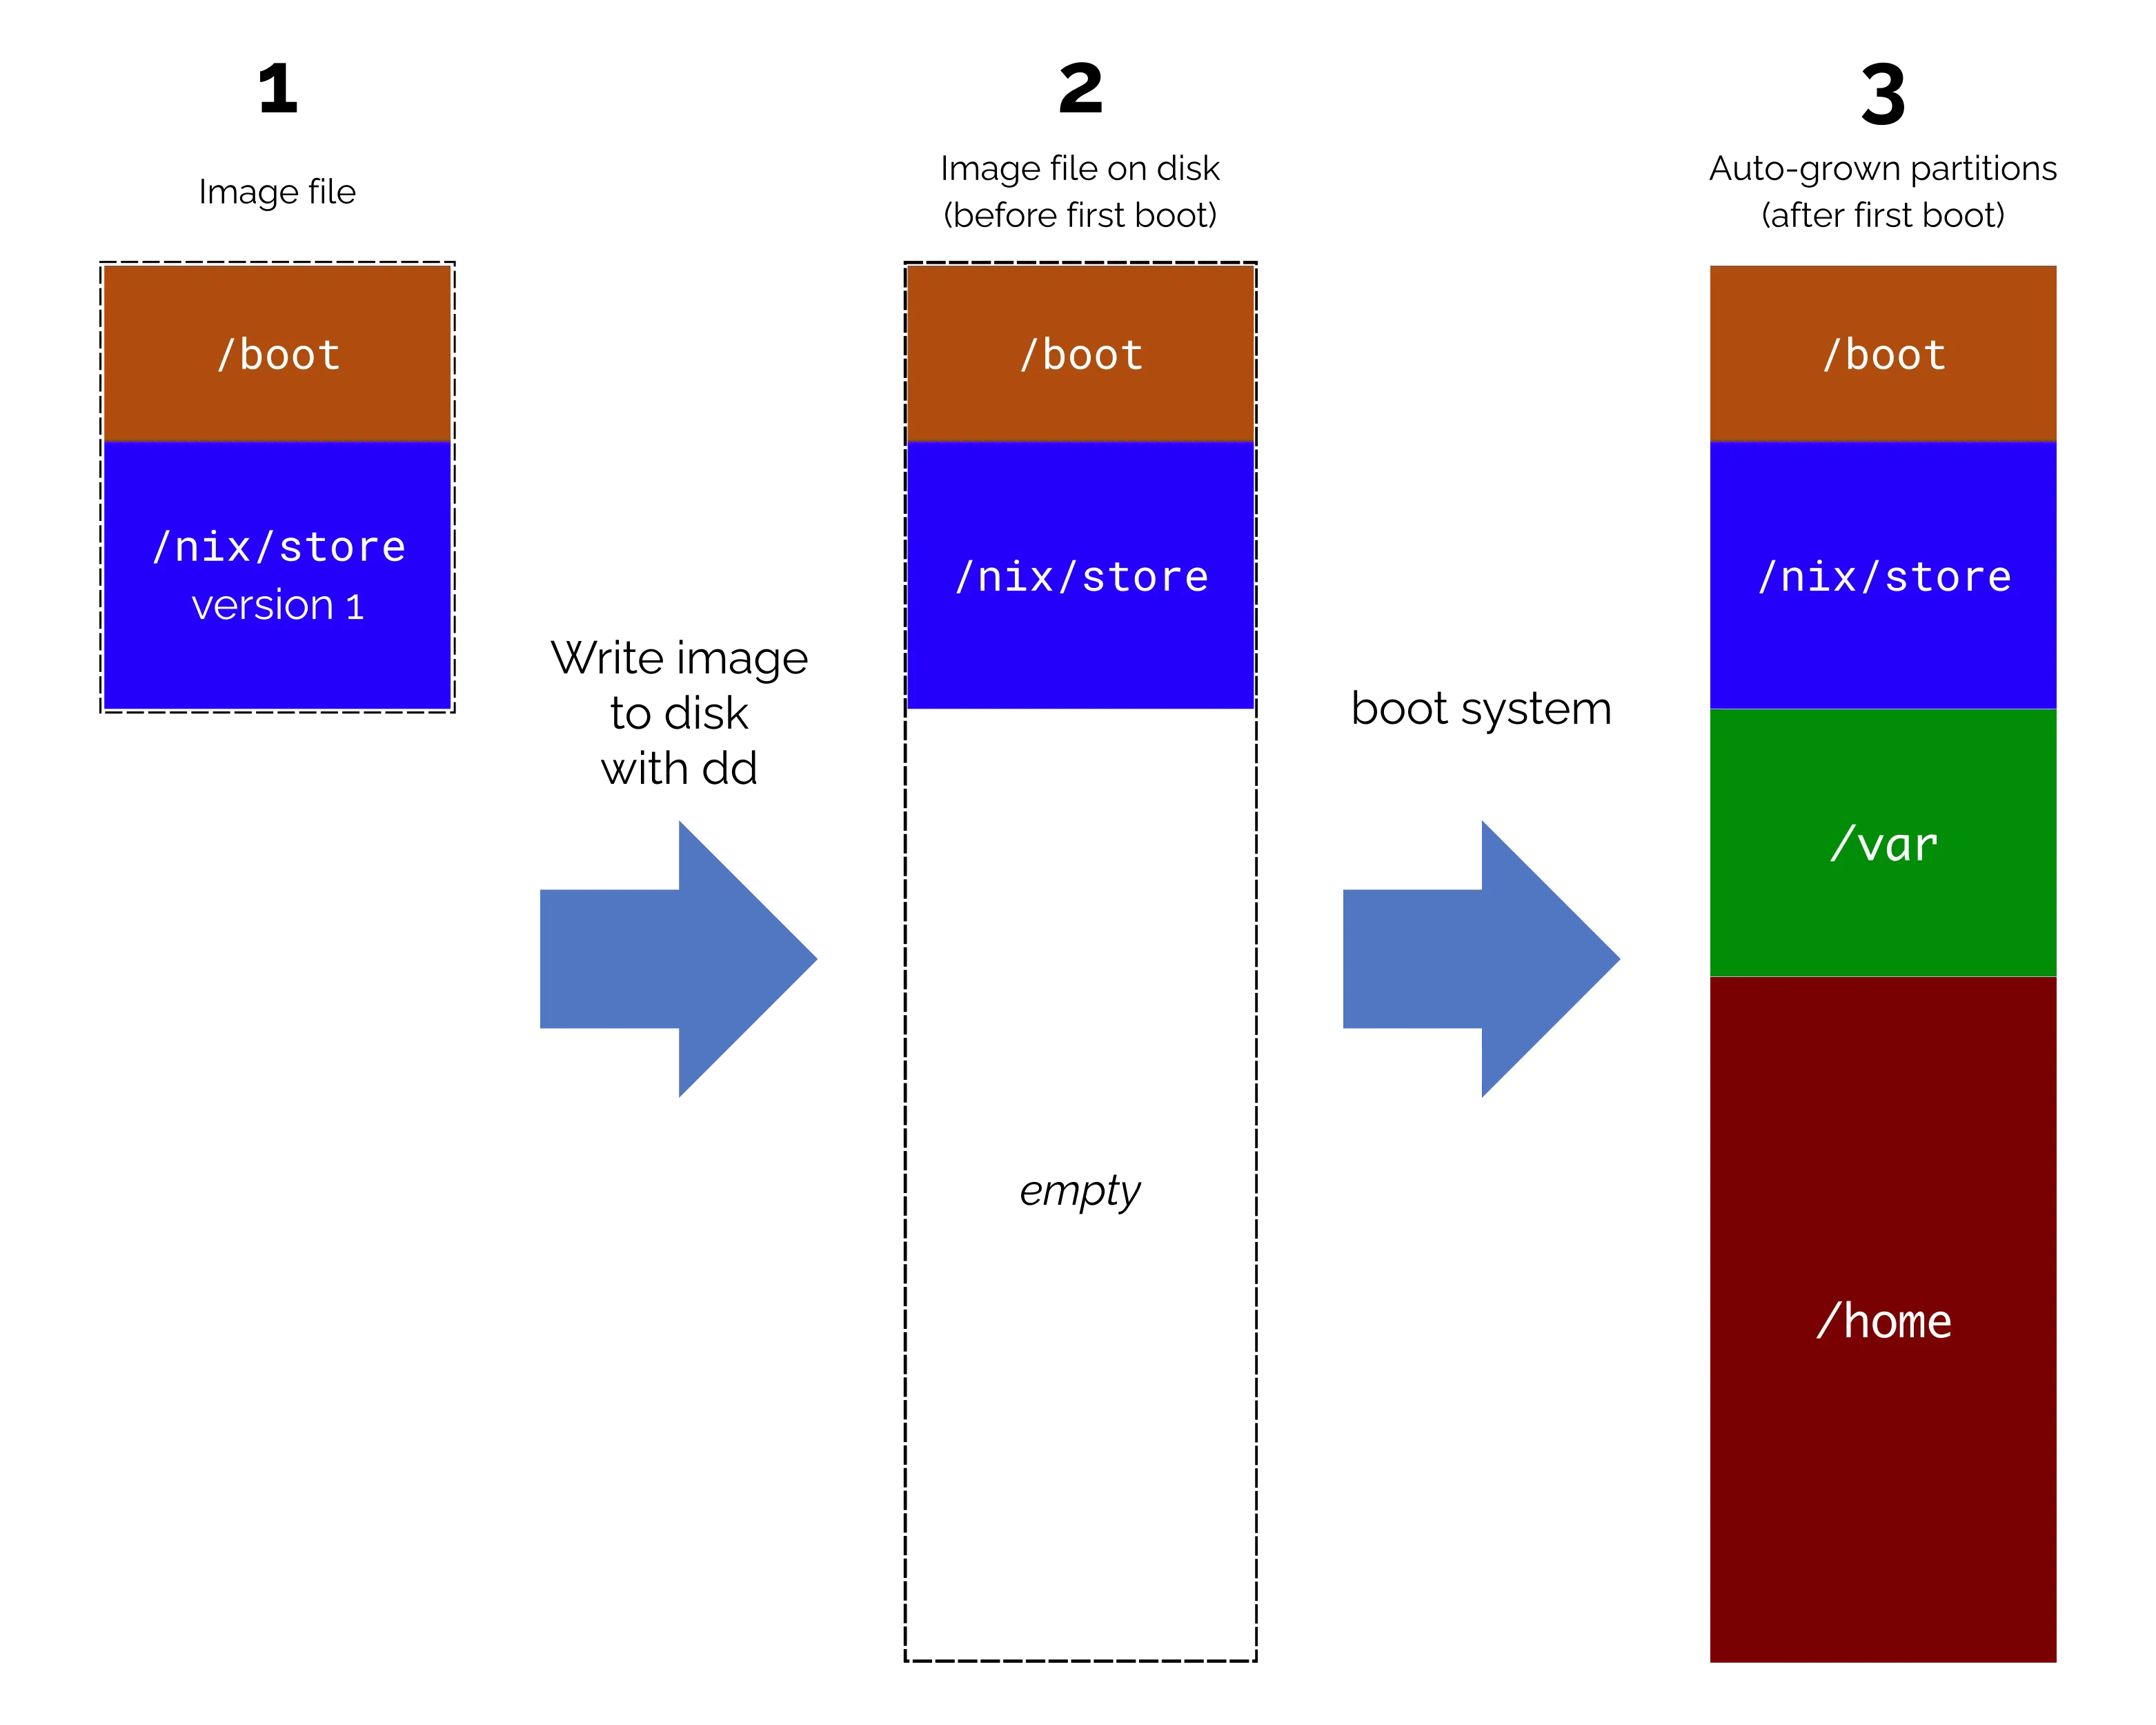
- We build a bootable system image. It shall be only a few hundred megabytes small for quick downloads and image transfer to boot media.
- We write the system image onto a real hard disk or other bootable medium. The disk is much bigger than the image.
- We want the system to fill the rest of the disk with a /home and a /var partition automatically during the first boot.
The NixOS documentation demonstrates how to build appliance-based images, so we will roughly follow their approach with minor modifications.
All the code is already available on GitHub: https://github.com/applicative-systems/simple-systemd-repart-nixos-image
Let’s start with a configuration.nix file for the later system:
# file: configuration.nix { modulesPath, ... }: { imports = [ (modulesPath + "/profiles/image-based-appliance.nix") ./filesystems.nix ./image.nix ./inflate.nix ]; boot.loader.grub.enable = false; # unsecured demo configuration services.getty.autologinUser = "root"; users.users.root.initialPassword = ""; }This setup provides an unsecured auto login at boot for the user root that will help with playing around later. Apart from that, we import the image-based-appliance.nix profile, which disables Nix and also the mechanisms behind nixos-rebuild switch. This way, the system cannot change itself any longer (because everything is locked read-only in the nix store), but we will fix that in the third article (TBD). We create the files filesystem.nix, image.nix, inflate.nix in the following steps.
Let’s start with filesystems.nix:
# file: filesystems.nix { fileSystems = { "/" = { fsType = "tmpfs"; options = [ "size=100m" ]; }; "/boot" = { device = "/dev/disk/by-partlabel/boot"; fsType = "vfat"; }; "/nix/store" = { device = "/dev/disk/by-partlabel/nix-store"; fsType = "squashfs"; }; "/home" = { device = "/dev/disk/by-partlabel/home"; fsType = "ext4"; }; "/var" = { device = "/dev/disk/by-partlabel/var"; fsType = "ext4"; }; }; }/boot and /nix/store will be part of the initial image. The root file system will be a tmpfs that runs completely in RAM. That is not going to be a problem because our generated NixOS configuration creates a new /etc file system with all configuration from scratch at every boot (the image-based-appliance.nix profile configures this). /var and /home shall not be part of the initial image, as they will be created at boot time, but our NixOS configuration shall assume that they exist.
To match these assumptions, we now need to define the partitions labeled as boot and nix-store in an image description in image.nix:
# file: image.nix { modulesPath, pkgs, config, lib, ... }: { imports = [ (modulesPath + "/image/repart.nix") ]; image.repart = let inherit (pkgs.stdenv.hostPlatform) efiArch; in { name = "image"; partitions = { esp = { contents = { "/EFI/BOOT/BOOT${lib.toUpper efiArch}.EFI".source = "${pkgs.systemd}/lib/systemd/boot/efi/systemd-boot${efiArch}.efi"; "/EFI/Linux/${config.system.boot.loader.ukiFile}".source = "${config.system.build.uki}/${config.system.boot.loader.ukiFile}"; }; repartConfig = { Format = "vfat"; Label = "boot"; SizeMinBytes = "200M"; Type = "esp"; }; }; nix-store = { storePaths = [ config.system.build.toplevel ]; nixStorePrefix = "/"; repartConfig = { Format = "squashfs"; Label = "nix-store"; Minimize = "guess"; ReadOnly = "yes"; Type = "linux-generic"; }; }; }; }; }The repart.nix NixOS module provides us with the attribute tree image.repart... to define partitions together with their initial content:
- image.repart.partitions.esp defines the partition that contains the bootable executables. It will be labeled as boot.
- image.repart.partitions.nix-store contains the toplevel derivation of the system. This is the “overall closure” that depends on everything that this system configuration consists of.
The content of the boot partition is the most complicated part in this snippet: It puts kernel and systemd-boot files into the bootable partition. The paths need to follow specific conventions for the boot to work.
Note that the attribute image.repart.partitions.nix-store.nixStorePrefix is set to / because we mount this partition under /nix/store later. This attribute removes the /nix/store prefix of the stored files so that we don’t get a double-prefix later.
What remains is the question “How does the system create the /home and /var partitions at boot?“. The inflate.nix module takes care of this:
# file: inflate.nix { boot.initrd.systemd.repart.enable = true; boot.initrd.systemd.repart.device = "/dev/sda"; systemd.repart.partitions = { home = { Format = "ext4"; Label = "home"; Type = "home"; Weight = 2000; # take twice as much space as /var }; var = { Format = "ext4"; Label = "var"; Type = "var"; Weight = 1000; }; }; }NixOS provides a systemd service that runs systemd-repart at boot time. Note that we are not enabling it with boot.systemd.repart.enable, but instead using boot.initrd.systemd.repart.enable. The difference is that the service runs at the boot stage, where everything is still running from the initial RAM disk before the hard disk partitions have been mounted.
The systemd.repart.partitions attribute set describes the two partitions that will be missing at the first boot. systemd-repart compares the partition descriptions that we provide with the actual disk partitions. Everything that it cannot find (and it will not find disks labeled var and home with the respective types), it will create.
The Weight attributes are interesting because with the given setting, systemd-repart will take this into account as constraints: First, it needs to find out how much space there is, then it needs to calculate how much space each partition may fill. In our case, var shall be only half the size of home.
How systemd-repart works in general is explained in the systemd documentation. I found it not easy to understand at first because it has the character of a reference manual, but it effectively explains all the option fields very well.
Let’s make this work by putting it into a flake.nix file:
{ description = "Simple systemd-repart based NixOS appliance images"; inputs.nixpkgs.url = "github:nixos/nixpkgs/nixos-unstable"; outputs = { self, nixpkgs }: let system = "x86_64-linux"; pkgs = nixpkgs.legacyPackages.${system}; in { nixosConfigurations.appliance = nixpkgs.lib.nixosSystem { modules = [ ./config/configuration.nix { nixpkgs.hostPlatform = system; } ]; }; packages.${system} = { inherit (self.nixosConfigurations.appliance.config.system.build) image; }; }; }If you run the demo code on a different platform than x86_64, you may adapt the system = ...; line to your platform to make this work.
Build and run the image
On real disks
To build the image and move it onto a disk, we can now run:
nix build .#image dd if=result/image.raw of=/dev/<some-disk> bs=4MThe disk can now be installed in a real computer.
Demonstration with a VM
To quickly demonstrate the behavior in a virtual machine, we can simulate the behavior of dd on a disk by making a writable copy of our image and then expanding the size of the image. This will result in empty, unpartitioned extra space of 10GB at the end of the image:
# produce the image nix build .#image # create a writable local copy of it cp result/image.raw demo-disk.raw chmod +w demo-disk.raw # Resize the image with an extra 10GB qemu-img resize -f raw demo-disk.raw "+10G"Running GNU parted on the image now shows:
$ parted demo-disk.raw p Model: (file) Disk demo-disk.raw: 11.3GB Sector size (logical/physical): 512B/512B Partition Table: gpt Disk Flags: Number Start End Size File system Name Flags 1 1049kB 211MB 210MB fat32 boot boot, esp 2 211MB 571MB 360MB nix-storeTo run a VM with the image as its disk drive, we prepared the short script run-image.nix, which can be installed in the flake like this:
packages.${system} = { inherit (self.nixosConfigurations.appliance.config.system.build) image; default = self.packages.${system}.run-image; run-image = pkgs.callPackage ./run-image.nix { inherit (self.nixosConfigurations.appliance.config.system.build) image; }; };The run-image script will automatically create and expand the demo-disk.raw file if it didn’t exist before (using the commands from earlier). Then, it runs qemu on the image file. To invoke the script and launch a VM, run:
nix run(This command works without further parameters because run-image is also aliased as the default package.)
After running the script, a QEMU window will pop up and boot NixOS from the disk. The new partitions are silently added at boot time and then mounted. We can check that this happened by running lsblk:
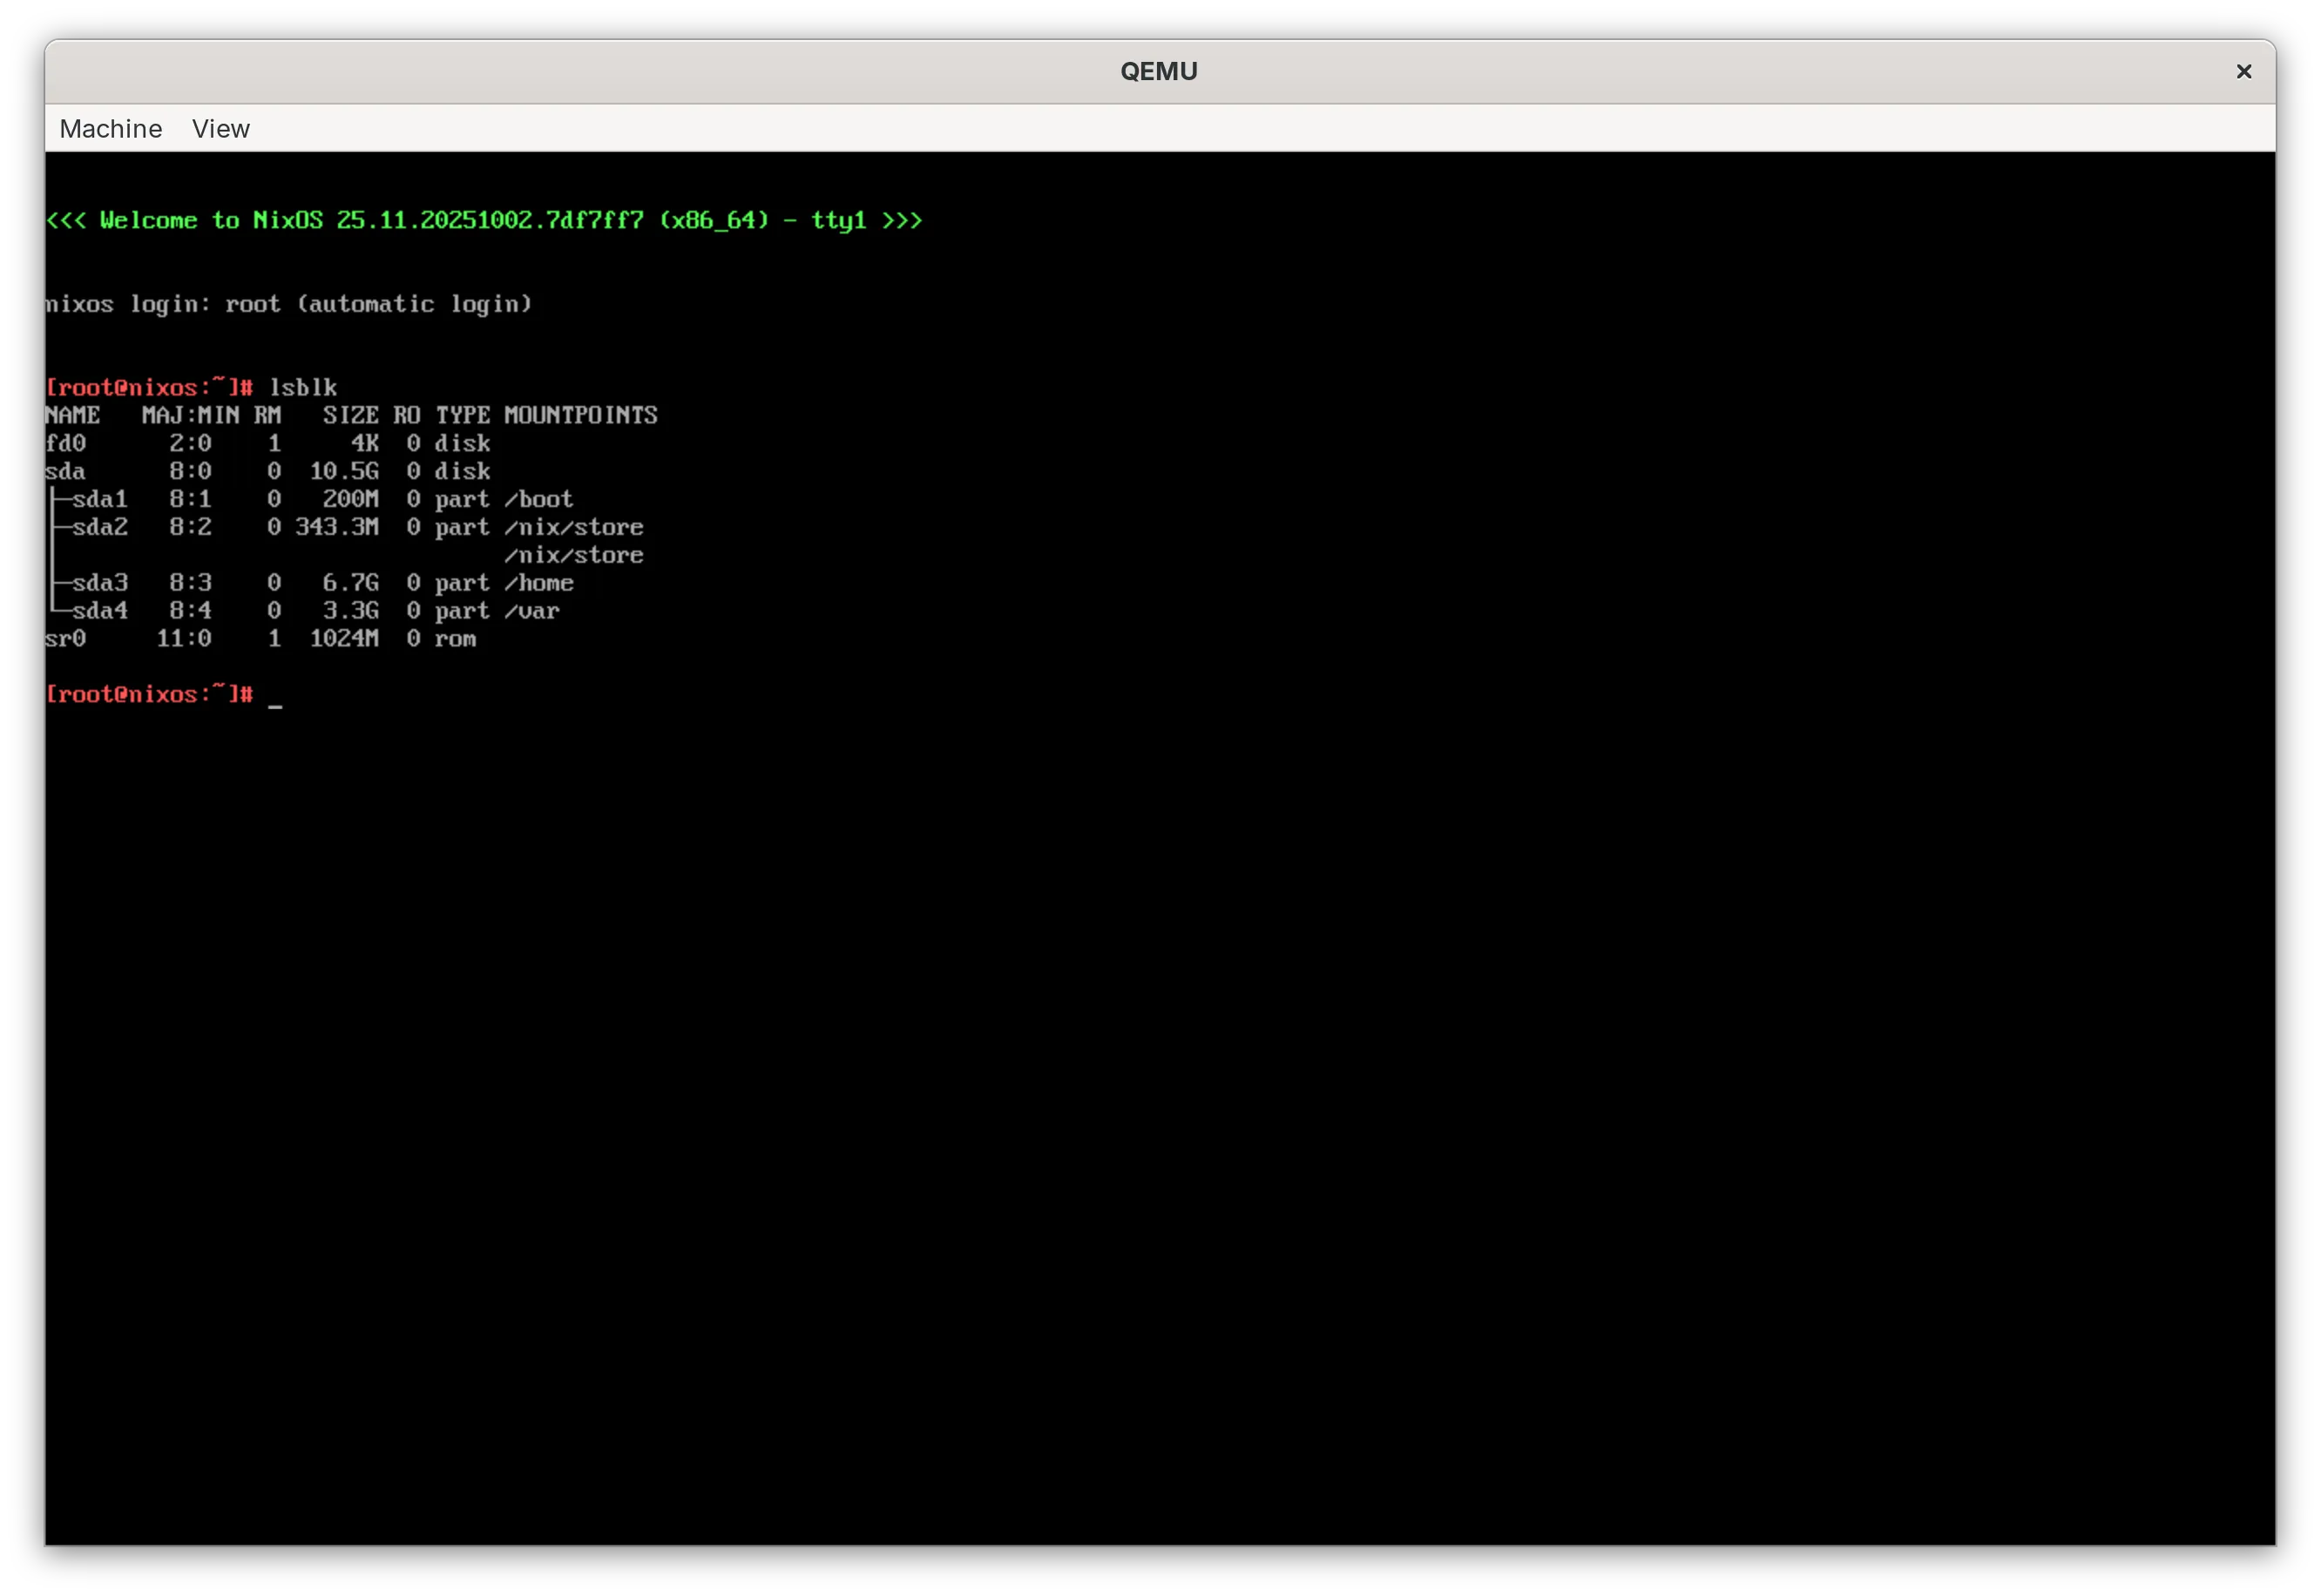
This is basically it. We can have a look at the systemd-repart logs that describe what it did to our disk:
# journalctl -u systemd-repart.service No machine ID set, using randomized partition UUIDs. TYPE LABEL UUID PARTNO FILE RAW SIZE SIZE PADDING home home ace3ff5a-ef31-4d4e-a8b4-15e87fe71dc9 2 home.conf 7158276096 → 6.6G → 0B var var 1b622723-1422-4a00-be82-c14a85a9c11d 3 var.conf 3579142144 → 3.3G → 0B esp boot dac4058a-2fc0-4808-a7ef-b8b4501c00ce 0 209715200 200M 0B linux-generic nix-store be6595b1-70b2-4c1e-a455-2693510a426f 1 359964672 343.2M 10G → 0B Σ = 10.5G Σ = 0B ▒▒▒▒▒▒▒▒▒▒▒▒▒▒▒▒▒▒▒▒▒▒▒▒▒▒▒▒▒▒▒▒▒▒▒▒▒▒▒▒▒▒▒▒▒▒▒▒▒▒▒▒▒▒▒▒▒▒▒▒▒▒▒▒▒▒▒▒▒▒▒▒▒▒▒▒▒░ │ │ │ └─ boot │ │ └─ var.conf └─ home.conf Applying changes to /dev/sda. ... Adding new partition 2 to partition table. Adding new partition 3 to partition table. Writing new partition table. Telling kernel to reread partition table. All done.At every reboot after the first one, the same log shows that systemd-repart does nothing:
# journalctl -u systemd-repart.service No machine ID set, using randomized partition UUIDs. TYPE LABEL UUID PARTNO FILE RAW SIZE SIZE PADDING home home ace3ff5a-ef31-4d4e-a8b4-15e87fe71dc9 2 home.conf 7158276096 6.6G 0B var var 1b622723-1422-4a00-be82-c14a85a9c11d 3 var.conf 3579142144 3.3G 0B esp boot dac4058a-2fc0-4808-a7ef-b8b4501c00ce 0 209715200 200M 0B linux-generic nix-store be6595b1-70b2-4c1e-a455-2693510a426f 1 359964672 343.2M 0B Σ = 10.5G Σ = 0B ▒▒▒▒▒▒▒▒▒▒▒▒▒▒▒▒▒▒▒▒▒▒▒▒▒▒▒▒▒▒▒▒▒▒▒▒▒▒▒▒▒▒▒▒▒▒▒▒▒▒▒▒▒▒▒▒▒▒▒▒▒▒▒▒▒▒▒▒▒▒▒▒▒▒▒▒▒░ │ │ │ └─ boot │ │ └─ var.conf └─ home.conf No changes.Running parted on the raw image file on the host computer also shows all the partitions in the partition table:
$ parted demo-disk.raw p Model: (file) Disk demo-disk.raw: 11.3GB Sector size (logical/physical): 512B/512B Partition Table: gpt Disk Flags: Number Start End Size File system Name Flags 1 1049kB 211MB 210MB fat32 boot boot, esp 2 211MB 571MB 360MB nix-store 3 571MB 7729MB 7158MB ext4 home linux-home 4 7729MB 11.3GB 3579MB ext4 varThe final repository is here on GitHub: https://github.com/applicative-systems/simple-systemd-repart-nixos-image
NixOS provides useful facilities (importable profiles) to build system images that don’t contain Nix itself, which relieves the system from a lot of complexity. This is very useful for embedded systems and everything that is supposed to be small and simple.
systemd-repart works twofold in our system:
- The attribute paths image.repart... allow for the simple definition of the contents of a bootable image.
- At boot time, systemd-repart can be run as a service to change the partitions before any of them are mounted.
Assuming we already know how systemd-repart (it is a powerful but complex tool) works and how the NixOS configuration attributes work that configure it, these tools make it entirely possible to build such a system from scratch in a few minutes! (Of course, the best way to do this is to copy&paste the generic parts from tutorials and then change the details for your use cases.) In fact, NixOS and systemd are a great team.
The system that we ended up with is still larger than necessary. In the next article, we will have a look at a Nix developer’s tool set to make the image smaller. This small appliance image still does not provide a useful update path. The third article will then explain how to provide update images on a web server that the system can use to periodically self-update. Stay tuned!
We help many customers transfer from other Linux-based solutions to NixOS or improve their existing NixOS-based solutions. From that experience, we can help you copy the successful patterns of winning organizations and avoid the patterns that have not worked well elsewhere, instead of having to make this experience yourself from scratch. No matter if you just need a quick consultation on how to build something with Nix or if we can help you by lending developer time, schedule a quick call with us or e-mail us.


