.png)

Introducing the KURTY Single-Handed Half-Board Keymap (or KURTY for short!), a free plug-and-play system enabling one-handed touch-typing on two-handed QWERTY keyboards. After a debilitating injury to my right arm and hand, I researched and tested adaptive keyboards, which had some crafty features but also deal-breaking downsides. While frustrating, this experience served as a catalyst, leading me to create this one-handed typing solution, which you are free to download and use!
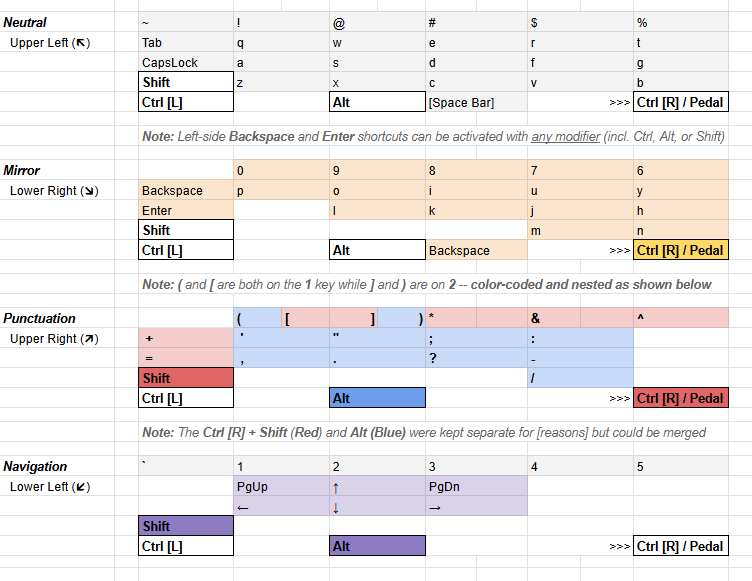
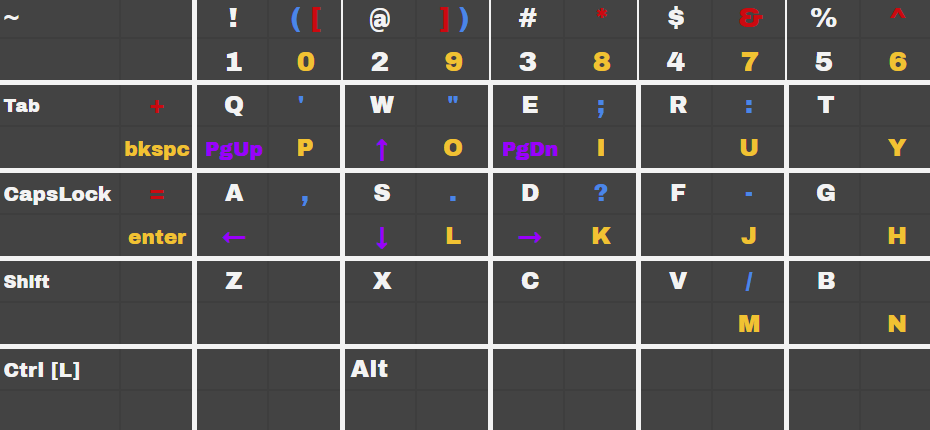 Composite diagram of keymap shortcuts
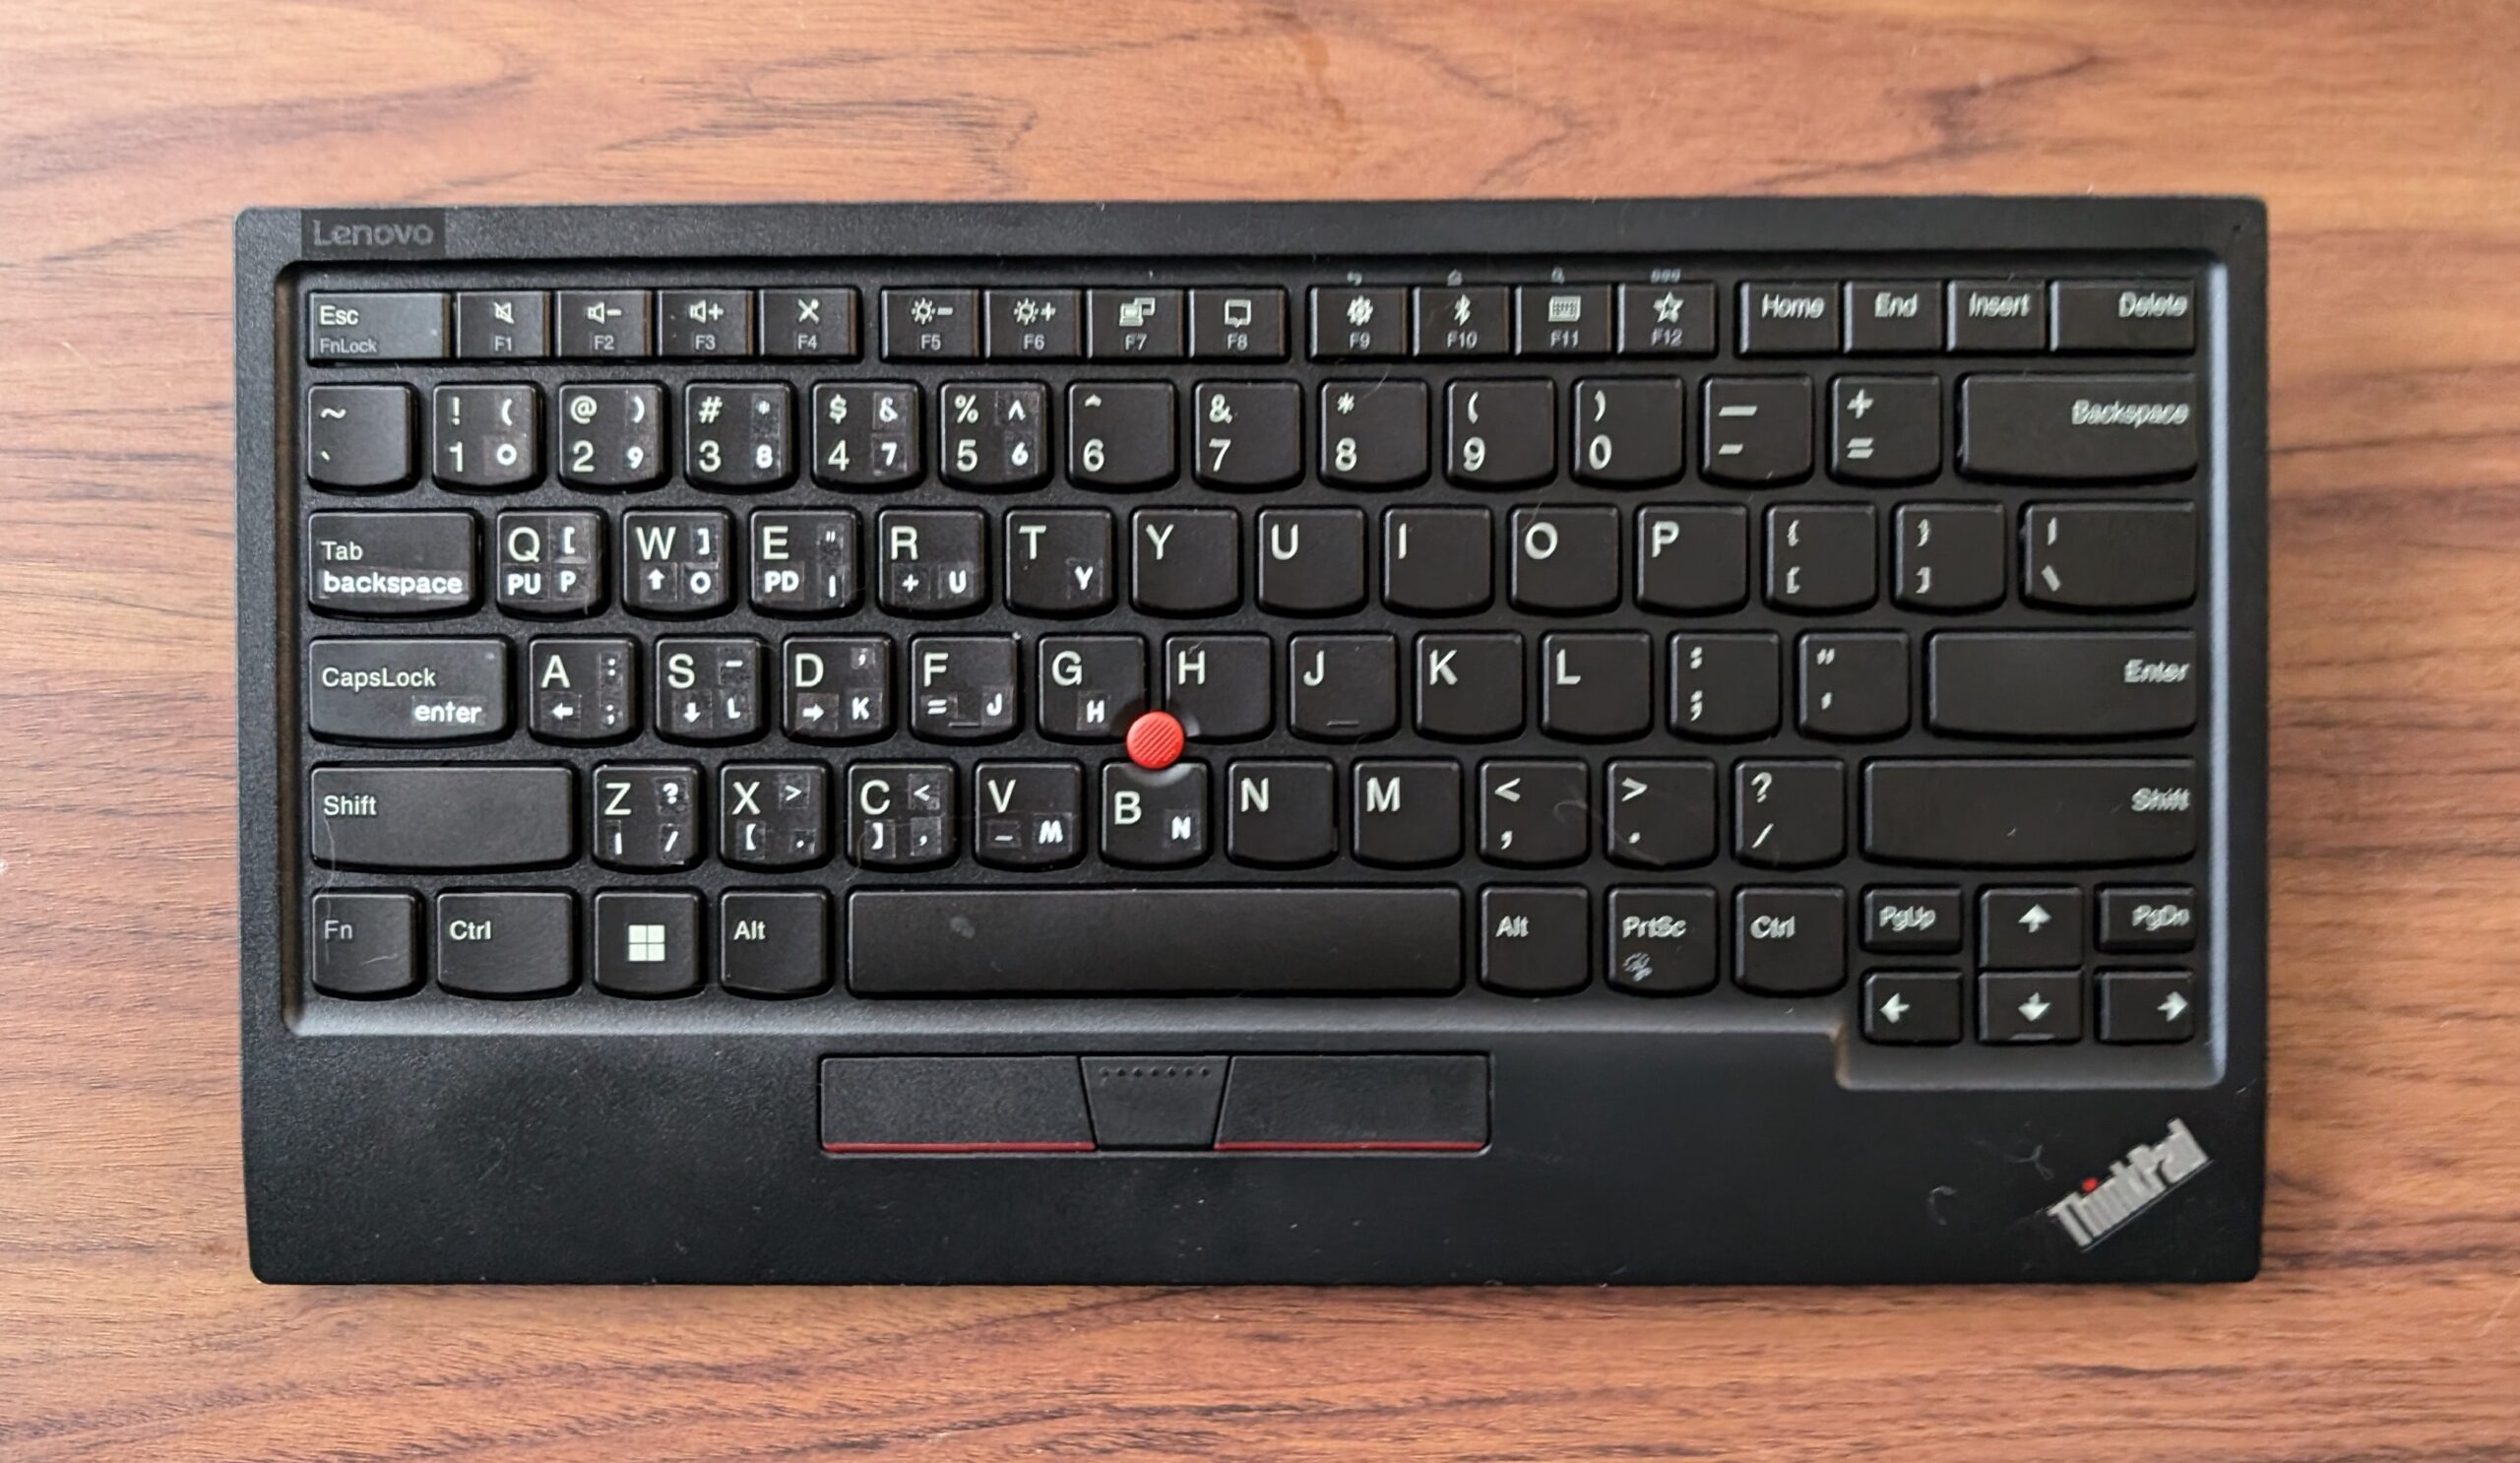
How it Works: This setup adds new functionality to the left side of conventional two-handed keyboards, enabling a user to touch-type with just one hand (while pressing familiar keys within a compact comfort zone).
A combination of “modifier” keys (e.g., Ctrl, Alt, Shift) and regular keys form shortcuts on the left that summon right-side functions and outputs. These are intentionally additive, so that a keyboard using this system will still continue to also work as it always has.
The KURTY being a computer-side design solution gives it a number of critical advantages over physical one-handed keyboards. It’s replicable and portable, for starters, working with whatever hardware you have on hand or prefer to use. It’s also customizable, so you can change it to suit your present needs and adapt it to suit future changes in your physical capabilities.
Below you’ll find everything you need to set up the KURTY keymap, including a layout file, installation instructions, and the color-coded user guide … as well as key labeling advice and troubleshooting tips!
How to Install & Test the KURTY Keymap
 Overview:
You’ll be loading the KURTY configuration from a saved backup file into PowerToys, a free Microsoft utility that supports key remapping and other advanced functionality. Note: the be patient with the first step below, which can take a few minutes.
To set up the KURTY keymap on your computer:
- Download and click to launch the Microsoft PowerToys Installer
- When the Welcome to Powertoys window appears, click Open Settings to open the PowerToys Settings window ***
- Go to the General tab, click to Restart PowerToys as administrator
- Click Yes to “…allow this app to make changes on your device.”
- Download the KURTY layout file (settings_101.ptb)
- Move that file to the Documents > Powertoys > Backup folder
- Back in the app settings window, go to the General tab, and under …
- … Administrator mode, check the box to Always run as administrator
- … Appearance and Behavior, make sure Run on startup is toggled on
- … Backup & restore, click the Restore button to launch the keymap
- *** If the Welcome to Powertoys window does not appear in (2): Click the app icon to launch PowerToys (Preview). You may need to do this twice – once to launch the utility, and once to open the Settings window)
With that, you should be good to go! Below are a few test shortcuts to make sure the keymap is working, plus instructions for reviewing and editing key combinations. Following that you’ll find the full User Guide.
(Optionally) get a feel for how the keymap works:
- Open up a document, text file, or browser tab to get a cursor, then:
- Hold down Alt and press the E key to generate a semicolon (;)
- Hold down Shift and press Tab for Backspace to delete that symbol
- Hold down Ctrl [R] (the right-side Ctrl key) and press D to generate a K
- Hold down Alt & Shift and press A to move the cursor back/left (⬅)
(Optionally) review shortcuts and/or edit the keymap:
- Click the Input/Output tab on the left, opening a small sub-menu
- Select Keyboard Manager (note the option here to toggle on/off)
- Scroll down to Shortcuts to see the full list of modified key sets
- Select Remap a Shortcut to add, remove, or edit combinations
If you do opt to experiment, you can back up your changes in the same place you originally uploaded (i.e. restored) the KURTY keymap file.
Side Note: While this keymap only works on PCs, I’ve been reliably informed that a viable MacOS alternative to PowerToys exists in the form of Karabiner, which is likewise free to use, though I know nothing more about using it!
User Manual: Color-Coded Shortcut Sheets
This color-coded guide lays out every KURTY key combination in a handy Google Docs spreadsheet, which you can copy for reference (and optionally edit should you choose to reconfigure the existing layout). The first page also features notes and pro tips as well as some examples of how key combinations work. The second sheet in the spread features a condensed key label guide diagram. And the third, well … that’s just a scratch pad of draft layout ideas and guide-building experiments.
Note regarding the gold modifier (listed as Ctrl [R] / Pedal). To type letters and numbers more quickly, I tied that layer to an unused, out-of-the-way modifier (Ctrl [R]), which in turn can be activated by a programmed foot pedal (or other programmable piece of hardware, like a mini keypad). Or you could change things around to use a left-side modifier; I tried that but found it more difficult, since it involved trade-offs that hampered typing speed.
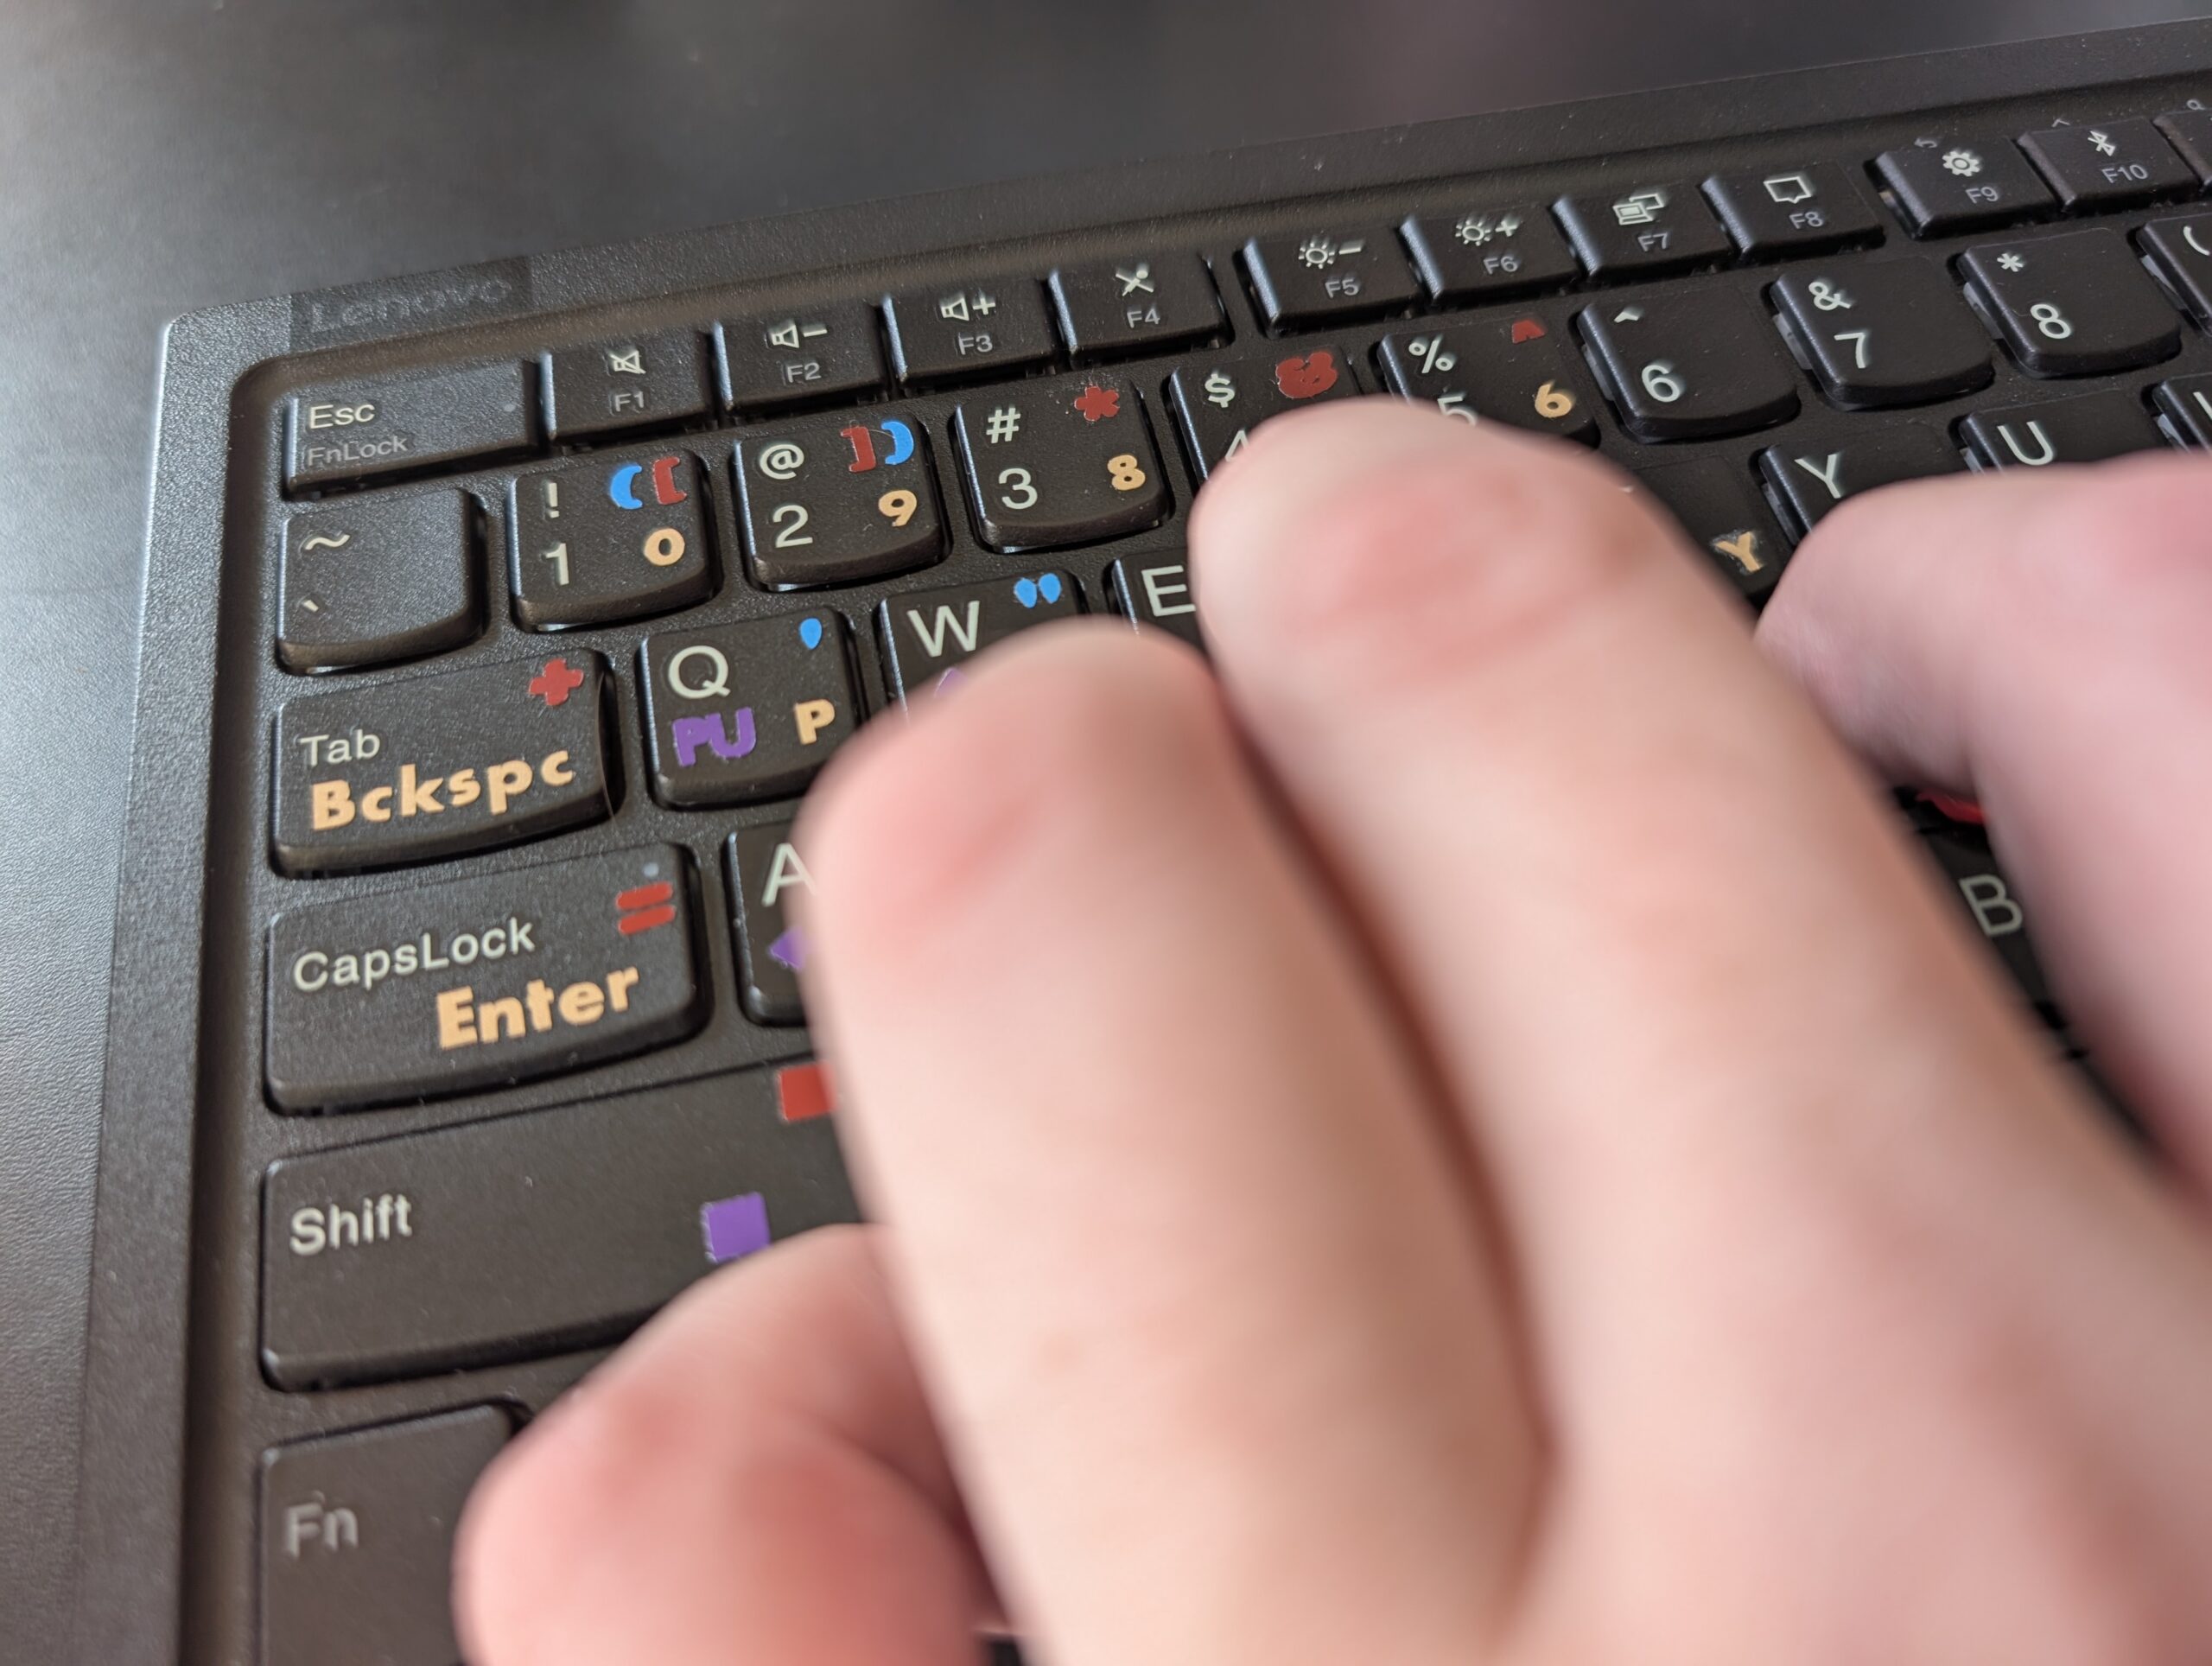
Labeling Keys: Choosing Colors & Materials
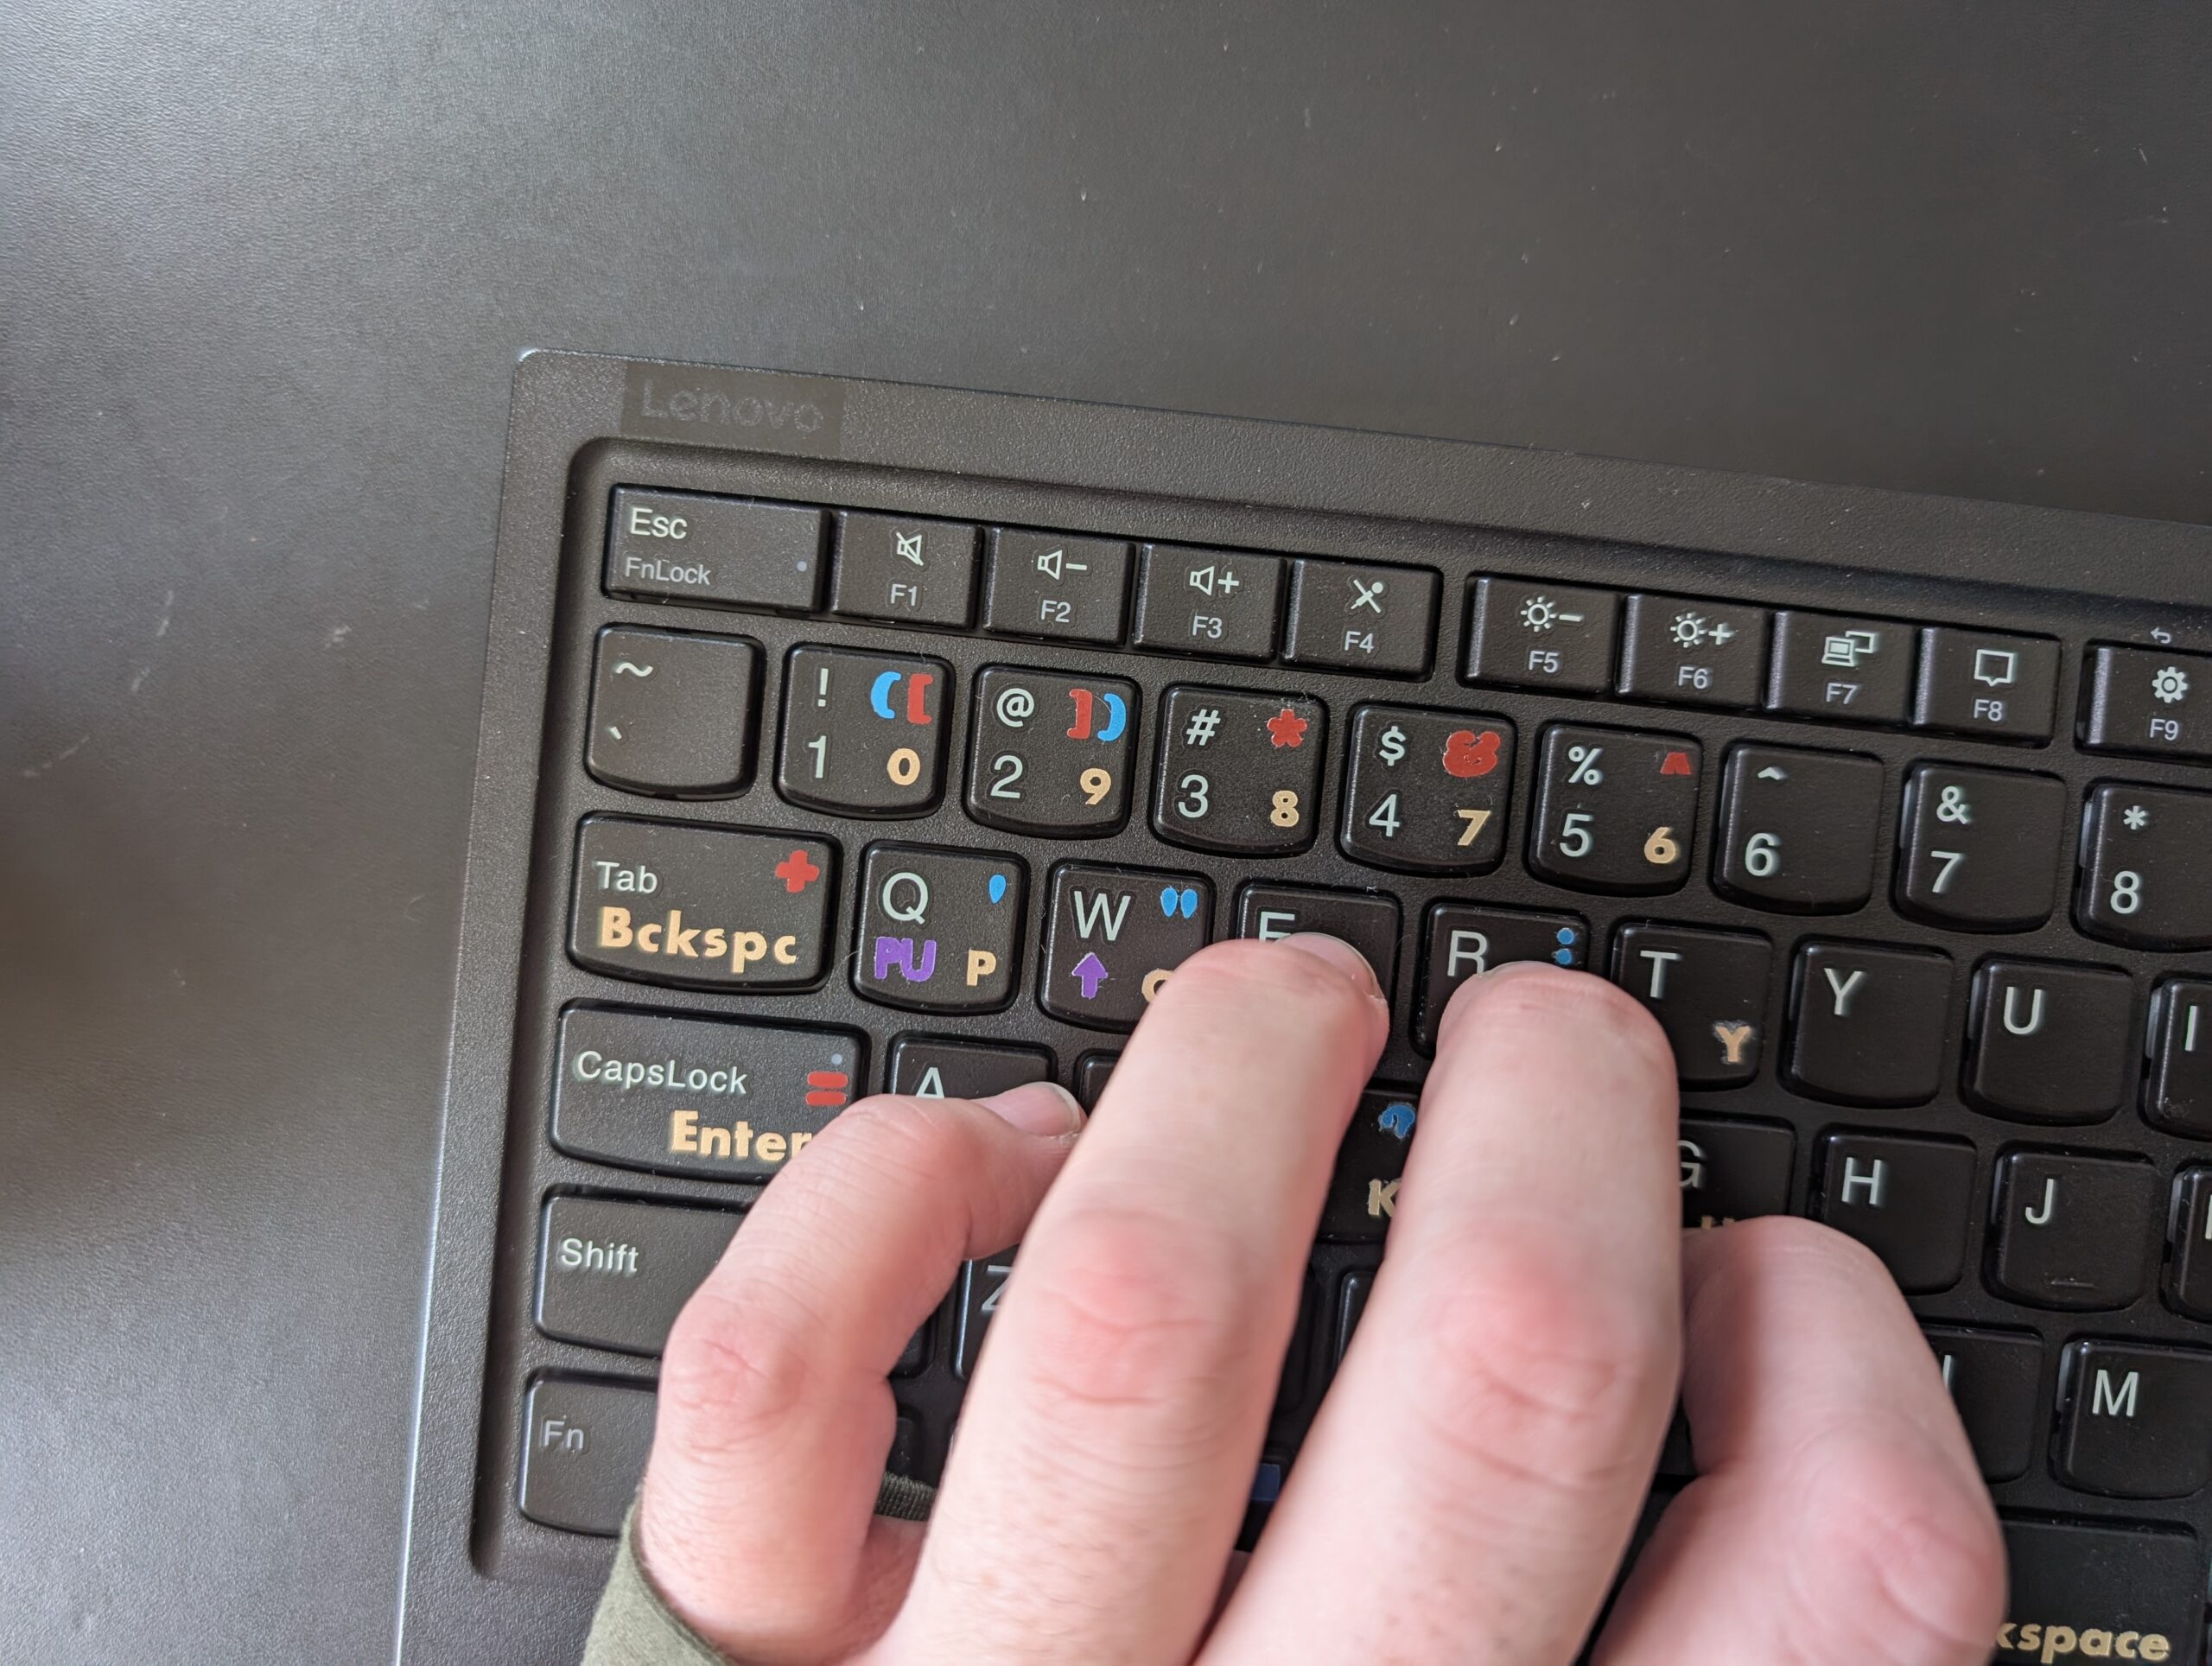
After sifting through sheets of the adhesive-backed vinyl I was planning to use, I chose four key label colors with an eye toward creating high-contrast adjacencies. Next, I sorted those four by relative brightness (and thus visibility). More visible colors were paired with more important modifier layers — gold, for instance, is tied to the critical layer of letter-and-number keys. I also placed higher priority labels on the right sides of keys, making them easier to see without lifting a finger to get a closer look. Gold labels sit in lower right key corners, for instance, for prominence (without the potential confusion of putting letters side-by-side along key tops).
Below is a summary of each color layer, from greatest to least visibility (and thus importance). These colors are separated out in the full key layout guide, which (I find) makes them easier to experiment with.
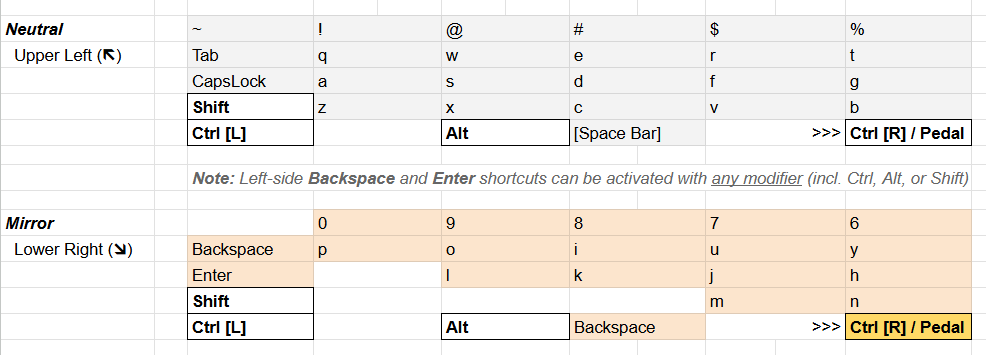
- Mirror (Gold): Letters and numbers are mirrored with a single modifier, in my case tied to a foot pedal for higher-speed access.
- Punctuation (Blue): Another one-modifier setup; this layer focuses frequently used marks on easily reached keys in upper rows.
- Navigation (Purple): The arrow pad is set on a central grid of six keys and uses two modifier keys; this placement relies on the ease of resting thumb and pinky fingers on a pair of modifiers below.
- Symbols (Red): Secondary number key symbols and other outputs were mapped to lesser-used keys and a pair of modifiers.
Note:
Finding four colors that work well together may lead you to a completely different set, depending the label-making material and technology you use. That’s not a problem! What’s important isn’t each color as such — it’s prioritizing contrast and visibility as described above.
 White-on-clear stickers from a label maker applied to an early version of the KURTY
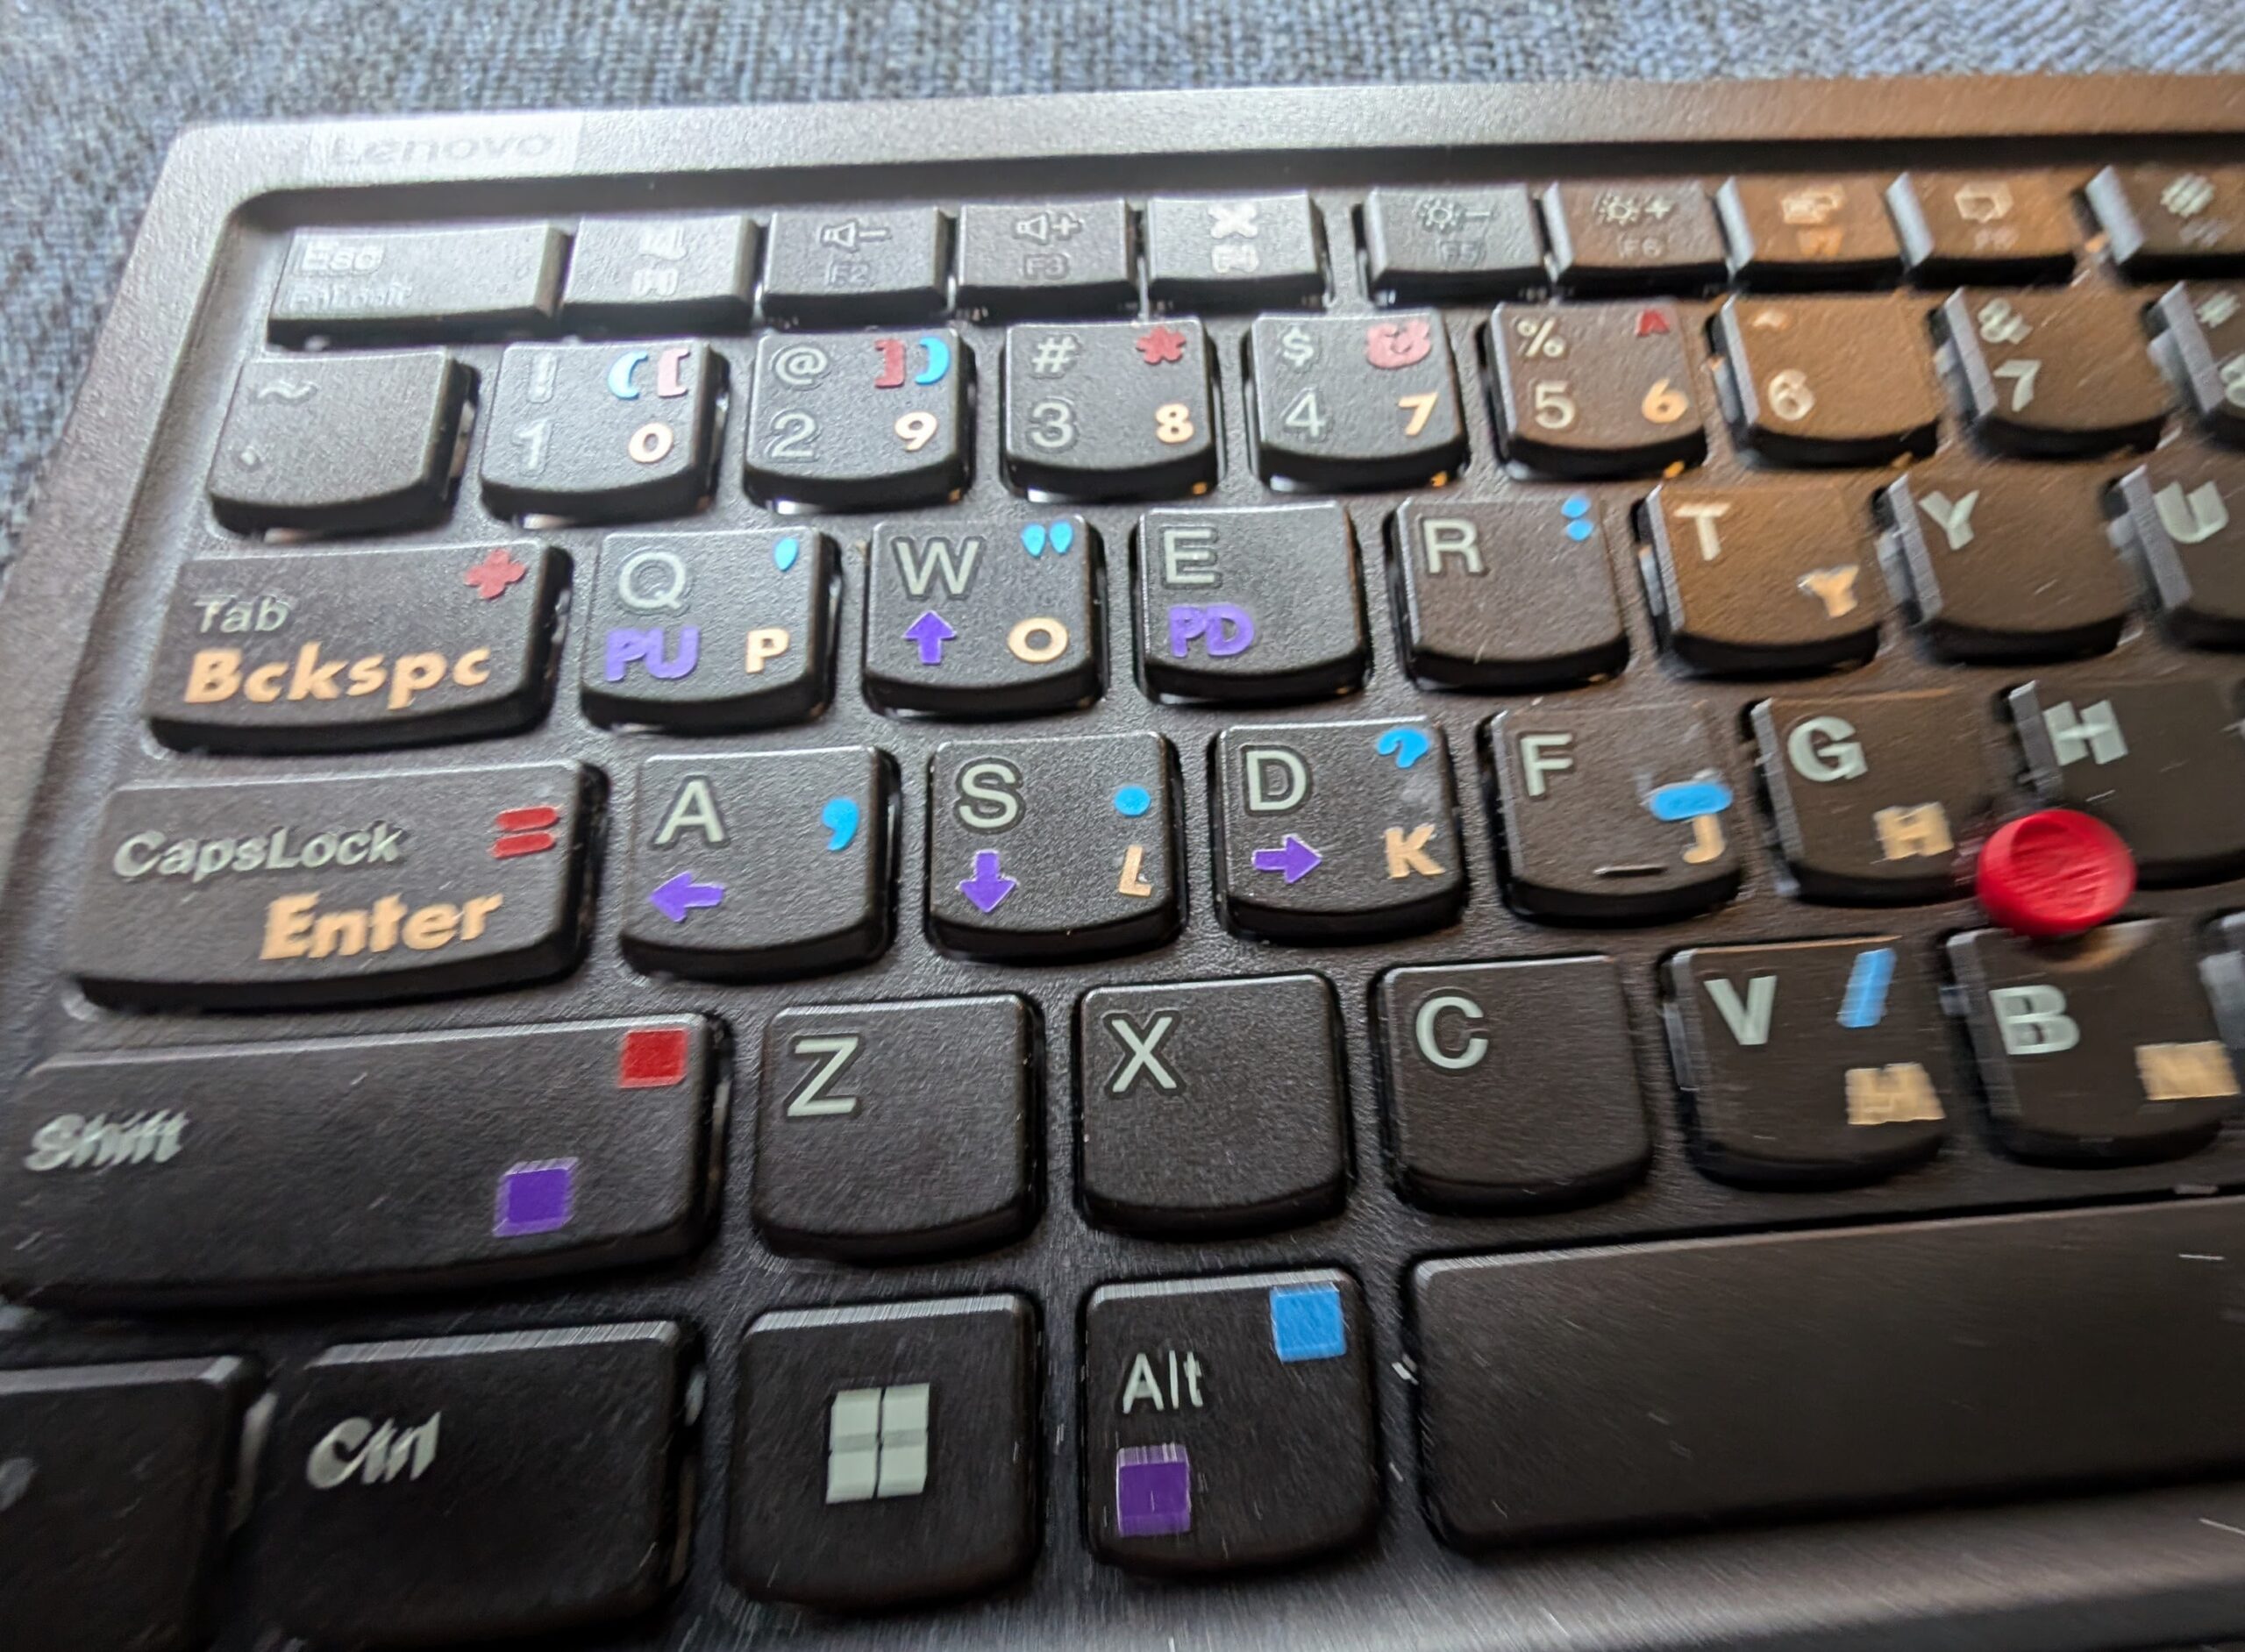
As for materials: my finished board employs vinyl letters, custom cut with a Cricut machine, thanks to my partner. After testing some other options, I found that matte metallic “chrome” vinyl showed up the best. The cut shapes can be tricky to maneuver, but the material is usefully robust.
That said, conventional label makers are also a solid option. They’re easier, cheaper, and can print labels with colored foregrounds and clear backgrounds or the reverse. In my experience (still having tape labels on one laptop) vinyl holds on better, but tape is easier to replace.
Keymap Troubleshooting & Shutdown Tips

To be clear, if you choose to use the KURTY layout file or follow any advice provided below (or above!), you should know that you do so at your own risk.
That said, I’ve remapped a lot of keys across different iterations, and I’m happy to share what’s worked for me. The first of these was the scariest, but the solution was simple … once I figured it out!
Things go Nucking Futz (Unexpected Key Behavior)
If key outputs suddenly get … strange, like: the spacebar turns into backspace, all letters come out as caps, etc… then you probably have a program that is taking up a huge amount of active memory.
- Press Ctrl+Alt+Delete then click to open the Task Manager
- Look for an App (or Apps) using a high percentage of Memory
- If there’s a single program hogging the plurality, either shut it down and decrease its demands (by, say, shutting some of your 42 browser tabs in Chrome) … or disable KURTY until you later quit that program.
Symbol Swapping Glitch
There’s a known issue I ran into with PowerToys that can swap a few key outputs around, such as the “ symbol for @. This is a case of the utility confusing different English keyboards. Here’s how I fixed it:
- Open Windows Settings (shortcut: Windows Key + I).
- Go to Time & Language > Region & Language > Add a language
- Ensure “English (US)” is your Preferred language and keyboard layout. Even if it is Preferred already, you might also Remove other unwanted keyboard layouts to prevent accidental switching.
Disabling the the Keyboard Layout (As Needed)
- Open PowerToys
- Select Keyboard Manager under Input/Output
- Click ‘disable’ to pause it indefinitely (i.e., until reactivated)
The Nuclear Option! (If the Utility Stalls or Freezes)
- Per The Hitchhiker’s Guide to the Galaxy: “Don’t Panic!”
- Press Ctrl+Alt+Delete then click to open the Task Manager
- Scroll down the list of Processes
- Right-click any instance(s) of PowerToys and then select End Task
- (See, that really wasn’t so scary, now was it‽)
A Side Note on Keyboard/Mouse Hardware
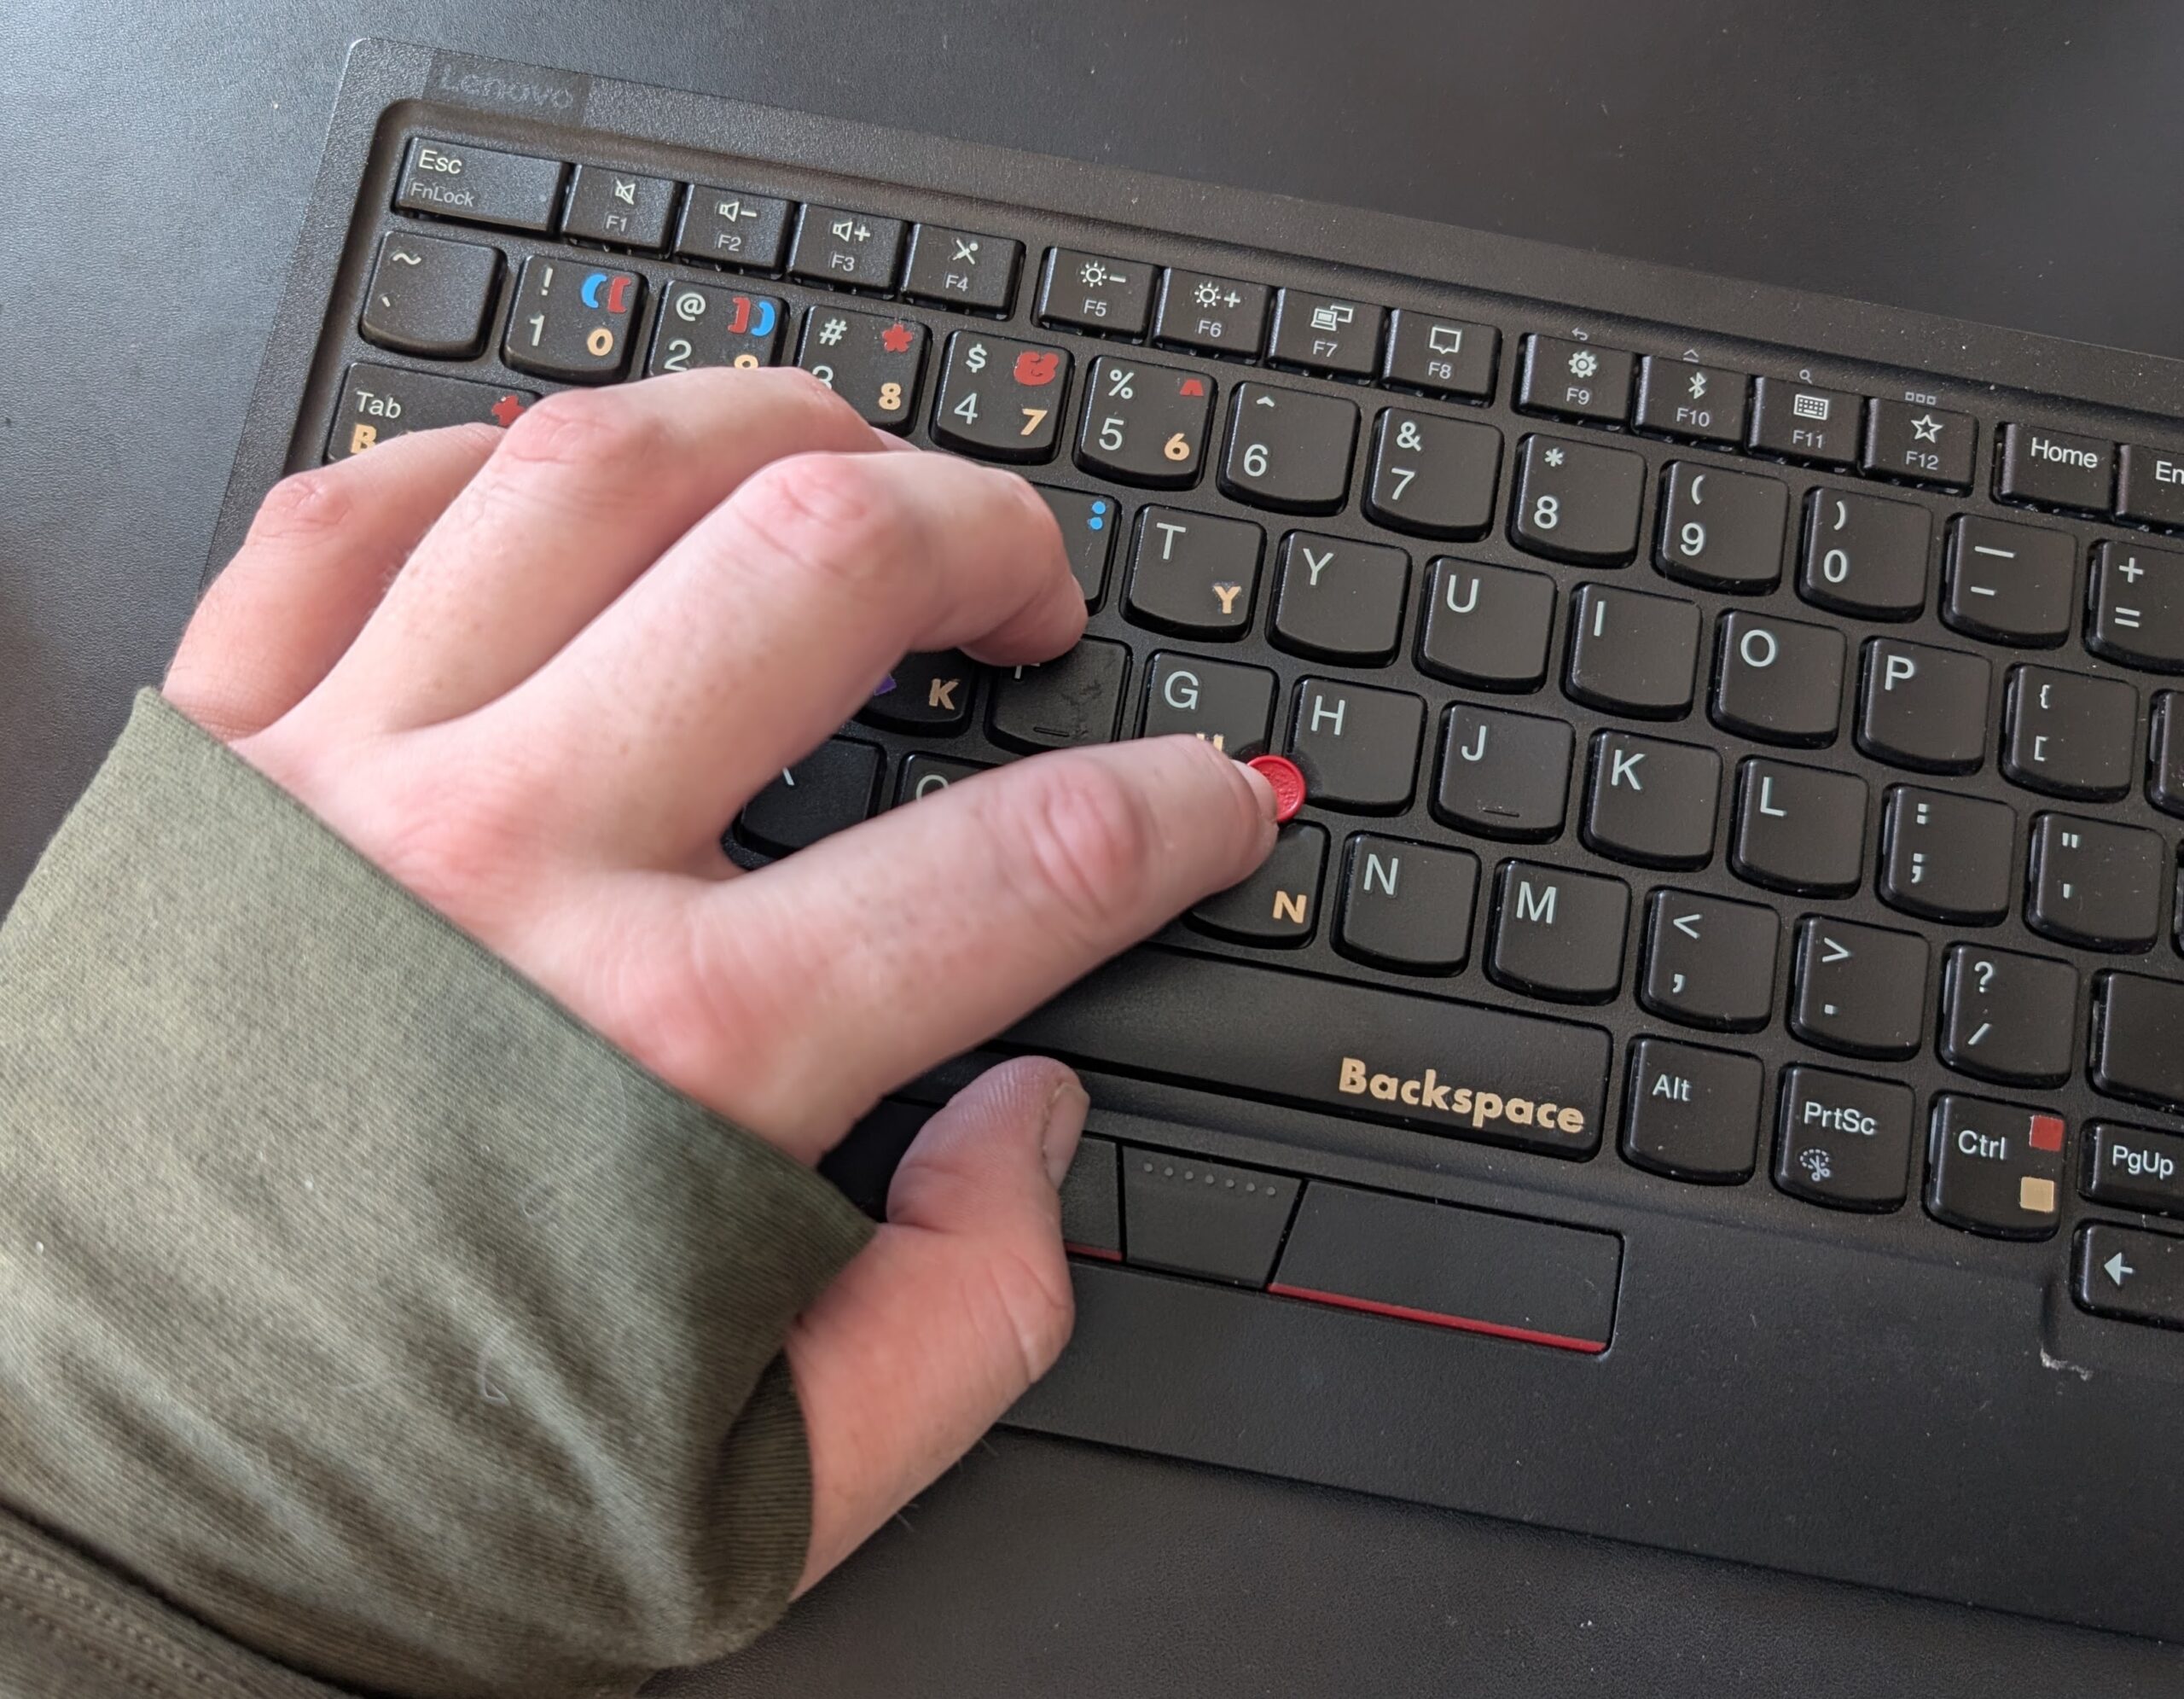
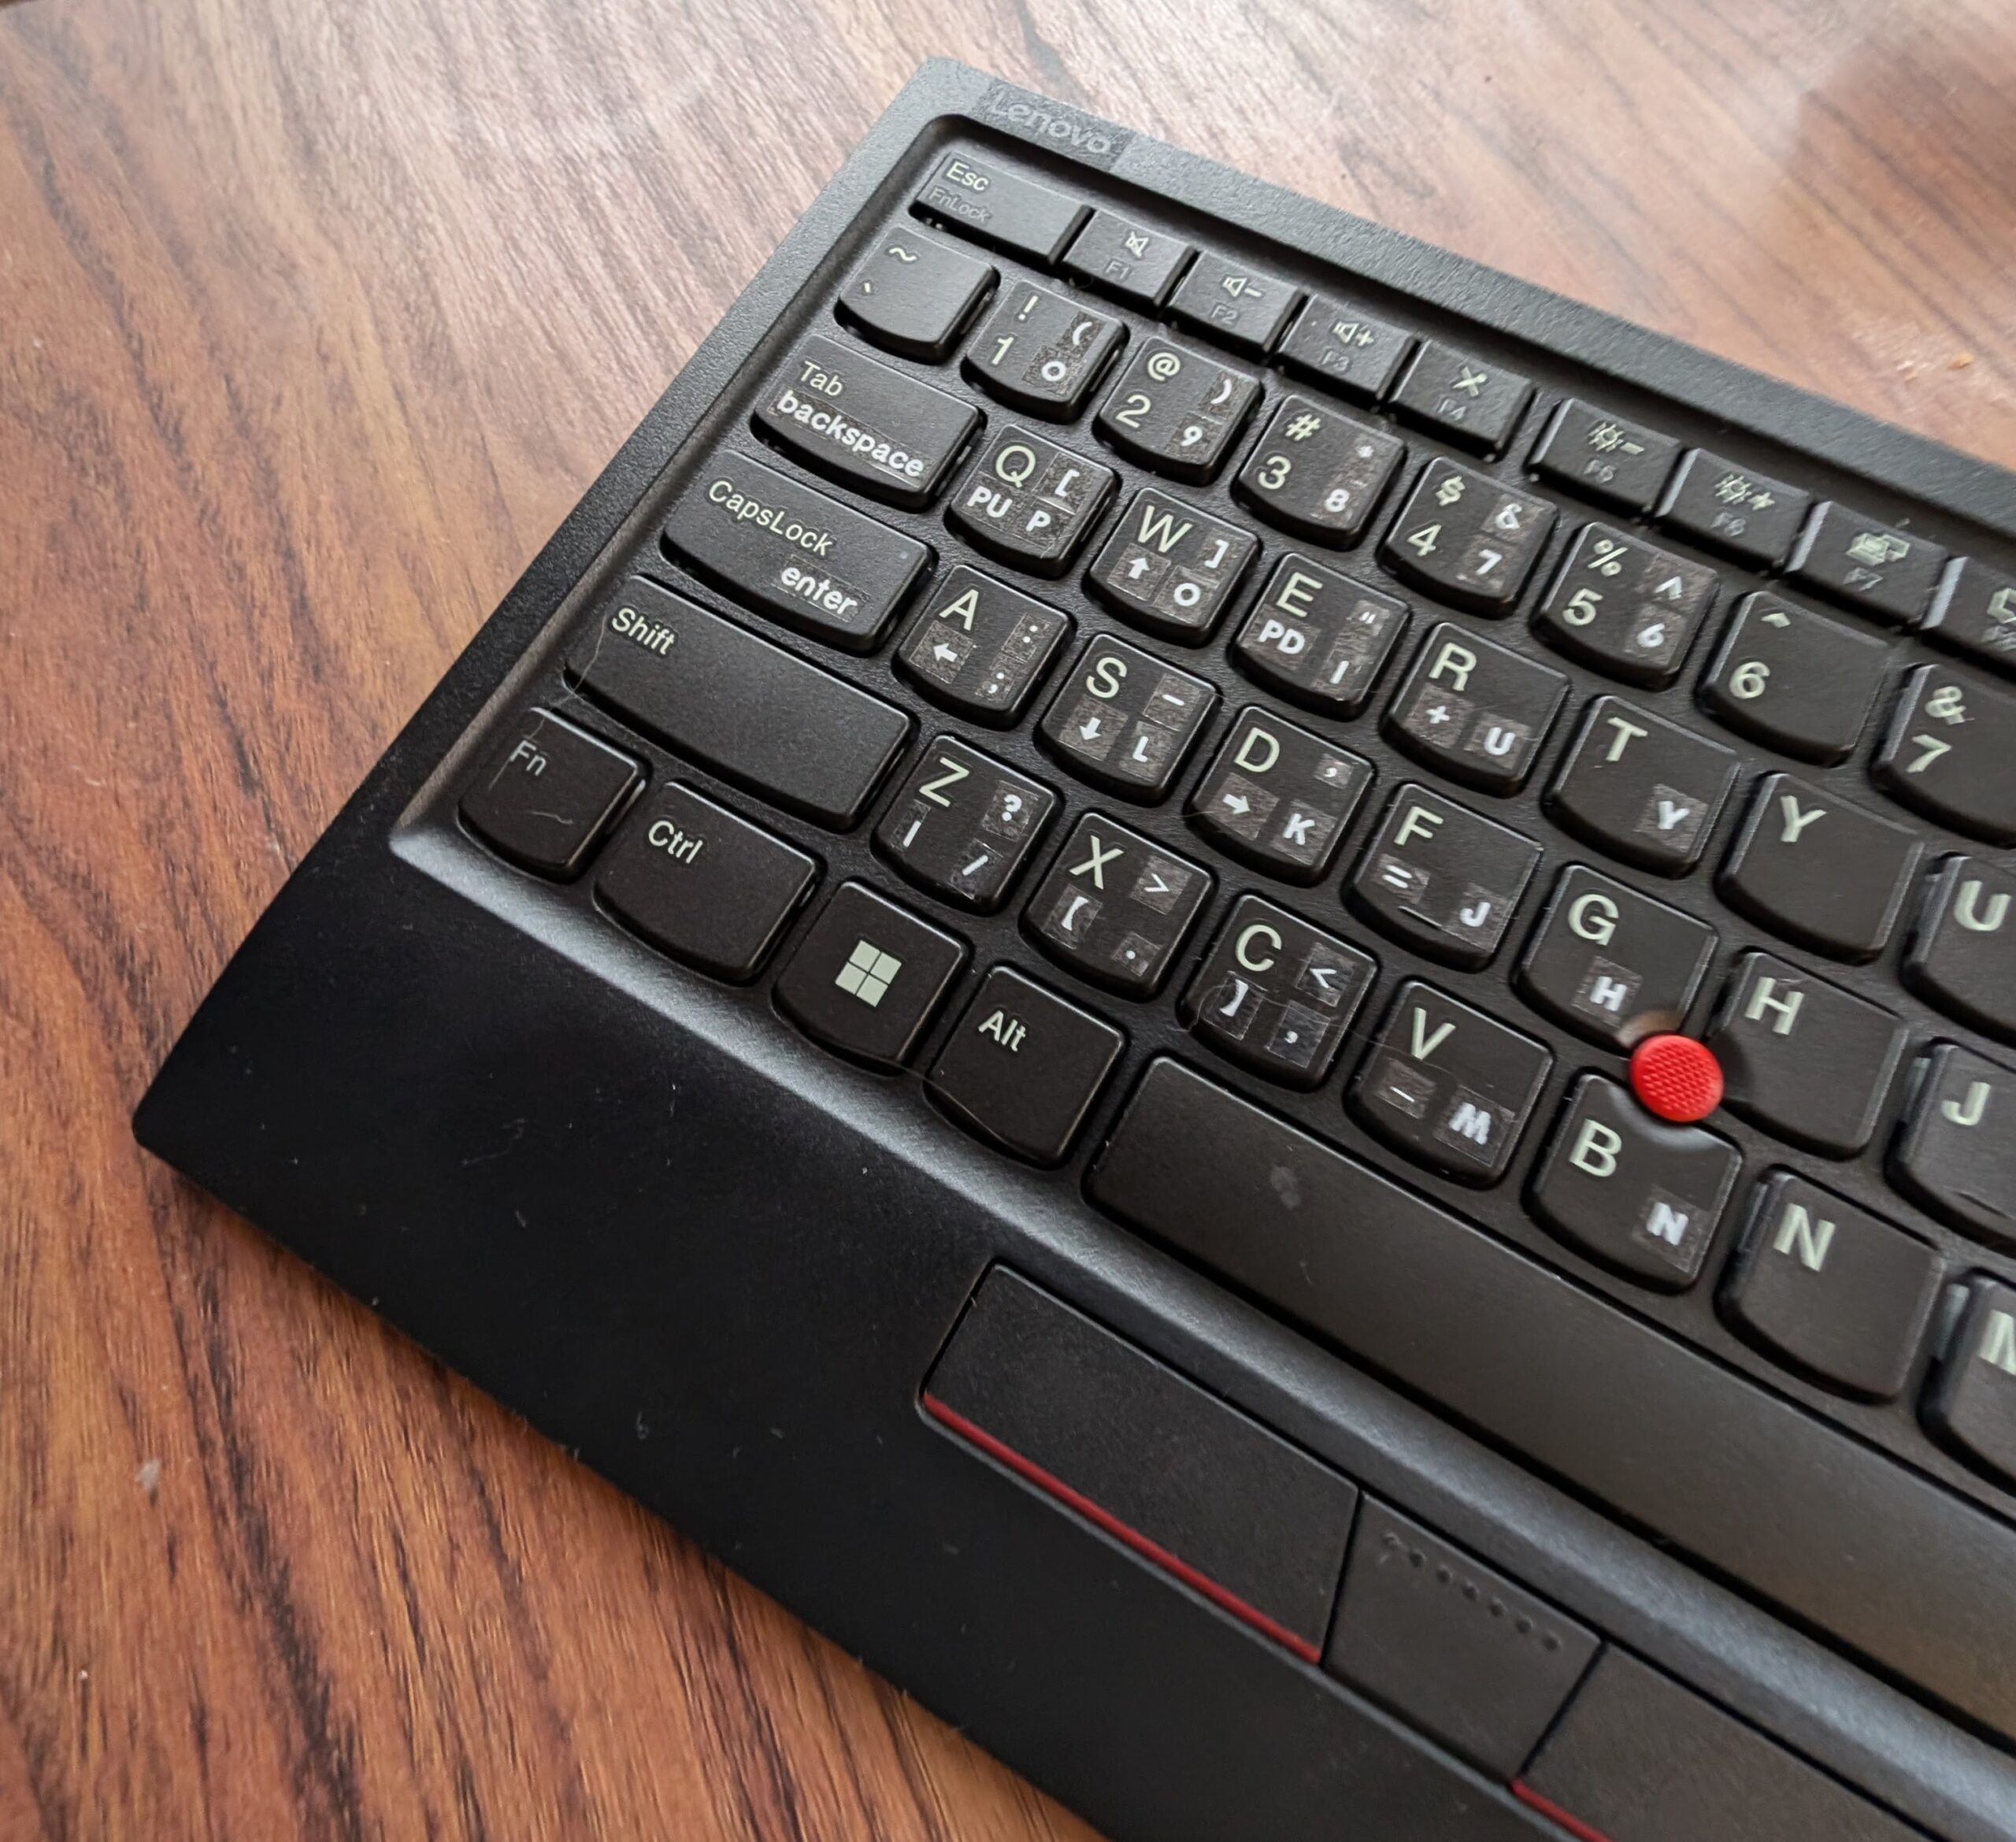
Technically, this has nothing to do with the KURTY as such, but I have found that a certain feature of the keyboards I use (both on my laptops and externally) has been extremely helpful since my injury. For context: I’ve been using Lenovo (previously: IBM) ThinkPad devices for decades. In fact, I’ve continued to stick with the brand because of this one feature. All the way back in college, while my contemporaries were learning trackpads, I was learning to use the TrackPoint, a rare and quirky option even then.
Basically, a TrackPoint is a small finger-driven mouse situated in the center of a keyboard. The location makes it extremely convenient — in my opinion much more so than a trackpad. That said, I’m clearly quite biased. I feel fortunate to have learned to use it with both hands over the years, so I can’t speak to the learning curve for a new user, but for what it’s worth: it has really helped me reduce hand movement (and thus strain) since becoming a functionally one-handed typist. YMMV!
Adaptive Technology: Honorable Mentions
While I’ve found my custom keymap exceedingly helpful, I should mention that I use other adaptive tools in addition to it. As you’ve already seen in the default KURTY configuration, I use a foot pedal programmed to send a Ctrl [R] signal to my computer, which in turn activates the mirror layer via PowerToys. I have also toyed with other programmable hardware tools, such as buttons from Microsoft’s Accessible Accessories lineup.
Early on, I tried out the latest Dragon as a potential supplementary speech-to-text option, but was underwhelmed. It seems to be the industry leader in stand-alone STT software, and it’s OK if you need something universal. But most programs I use, including Google Docs and Android’s default messenger app, have built-in STT functionality that works way better IMO. But when in doubt: research and test! After all, that’s how I came up with the KURTY Single-Handed Half-Board Keymap in the first place (as well as its ridiculous name)!
Speaking of which: in case you missed them, above and below are parts one and two of this three-piece set, respectively. The first article compares other one-handed (hardware and software) solutions I researched and tested. The second goes over the design process behind the KURTY, starting with sources of frustration and inspiration.
Here’s to a Decade of Design Stories at 99pi

So there you have it, folks — not just the end of this article, or three-piece Left to Write set, but the whole twelve-part Adapt or Design project. Perhaps I’ll circle back to write more on adaptive design at some point, but meanwhile: I hope you’ve found this useful, entertaining, or maybe even both!
Writing this saga has been a curious combination of cathartic and melancholic, but it’s past time I return to my regular beat. So stay tuned for stories about spite houses, elevator shafts, and other wonders of everyday design … in the lead-up to celebratory fare around the fifth anniversary of The 99% Invisible City. Finally, a fun fact: this fall I’ll be celebrating my 10th year on the show. And what a ride it’s been!
-= Kurt
Adapt or Design — A Project of 99% Invisible