.png)

Table of Contents
- What is Astronomical Seeing?
- How Does Seeing Affect Your Images?
- My First Experience with Bad Seeing
- How to Measure Seeing Conditions
- When is Seeing at Its Best?
- Tools to Check Seeing Conditions
- Tips for Dealing with Poor Seeing
- Seeing vs Transparency: What’s the Difference?
- How to Improve Your Results Despite Poor Seeing
- Conclusion: Working with What You’ve Got
- References
The night sky was crystal clear, stars shimmering gently. I had my telescope perfectly aligned, camera settings optimized, and target acquired—Jupiter, in all its glory. But when I reviewed my images later, instead of the sharp, detailed gas giant I expected, I found only a blurry, wobbling mess. What went wrong? The culprit wasn’t my equipment or technique—it was something far more fundamental that many beginning astrophotographers overlook: atmospheric seeing conditions. Understanding this single factor could be the difference between frustrating failures and breathtaking cosmic portraits. Here’s what five years of stargazing have taught me about working with (and sometimes against) our turbulent atmosphere.
To understand why my Jupiter photos failed that night, we first need to answer this question: what does seeing mean in astrophotography?
What is Astronomical Seeing?
Astronomical seeing refers to the quality and stability of Earth’s atmosphere and how it affects the sharpness of celestial objects when viewed or photographed through a telescope. Poor seeing makes stars appear to twinkle and blurs objects, while good seeing allows for sharp, steady views.
While this definition explains the basics, the reality of how our atmosphere interferes with starlight is far more complex than most people realize.
 Diagram showing how disturbances in the atmosphere affect astronomical images
Let’s look more closely at how Earth’s atmosphere affects how we see objects in space from the ground. Most people think of air as empty space, but that is far from the truth. If this were true, then aeroplanes wouldn’t fly. In fact, the way a plane flies is similar to a surfer riding the waves. Yes, air can be thought of as being like water in that it moves about and changing constantly. Some areas are warmer or cooler, and some areas can be very disturbed, with changes in the direction and speed of movement similar to waves in water.
Atmospheric seeing changes according to the conditions in the air. Imagine taking a photo through water in a swimming pool. One moment the view of the bottom is clear and the next it isn’t because the water is moving and the light moves and bends in different ways. In the sky this movement and change in the air causes stars to flicker and twinkle. If you look at the moon through a telescope you can see the surface moving about almost as if you are looking through water. It’s never still because there is so much atmosphere between us and space.
What’s the technical explanation? Seeing is caused by turbulent pockets of air with different temperatures and densities that bend light irregularly as it passes through. This causes blurry images and distortions in what we see. The images are less sharp than if we were viewing them from outside the atmosphere in space. This is why we have telescopes high up at the tops of mountains or out in space where there is less disturbance from the air above us.
In fact, the impact of atmospheric seeing on visual astronomy and astrophotography is more dramatic than most amateur astronomers realize, and the numbers tell a sobering story.
The Impact of Seeing on Telescopes
On average, even at professional observatory sites, typical seeing is around 0.5 to 1.5 arcseconds. For most amateur astronomers at typical locations, seeing often ranges from 2 to 4 arcseconds[3]. This means that, regardless of telescope size, atmospheric turbulence usually limits the sharpness of your astrophotography images to a resolution of about 2–4 arcseconds—far less than what many modern telescopes are theoretically capable of achieving. In practical terms, this atmospheric blurring can reduce the effective resolution of a high-quality 8-inch (20 cm) telescope by more than 80% on an average night, making the atmosphere the dominant factor in image sharpness for most observers[3][1].
Sources
[1] https://en.wikipedia.org/wiki/Astronomical_seeing [2] https://skyandtelescope.org/astronomy-equipment/beating-the-seeing/ [3] https://www.innovationsforesight.com/astronomical-seeing-tutorial/
Now that we understand what seeing is, and how significantly it affects our equipment’s performance, let’s examine how these atmospheric conditions cause practical challenges for different types of astrophotography.
How Does Seeing Affect Your Images?
Poor seeing affects different types of astrophotography in various ways:
For planetary imaging: This is where seeing matters most! When I’m trying to capture the details on the surface of Jupiter or Saturn’s rings, poor seeing can turn these into an ugly mess. Instead of sharp features, it looks washed out and without any definition.
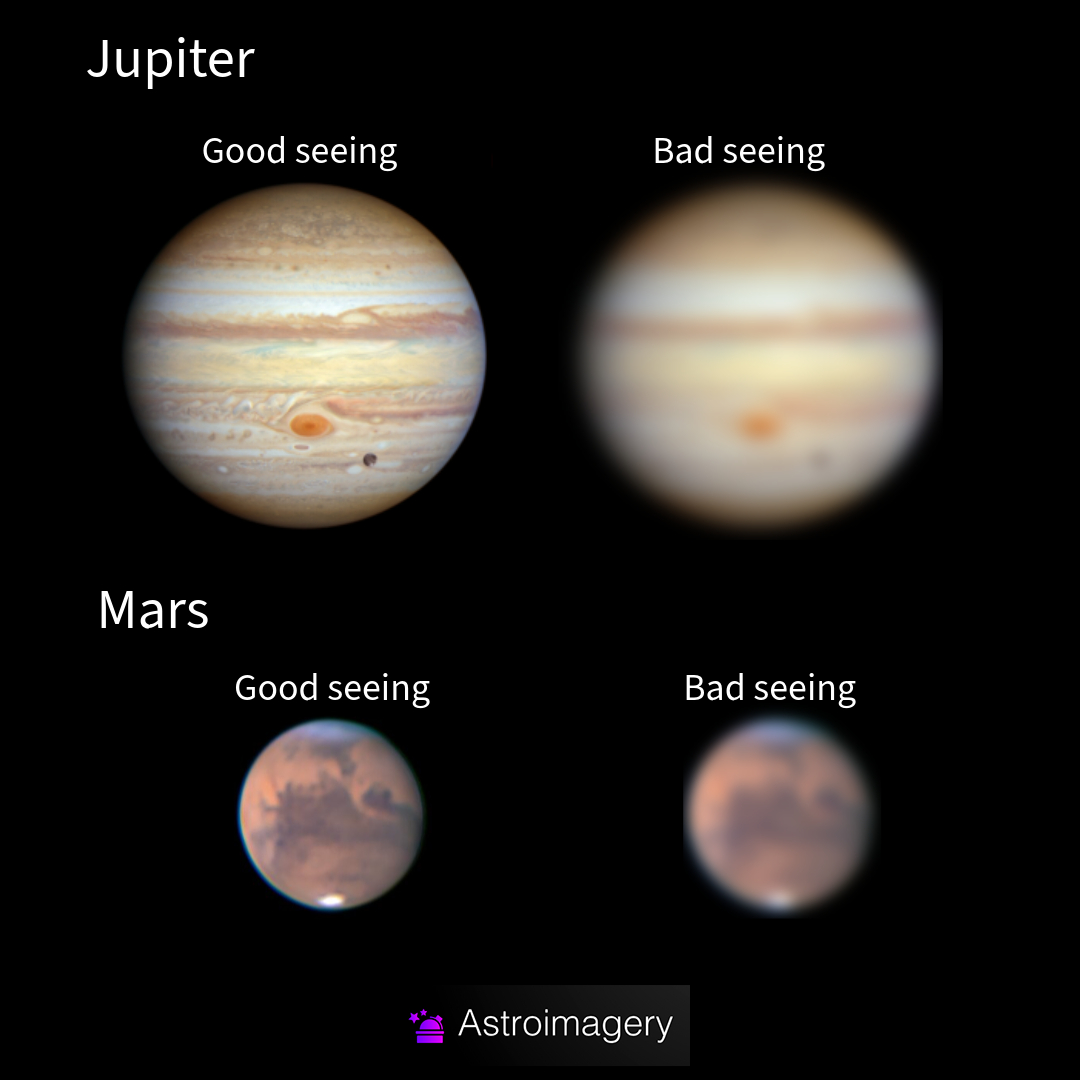 The effects of seeing conditions on two of the planets Mars and Jupiter
For deep sky objects: Seeing is less important here, but it still matters. Poor seeing makes your stars look bloated and fuzzy rather than sharp points of light. This is particularly obvious when trying to capture star clusters or galaxies.
For lunar photography: The Moon is so bright that you can usually overcome moderate seeing conditions, but you’ll notice the difference. Good seeing enables you to capture sharp craters and mountains, while poor seeing makes everything look slightly out of focus.
These technical explanations became painfully real during one of my most anticipated imaging sessions.
My First Experience with Bad Seeing
I’ll never forget my first proper encounter with terrible seeing. I’d waited weeks for a clear night to photograph Mars during its 2020 opposition. The forecast showed crystal clear skies, and I was ready with my Celestron 130 SLT and Canon 600D.
When I looked through the eyepiece, Mars was dancing about like a hyperactive firefly! The image was constantly shifting and pulsing. I tried taking videos for lucky imaging (more on that later), but even after stacking hundreds of frames, the result was disappointing – just a fuzzy orange blob with no surface features visible.
That’s when I learned that clear skies don’t always mean good seeing. In fact, some of the clearest nights have the worst seeing because the same high-pressure systems that bring clear weather can also create atmospheric instability.
That frustrating night taught why I needed to understand and measure seeing conditions before setting up my telescope and imaging equipment.
How to Measure Seeing Conditions
Astronomers measure seeing using the Pickering Scale or in arcseconds. Here’s what you need to know:
The Pickering Scale runs from 1 to 10:
- 1-2: Terrible – don’t bother with planets
- 3-4: Poor – only bright objects worth attempting
- 5-6: Average – decent for most astrophotography
- 7-8: Good – you’ll get nice sharp images
- 9-10: Excellent – rare but amazing when it happens!
Arcseconds are more precise:
- <1″: Excellent seeing
- 1-2″: Good seeing
- 2-4″: Average seeing
- 4″: Poor seeing
 The pickering Scale showing how stars can appear in different seeing conditions.
What are arcseconds?
An arcsecond is a measure of distance of something in the sky. Instead of regular measurements like miles or kilometers we use degrees or fractions of a degree because when we look up we can 360 around the sky and 180 degrees from east to west or north to south. As in measurements of time on a clock, in a degree we have sixty minutes, we call these an arc degree and arcminutes. An arcminute is further divided into arcseconds, and there are sixty of these in an arcminute. Saying the seeing is two arcseconds means that objects will appear to move or blur by approximately that amount. So on poor nights objects will move more and twinkle more. This is why you’ll get more blurry pictures and less sharpness.
In my experience in the UK, is we typically get 2-3″ seeing on average nights. Those magical sub-1″ nights are few and far between! The past few years I am living in Turkey where the seeing conditions are much better, although being by the sea what appears to be very clear skies can sometimes be less than ideal. It has happened several times that after a night of imaging under clear skies my photos are not as clear as I thought they would be. At times it seems that astronomical seeing is a black art!
To help illustrate the dramatic difference seeing conditions can make, here’s how various celestial objects appear under different atmospheric conditions:
Examples of good and bad seeing for different astronomical objects
| Object | Good Seeing | Bad Seeing |
| The Moon | Small craters within larger ones are clearly visible. Features are sharp. | Only major craters are visible as blurry depressions. Fine details are lost in the atmospheric turbulence. |
| Globular Clusters | Individual stars are resolved throughout the cluster (depending on aperture). The core appears as a concentration of distinct stars rather than a hazy glow. Stars are pinpoint and sharp. | Stars are bloated and fuzzy. The cluster’s core looks hazy. Resolution of individual stars is limited to the outer regions only. |
| Galaxies | Spiral structure is clear and sharp. Dust lanes are obvious and well defined. Star-forming regions and HII regions are distinctly visible as separate features rather than blending together. | Spiral arms are washed out or invisible. The galaxy’s core looks bloated and overly bright compared to the outer regions. Subtle details in the structure are completely lost. |
| Nebulae | Filamentary structure is clearly visible. Bright and dark regions appear sharply defined. Stars embedded within the nebula are points of light rather than fuzzy blobs. | Fine details are lost, leaving only the general shape and brightest regions visible. The nebula appears as a uniform glow without depth or detailed structure. |
| Double Stars | Stars that are near can be clearly seen as separate points of light. The diffraction patterns around bright stars appear as spikes (depending on your telescope design). | Stars that should be resolvable merge together. It becomes impossible to detect close companion stars. |
Understanding these differences is important, but so is understanding when you’re likely to have good seeing conditions.
When is Seeing at Its Best?
Through years of imaging, I’ve noticed patterns in seeing conditions:
Time of night: Seeing often improves after midnight as the ground cools and temperature differences are less. Some of my best planetary images have been captured at 2 or 3 AM.
Seasonal variations: In my location, autumn and spring tend to offer the best seeing. Summer can be tricky with heat rising from the ground, while winter brings crisp but often turbulent air.
Weather patterns: The best seeing often comes:
- After a weather front has passed through
- During periods of stable high pressure
- When there’s a slight haze (surprisingly!)
- On nights with little temperature difference between air masses
Location matters: Coastal areas often have steadier seeing due to the moderating effect of water. Mountains can be excellent places to image, but valleys can trap turbulent air.
Instead of guessing what conditions might be, modern apps can help you with reliable seeing forecasts that will guide you in planning better imaging sessions.
Tools to Check Seeing Conditions
Before I take my equipment outside, I always check the weather forecast:
Clear Outside – This has become my go-to forecast tool. It shows seeing predictions in arcseconds for your exact location. I’ve found it remarkably accurate.
other apps you can try include:
Meteoblue – Offers detailed atmospheric models including seeing forecasts. The “Astronomy” section is particularly useful.
SkippySky – Great for UK astronomers, provides seeing forecasts specifically for astronomical purposes.
Check out the 6 best apps I use for astrophotography here. They are extremely helpful!
Local weather balloon data – If your technically minded, you can check atmospheric soundings to see temperature gradients at different altitudes. Probably unnecessary but could be worth checking out.
But here’s a tip: don’t rely entirely on forecasts. I always do a quick visual check by looking at bright stars. If they’re twinkling madly, seeing is poor. If they appear steady, it’s worth setting up the telescope. I can’t tell you the number of times my local weather forecast has been completely wrong. If I had relied 100% on that, I would never have got some of my best images!
However, even with the best forecasting apps, you’ll sometimes face nights with below average seeing. Here’s how to make the most of these challenging conditions.
Tips for Dealing with Poor Seeing
Let’s be honest – we can’t all wait for perfect seeing conditions. Here’s how I make the most of less-than-ideal nights:
1. Let your telescope cool down properly; This is crucial! I take my scope outside at least 30-45 minutes before imaging. Tube currents from a warm telescope will create their own seeing problems.
2. Avoid heat sources Never set up near:
- Concrete that’s been baking in the sun all day
- House walls that radiate heat
- Air conditioning units
- Asphalt driveways
3. Use appropriate magnification On nights with poor seeing, I reduce my magnification. There’s no point pushing your telescope beyond what the atmosphere will allow.
4. Try lucky imaging For planets, this is a game-changer. Take hundreds or thousands of short exposures and stack only the sharpest ones. Software like AutoStakkert! or Registax works brilliantly for this.
5. Focus on different targets If seeing is poor, I switch from planets to wider field targets like open clusters or larger nebulae where seeing is less critical.
Before diving deeper into specific techniques we can use to improve things during poor seeing, it’s important to clear up a common source of confusion among beginner astrophotographers.
Seeing vs Transparency: What’s the Difference?
This confused me initially, so let me clarify:
Seeing = atmospheric steadiness (affects sharpness) Transparency = atmospheric clarity (affects how faint an object you can see)
You can have:
- Good seeing + poor transparency = Great for planets, not for faint galaxies
- Poor seeing + good transparency = Good for wide-field Milky Way shots
- Good seeing + good transparency = The holy grail! (Rare but amazing)
I’ve had nights with terrible transparency due to thin clouds but excellent seeing that produced my best Jupiter images. Conversely, crystal-clear transparent nights after cold fronts often have terrible seeing.
How to Improve Your Results Despite Poor Seeing
Here’s what I’ve learned over the years:
For planetary imaging:
- Shoot lots of frames (I typically capture 2-3 minute videos)
- Use a high frame rate camera if possible
- Keep individual exposures short (5-20ms)
- Stack only the best 5-10% of frames
For deep sky:
- Use slightly shorter exposures on poor seeing nights
- Take more frames to compensate
- Consider binning your camera 2×2
- Focus on larger targets
Equipment considerations: Smaller telescopes are often less affected by seeing. My 130mm reflector sometimes outperforms larger instruments on poor seeing nights. If you’re primarily interested in imaging planets with a telescope, consider a quality 100-150mm refractor. If you’re wondering, here are the best telescopes for seeing planets.
Conclusion: Working with What You’ve Got
Perfect seeing is rare, more so in certain locations. But don’t let that discourage you! Some of my favourite images were captured on nights with average seeing because I understood the limitations and worked within them.
Remember:
- Check seeing forecasts but verify with your eyes
- Let your equipment cool down properly
- Choose appropriate targets for the conditions
- Use techniques like lucky imaging to your advantage
- Keep practicing – you’ll learn to make the most of any conditions
The key is understanding what seeing means and how it affects your imaging. Once you know this, you can plan your sessions accordingly and still capture stunning images of our incredible universe.
Clear skies and steady seeing!
Key Takeaways: Astronomical Seeing and Astrophotography
- Astronomical seeing is the single most important atmospheric factor affecting the sharpness of your astrophotography images. Even with perfect equipment and clear skies, turbulent air can blur details and limit your results.
- Typical seeing values for amateur astronomers ranges from 2 to 4 arcseconds, which can reduce the resolution of a telescope by over 80% on an average night.
- Seeing does not affect all astronomical objects in the same way: Planets and the Moon are most affected, with fine details lost in poor seeing. Deep sky objects like galaxies and clusters suffer less. Good seeing is essential for resolving double stars and capturing sharp lunar features.
- Clear skies do not guarantee good seeing. High-pressure systems can bring both clear weather and unstable air, so always check seeing forecasts and visually assess visibility before imaging.
- You can measure seeing using the Pickering Scale (1–10) or in arcseconds. Sub-1″ seeing is rare for most locations, but knowing the current conditions helps you choose the right targets and techniques.
- Optimize your results by letting your telescope cool down, avoiding heat sources, using appropriate magnification, and employing lucky imaging (capturing and stacking many short exposures) to overcome atmospheric blur.
- Seeing and transparency are different: Seeing affects sharpness, while transparency affects how faint an object you can see. Both matter, but for planetary and high-resolution imaging, seeing is the critical factor.
- Adapt your approach: On nights with poor seeing, focus on wide-field targets or deep sky objects less affected by turbulence.
- Understanding and planning for seeing conditions will help you capture sharper, more detailed images and make the most of your time under the stars.
References
Chromey, F.R. (2016). To Measure the Sky: An Introduction to Observational Astronomy. Cambridge University Press.
North, G. (2007). Observing Variable Stars, Novae and Supernovae. Cambridge University Press.
European Southern Observatory. Astronomical Seeing. Retrieved from https://www.eso.org/public/