.png)

This is a detailed walk-through of how I built my own AI server from scratch—on a budget of $1.3K.
These are the main steps:
Step 1: Acquire Hardware.
Step 2: Assemble Hardware.
Step 3: Install OS.
Step 4: Install Software Tools & Libraries.
This post may seem long, but I promise, it's because it contains a lot of pictures and code snippets.
Rationale
Why did I decide to invest in an on-prem, DIY server?
For a few reasons:
- Unrestricted Learning: I'm fascinated by the whole AI stack--from the bare-metal, to low-level compilation, to high-level programming abstractions. I want to have unfettered access to all the hardware and software layers so I can follow my curiosity into the internals without the limitations with cloud-hosted instances.
- Hands-On Operations: Managing the server can be a hassle, but I do it for the operational experience. I'm treating my home server as a microcosm of a data center, implementing monitoring and logging systems, configuring backups, managing power and temperature—all things we take for granted with the cloud, but I find interesting.
- Cost Savings: You pay a lot upfront for the hardware, but if your usage of the GPU is heavy, then you save a lot of money in the long run. I'm running a lot of AI workloads so the investment is probably justified, although time will tell. For low utilization rates, cloud instances are usually more cost-effective. (Tim Dettmers has a good breakdown of the tradeoffs.)
The biggest downside with a personal rig is that you're limited to small-scale experiments and tasks. None of my runs have hit the ceiling of scale yet, but I can see myself adopting a hybrid approach in the future: using my server for local development with miniaturized workloads and the cloud when I need to scale-up.
Ok, now here's how I built the rig.
Step 1: Acquire Hardware
Step 1.1: Buy the GPU
These are the factors I considered when selecting which AI accelerator to buy:
- Maker: Nvidia was the obvious choice. Their hardware has wide industry adoption so the software (e.g. drivers, CUDA) ecosystem and community is mature.
- Nvidia vs AMD: AMD GPUs with ROCm lets you peer deeper into the stack internals, but the supporting software and community for AI use cases is still nascent.
- Nvidia vs Apple: Devices with Apple Silicon are more closed. They don't expose the mid- and low-level layers for optimization. Also, you're not going to find M-series chips in data centers so your technical learnings and implementation are limited to edge deployments.
- Price: Under $700.
- Memory: The VRAM capacity determines the size of the models you can tinker with. 12GB lets you comfortably load LLMs with 14B parameters (~9GB) into the GPU.
- Power: I didn't want a complicated setup to power the GPU and accompanying components, so I was looking for GPUs that were compatible with commodity power supply units that could be plugged into residential outlets. This is pretty much guaranteed with consumer-grade GPUs (like Nvidia's RTX series).
- Resale Value: When Nvidia releases a new ship, the value of previous generations does drop, but not by that much. Newer generations will depreciate more slowly in the near-term. (This may change as new market entrants introduce alternative GPU supply, satisfying the high demand right now for AI chips.) I plan to keep the GPU for awhile, but I'll resell it when I upgrade to a later generation, so I do want it to retain some of its original value.
- Tensor Cores: Most GPU units coming out of Nvidia have Tensor cores these days, but it's something you want to confirm before you purchase. Tensor cores are specialized cores inside of GPUs optimized for training and inference operations.
- NVLink: NVLink is a high-speed interconnect between GPUs that allows them to collaborate more efficiently on workloads. If you're going to purchase multiple GPUs, then you might want to consider models that are NVLink-compatible. Although, it's not necessary. You can still link up multiple GPUs using a PCIe switch, but it will be slower.
- Availability: Some Nvidia models (e.g. RTX 4090) are more difficult to find than others. I didn't want to wait, so I considered only units that were ready to ship right away.
DECISION: Nvidia RTX 4070
- Maker: Nvidia
- Price: $597.60 (incl. tax)
- Memory: 12GB
- Power: Worst-case draw is 200W, combined with server components, is likely to be ~450W, which is well under the 1,440W limit on power outlets in California
- Resale Value: Second-latest generation (50-series is the most recent)
- Tensor Cores: Yes
- NVLink: No
- Availability: Yes (bought a used version off eBay)
Step 1.2: Buy the Other Components
These are the ancillary components needed for a minimum viable server:
- Motherboard: The backbone that holds all elements of the server together, as well the mechanism that enables them all to communicate.
- CPU: The central processing unit that controls the overall operation of the server.
- CPU fan: Keeps the CPU within safe operating temperatures.
- RAM: Memory storing data and instructions for the CPU.
- Storage: Stores the operating system, files, and other data. A solid-state drive (SSD) has faster performance, but a hard disk drive (HDD) is less expensive.
- Power supply unit (PSU): Converts mains power to a lower voltage to ensure the power entering the server is appropriate for all internal components.
- Case: Encases the components in a sealed enclosure, shielding it from dust and debris, managing airflow for cooling, and servers as a mount for the fan(s).
I prompted ChatGPT to give me recommendations. Prompt:
I recently bought a Gigabyte Nvidia GeForce RTX 4070 12GB Graphics Card to build a custom AI server I can use to run deep learning workloads with my MacBook Pro as the terminal. Recommend hardware components I can buy to build my AI server that balances budget (under $1,000), performance, and being future-proof or at least easy to upgrade. Differentiate between components that are essential and non-essential. The final build will be located at my residence in San Francisco, CA, so it will receive power from a regular outlet.
I used the AI-generated recommendations as a starting point, and refined the options with my own research. I eventually landed on the following:
Total: $708.20 (incl. tax)
Future-proofing the build was important to me so I paid extra attention to these components during the buy flow:
- Motherboard: Extra slots to make room for additional GPUs, memory, and storage.
- PSU: With 50% headroom above the system's theoretical peak power draw to allow for additional upgrades. (Will also keep the fan noise down.) And enough peripheral connectors for future components (e.g. a second GPU).
- Case: Physical space for additional parts.
Before pulling the trigger, I confirmed with ChatGPT that all the components were compatible. I then ordered all the parts from Amazon, and they arrived in less than a week.

Step 1.3: Prepare for Build
I needed the following:
- A pair of scissors to open boxes and packaging.
- A Philips screwdriver.
- A USB drive for storing the OS.
- A computer to download the OS and create the bootable USB drive.
- A monitor for the server to observe the OS installation and configuration process.
- A keyboard to provide inputs to the server during installation.
- A power outlet to power the server.
Step 2: Assemble Hardware
Step 2.1: Unbox Components
Laid out the unboxed components on a bed sheet or towel, or something else, so that broken styrofoam bits and other debris doesn't scatter all over the floor.

Also, had to download user manuals for parts that didn't come with a printed copy.
- Motherboard: https://download-2.msi.com/archive/mnu_exe/mb/B650GAMINGPLUSWIFI.pdf
- Case: https://www.corsair.com/us/en/explorer/diy-builder/cases/corsair-frame-4000-series/
Step 2.2: Install Motherboard Components
Installed the CPU, fan, RAM DIMMs, and SSD on the motherboard first. This was easier than installing the motherboard in the case first, and then installing these components inside a more restricted space.
For this step, I took the following precautions:
- Held the motherboard by the edges to avoid touching sensitive components.
- Discharged myself of static electricity by touching another metal object (my bed frame) before handling the motherboard.
- Laid the motherboard on top of the anti-static bag it came in (the silvery, crinkly bag). Making sure it was flat and sitting securely.


Step 2.2.1: Install CPU and CPU Fan
I followed the instructions in this video.
First, I placed the CPU chip in the CPU socket, making sure it was seated securely.


Then, I mounted the CPU fan over the CPU socket, screwing it into the screw holes surrounding the socket on the motherboard.

Plugged the fan's power cord to the motherboard's CPU_FAN1 connector.

Step 2.2.2: Install RAM
I followed the instructions in this video to install the RAM DIMMs into the slots on the motherboard, right next to the CPU.

Step 2.2.3: Install SSD

Removed the cover plate for the SSD slot on the motherboard, inserted the SSD into the slot, and then screwed the cover plate back in place.


Step 2.3: Prepare Case
Unscrewed the side and top panels, and any railings, to make it easier to install the server parts.

Step 2.4: Install PSU
Placed the PSU at the bottom of the case.

Step 2.5: Install Motherboard
I followed the instructions in this video.
First, I inserted the I/O shield into the I/O bay of the case.

Then, I mounted the motherboard into the built-in tray in the case, screwing it into place.

Made sure the I/O ports on the motherboard were aligned with the I/O shield.

Step 2.6: Install the GPU


First, I lay the case flat on the floor, with the motherboard facing up. Then I inserted the GPU bracket into one of the PCIe slots on the motherboard.


I installed an anti-sag mount in the interior of the case to keep the GPU from sagging down.

I re-attached the side panel on the I/O side of the GPU, making sure the GPU ports were exposed.

Step 2.7: Power Cables
The front panel of the case has buttons with LED lights. I connected the power cables for the lights to the motherboard's PANEL1 connector.

(I technically did this before Step 2.6 because it was easier without the GPU in the case.)
Then, I proceeded to connect the power cables for the motherboard, fans, and GPU.


Step 2.8: First Boot
I connected a monitor to the GPU's display port, plugged the PSU into a wall outlet, turned on the PSU by flipping a switch, and then pressed the power button on the front panel of the completed server. The LED lights lit up and the fans started spinning.


Success!
Step 2.9: Re-Attach Case Panels

Step 2.10: Connect WiFi Antenna
The motherboard came with two Wifi antenna, which I connected to the two gold-colored threaded connectors on the I/O panel.

Step 3: Install OS
Step 3.0: Shutdown Server and Connect Peripherals
I connected the monitor to the GPU and connected the keyboard to the motherboard through a USB cable. Then I shutdown the server.
Step 3.1: Download OS ISO
I downloaded the ISO of the latest stable version of Ubuntu Server (specifically 24.04.2 LTS) onto my computer.
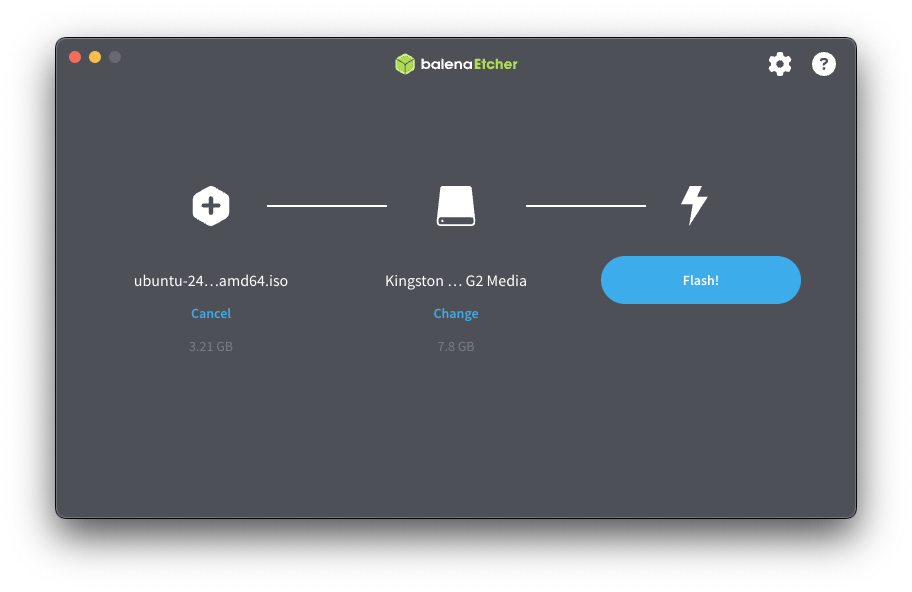
Step 3.2: Create Bootable USB Drive
I plugged an 8GB USB drive into my computer and used Balena Etcher to create a bootable drive.
Step 3.3: Boot Server from USB Drive
From a shutdown state, I inserted the USB drive into the server and powered it on. While it was starting up, I pressed and held the DEL key to enter the BIOS setup.

Step 3.4: Install OS
I chose "Try or Install Ubuntu Server" and pressed Enter. That initiated the OS installation, which took a few minutes.

Step 3.5: Configure Settings
The first thing I was prompted to do immediately after OS installation was to configure the language.

Then installation type.

The network configuration. This is where I connected the server to my home WiFi network.


Took note of the assigned IP address in my local network: 192.168.0.34
Left the proxy settings empty.

Then came the Ubuntu archive mirror address. Left it as-is.

Then storage configuration. The server was able to auto-detect the SSD and prepare defaults, so I didn't have to do anything.


Profile configuration. This is where you setup your user profile with password. Also name the server (I named it, scale-1).

Installed OpenSSH server so I can access the server using a secure remote connection from my computer via SSH.

Didn't install any server snaps.

Installation complete!

Step 3.6: Reboot Server
Once the installation finished, I rebooted the server. I was asked to login using the credentials I created during profile setup. After successfully logging in, I was taken to a terminal session where I could start using the server.

Step 4.0: Connect to Server Remotely
In a terminal window on my computer, I opened an SSH tunnel to the server using ssh [email protected] (used the IP address that was assigned during network config).
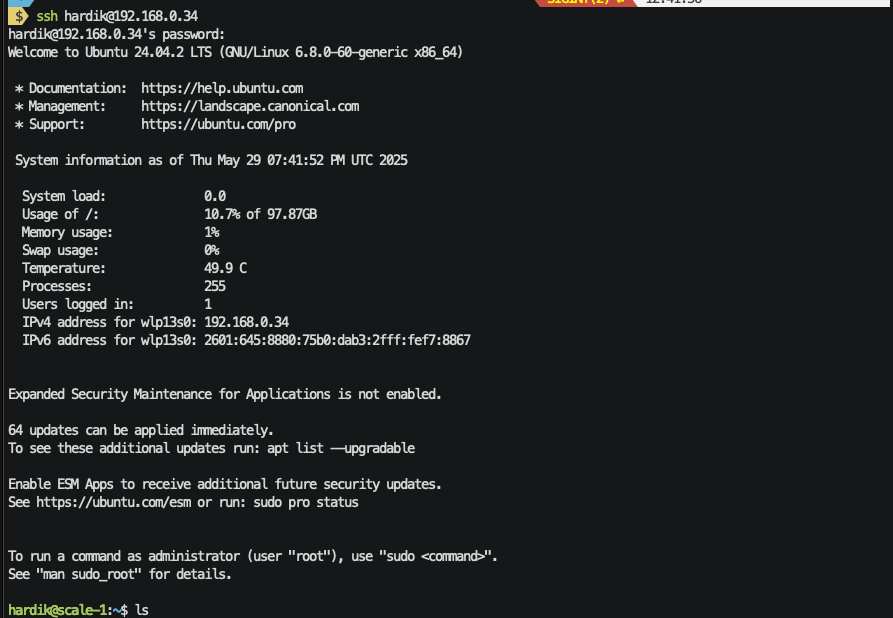
After I was connected, I removed the peripherals (monitor and keyboard) from the server.
Step 4.1: Update System
I updated the system using sudo apt update && sudo apt upgrade -y.
Step 4.2: Diagnostics
I asked Claude to give me a list of commands to run to check the health of the server. Here are the commands I ended up running:
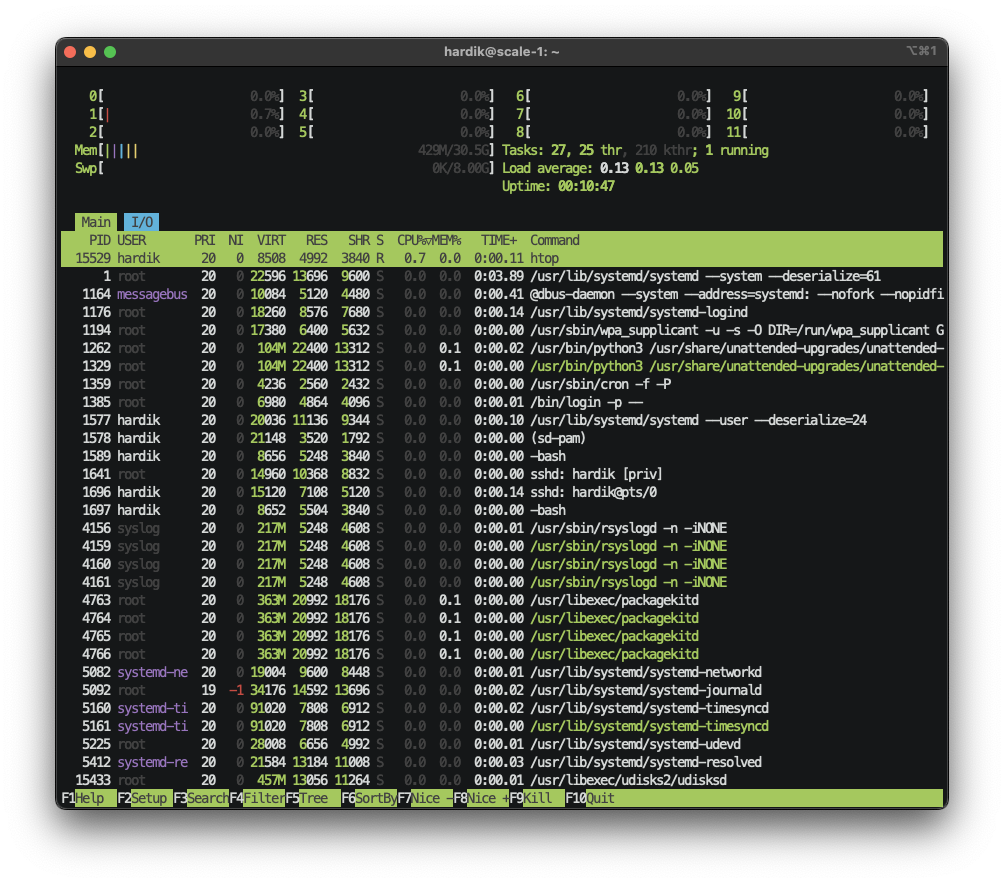
Finally, I ran htop.
Step 4.3: Allocate Disk Space
By default, only ~10% of the disk space on my SSD was allocated to the root partition.
I expanded the allocation to ~80% of the disk space using sudo lvextend -L +800G /dev/ubuntu-vg/ubuntu-lv.
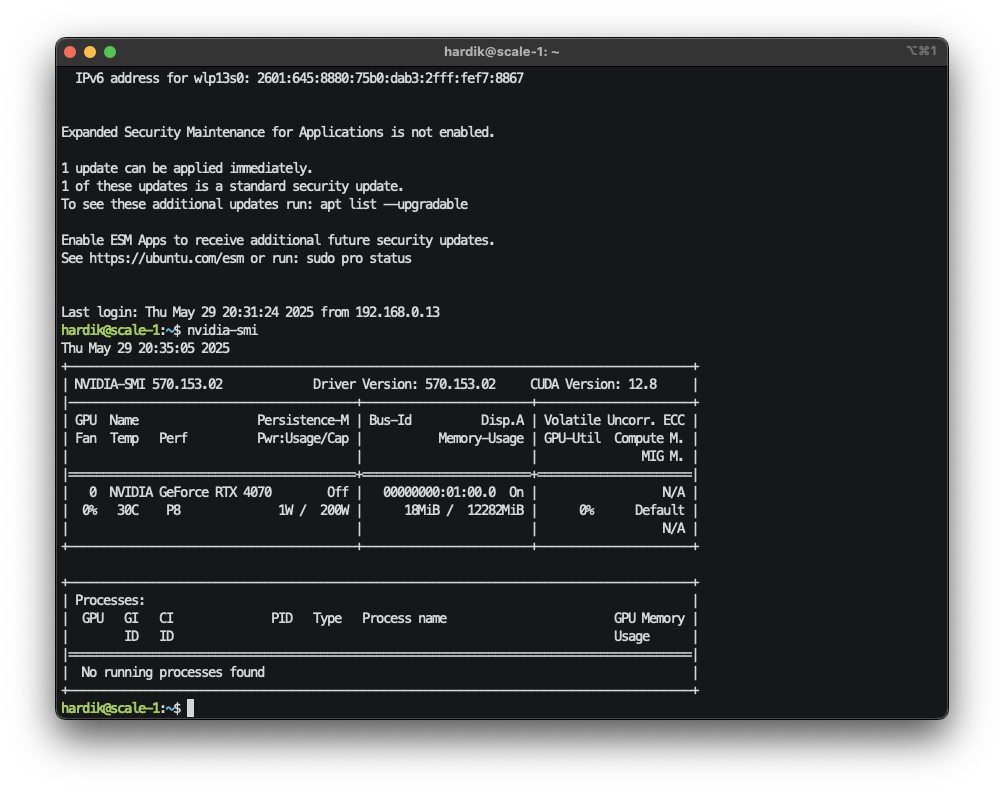
Step 4.4: Install Nvidia Drivers
Used this resource to find the latest stable drivers for Ubuntu Server to install.
Then ran nvidia-smi to verify the installation.
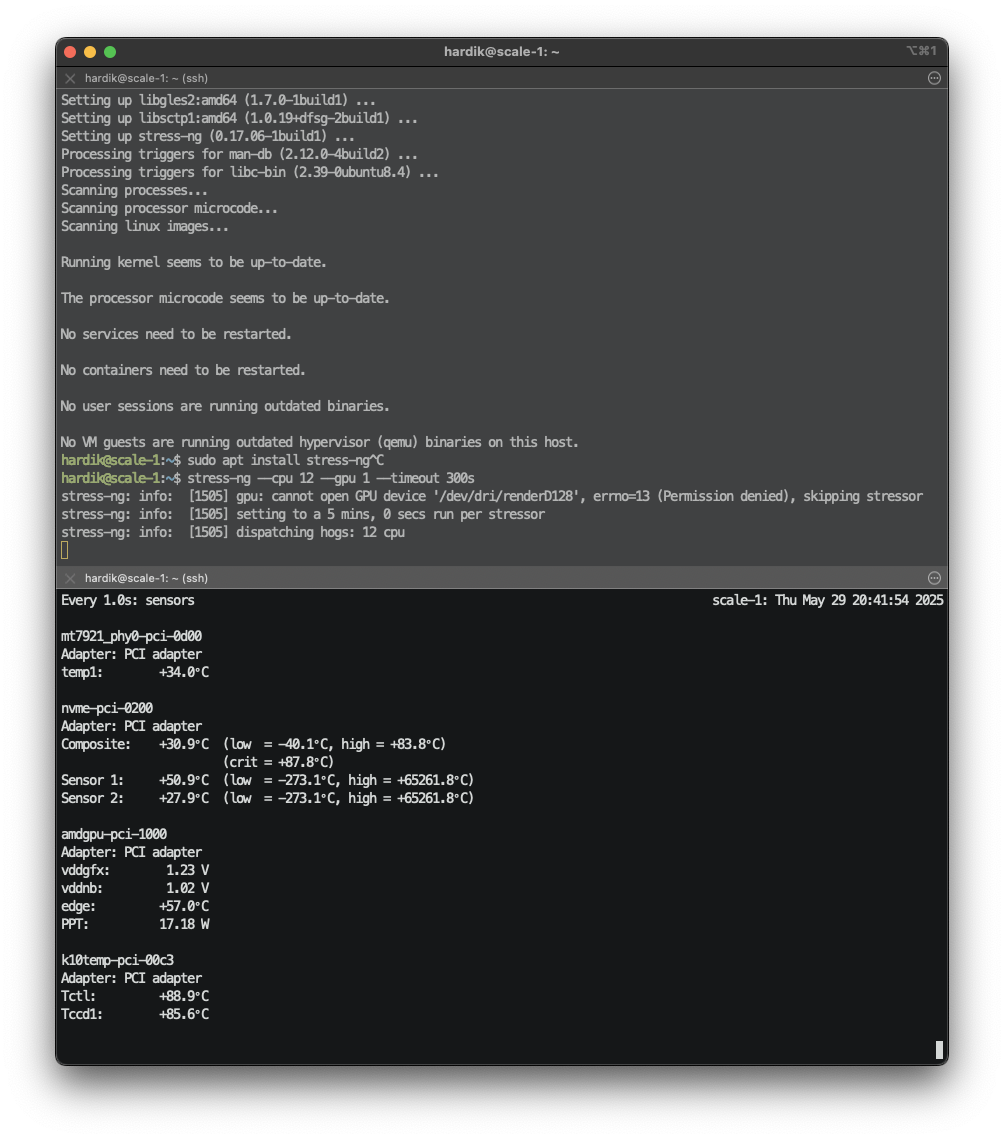
Step 4.5: Stress Test CPU and GPU
Using stress-n (sudo apt install stress-n), I ran stress tests against the CPU, and separately against the GPU (lasting 5 min. each).
While the tests were running, I was monitoring sensors using watch -n 1 'sensors' in a separate terminal window. (Note: I had to install lm-sensors first using sudo apt install lm-sensors and then set it up with sudo sensors-detect, answering "yes" to all questions.)
Step 4.6: Install CUDA Toolkit
Ran sudo apt install nvidia-cuda-toolkit to install the CUDA toolkit, and then verified the installation using nvcc --version.
For added assurance, I wrote some test CUDA code.
Then compiled and ran it.
Got the following output:
Hello from block: 0, thread: 0 Hello from block: 0, thread: 1 Hello from block: 1, thread: 0 Hello from block: 1, thread: 1Step 4.7: Install Python
Tested the installation.
Step 4.8: Setup Remote Management with Tailscale
To simplify remote access, I installed Tailscale, which allows me to access my server using a stable hostname (i.e. ssh hardik@scale-1) over an unstable IP address.
Conclusion
Claude was super helpful throughout this process, giving me personalized guidance and explaining all sorts of technical jargon.
If you have any questions, suggestions, or comments, you can message me on LinkedIn, Twitter / X, or BlueSky.


