.png)

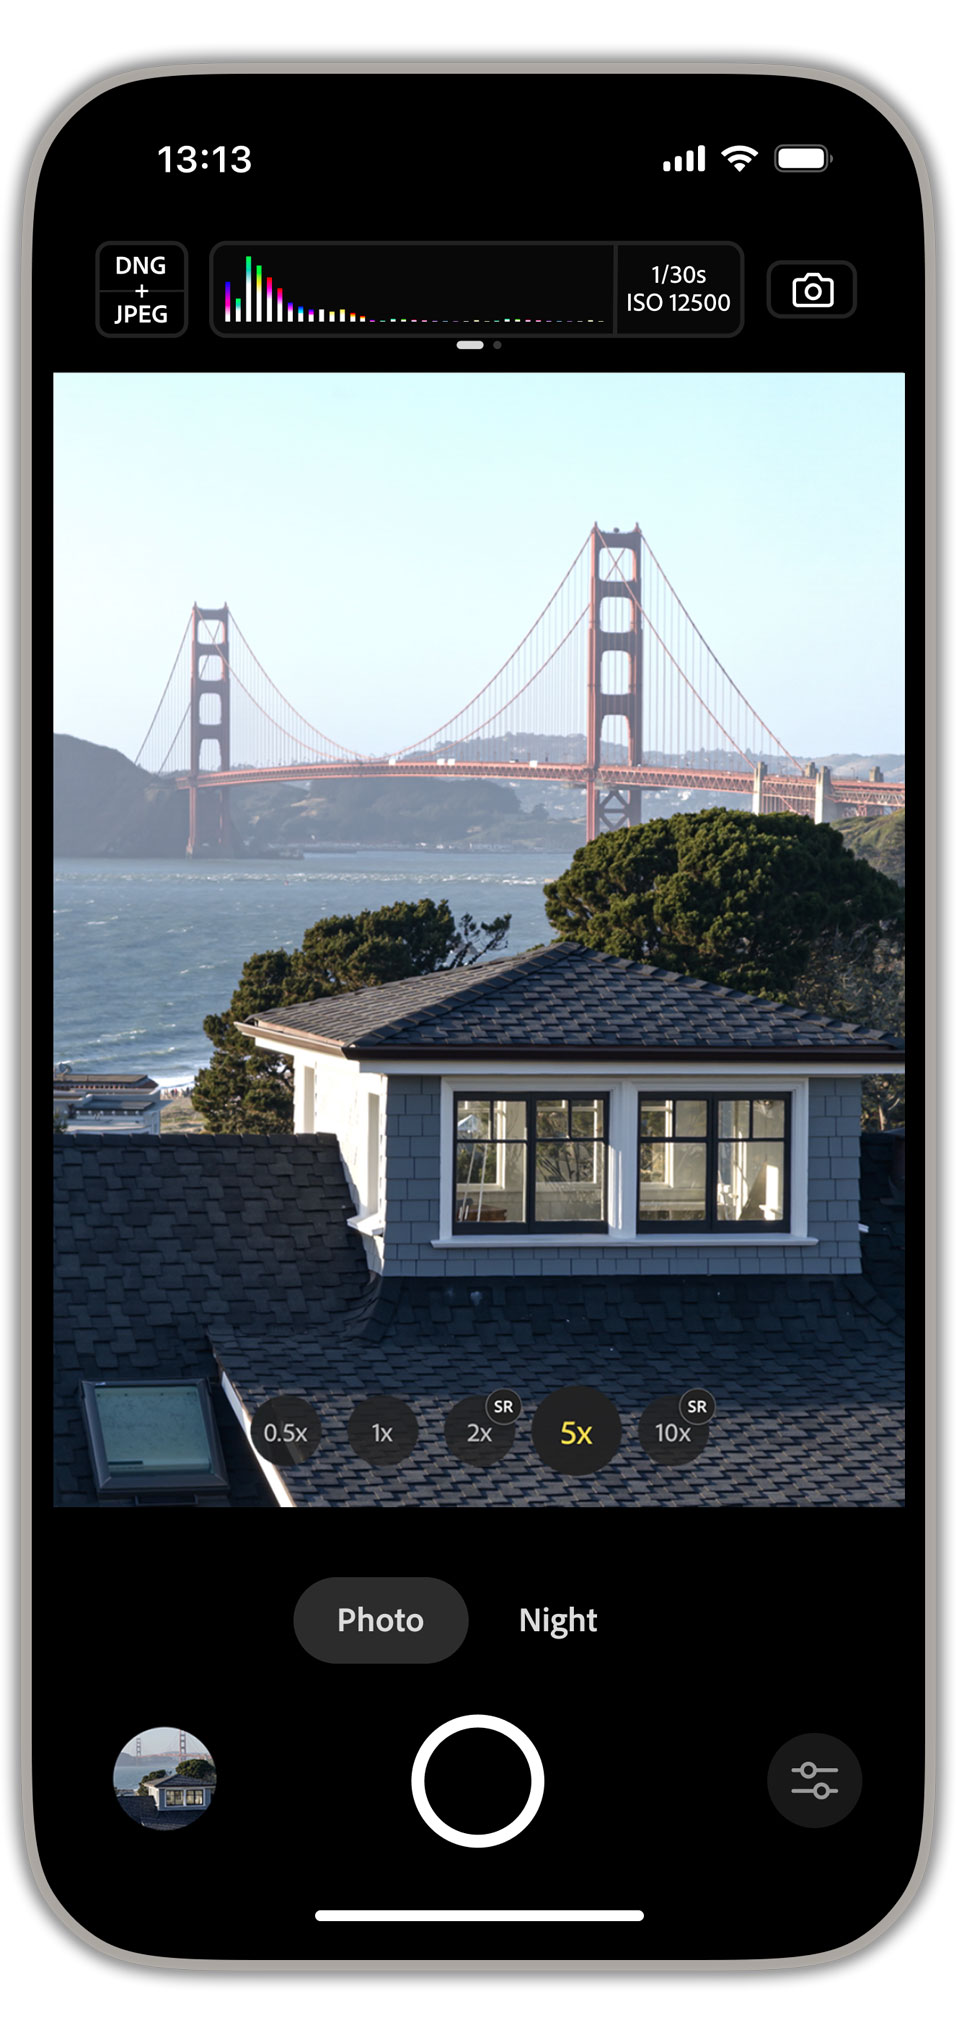
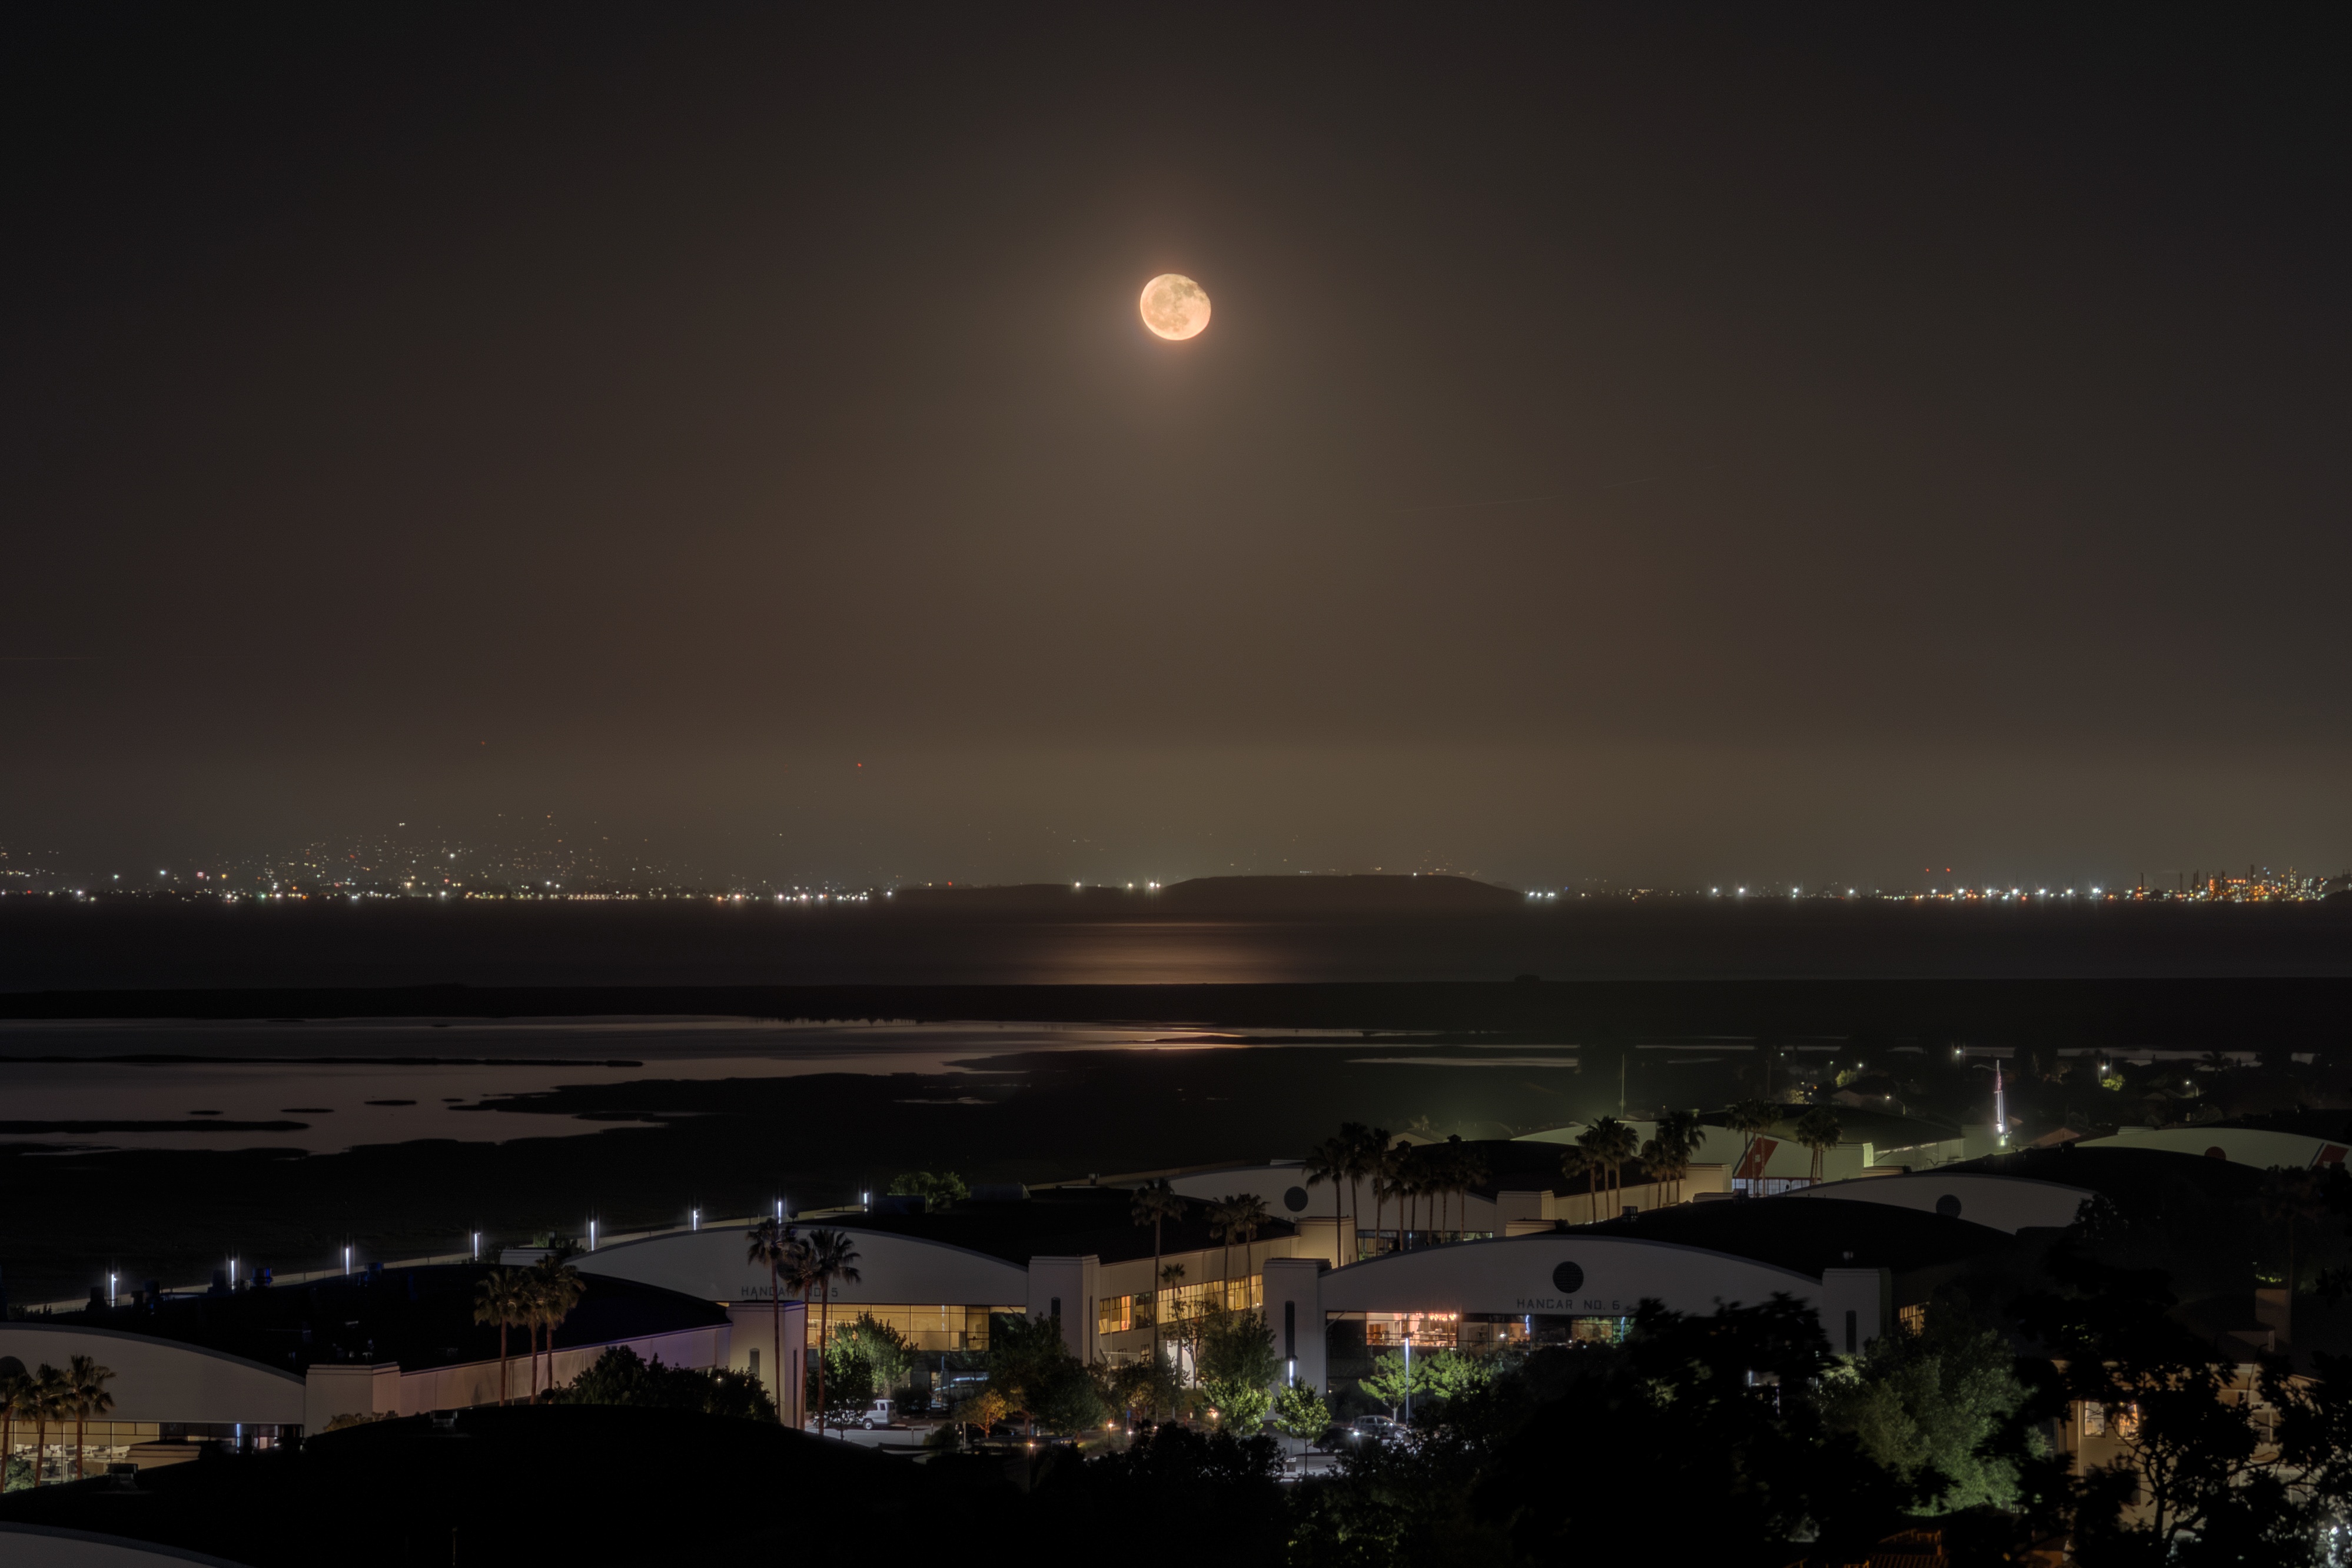
At left is the user interface of Indigo, running on an iPhone 16 Pro Max. At right is a high dynamic range (HDR) snapshot captured by Indigo, then adjusted in Adobe Lightroom. Click on any image in this blog to view it in HDR (on a compatible display) and at full resolution.
One of the enduring benefits of the smartphone revolution is that it has put a camera in everyone's pocket - one that can reliably take good photos at the press of a button, combined with the convenience of using the same device for editing and sharing of these photos. In fact, despite the small size of these cameras, their photos often rival those from big cameras (SLRs and MILCs), with high dynamic range in bright scenes (like the snapshot above) and low noise in dark scenes (like the grandfather clock below). In fact, mobile cameras seem to keep getting better. How is this possible?
Why are mobile cameras so good?
Some of the remarkable improvement in mobile cameras over the past 15 years comes from better hardware - more sensitive imaging chips, higher-quality lenses, and more powerful processors. But another factor is camera software, whose improvement can be ascribed to several factors, including the programmability of smartphone processors, a competitive market for camera apps, and an open and vibrant research community.
Despite these improvements, mobile cameras don't fulfill all the needs of hobbyists or professional photographers. First, their image quality, while high for such a small device, cannot compete with a big camera in challenging situations. To photograph wildlife you still need a long telephoto lens, and to capture fast-moving sports, where freezing the action requires capturing it in a single frame, you need an imaging chip with large, sensitive pixels.
Second, people often complain about the "smartphone look" - overly bright, low contrast, high color saturation, strong smoothing, and strong sharpening. To some extent this look is driven by consumer preference. It also makes photos easier to read on the small screen and in bad lighting. But to the discerning photographer, or anybody who views these photos on a larger screen than a phone, they may look unrealistic.
Third, photographers sometimes need full manual control - over aperture, exposure time, ISO, and focus, and they want the ability to save photos in a raw format. Some smartphone apps have copied these features, except for aperture, which is typically fixed on a mobile camera, but they often accomplish it by capturing only a single image, rather than combining multiple images as described below. This makes the resulting photo noisy, especially in low light.
Introducing Project Indigo
As Adobe explores ways to evolve mobile photography, and in order to address some of these gaps, we have developed a camera app we call Project Indigo. Today, we are releasing this for iPhone as a free mobile app from Adobe Labs, available in the Apple App Store - to share our progress and get feedback from the community. The app offers full manual controls, a more natural ("SLR-like") look, and the highest image quality that computational photography can provide - in both JPEG and raw formats. It also introduces some new photographic experiences not available in other camera apps.
Let's break this down, starting with computational photography. While this phrase has come to mean many things, in the context of mobile cameras it typically includes two strategies: (1) under-expose slightly to reduce the clipping of highlights, and (2) capture multiple images in rapid succession when you press the shutter button. These images are aligned and combined to reduce noise in the shadows. The laws of physics say that imaging noise (the digital version of film grain) goes down as the square root of the number of images that are added together, so if the camera combines 9 images, noise is reduced by a factor of 3. Here's an example:
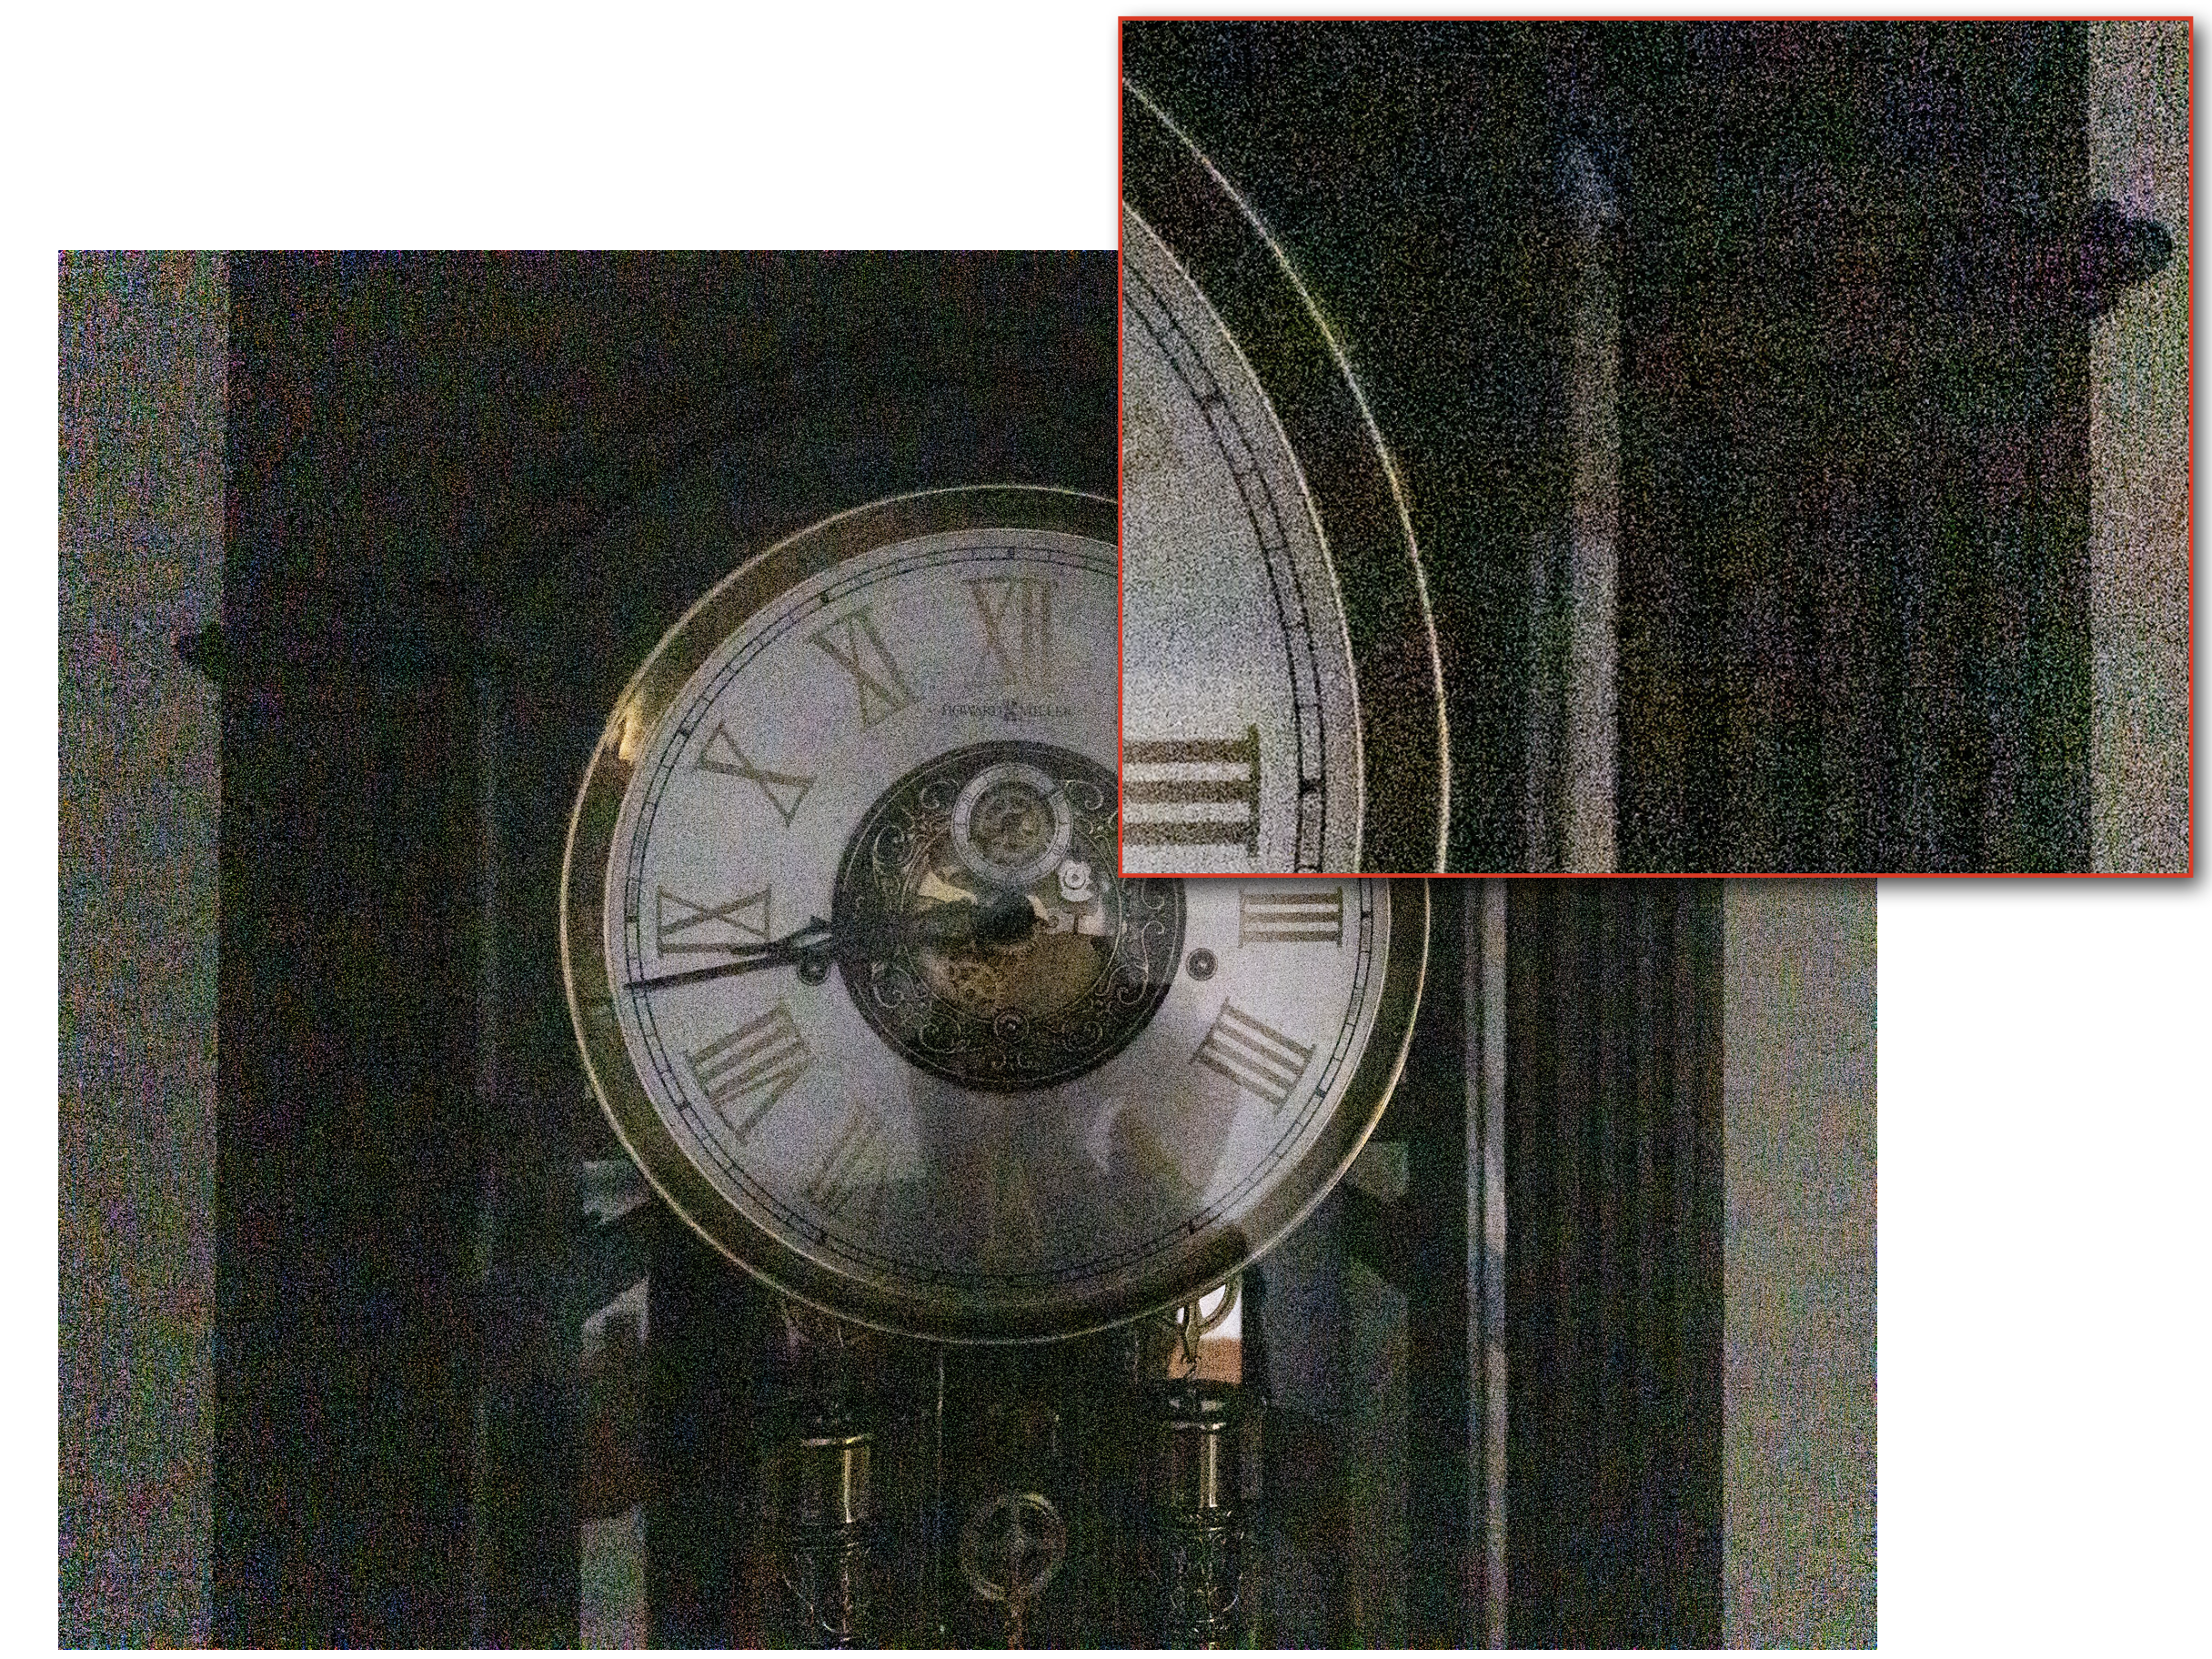

At left is a single-image photo taken by an iPhone under 1/10 lux illumination. (It's so dark you couldn't find your keys if they dropped on the floor!) At right is a handheld photo taken by Indigo, which has captured and merged 32 images (sometimes called frames) to reduce imaging noise. Click to enlarge the images.
What's different about computational photography using Indigo? First, we under-expose more strongly than most cameras. Second, we capture, align, and combine more frames when producing each photo - up to 32 frames as in the example above. This means that our photos have fewer blown-out highlights and less noise in the shadows. Taking a photo with our app may require slightly more patience after pressing the shutter button than you're used to, but after a few seconds you'll be rewarded with a better picture.
As a side benefit of these two strategies, we need less spatial denoising (i.e. smoothing) than most camera apps. This means we preserve more natural textures. In fact, we bias our processing towards minimal smoothing, even if this means leaving a bit of noise in the photo. You can see these effects in the example photos later in this article.
One more thing. Many of our users prefer to shoot raw, not JPEGs, and they want these raw images to benefit from computational photography. (Some big cameras offer the ability to capture bursts of images and combine them in-camera, but they output a JPEG, not a raw file.) Indigo can output JPEG or raw files that benefit equally from the computational photography strategy outlined here.
A natural look
Now let's talk about the look of a smartphone photo. As described in the last section, computational photography allows us to capture scenes having a very high dynamic range (the span from brights to darks) in a single photo. To display high dynamic range photos in a pleasing way on a phone screen, whose brightness is limited by screen hardware, they must be tone mapped, typically by darkening the highlights and brightening the shadows - sometimes a lot. The goal of tone mapping is to make the image readable on the small screen, while avoiding bright regions being clipped to white or dark regions being crushed to black.
If applied uniformly to the entire image, such darkening or brightening is called "global tone mapping". When different amounts darkening and brightening are selectively applied to different regions in the image, the technique is called "local tone mapping." When presented with a scene having a very high dynamic range, most smartphones apply an exaggerated version of local tone mapping, in which the contrast across edges is amplified even if this causes a distortion of tonal relationships among different parts of the image. To illustrate the effects of local tone mapping, here's a manually adjusted example that uses both global and strong local tone mapping, as well as masks to allow different tone mapping for the background, midground, and subjects:
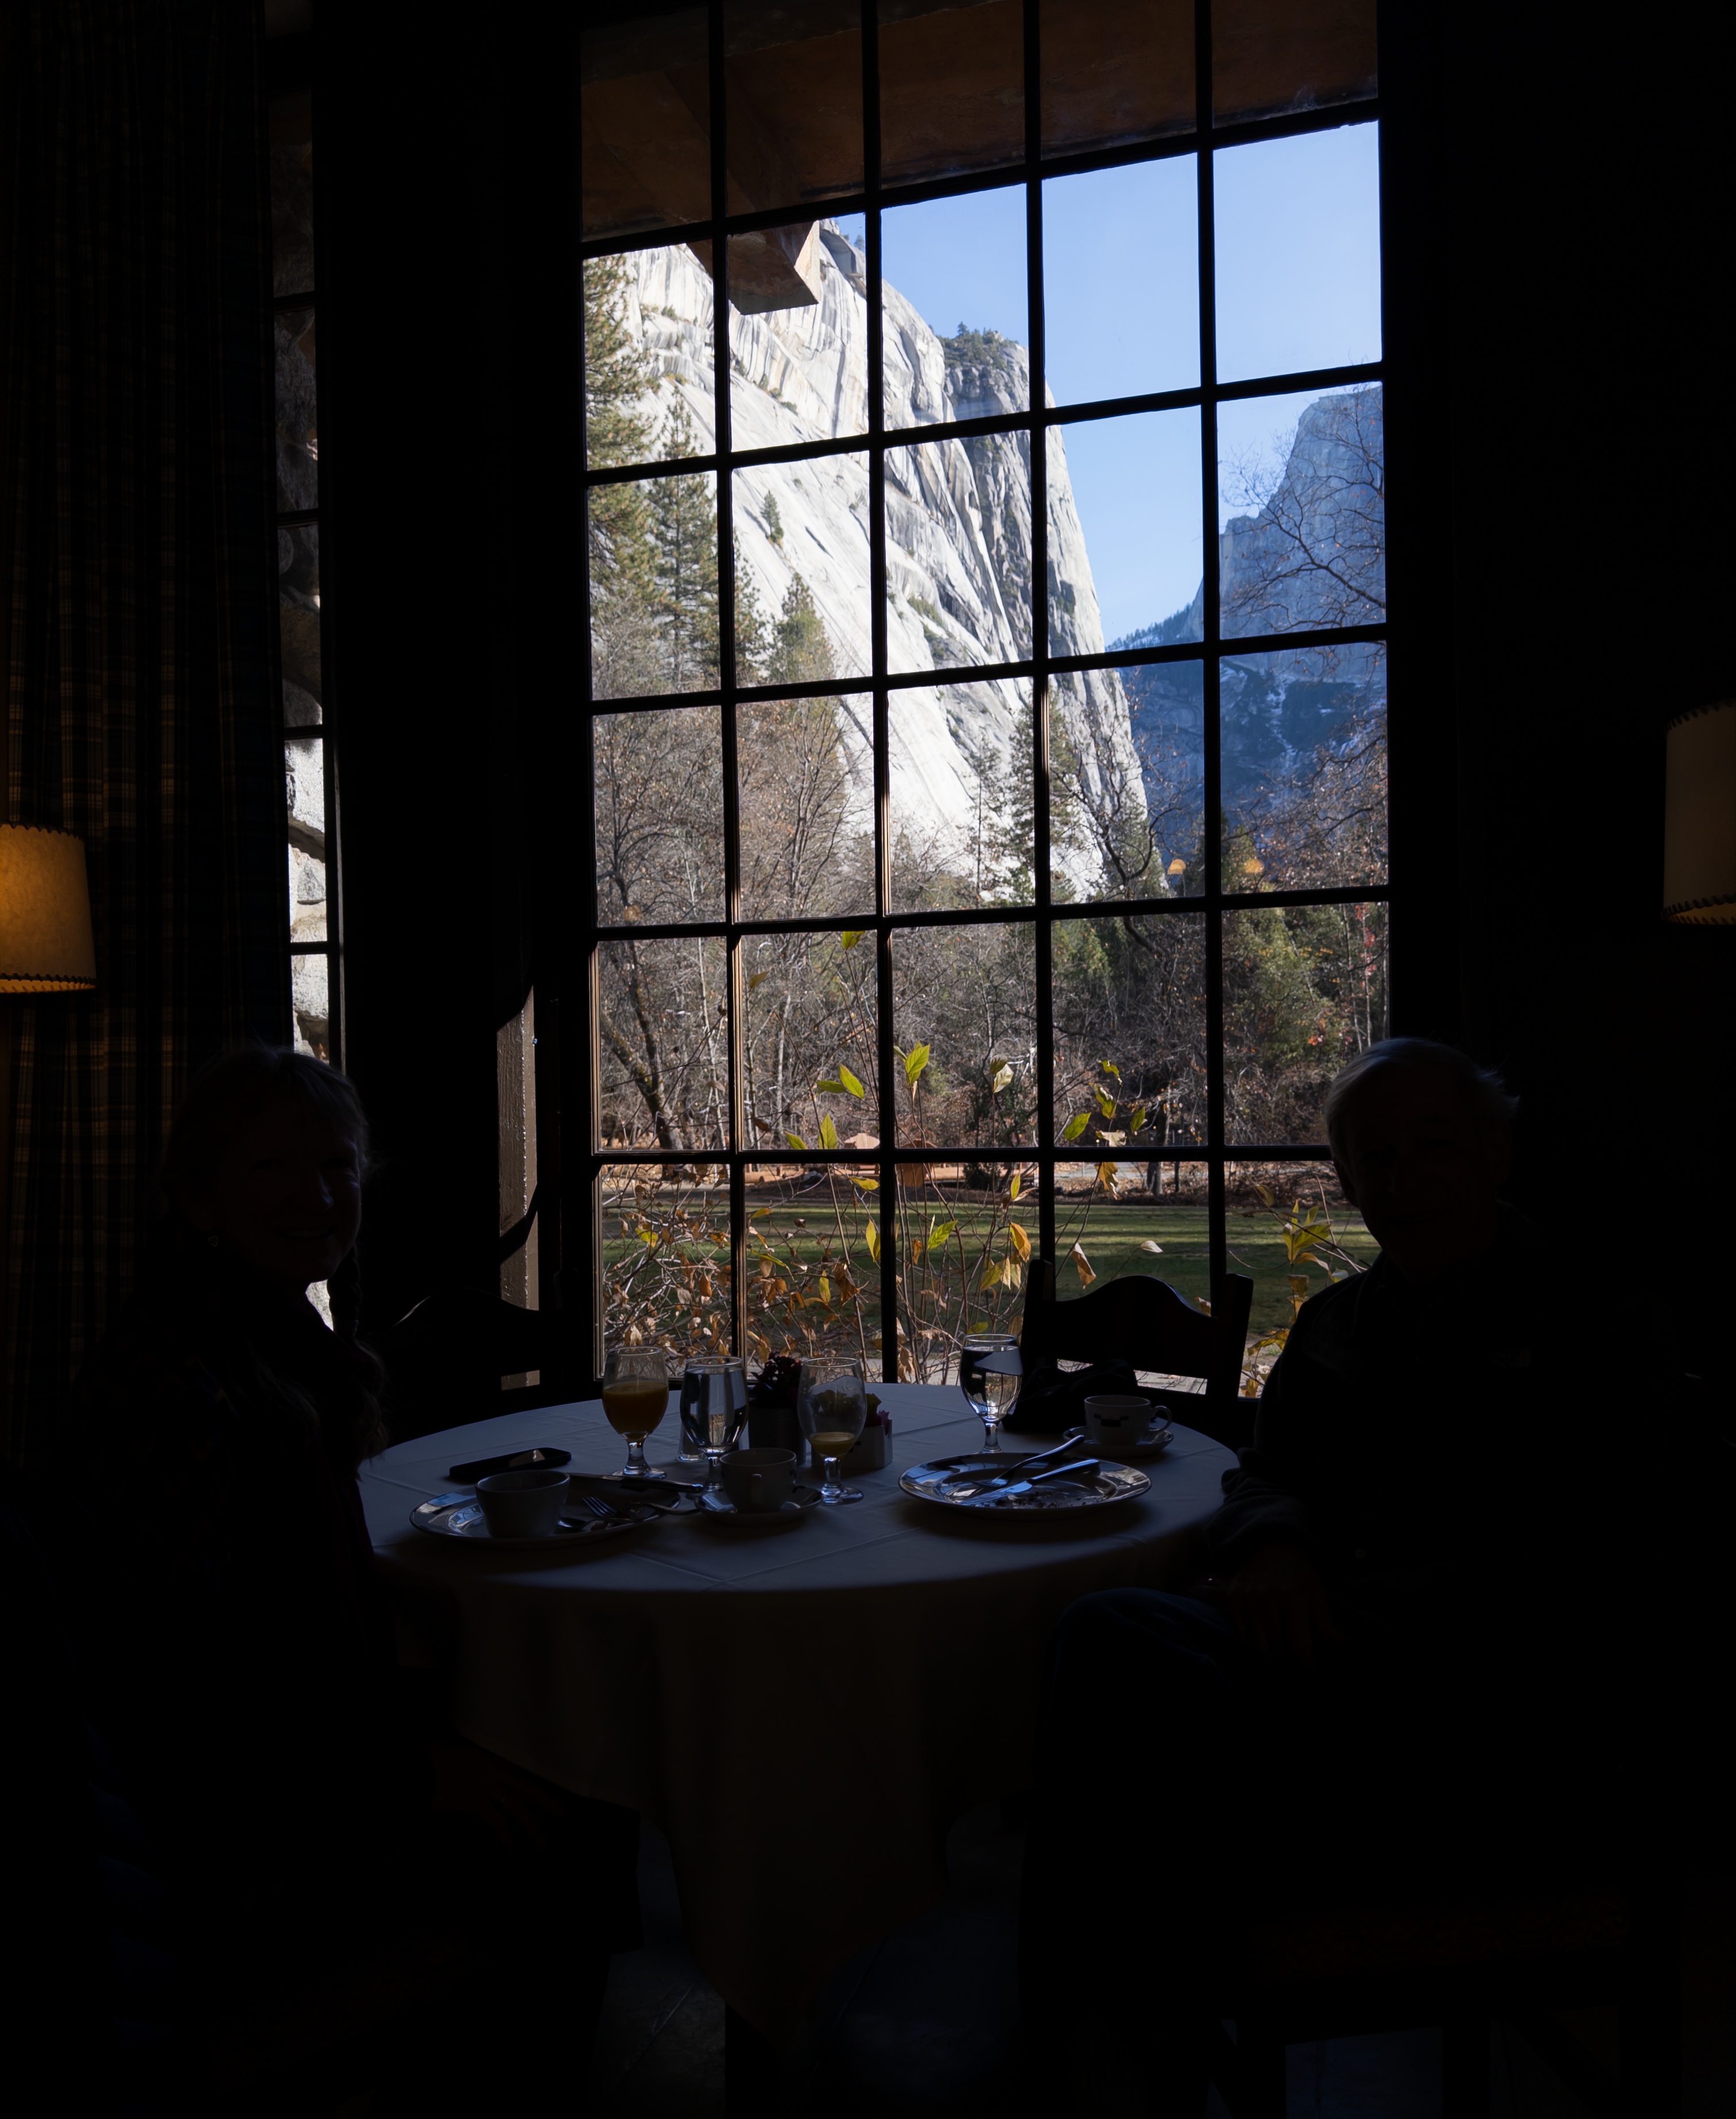
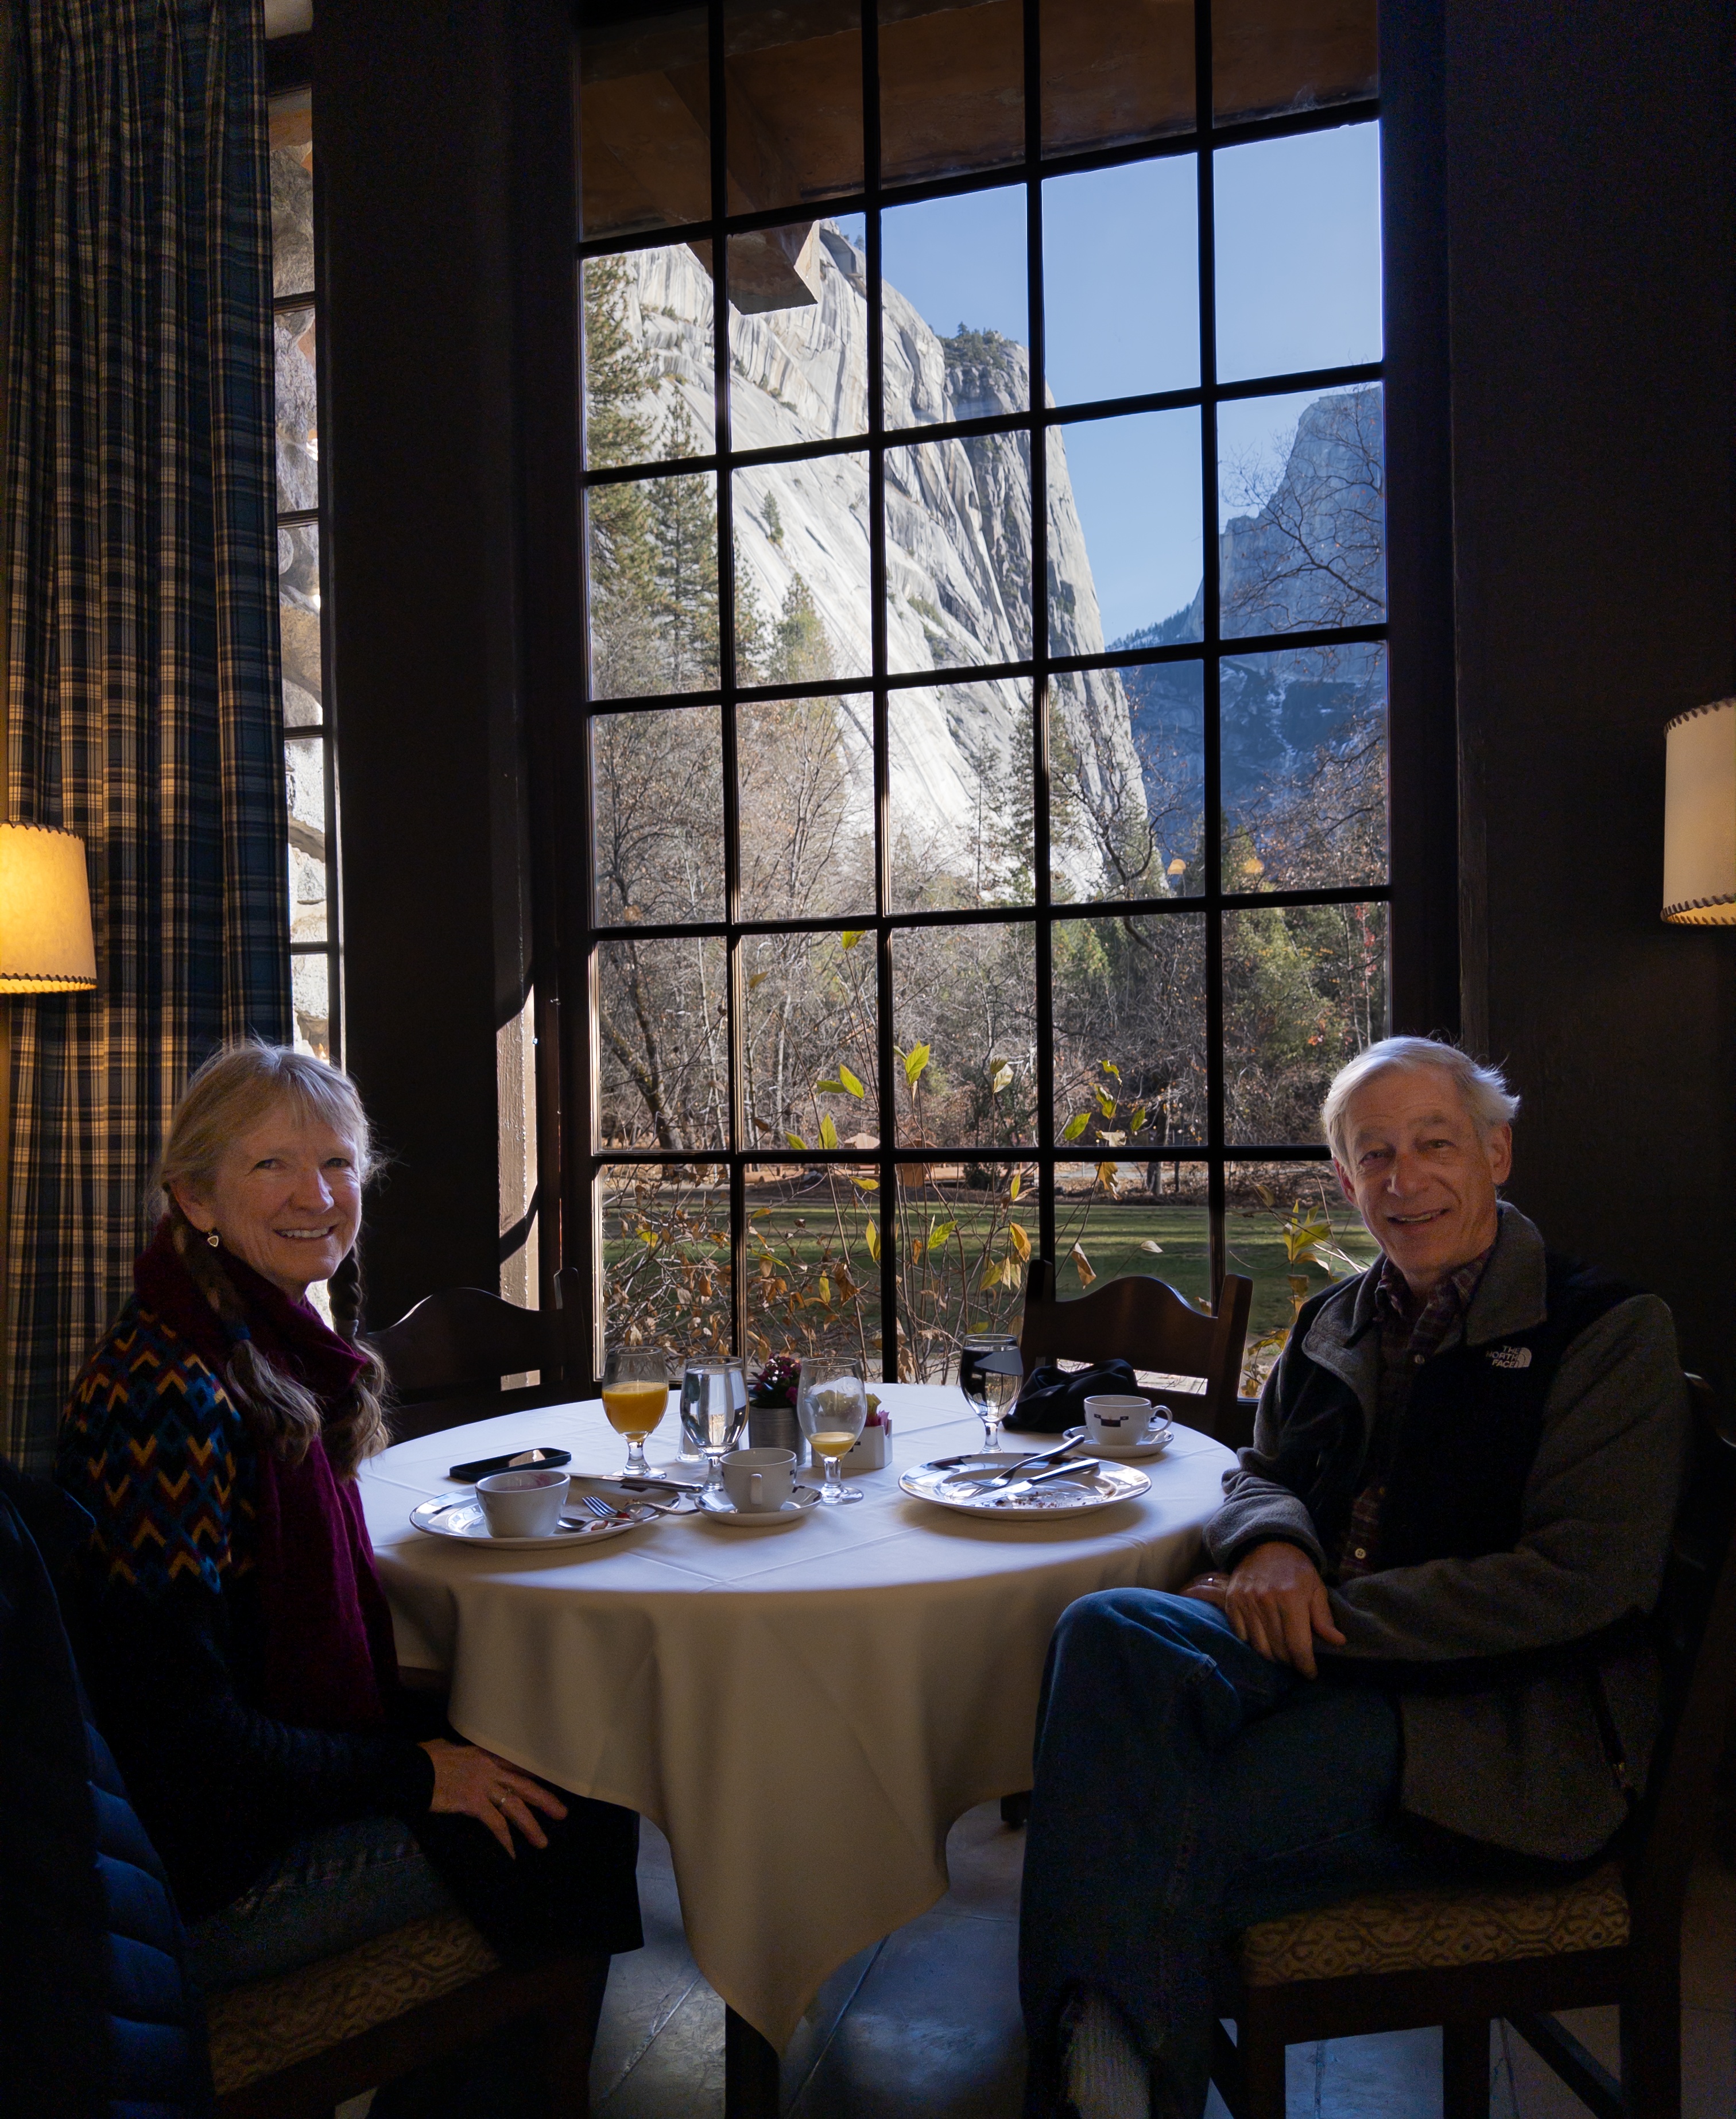
This is a very high dynamic range scene - two people sitting in front of a window through which we see a cliff illuminated by sunlight. Using a "faithful" depiction of relative brightnesses (left image), the cliff is nearly white, while the faces are nearly black. By lowering highlights and raising shadows beyond what is physically correct, we can make the people visible at the same time as the cliff (right image). If you're reading this blog on a display with HDR capabilities, such as a recent Macbook Pro, then the cliff should be brighter than the white of this page.
Such strong tone mapping poses risks. First, tone-mapped images are hard to edit, because the highlights in one part of the image may have the same pixel values as the shadows in another part. In the example at right above, the highlights on the man's jeans are as bright as the sunlit grass outside the window, which is not true in reality. Second, if pushed too far this technique produces a low-contrast "HDR-ish" look - a familiar problem.
In addition to strong tone mapping, most mobile camera apps also apply global brightening, high color saturation, strong smoothing, and strong sharpening. They also use AIs to perform "semantic analysis" and beautification - making faces lighter, skin smoother, and skies bluer. To some extent this "smartphone look" is driven by consumer preference. It also makes photos easier to read on the small screen and in bad lighting - an important criterion. However, when viewed on a larger screen than a phone, photos that have been processed this way can look unrealistic.
In reaction to the prevailing smartphone look, some camera apps advertise "zero-process" photography. In fact, the pixels read from a digital sensor must be processed to create a recognizable image. This processing includes at a minimum white balancing, color correction to account for the different light sensitivity of the red, green and blue pixels, and demosaicing to create a full-color image.
Based on our conversations with photographers, what they really want is not zero-process but a more natural look - more like what an SLR might produce. To accomplish this, our photos employ only mild tone mapping, boosting of color saturation, and sharpening. We do perform semantically-aware mask-based adjustments, but only subtle ones. Our look is similar to Adobe's Adaptive Color profile, making our camera app naturally compatible with Adobe Camera Raw and Lightroom. That said, we know which camera, exposure time, and ISO was used when capturing your photo, so our look can be more faithful than Adobe's profile to the brightness of the scene before you. Here are some examples of the look produced by Indigo. And here's a Lightroom album with more Indigo HDR photos – some adjusted in Lightroom.
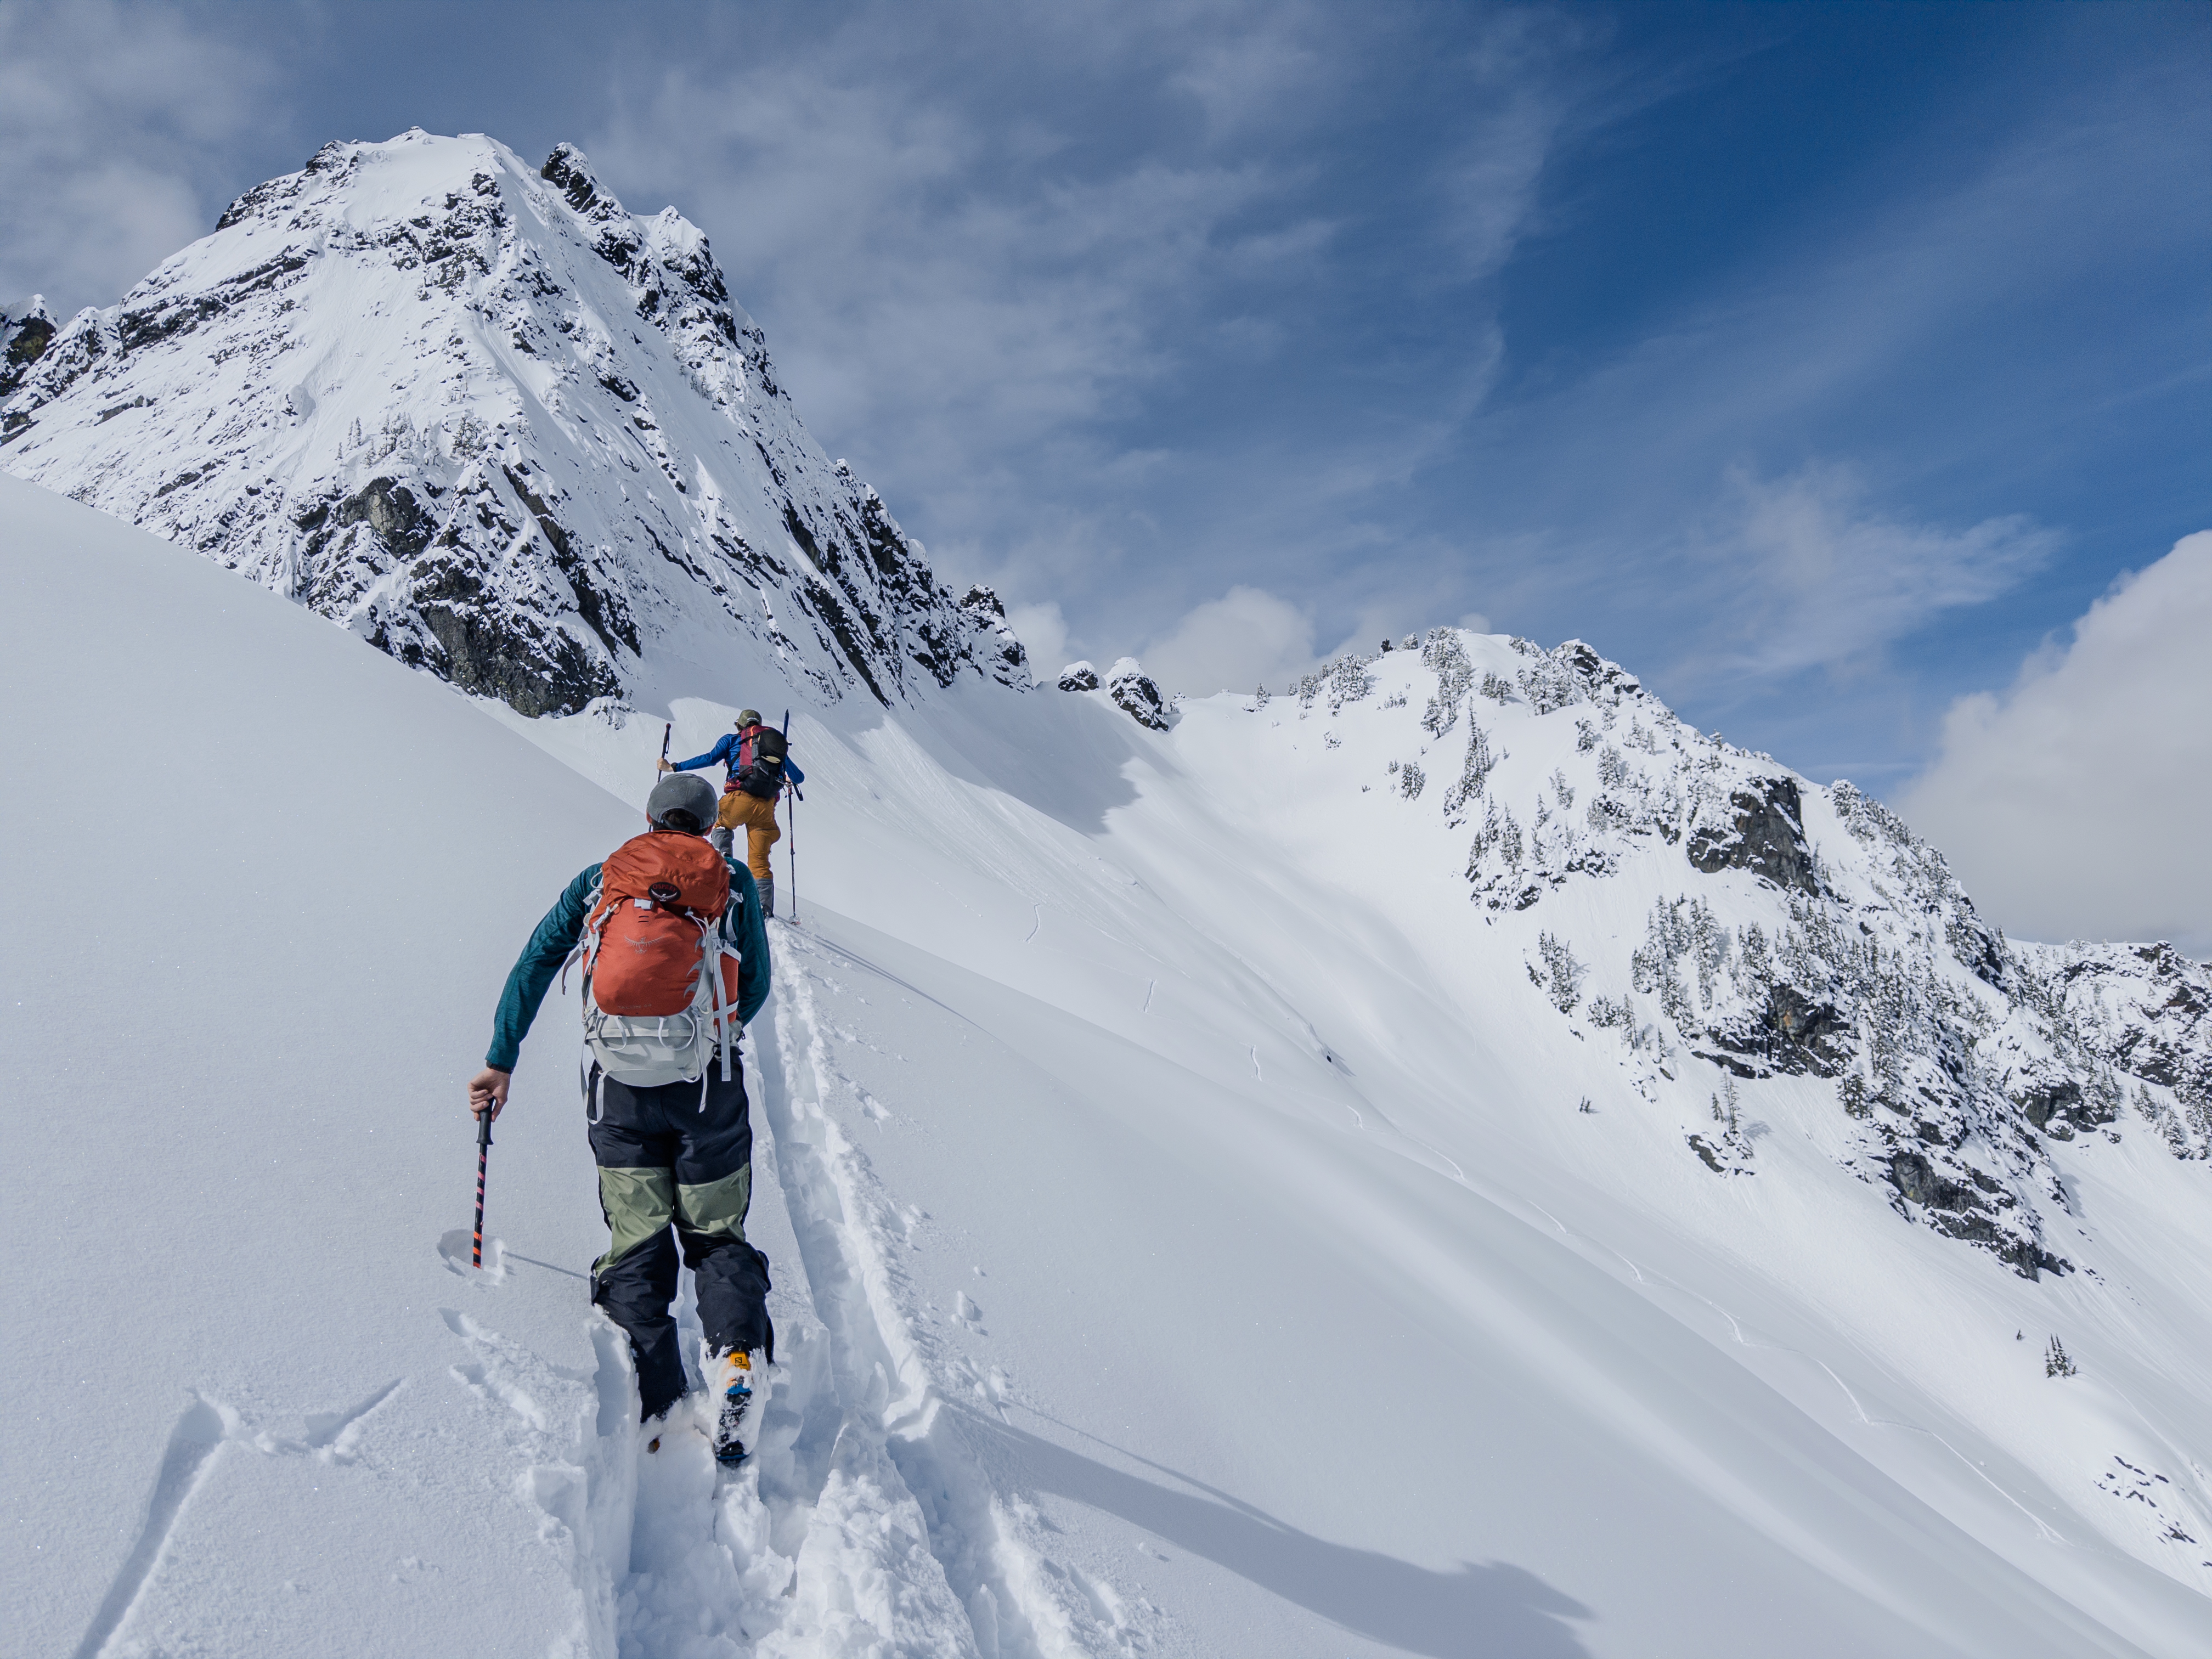

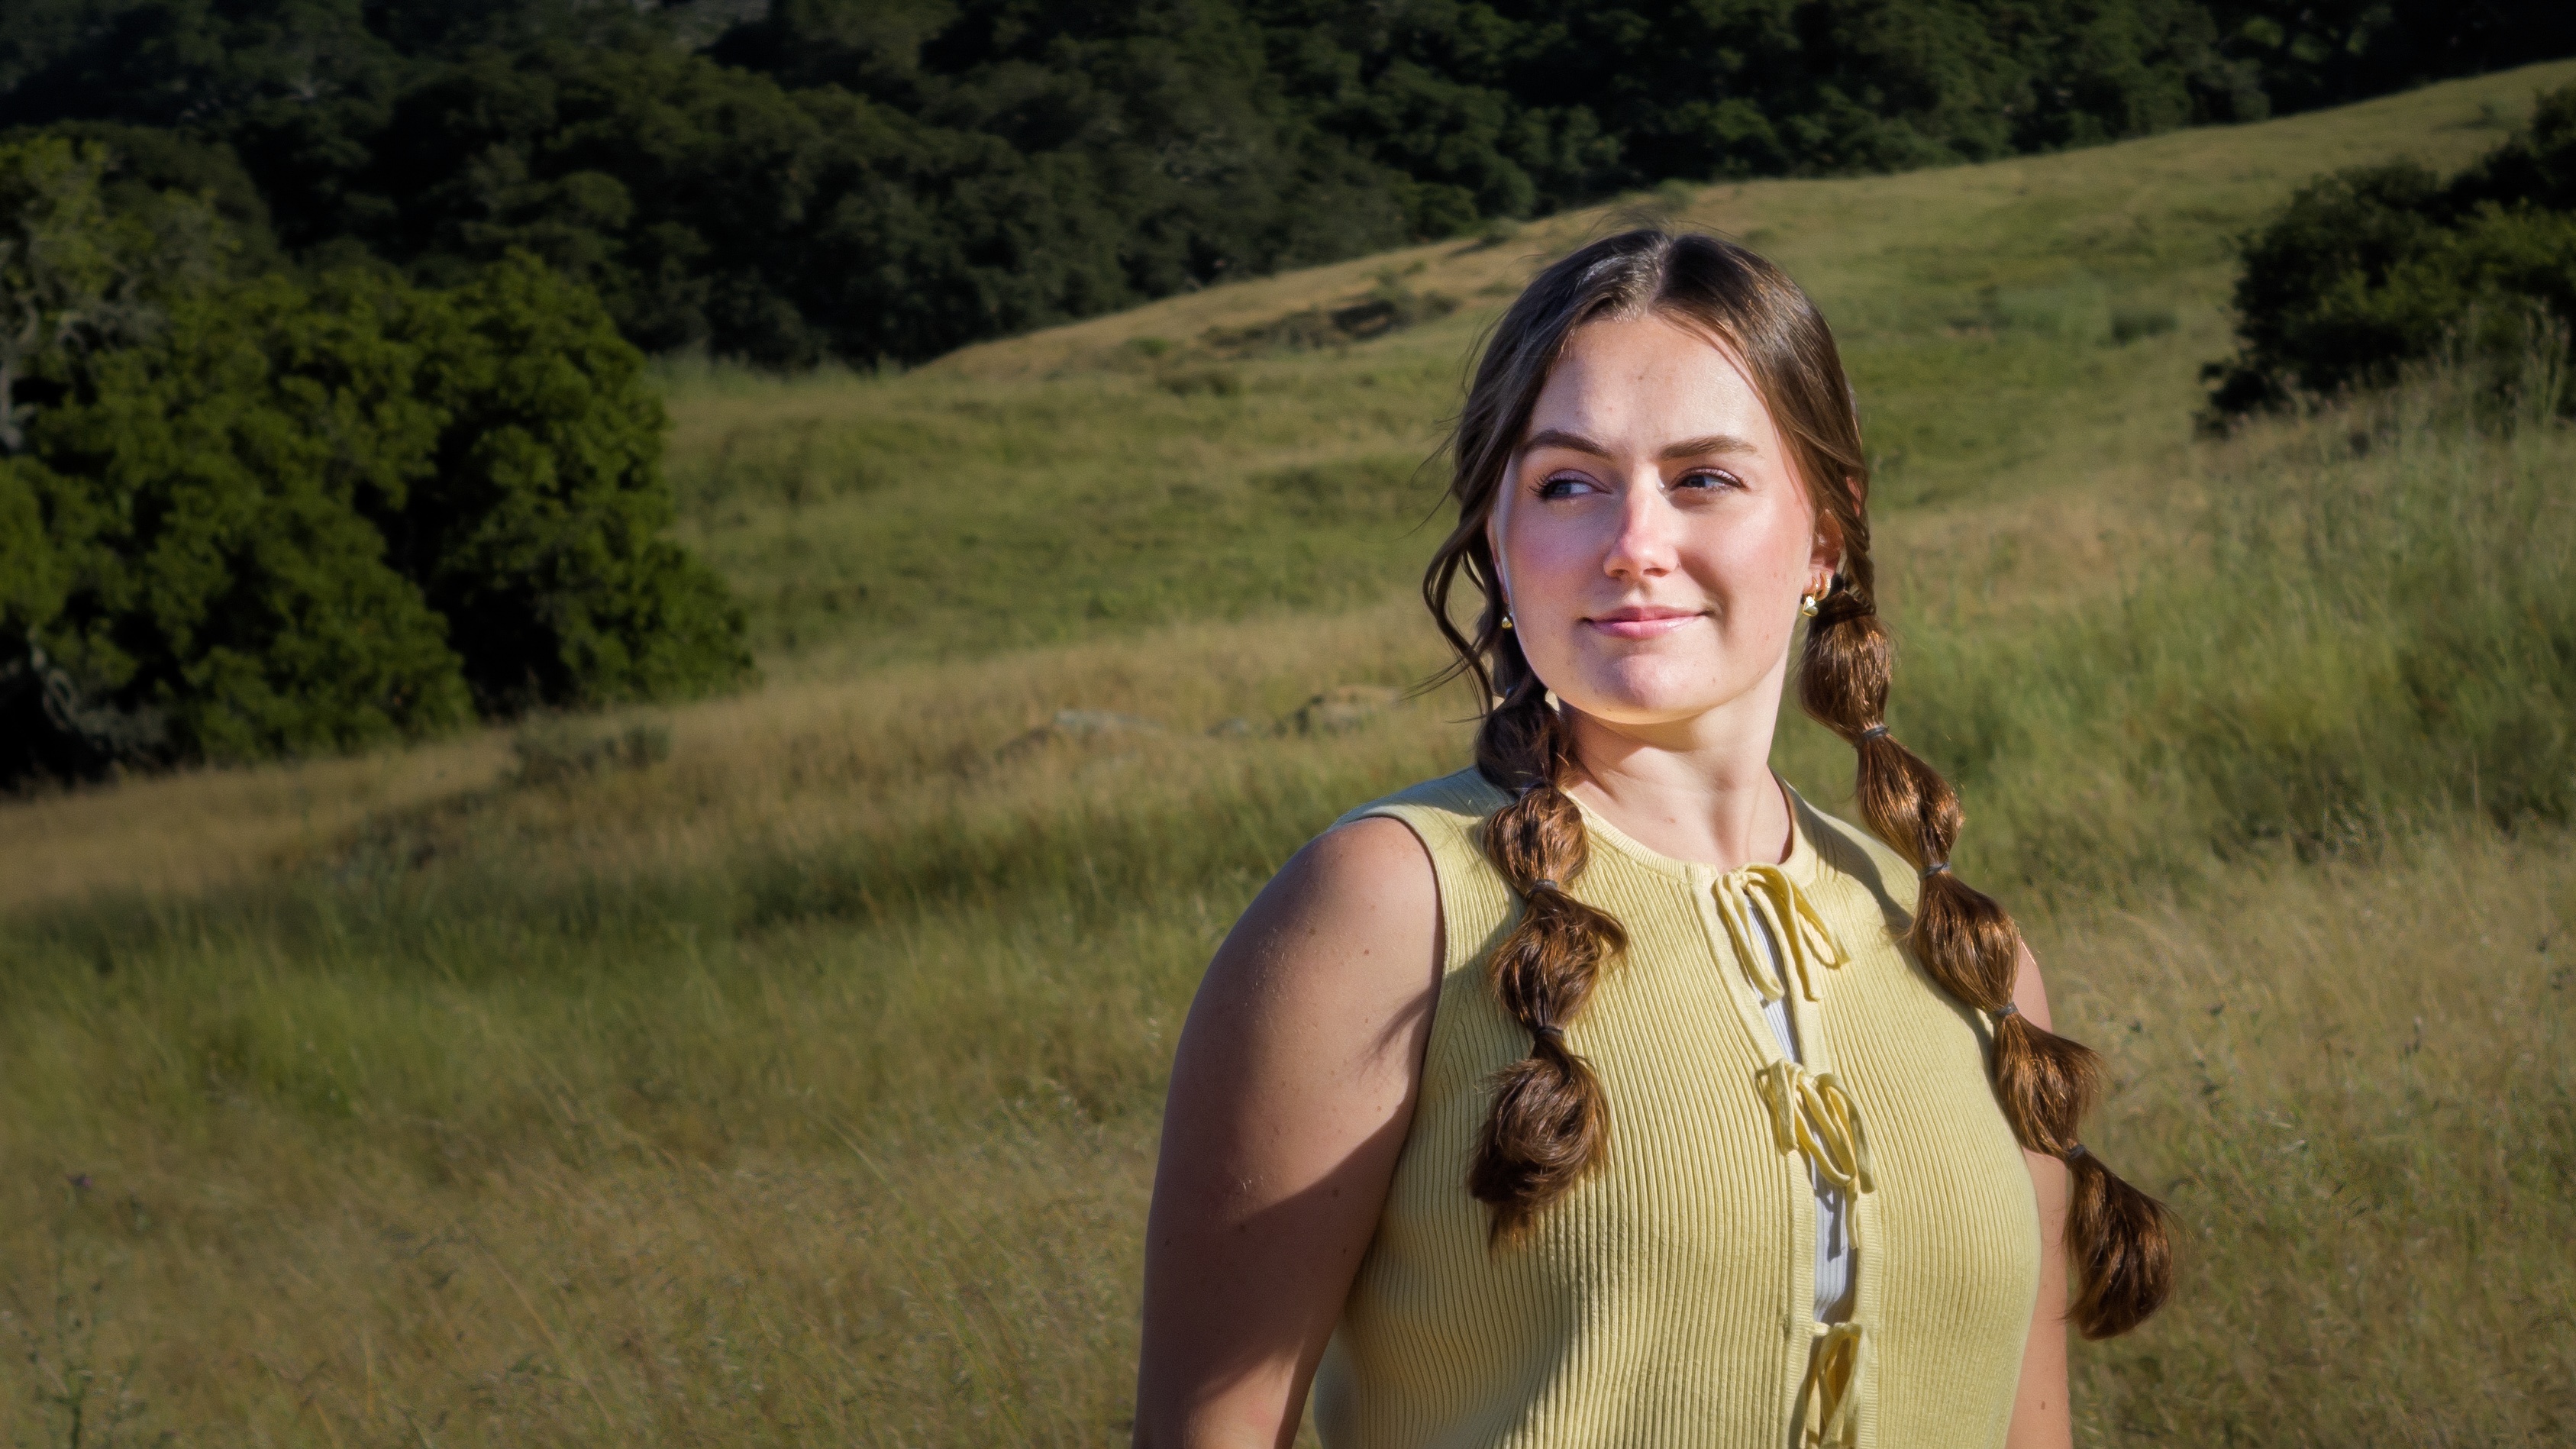
These photos were taken using Indigo and rendered on-device using our AI-based natural look. The first four are straight out of the camera; the last two were lightly adjusted in Lightroom starting from our look. The photos are displayed here in high dynamic range, which you can enjoy if you read this blog on a suitable HDR display. We also encourage you read this blog on a large laptop or external monitor, and to click on the images to view them at full resolution. Our look is designed to look good, and not over-processed, when viewed on a big screen.
DNG, JPEG, SDR, HDR, and all that
Although it's a bit technical, it sometimes helps to visualize Indigo's computations as blocks in a pipeline, with images flowing, like water through a filtration plant, from the camera at left to the JPEG at right:
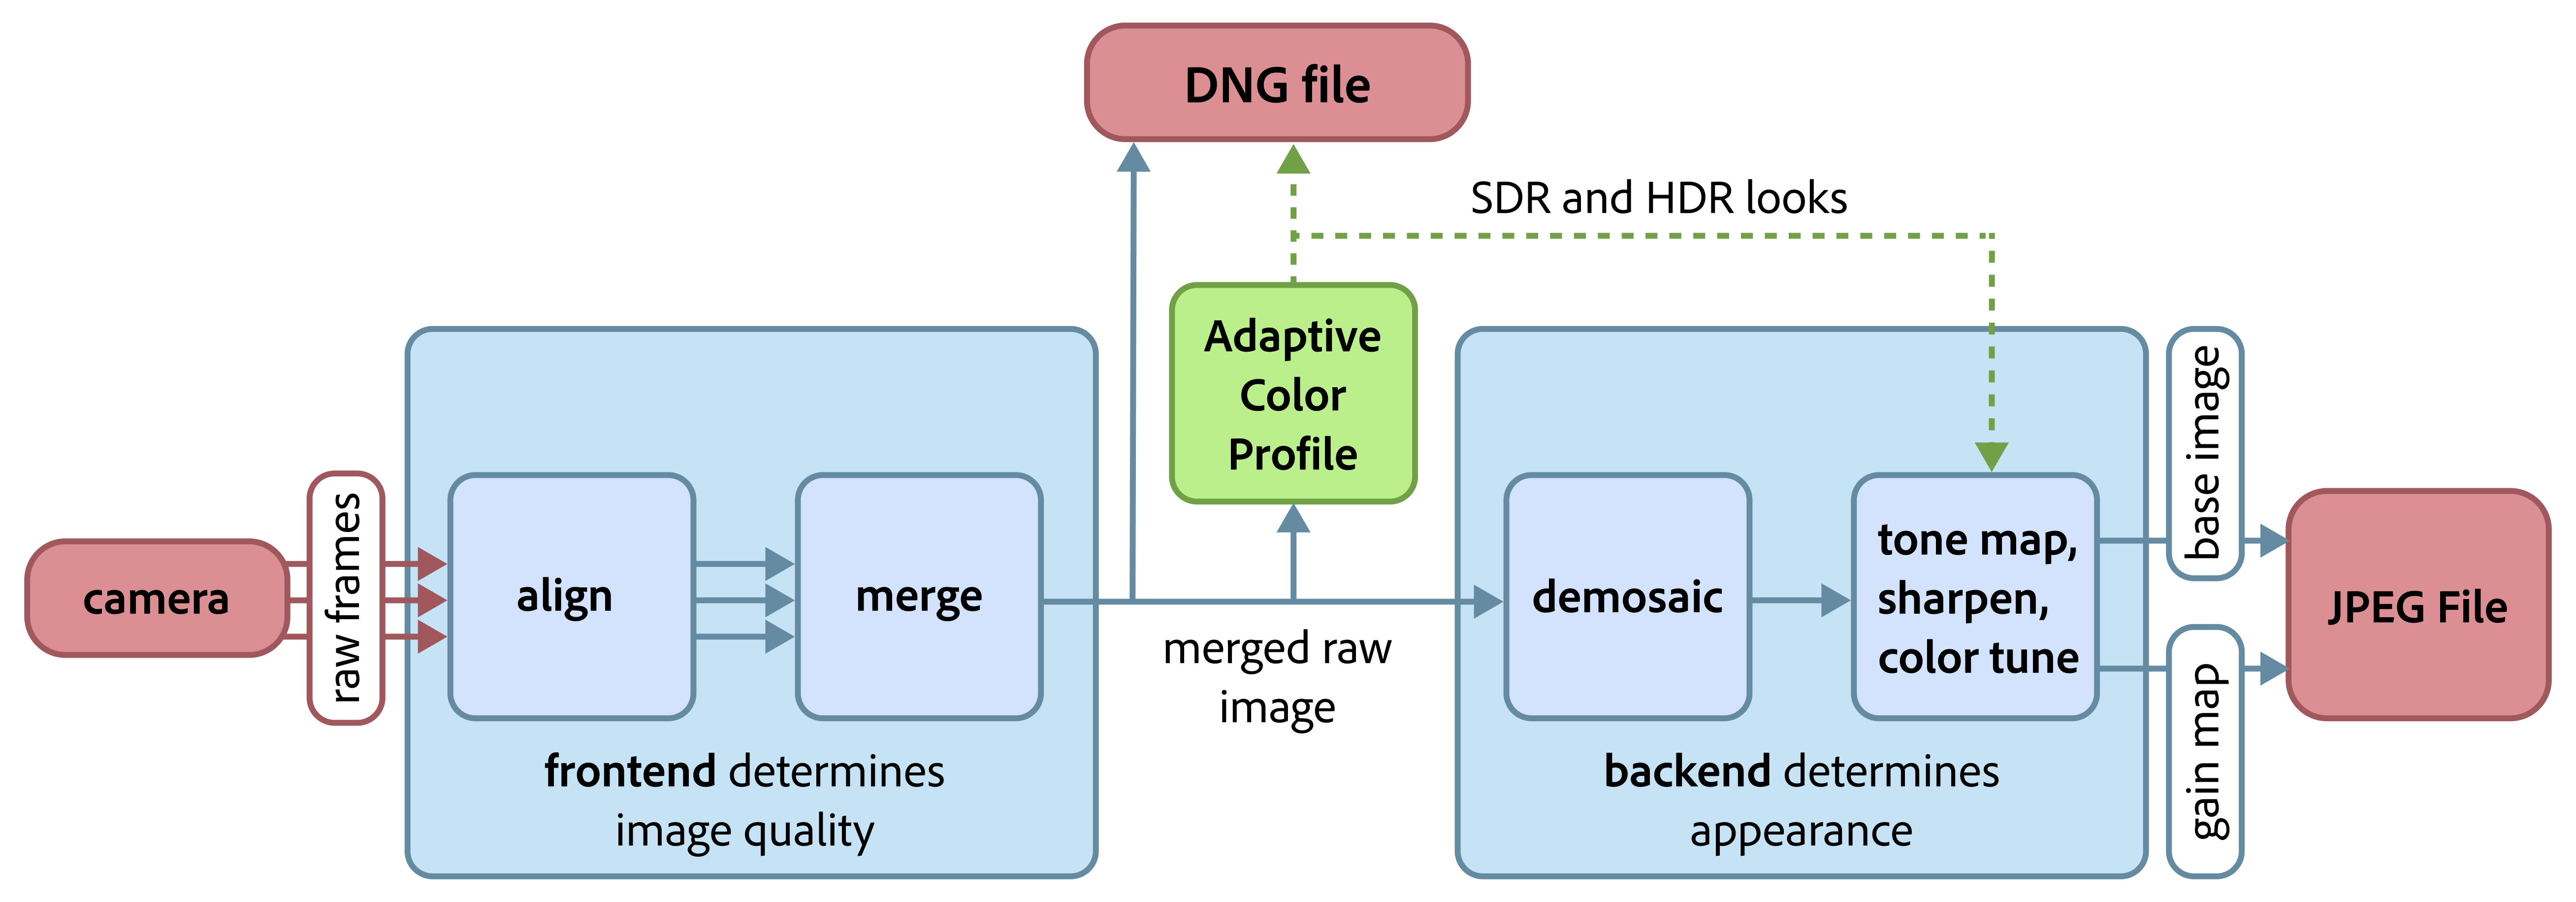
A simplified depiction of Indigo's image processing pipeline. The frontend (at left) aligns and merges a stream of raw frames flowing from the camera. The merged but still (nearly) raw image is optionally stored as an Adobe DNG (Digital Negative) file (red box at top). The look computed by our Adaptive Color Profile AI (green box) is stored in the DNG file alongside the pixels, but doesn't change them. The output of this AI also drives the backend (at right), which consists of tone mapping, sharpening, and color adjustments. These operations do change the pixel values. The modified pixels are compressed and stored in the JPEG file. The baking of adjustments into pixels is why editing a JPEG is always harder than editing a DNG.
A few comments about this diagram. First, the DNG output by our app preserves the main benefits of raw imagery, which are that its pixels are proportional to scene brightness, i.e. they have not been tone mapped, and they have a greater dynamic range than the pixels in JPEGs, e.g. 16 bits for each of red, green, and blue, instead of 8. These differences provide more latitude during editing.
Second, as the diagram shows, our DNG provides a benefit that most raw images do not - the aligning and merging of multiple frames. This gives them high dynamic range and low noise. They are also stored before demosaicking, i.e. 1 color per pixel instead of 3, so they are smaller than Apple's ProRAW files with no loss in quality. Finally, they are available on recent non-Pro iPhones, while ProRAW files are not.
Third, like Adobe's Adaptive Color profile, our AI produces two looks - standard dynamic range (SDR) and high dynamic range (HDR). We store both looks in the JPEG using a new hybrid SDR/HDR format that has been adopted by Adobe, Apple, Google, Meta, and many others. Specifically, these JPEGs contain a base image that is SDR and a gain map that, when combined with the base image, forms an HDR image. When you review a photo using Indigo's built-in filmstrip, we show you this HDR image. (If your phone is set to max brightness, some highlights may look blown out; try lowering the brightness slightly, thereby giving your screen the "HDR headroom" it needs to render highlights correctly.) If you long-press on the screen, we'll show you the SDR version. If you share the JPEG, which version your recipient sees depends on what browser or social media app they use and whether their screen is capable of displaying HDR imagery. In short, this is an HDR camera from the get-go, but with a graceful fallback to SDR.
Using Indigo with Lightroom
Indigo is designed from the ground up to work well with Adobe's photography ecosystem. In particular, if you review a photo using Indigo's filmstrip, there is a button at the bottom that will launch the Lightroom mobile app (if it is installed, or pop up the App Store page if it is not), bringing up your JPEG for immediate editing. And if you are capturing JPEG + DNG, it will bring up the DNG for editing rather than the JPEG.
Whether you are editing a JPEG or DNG, you can use Lightroom's adjustment panels to toggle between the SDR and HDR looks that our camera app placed in the file. If you are editing a DNG, our SDR and HDR looks are embedded as a profile, similar to Adobe's Adaptive Color profile, but you can change to a different profile if you wish. If you are editing a JPEG, our looks are baked into the pixels. In either case you can perform additional adjustments using Lightroom's familiar controls.
Once Project Indigo is installed on your phone, the Lightroom mobile app will give you the option to launch Indigo instead of the Lightroom camera to take a picture (provided the associated Tech Preview toggle is enabled in Lightroom's settings, available soon).
Capture modes in Indigo
Indigo has two still photo modes, called Photo and Night. The app launches initially into Photo mode, but if it's dark enough the app will pop up a suggestion that you try Night mode. The most obvious difference between these modes is that Night mode uses longer exposure times and captures more images with each shutter press - up to 1 second × 32 frames if the scene is very dark and the app senses that the phone is on a tripod. If you're handholding the phone, it helps to hold it with two hands, and maybe brace yourself or the phone against an object. Indigo's Night mode will detect the reduced handshake and use longer exposures.
A more subtle difference is that Photo mode has "zero shutter lag". This fancy phrase means that Indigo is constantly capturing raw images while the viewfinder is running. When you press the shutter button, the last image captured before you pressed the button is used as the "reference image" for merging an already captured burst of images. As a result, you will perceive having captured the instant you wanted from a fast-moving scene. Strictly speaking, most big cameras do not offer zero shutter lag; the shutter triggers after you press the shutter button, although the lag is usually quite small. Most modern smartphones offer zero shutter lag, but some of them offer it only if you are outputting JPEGs. Our app offers zero shutter lag whether you are outputting JPEGs or DNGs. Night mode does not employ zero shutter lag, but it also uses longer exposures, thereby minimizing imaging noise.
Multi-frame super-resolution
Most modern smartphones have several rear-facing cameras, e.g. main, telephoto, and ultrawide. These cameras provide different fields of view (or equivalently, different magnifications). On an iPhone 15 or 16 Pro Max, these magnifications are 1×, 5×, and 0.5×, respectively. But smartphones do not employ optical zoom lenses, such as you might find on a big camera. Thus, when you pinch-zoom on a smartphone, the camera reads only the central portion of the camera sensor. This produces a small image, which the camera app then blows up using digital scaling. This scaling reduces image quality.
In Indigo, if you pinch-zoom enough (2× or more if using the main lens; 10× or more if using the telephoto lens on an iPhone 16 Pro Max), we employ multi-frame super-resolution, which restores much of the image quality lost by digital scaling. Unlike AI-based super-resolution software packages, Indigo uses the camera to silently capture multiple images of the scene, more images than we need to reduce noise, counting on your natural handshake to provide slightly different viewpoints for each image. (Don't intentionally shake the phone, though, because that would cause motion blur!) We then combine these images to produce a single photo with more detail than is present in a single image. And because we've captured different viewpoints, the extra detail in our super-resolution photos is real, not hallucinated, as shown here:
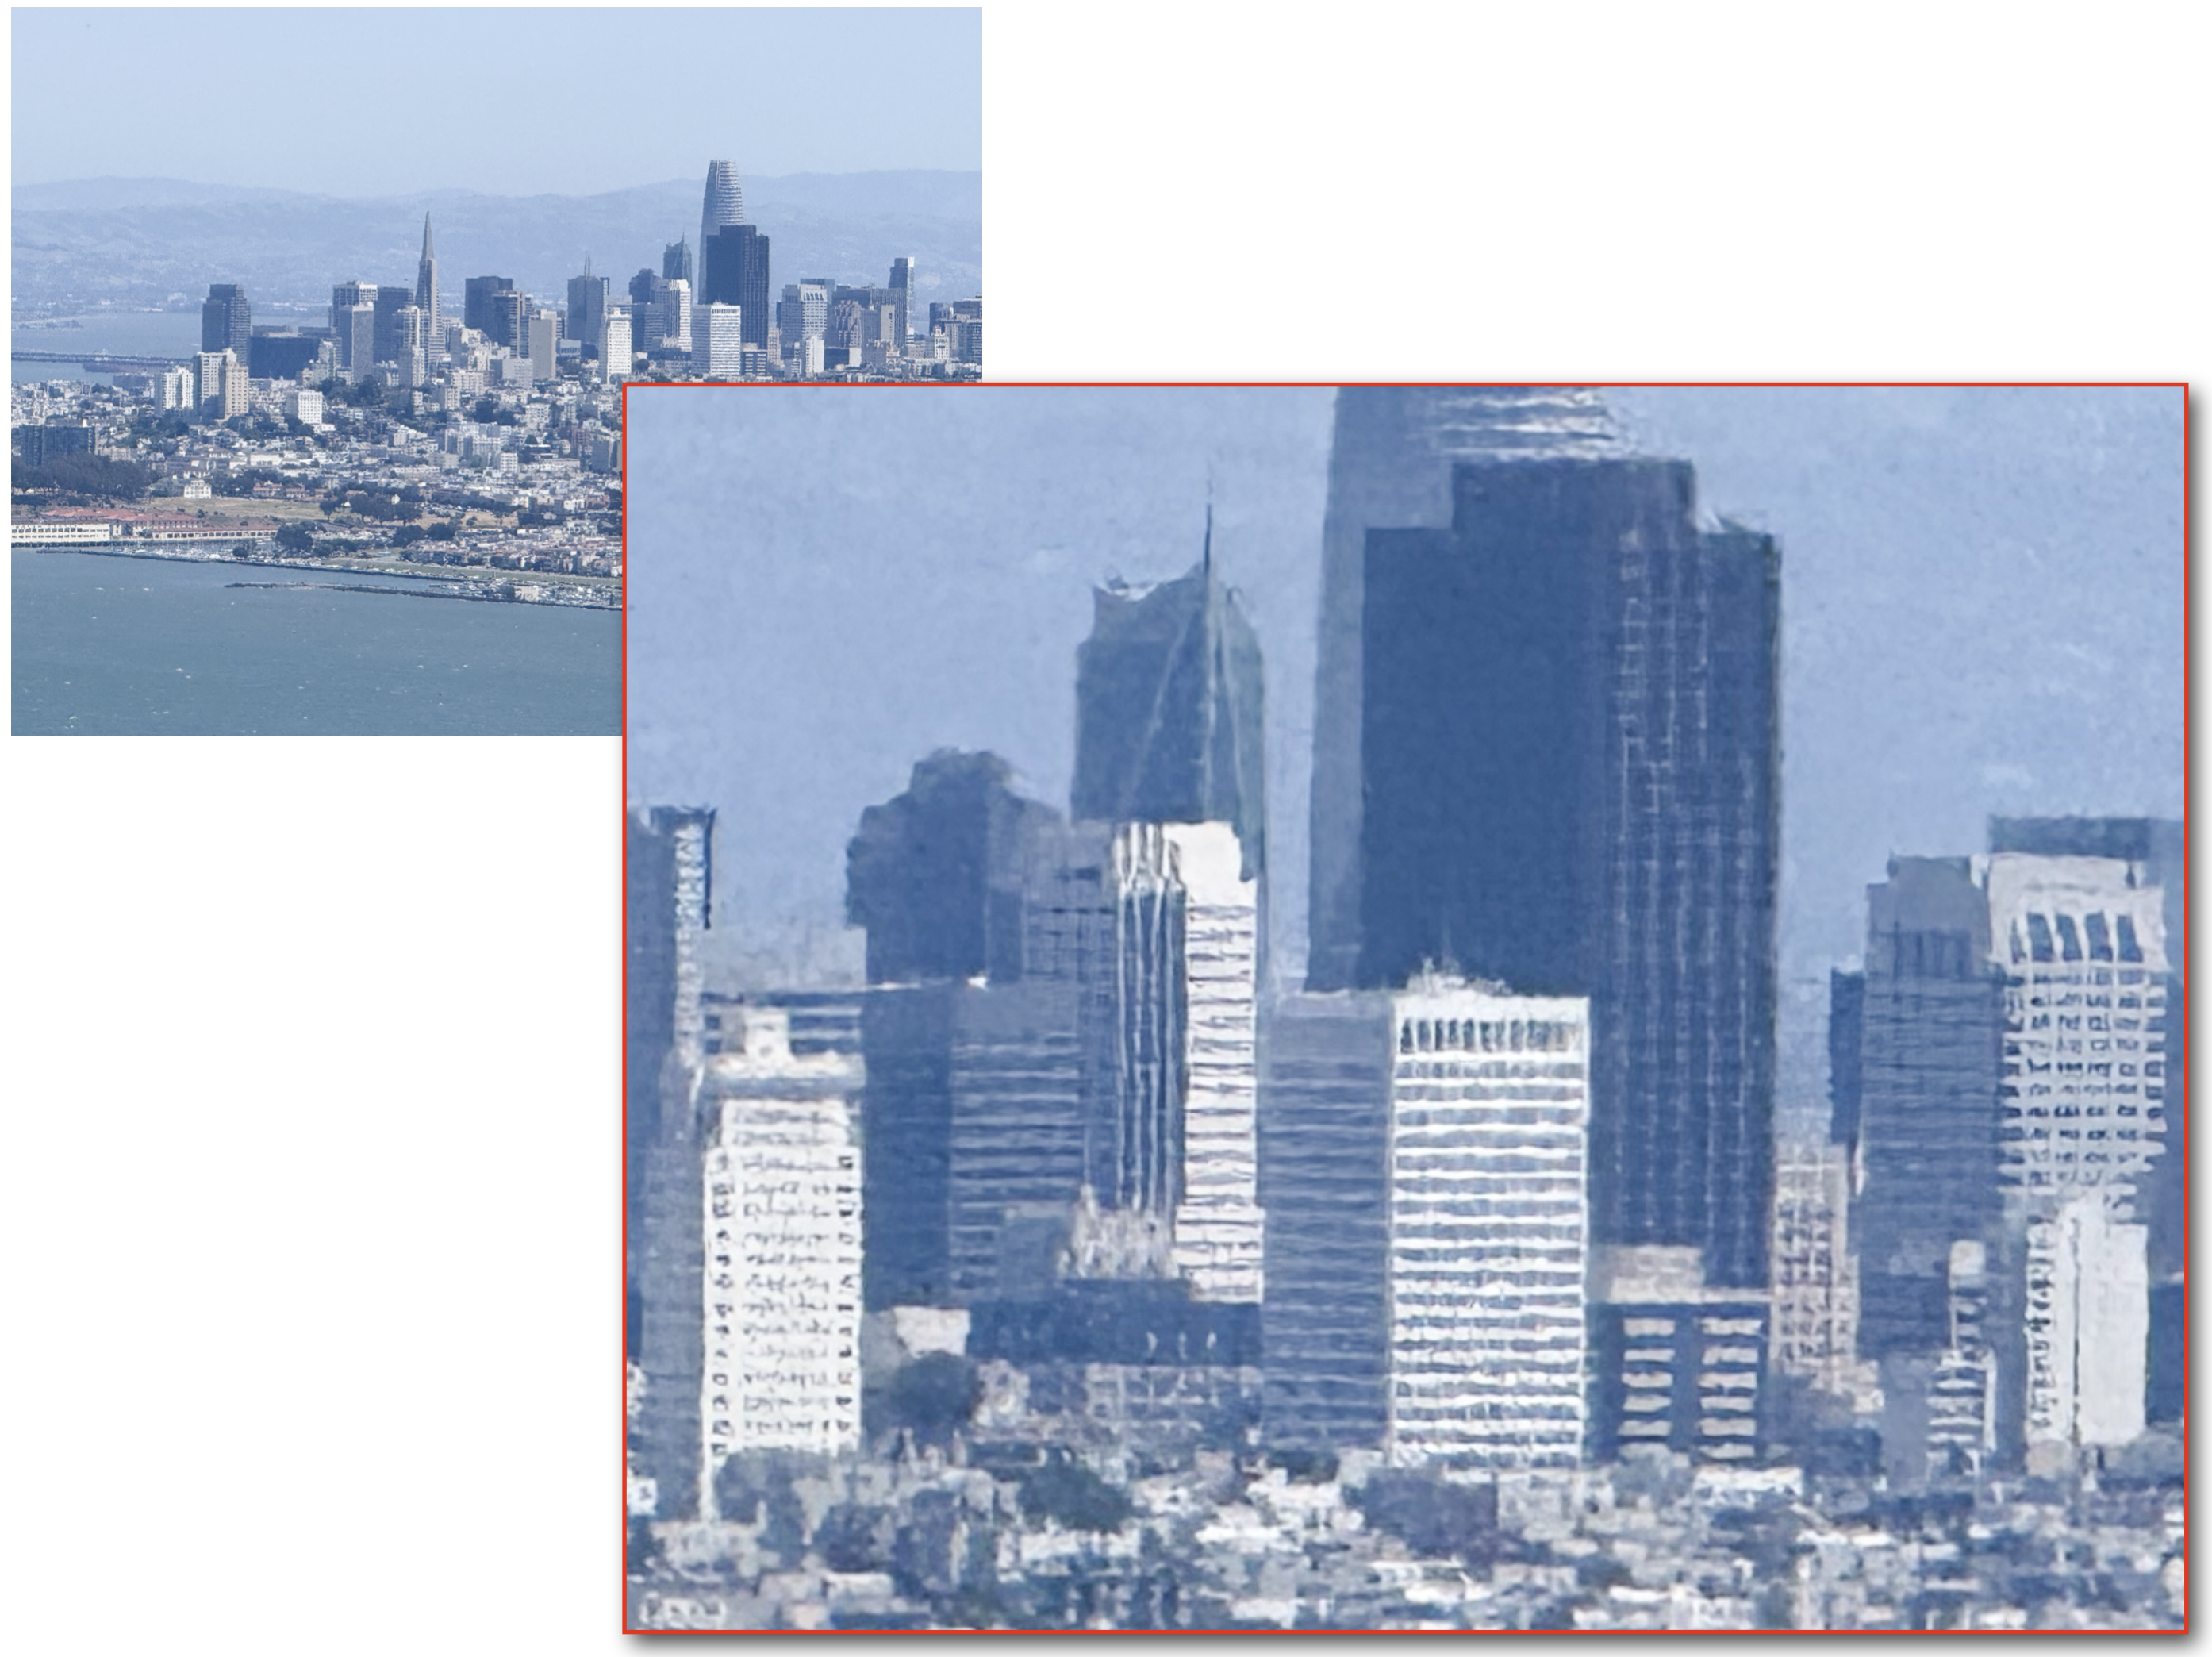
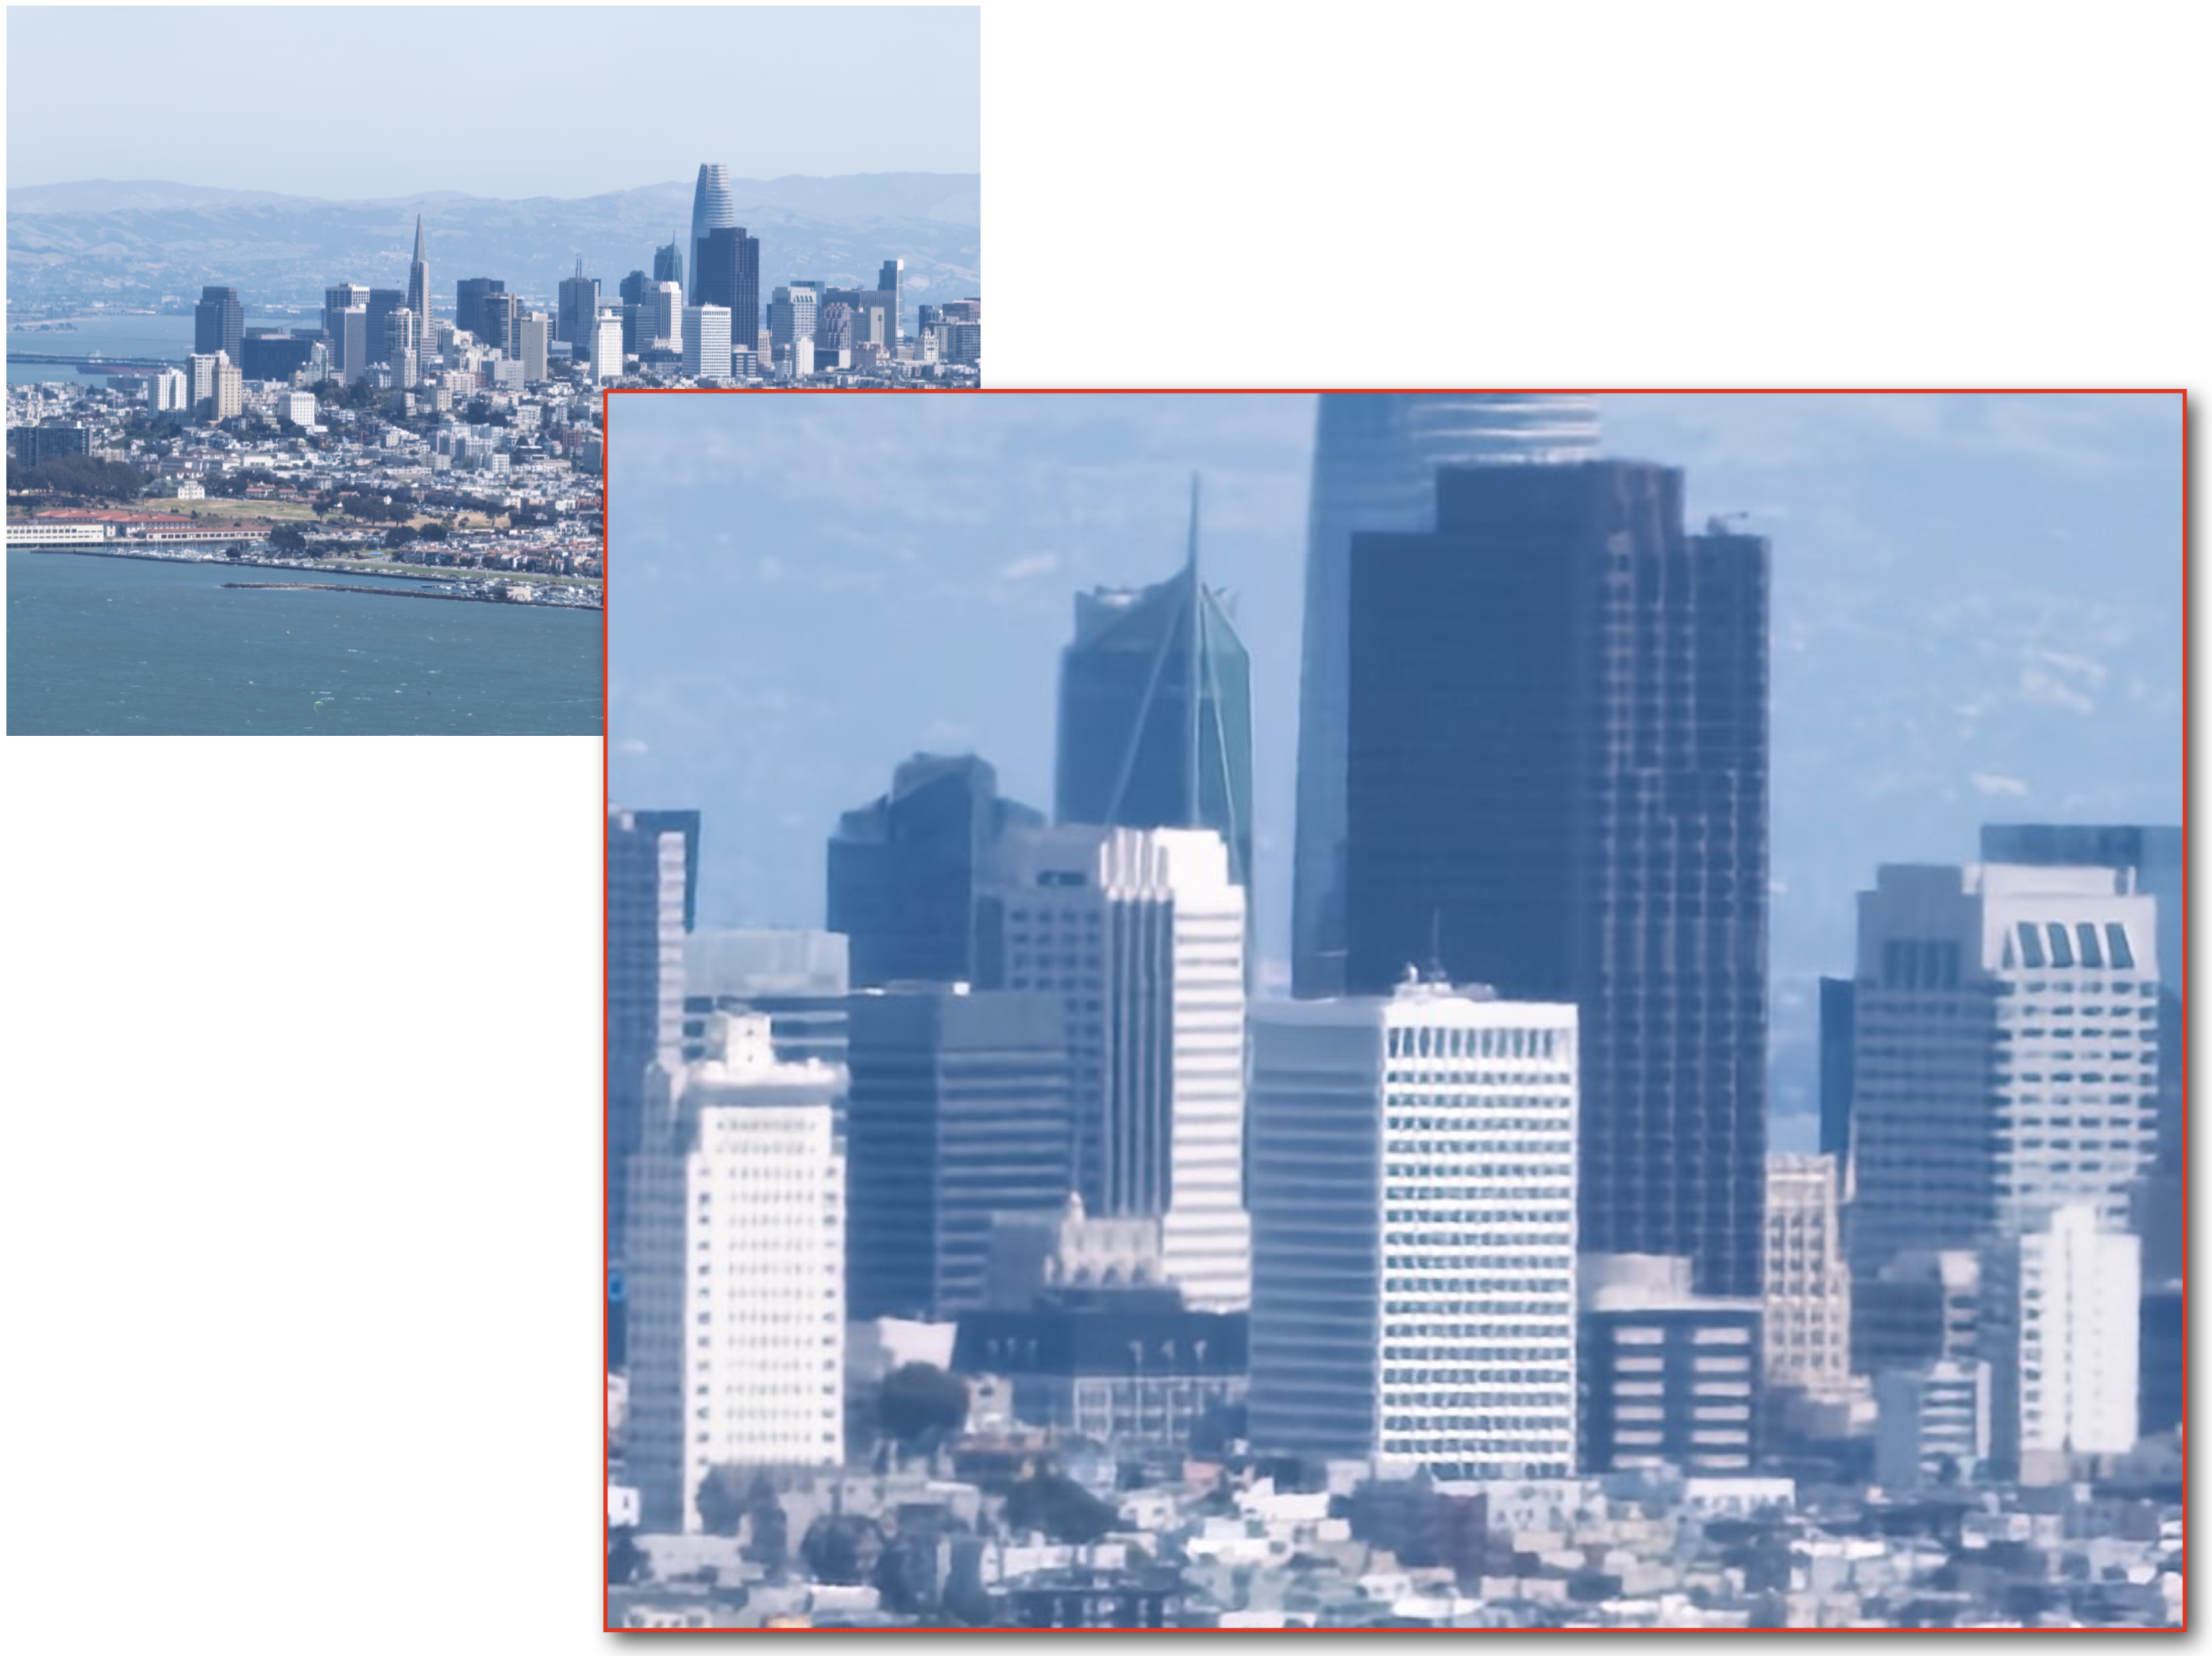
At left is a handheld snapshot of San Francisco, taken using an iPhone 16 Pro Max's native camera and the 5× lens, but pinch-zoomed to 10×. At right is a comparable snapshot taken using Indigo, which uses multi-frame super-resolution. The Indigo photo has less noise and more detail (without hallucination) than the native camera photo. Look at the windows in the buildings in the insets.
Pro controls
One of the biggest innovations in Indigo are the pro controls - designed from the ground up for a natively computational camera. We offer the obvious controls over focus, shutter speed, ISO, exposure compensation, and white balance - the latter with separate control over temperature and tint, like Lightroom. But since each photo is the result of combining a burst of frames, Indigo also offers control over the number of frames in the burst. This gives photographers a way to trade off total capture time against noise level.
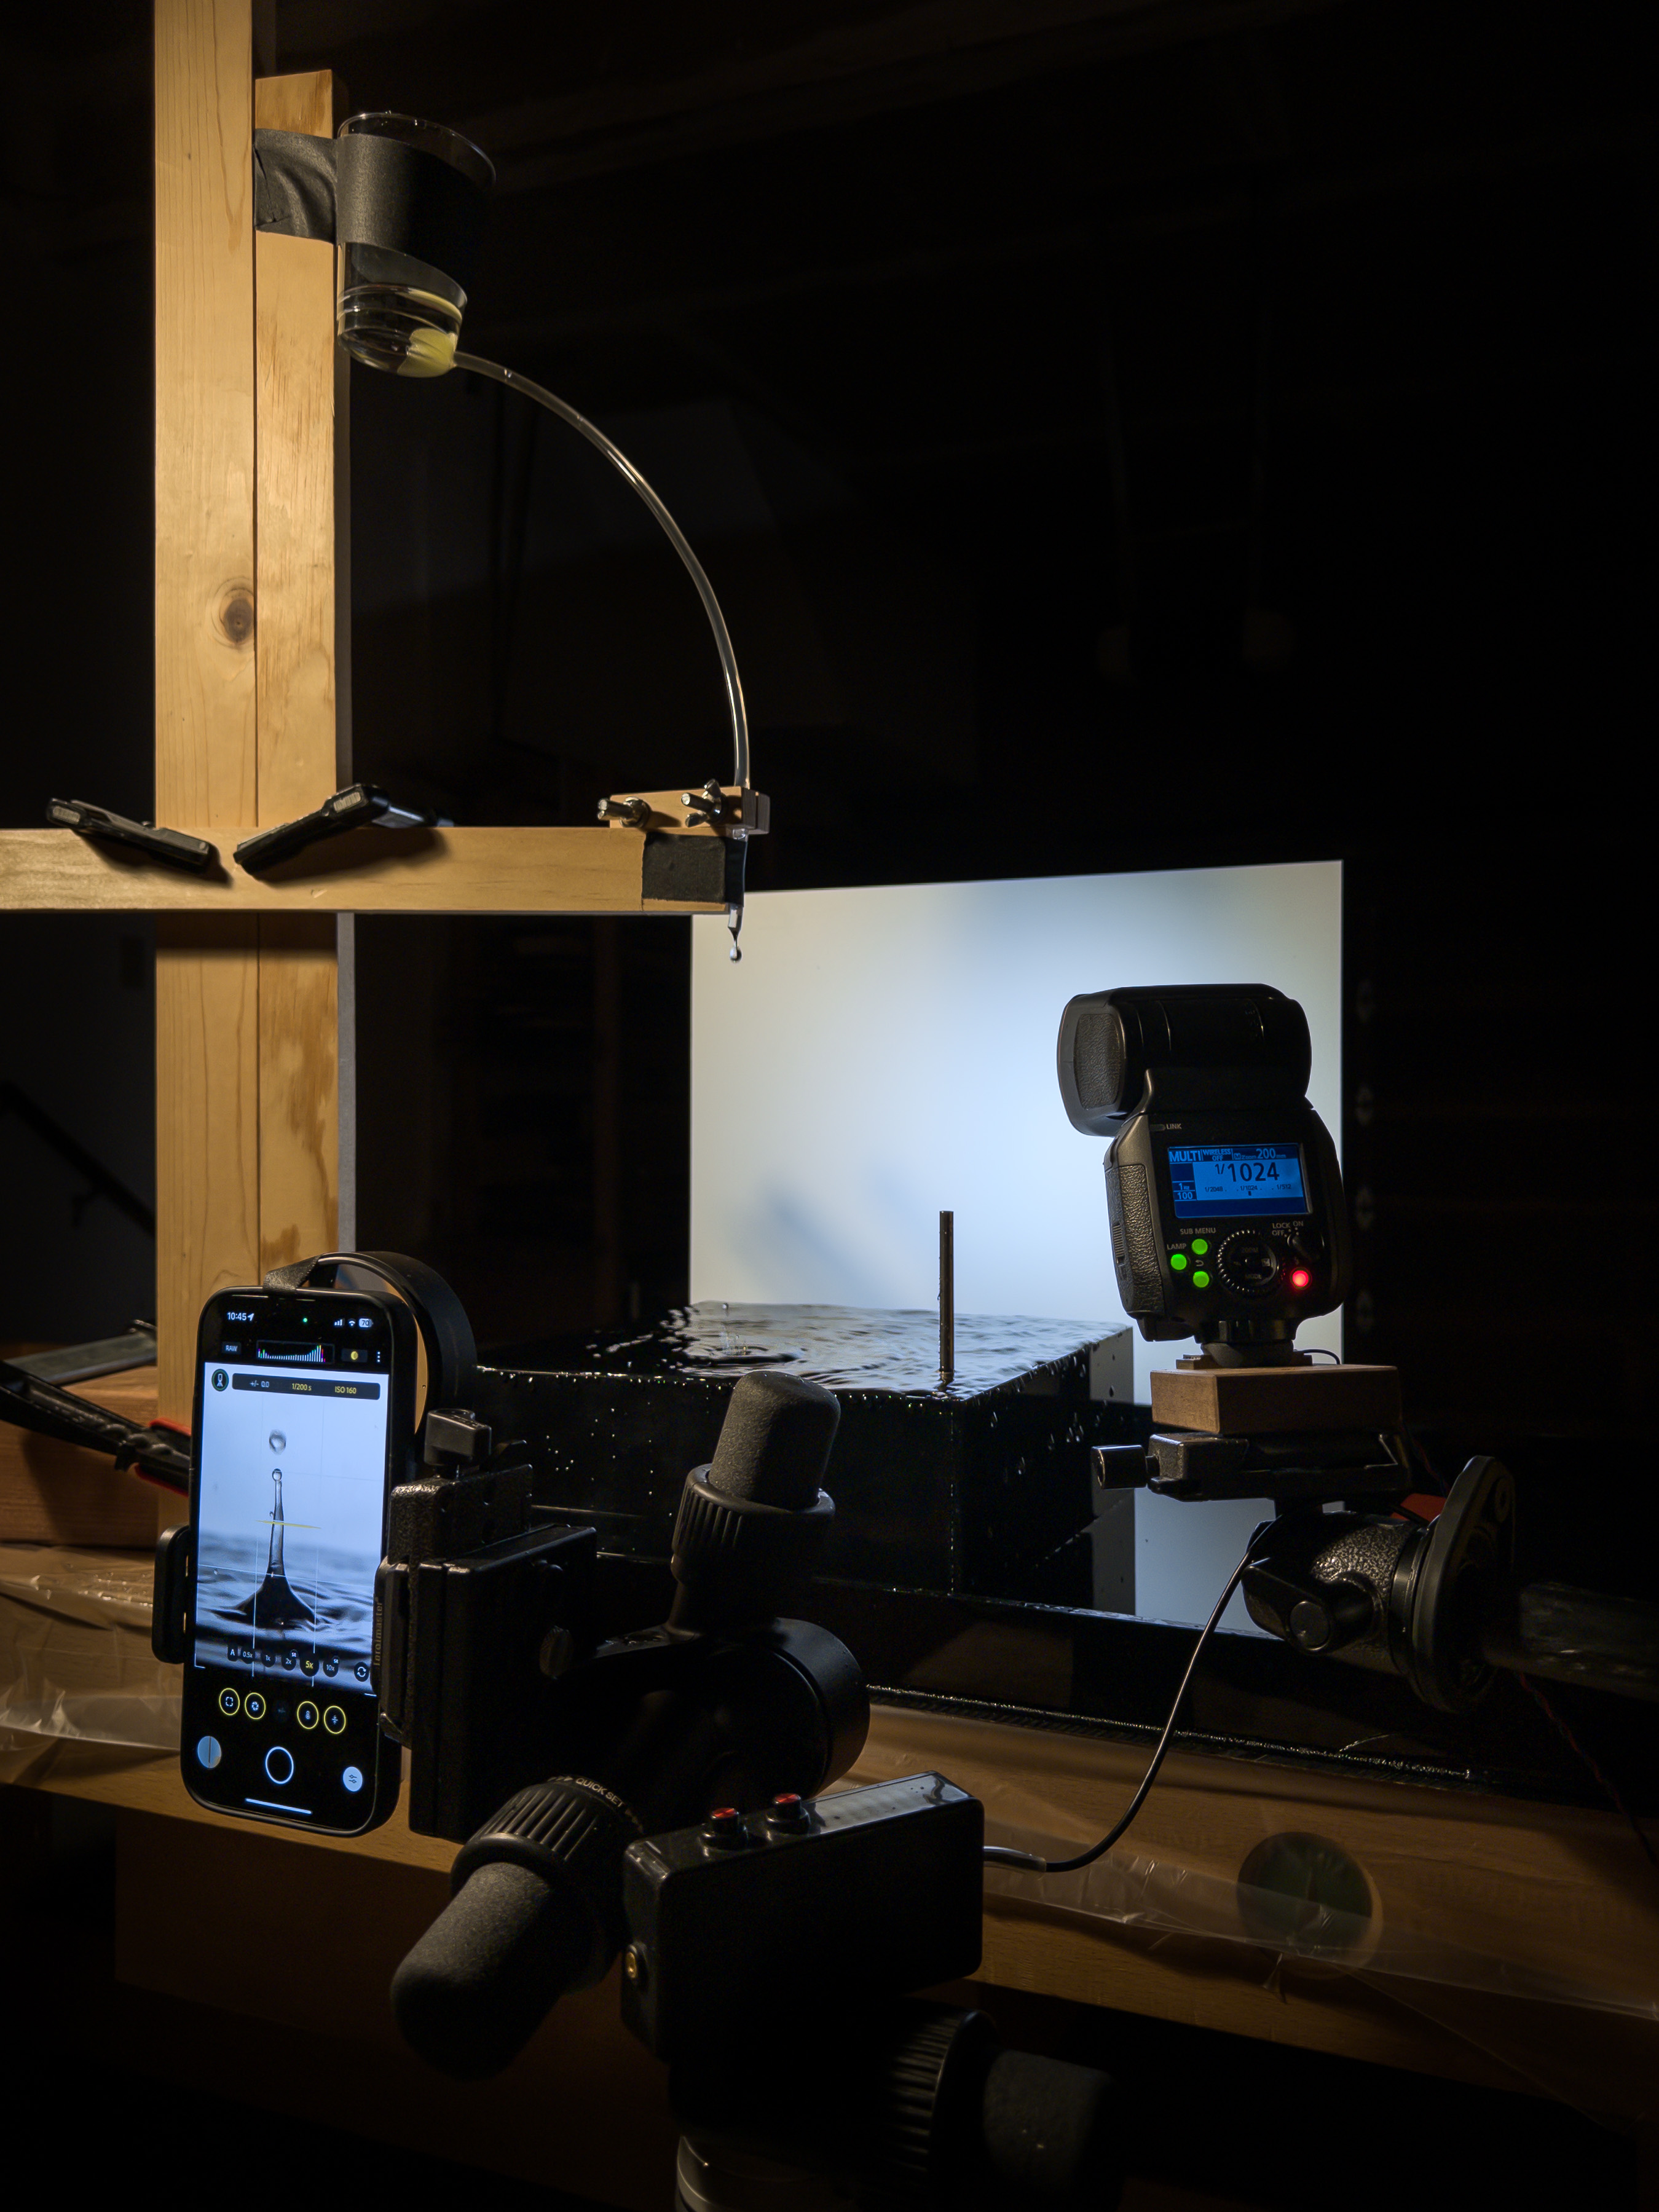
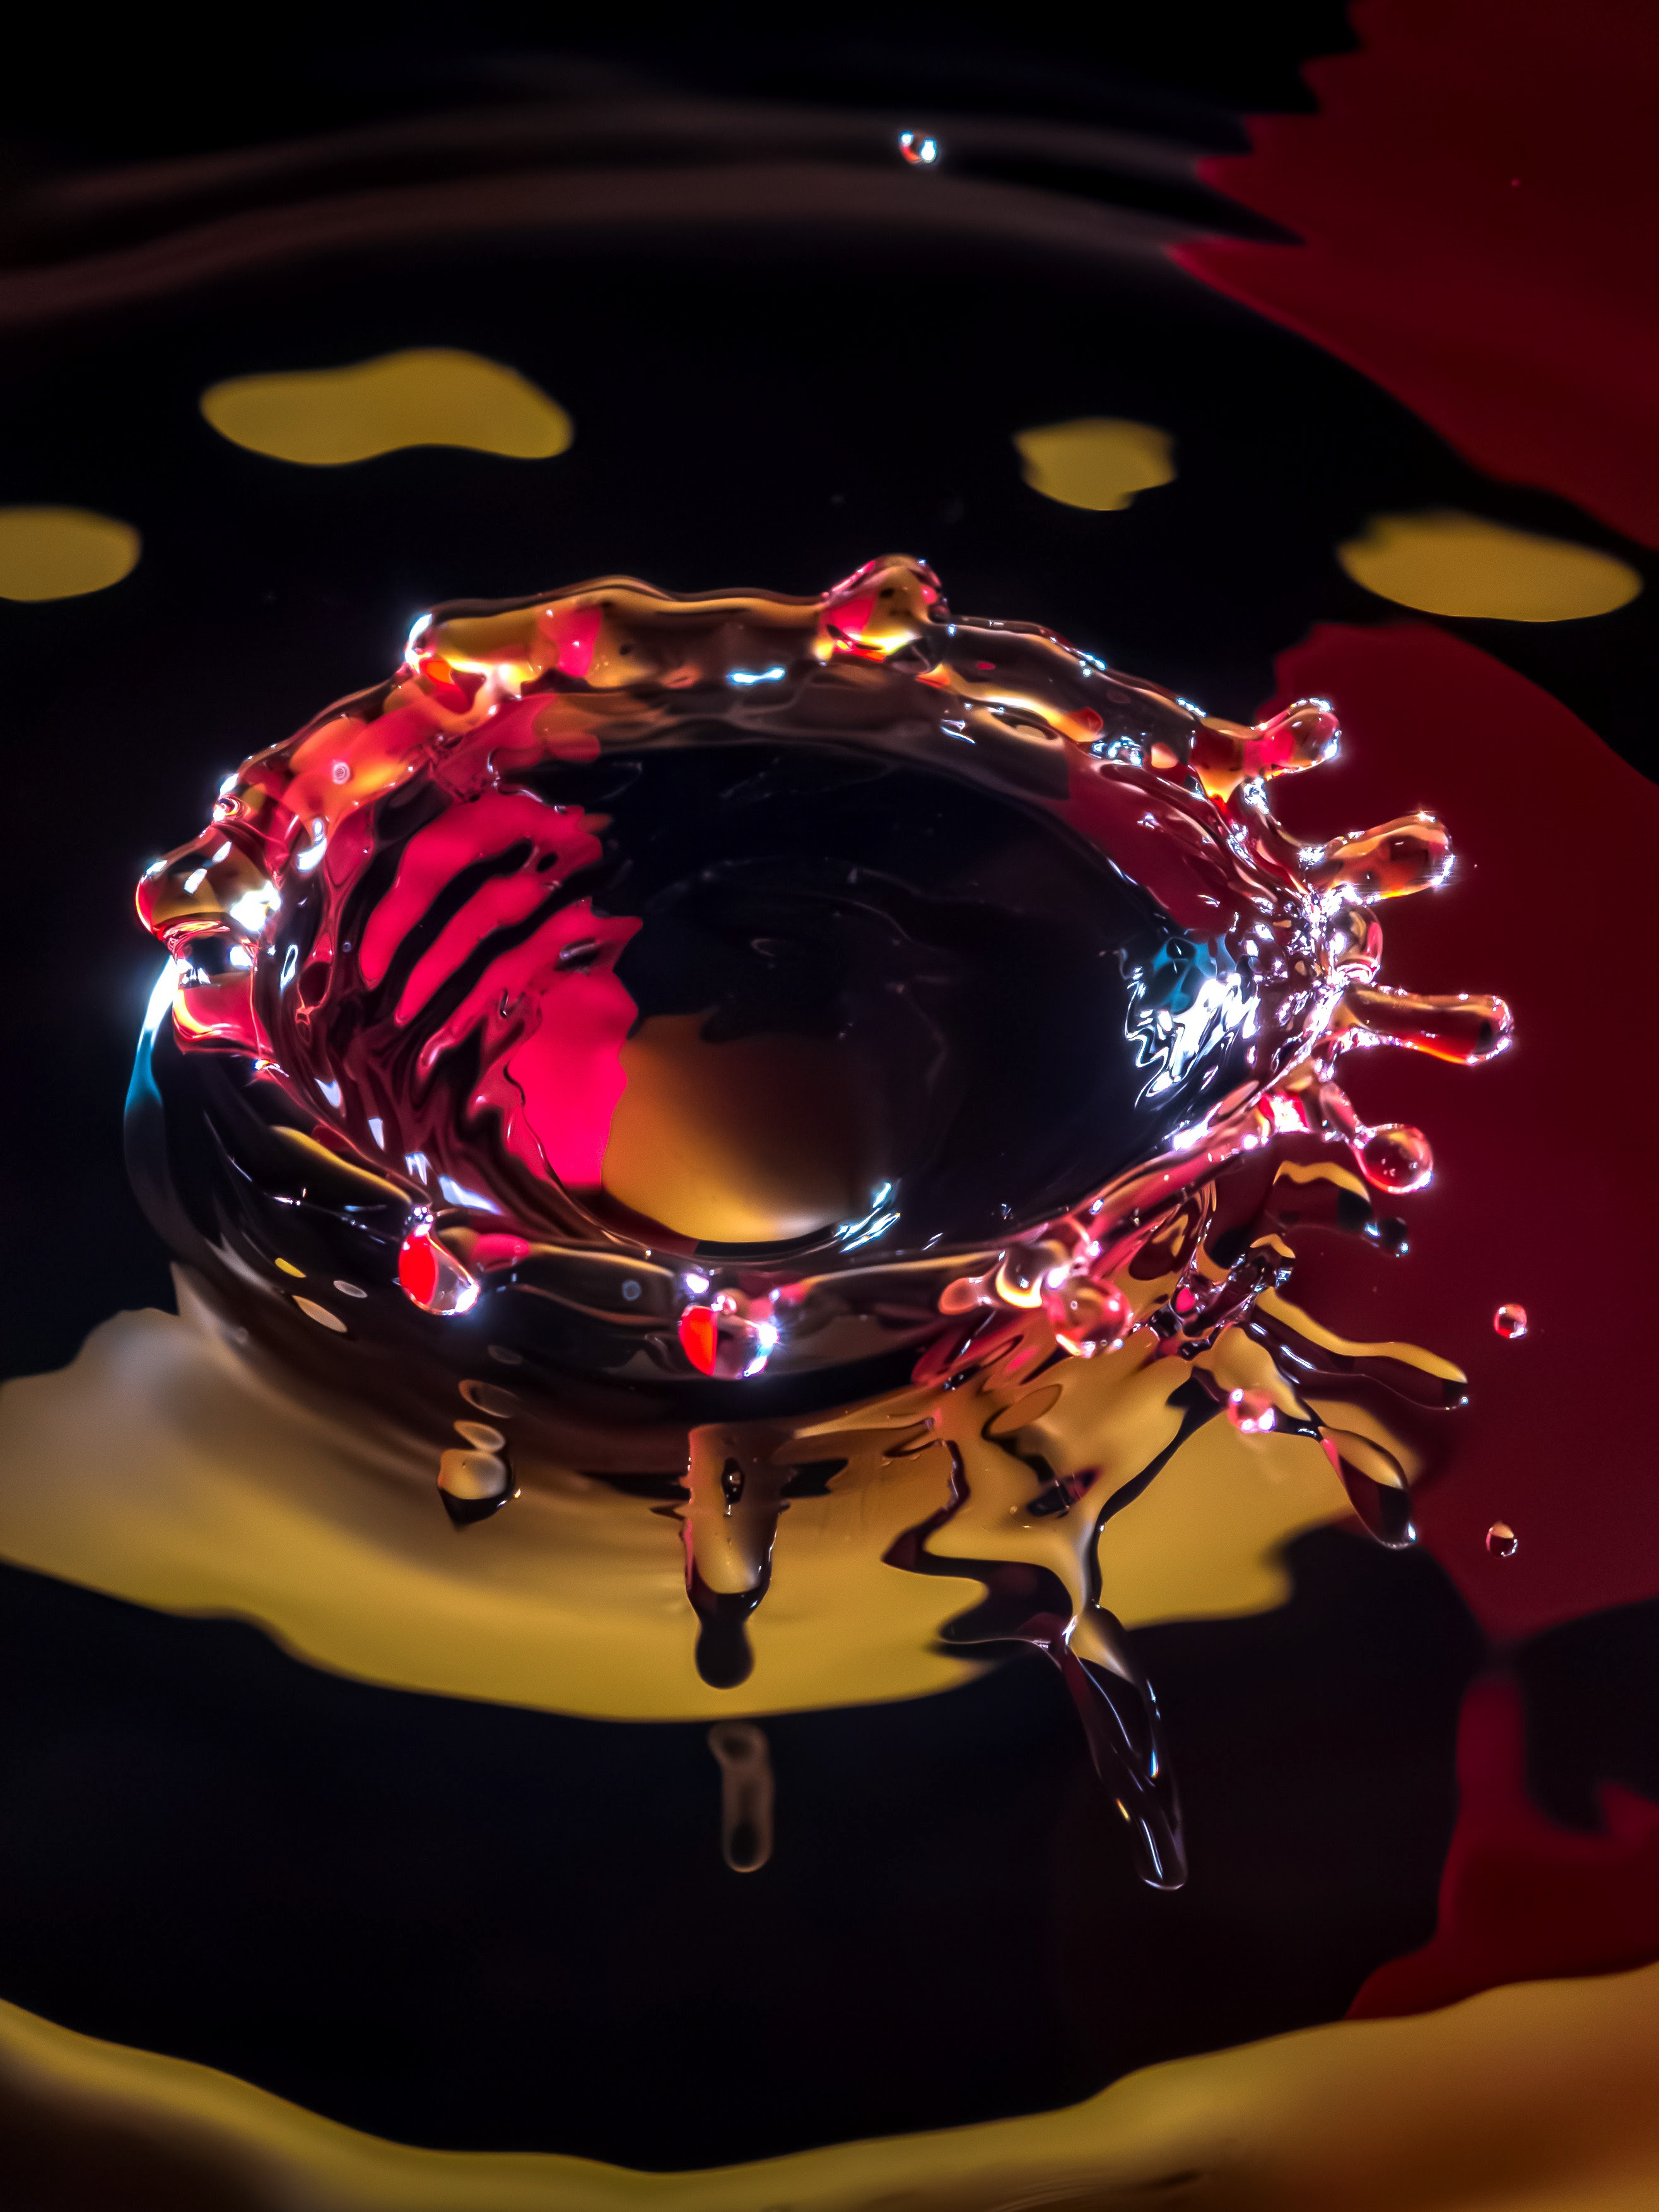

As a fun example of how our manual controls can be used, we built a continuous slow-drip water rig (left), and with an iPhone 16 Pro Max running Indigo and mounted on a tripod, set the number of frames to 1, the shutter speed to 1 second, pressed the shutter button, and during that second fired an external strobe. Some example results (lightly edited) are shown at center and right.
As another example of manual control, Indigo offers a "Long Exposure" button. Enabling it replaces our robust merging method, which avoids ghosts or double images in handheld shots, with just adding the frames together. It operates at full resolution, and creates a DNG as well as a JPEG. Here are some examples:
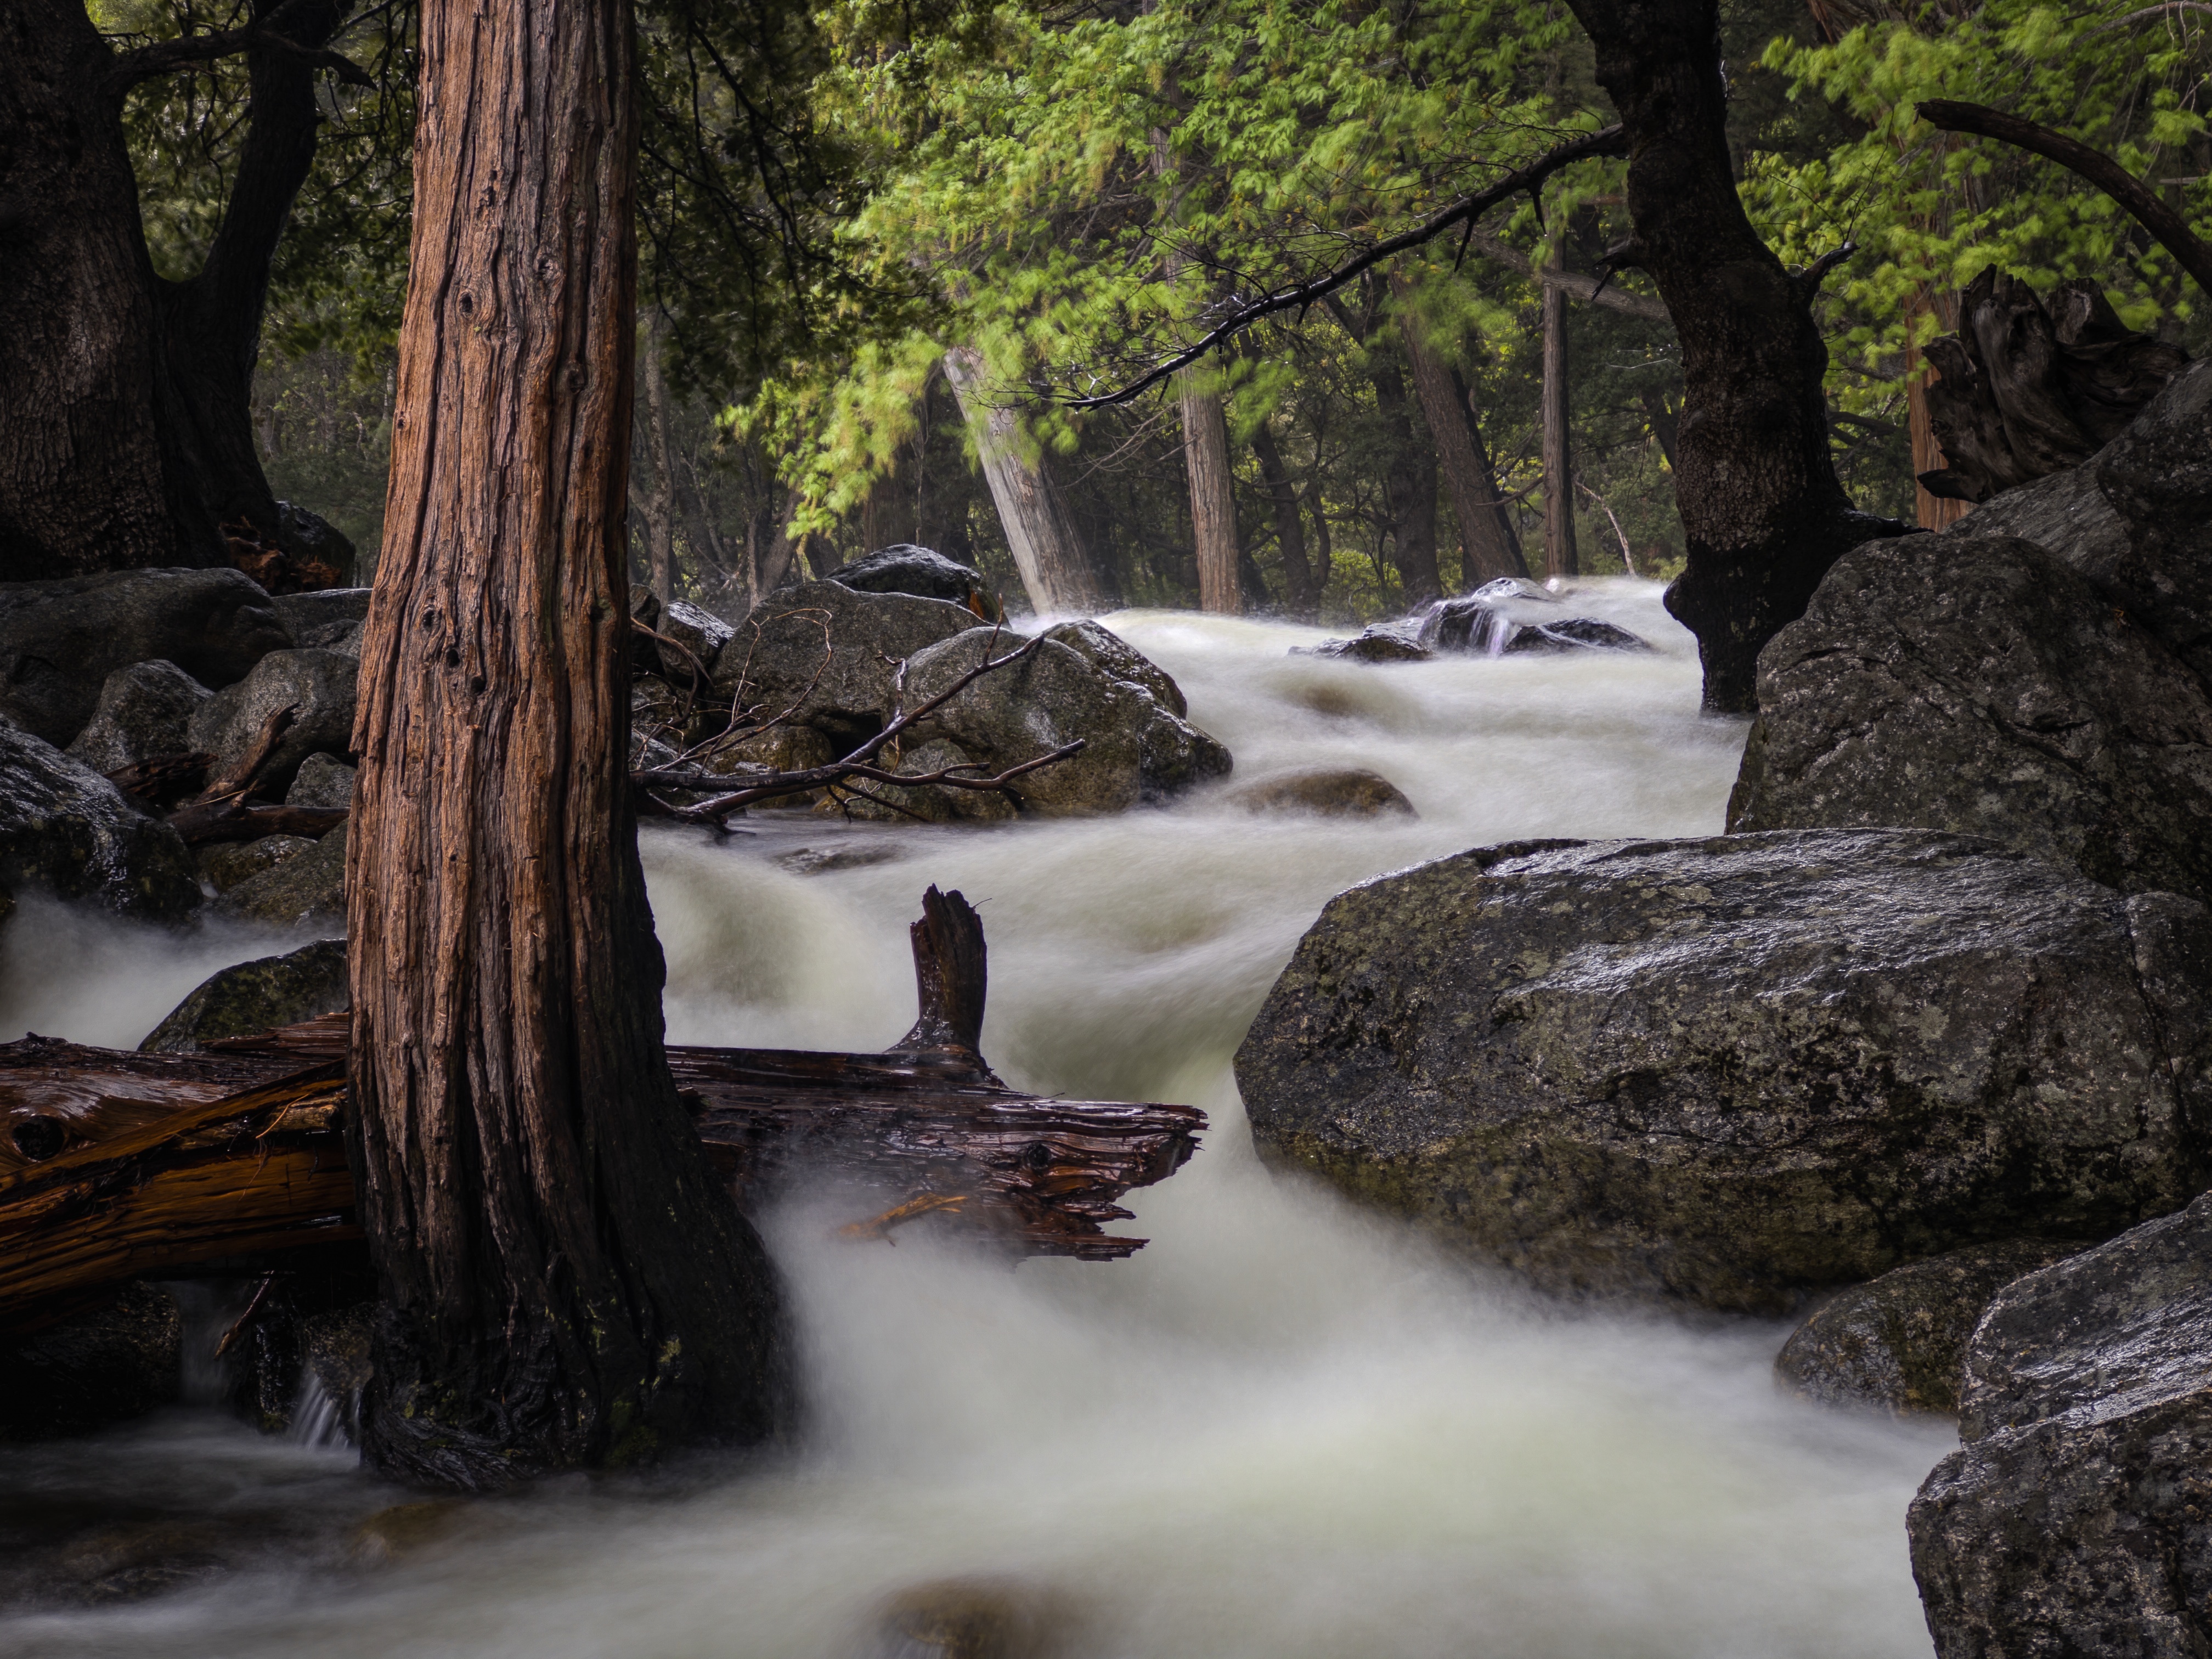
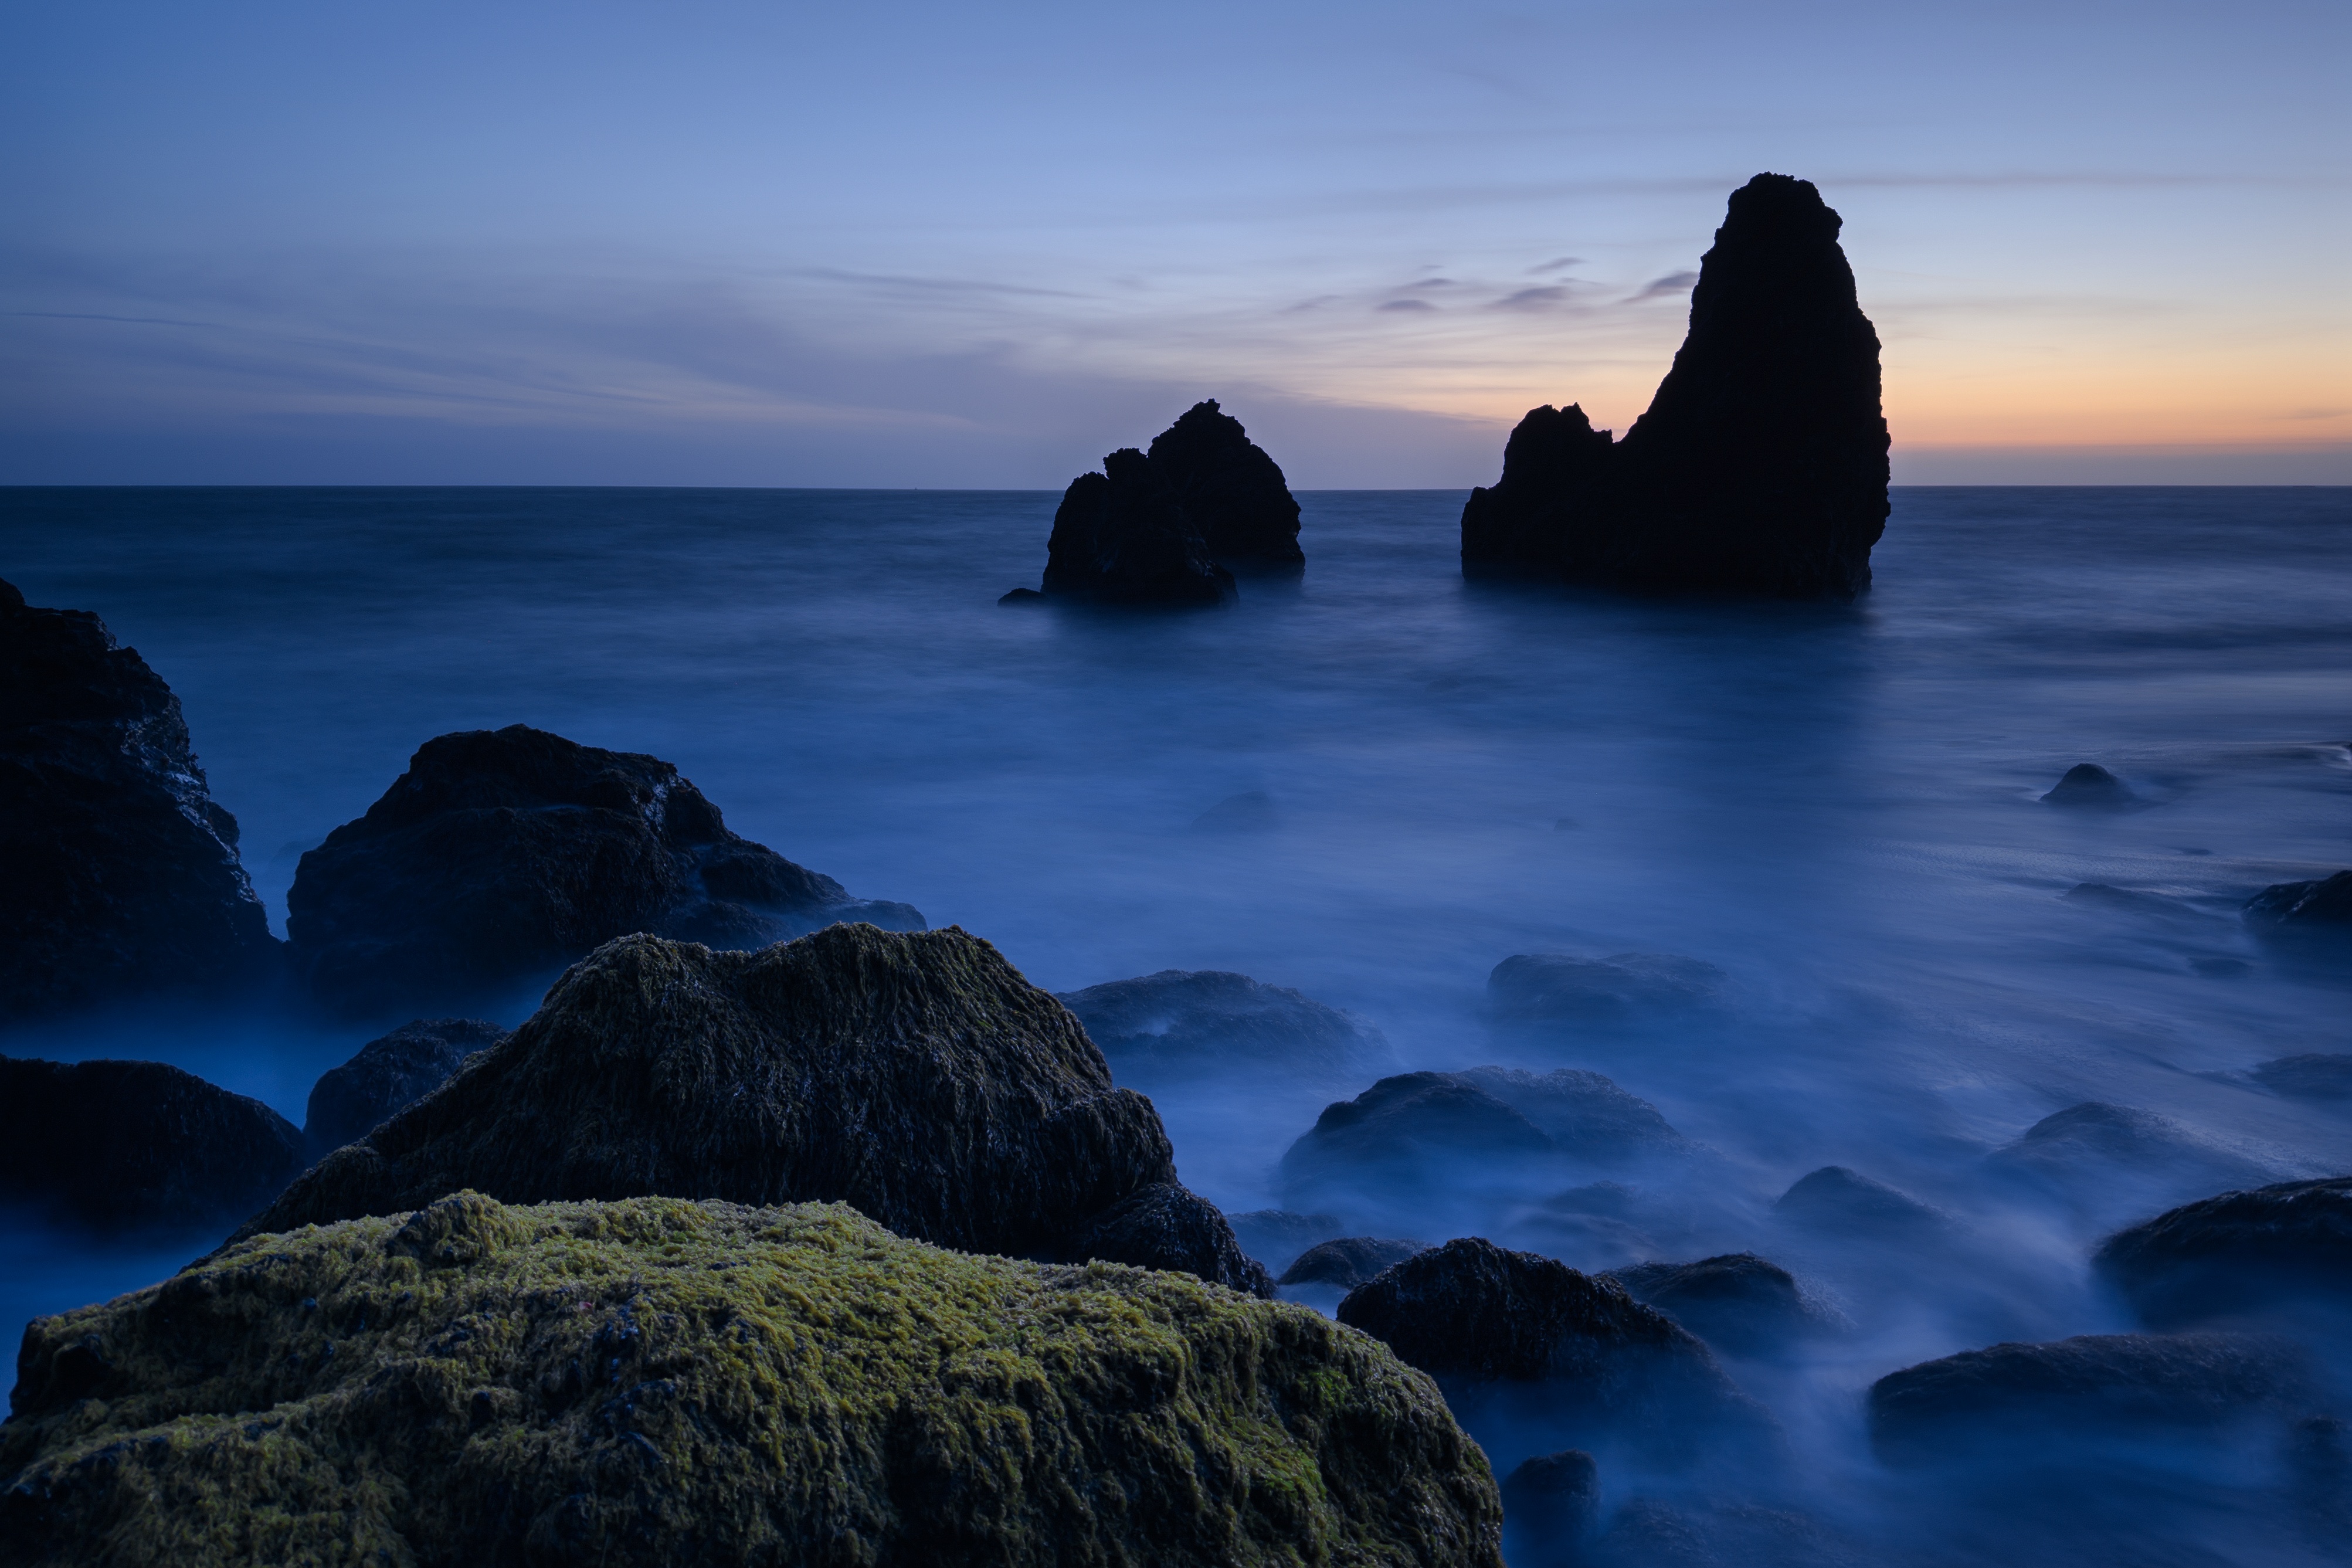
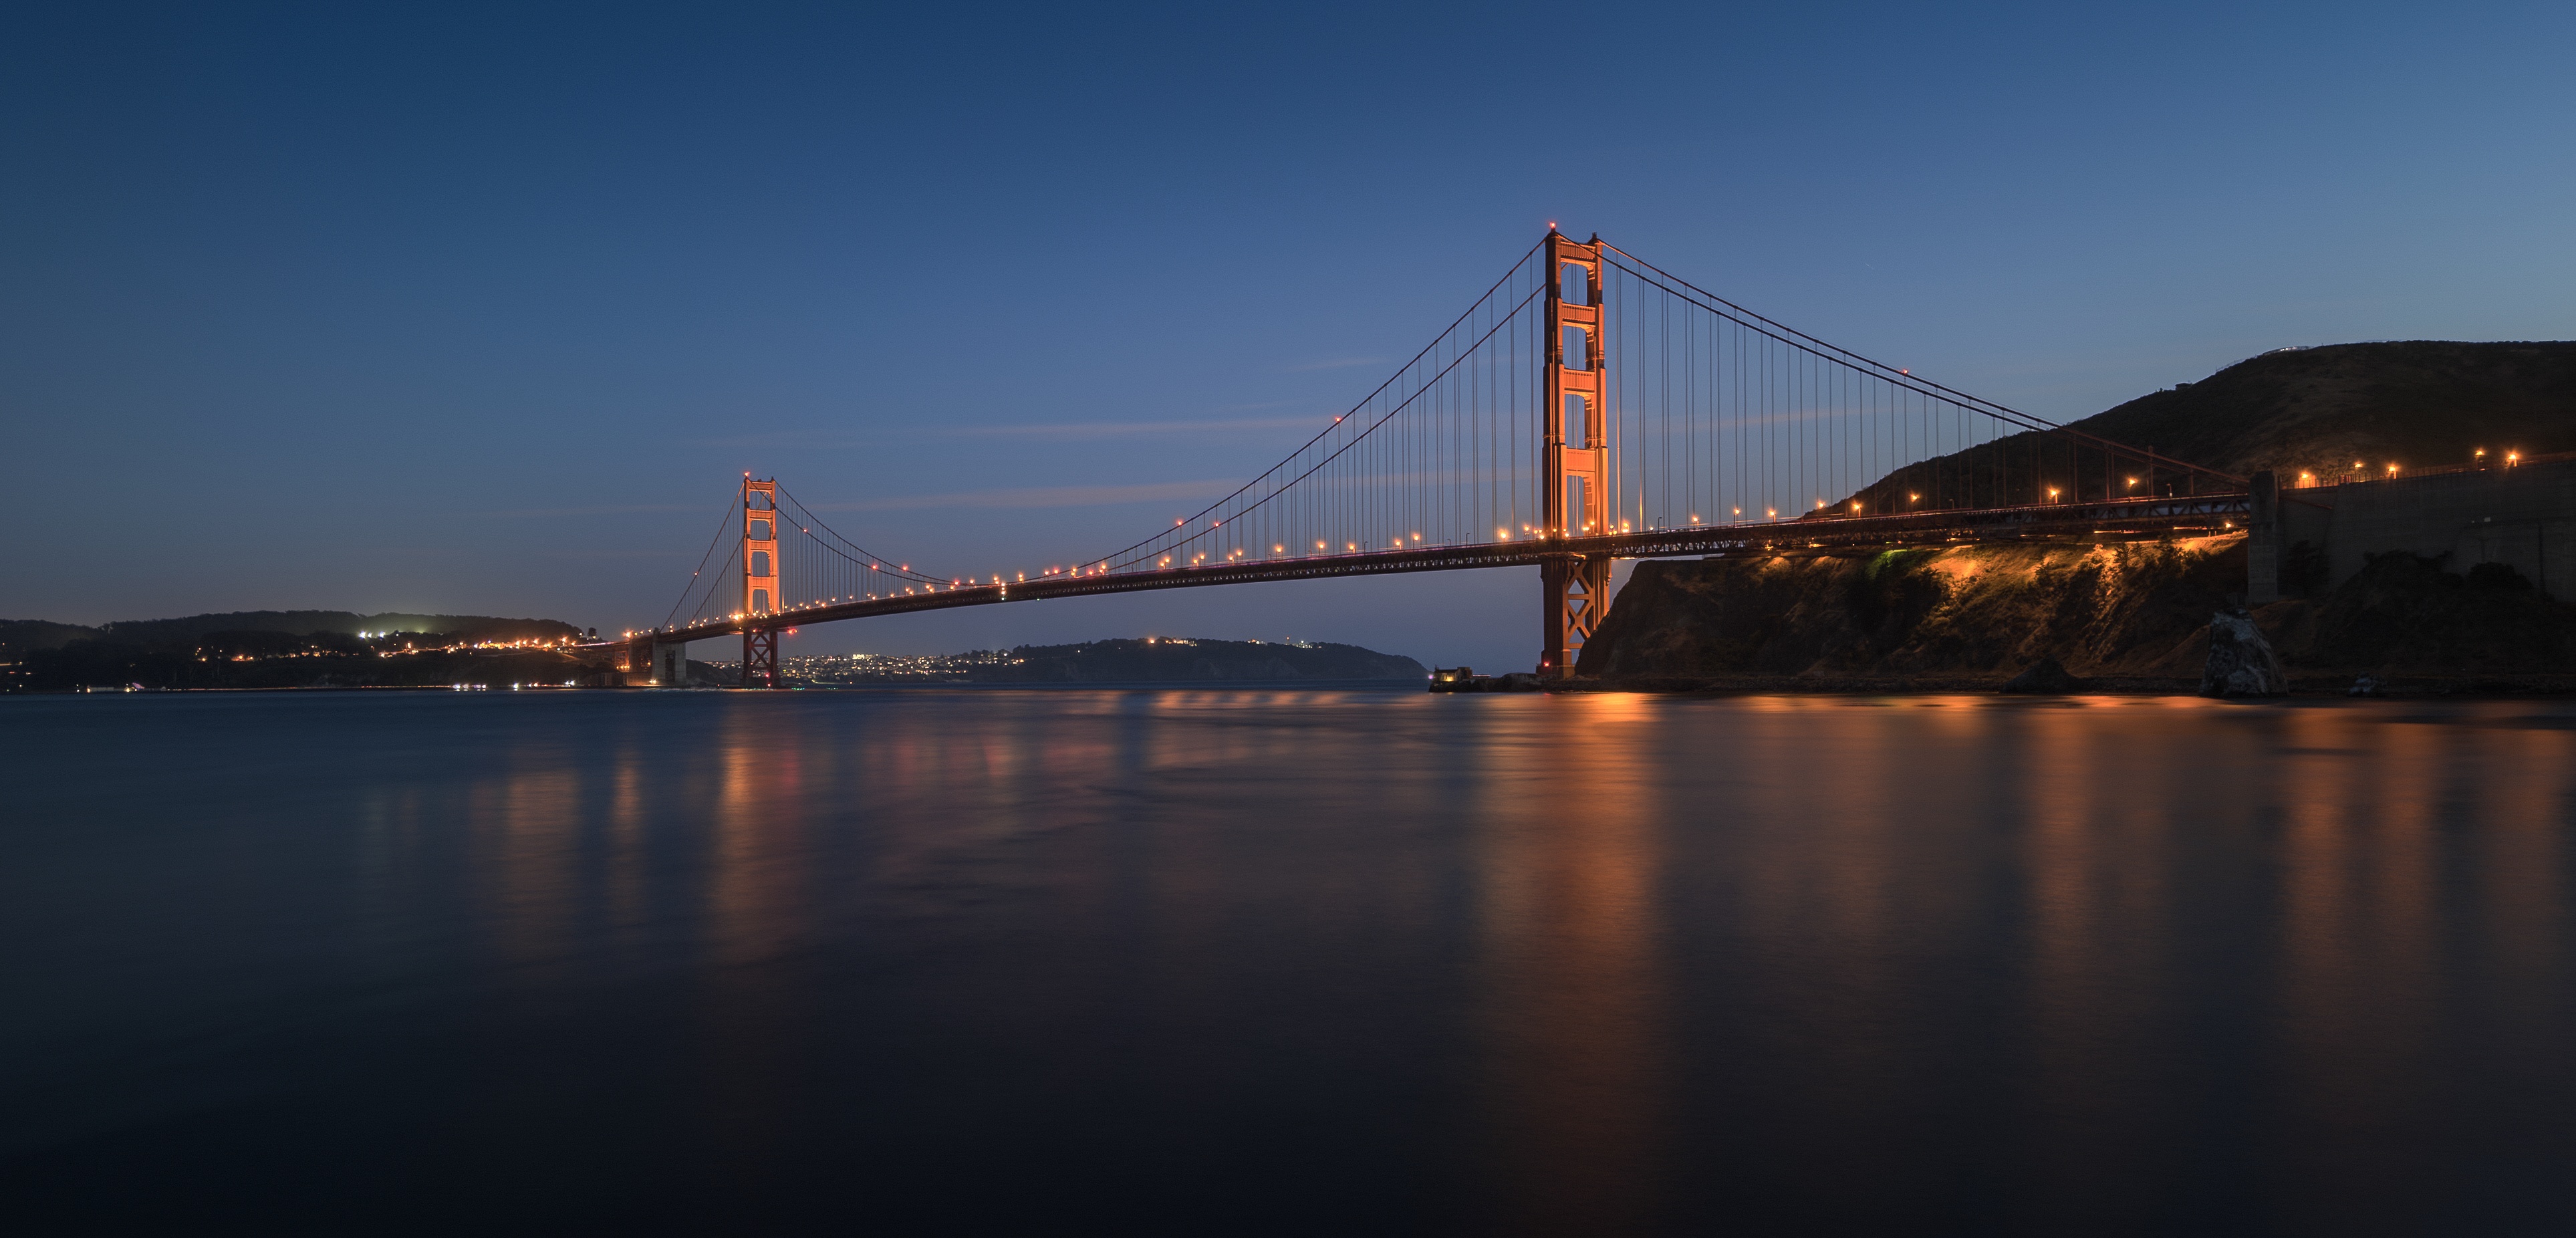
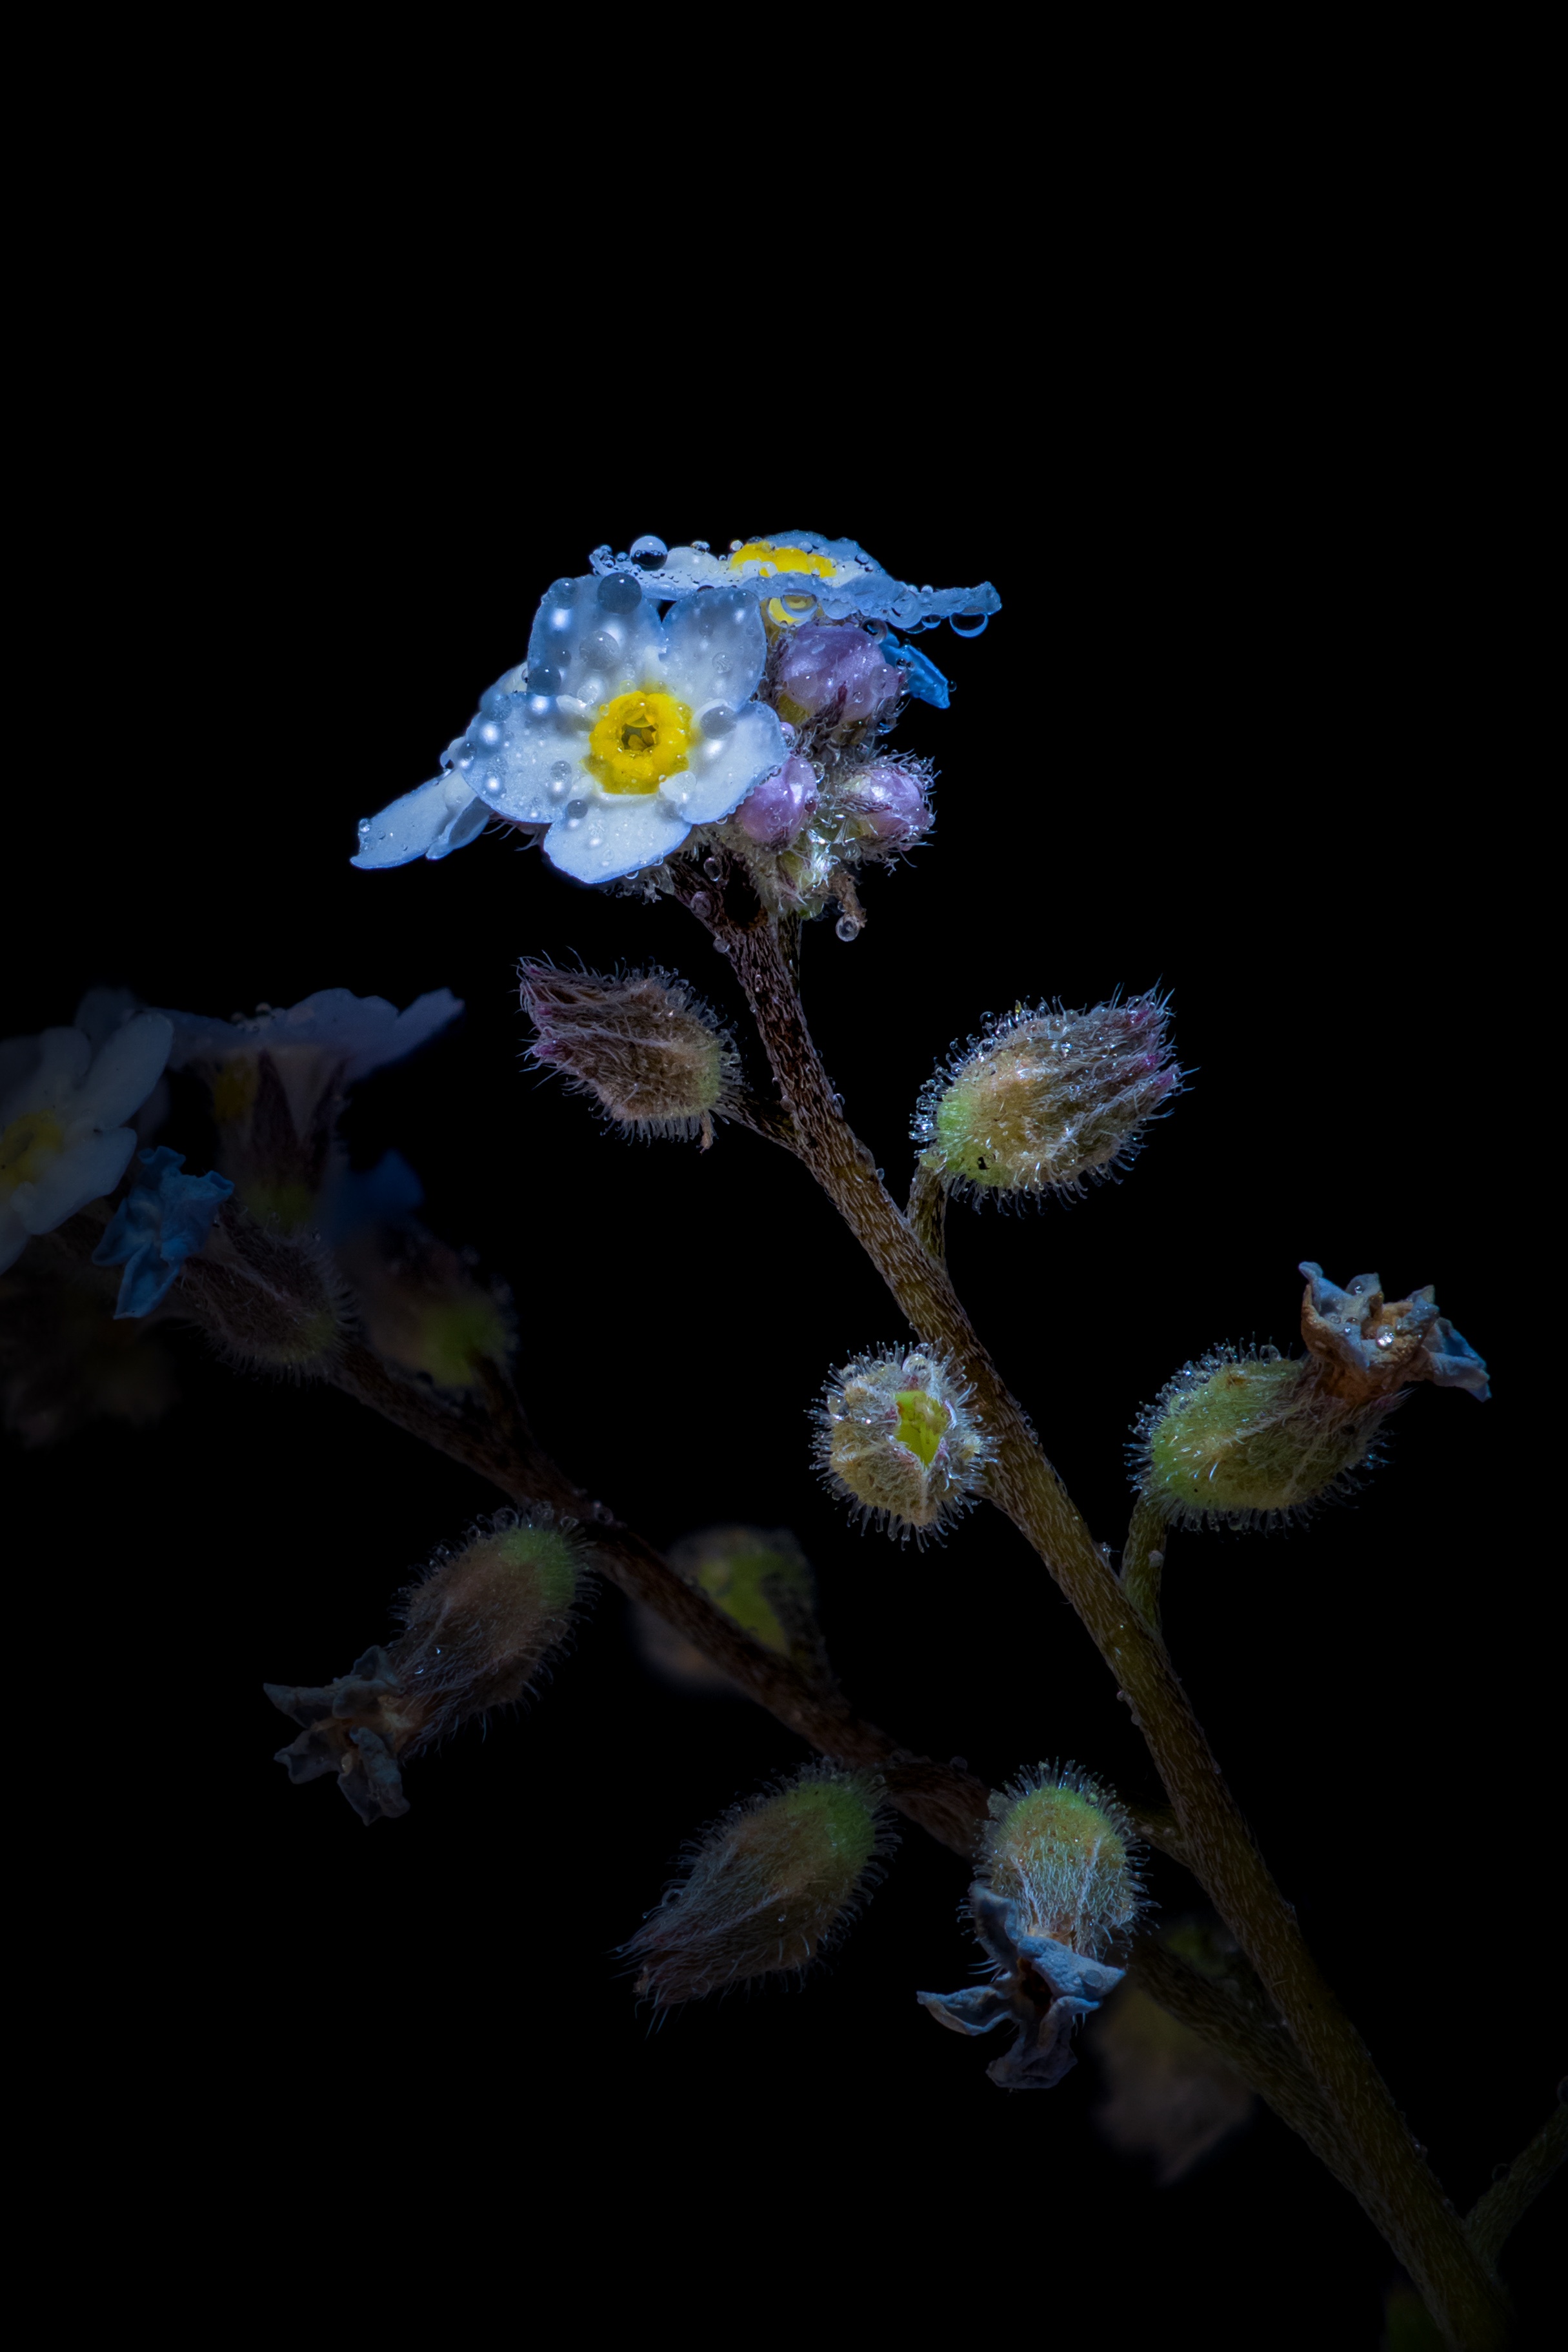
If the phone is on a tripod, our Long Exposure button can be used to obtain "water-into-silk" effects. These effects normally require an SLR, a long exposure, and neutral density (ND) filters to avoid over-exposure in daylight scenes. The images have been adjusted in Lightroom (on top of our look). The lower-right photo is an example of light painting with the help of Long Exposure. It is a single capture of 32 1-second exposures while the flowers were illuminated with a UV flashlight that was moved around the flowers during the capture. UV light is invisible, but feeding the flowers with a strong fluorescent dye prior to taking the picture made them emit a visible glow.
While these controls already suggest that this is "not your father's camera", a larger paradigm shift is just around the corner. We are working on being able to render the final look of your photo in real time, so that we can display it live in the viewfinder - in other words true WYSIWYG (What You See Is What You Get).
Why is this important? Because it lets photographers use the manual controls of a camera in a new way. In particular, if you want to make a darker image, you really shouldn't shorten exposure time; that will just produce a noisier image. Instead, you should lower the brightness of the captured photo. Conversely, if you want to make the shadows brighter you shouldn't increase exposure time; that might clip highlights. Instead you should raise the shadows of the captured photo. In a big camera it's hard to imagine the visual effect of these editing adjustments while you're taking the picture. As a result, photographers have trained themselves to "visualize" what their photograph will look like after editing. But in a computational camera that offers rendering controls during framing, and that uses these settings to render the final look in real-time in the viewfinder, such visualization becomes trivial. This will change how photographers take photos. Stay tuned!
Technology Previews
Indigo is not just a camera app; it's also an agile prototyping platform for technologies that may eventually be deployed in Adobe's flagship products, especially Lightroom. If you go to Indigo's filmstrip and tap on the flask icon, you'll switch to a screen that lets you try out some of these technologies.
For example, we have a button for Removing Reflections, currently available in Camera Raw. The feature allows you to remove reflections immediately after capture, so you can share your photograph taken through a window right away. Here's an example:
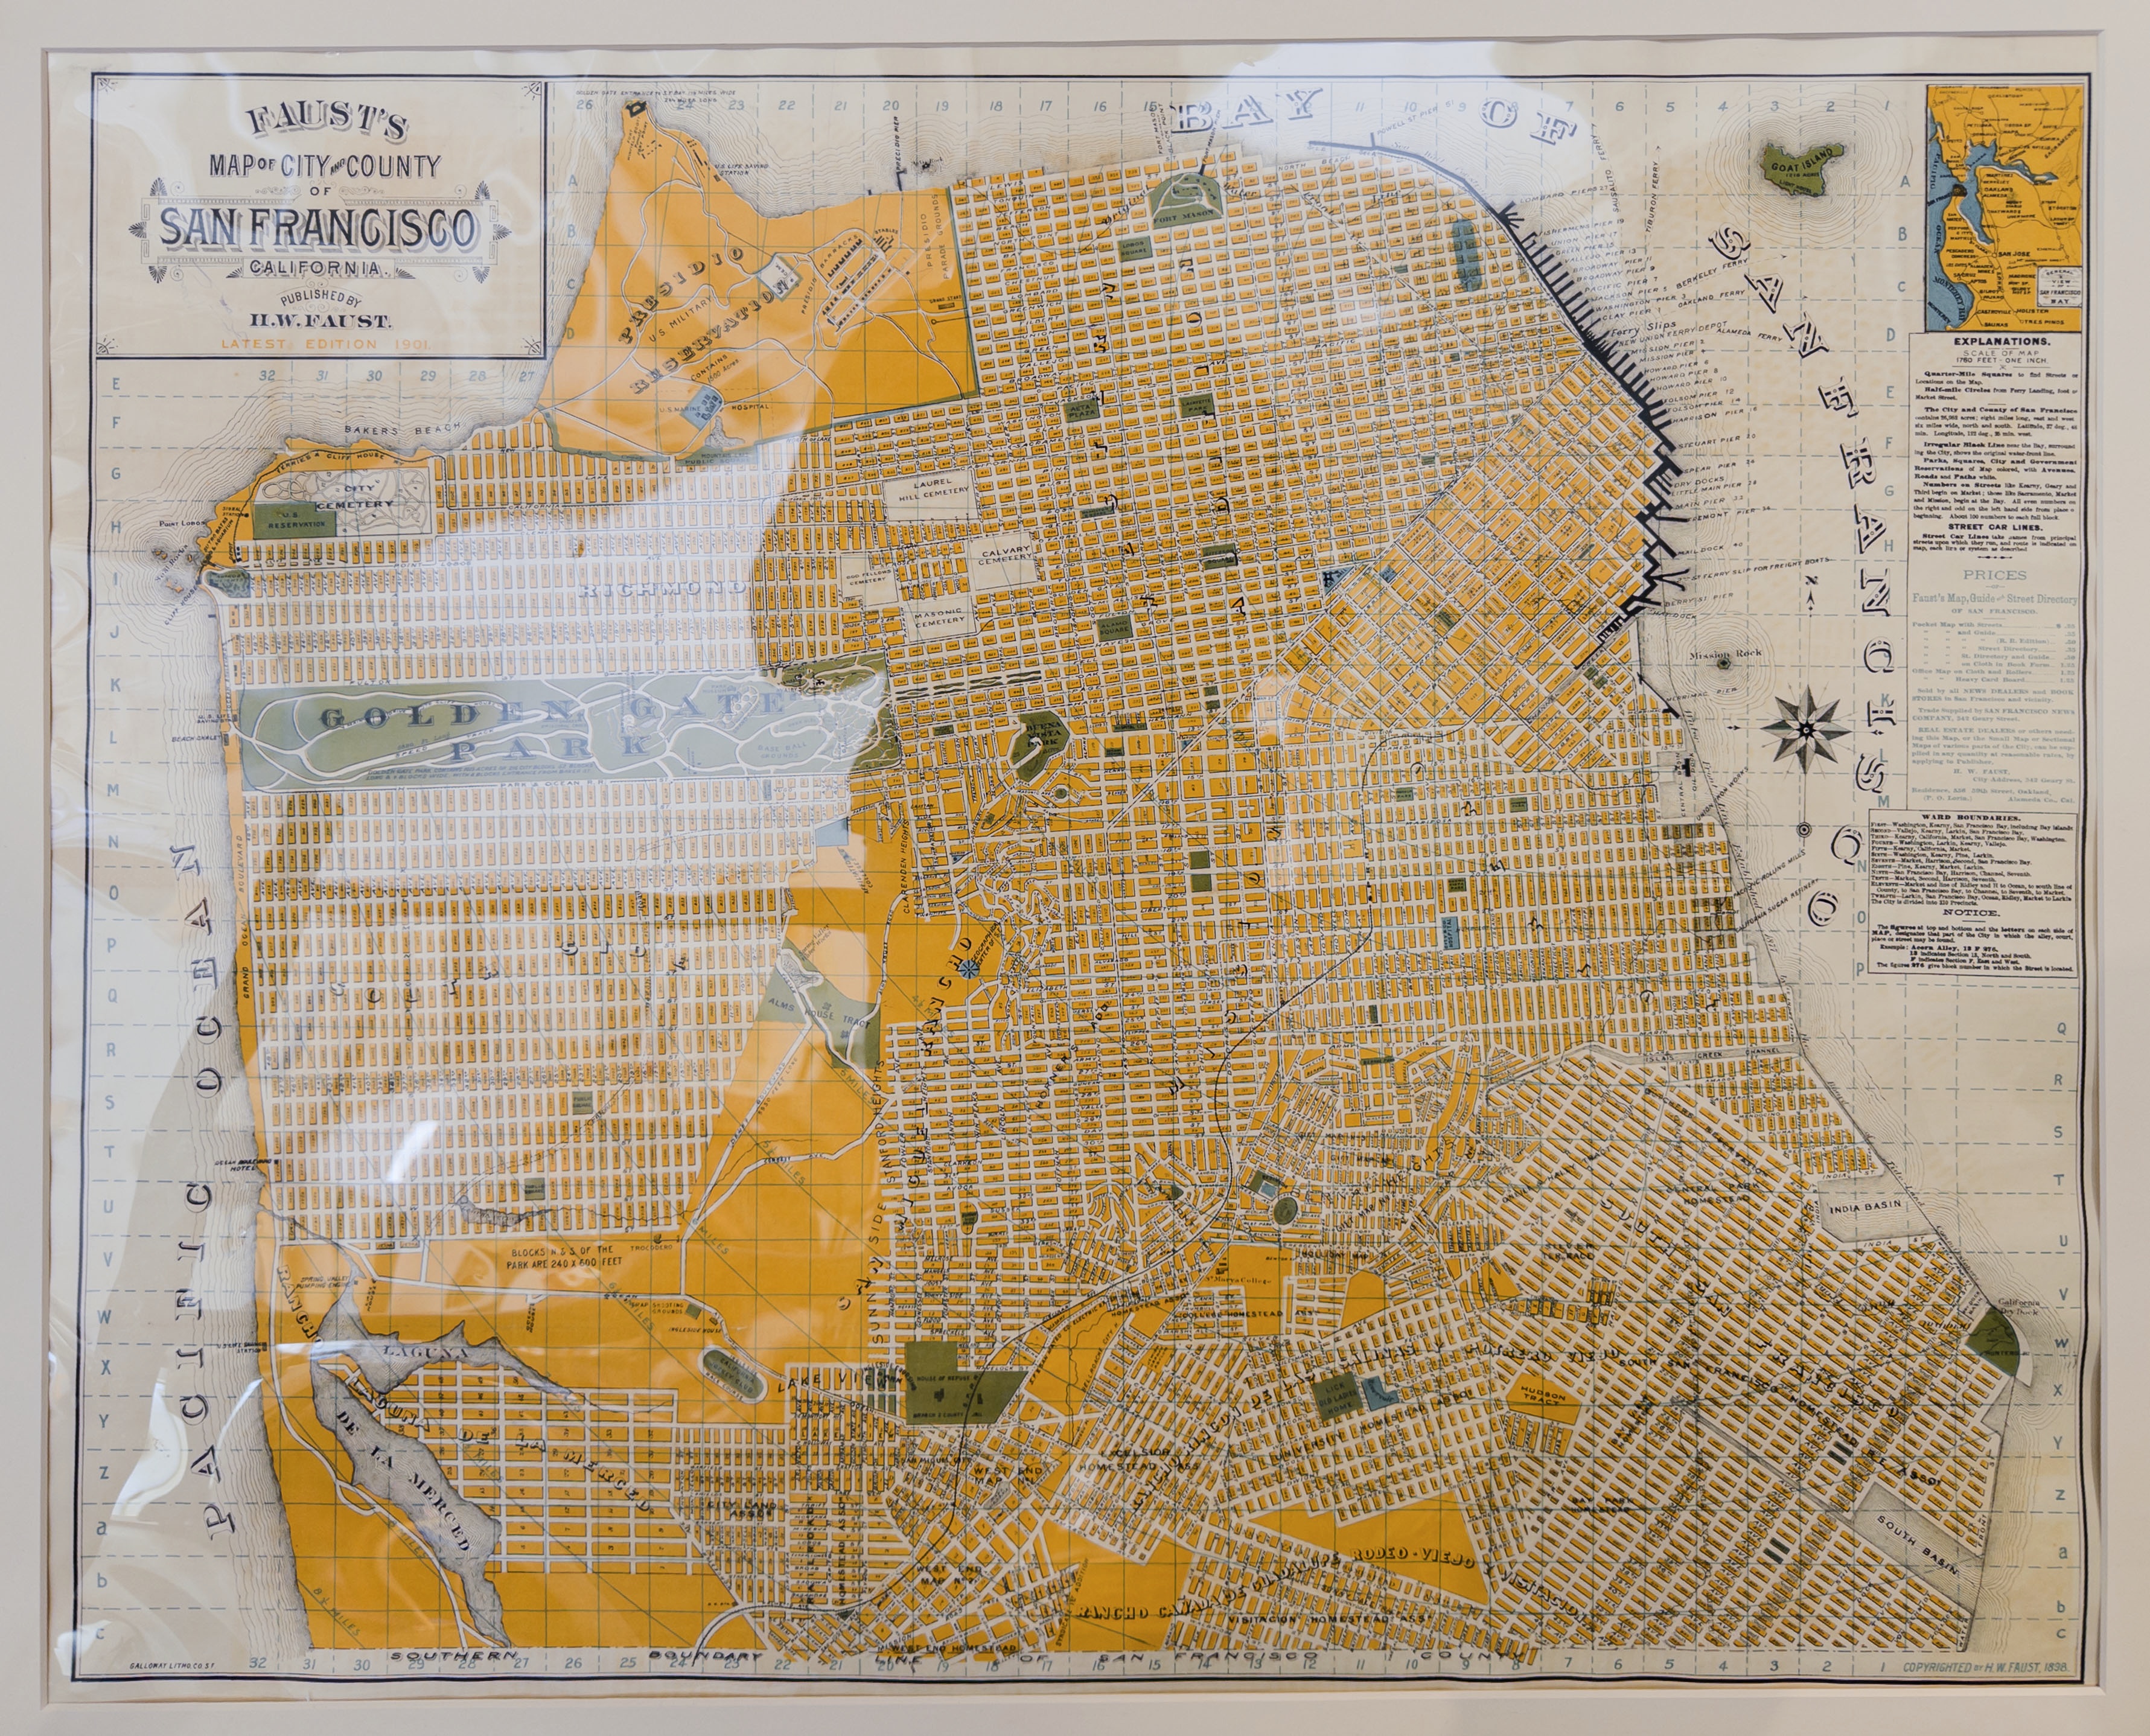
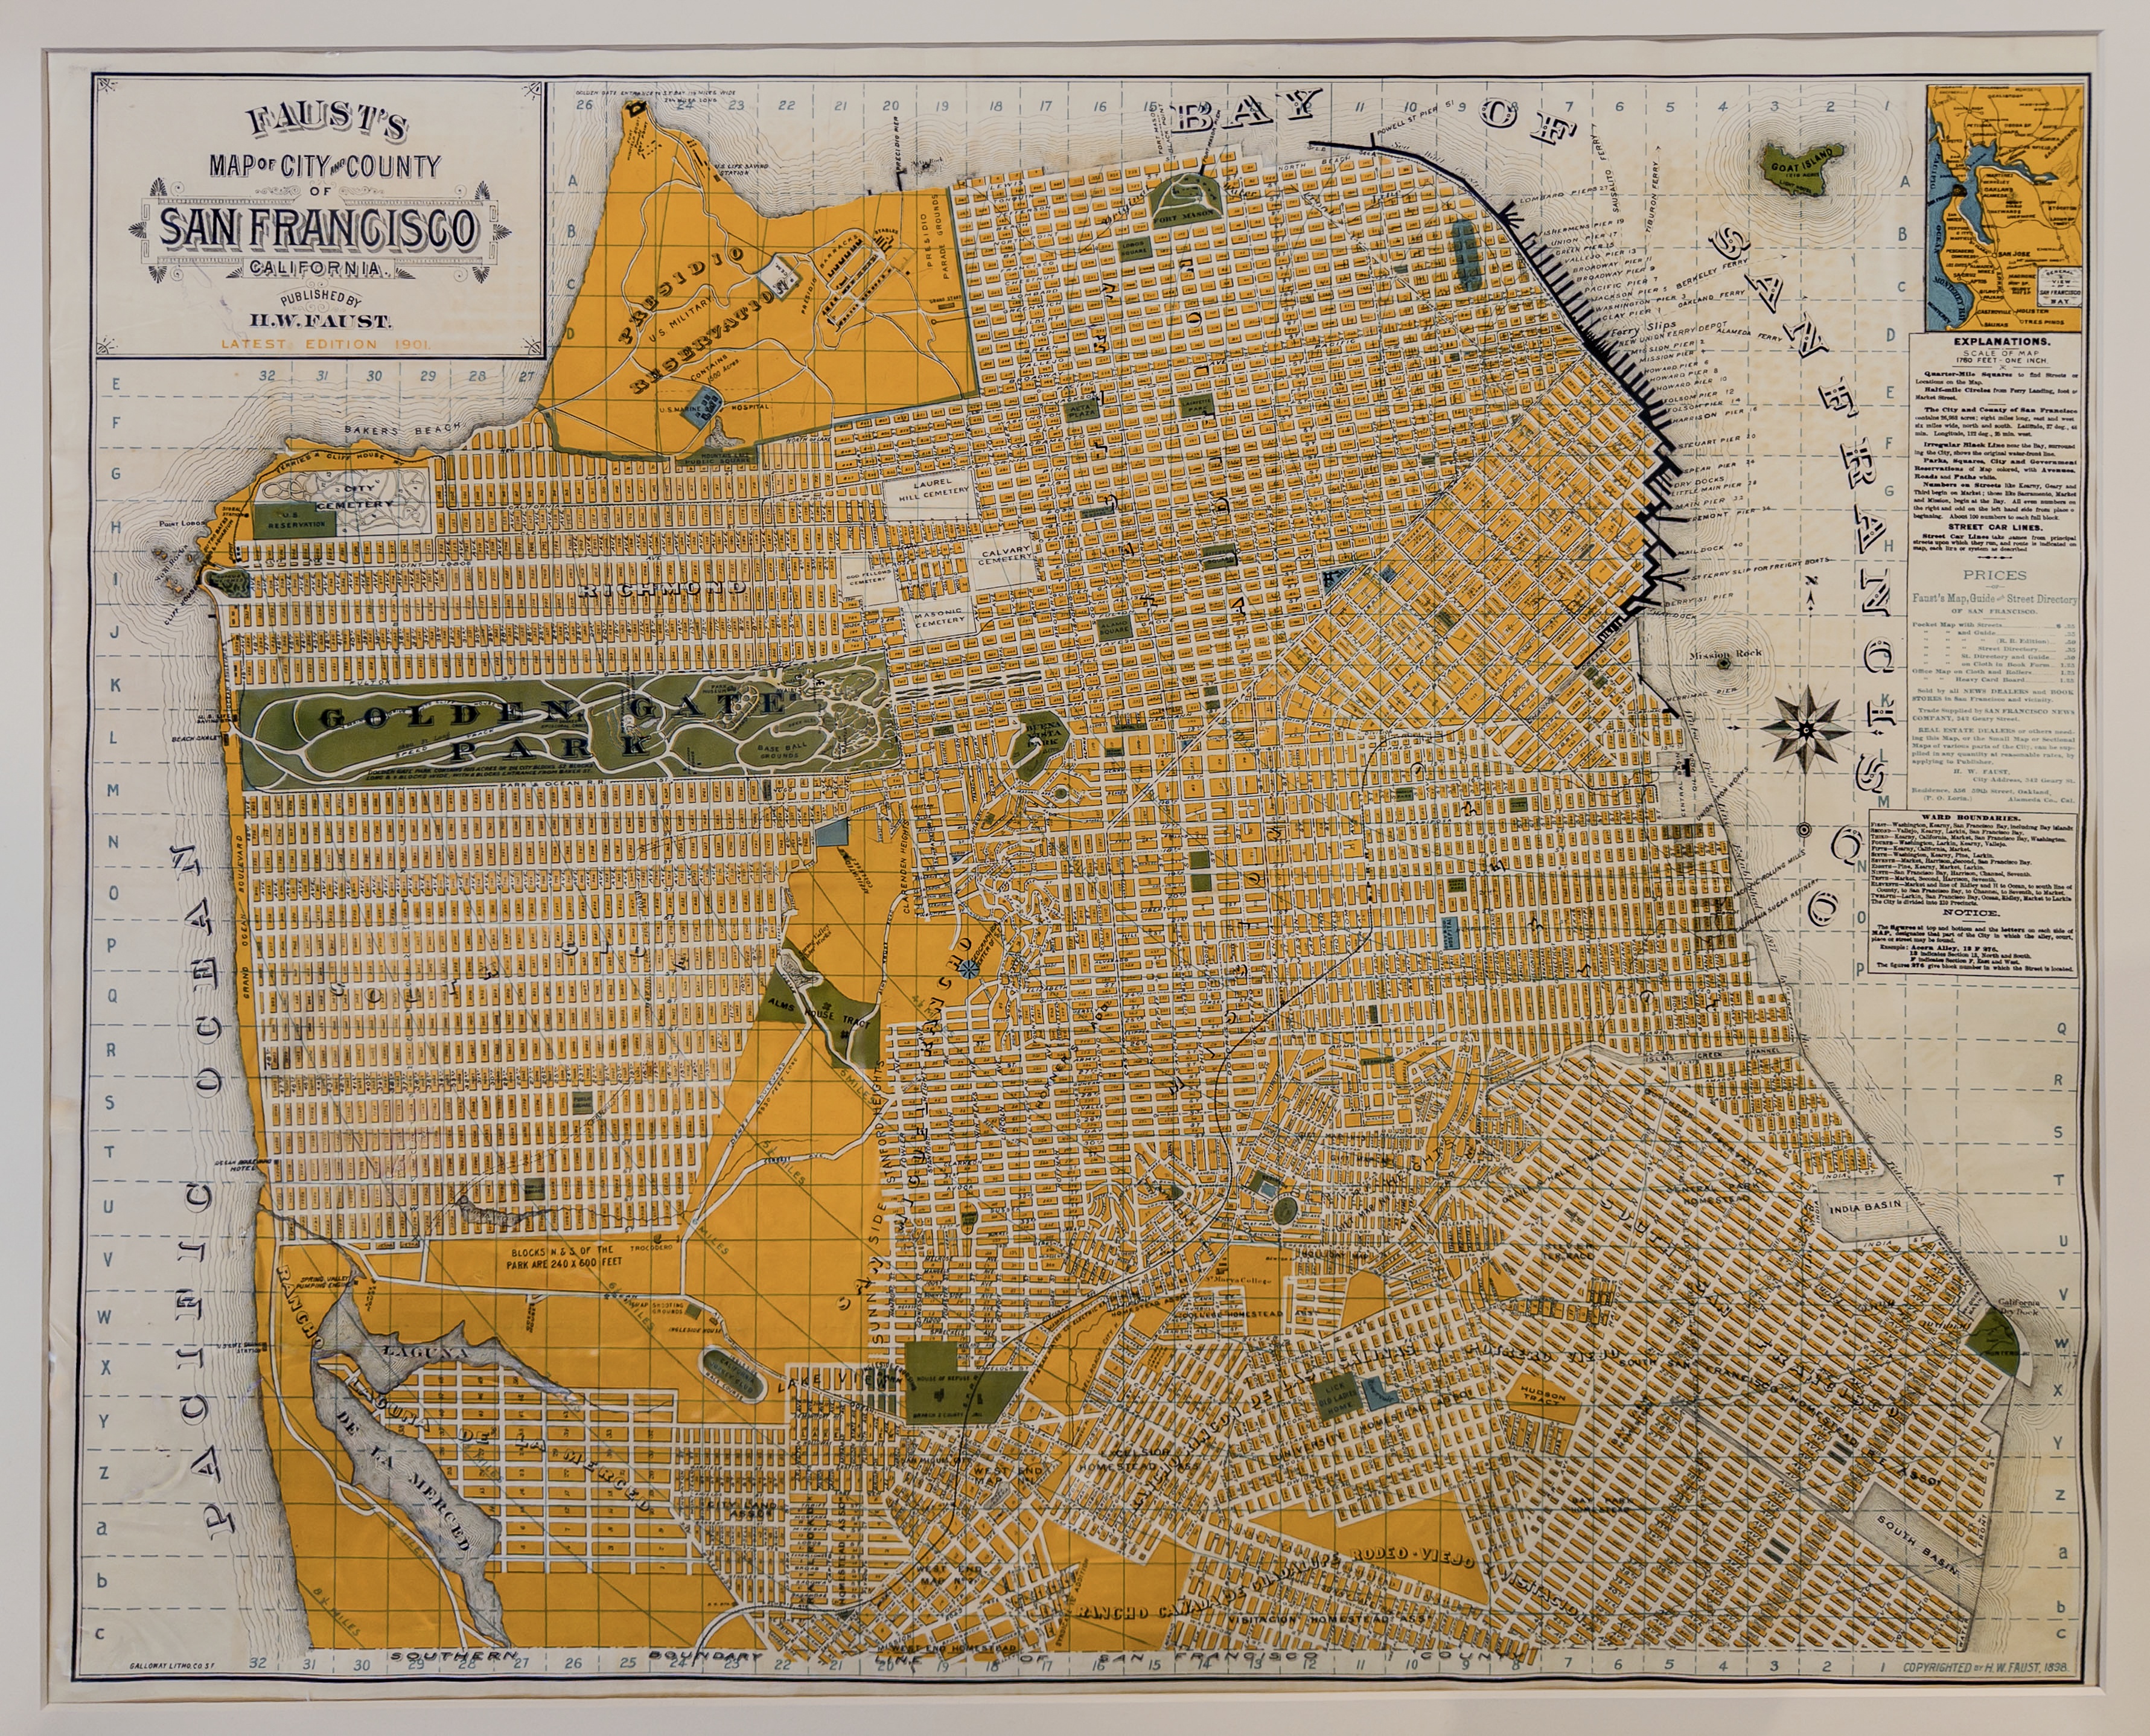
Photo of an antique street map of San Francisco, shot through a protective plastic sleeve. You can even see the photographer in the reflection. At right is the same photo with reflections removed - using a single tap in our camera app. Try dereflecting photos taken through a car, train, or plane window!
What's next?
Project Indigo is an experimental camera app developed by Adobe's Nextcam team. Contributors were Jiawen (Kevin) Chen, Zhoutong Zhang, Yuting Yang, Richard Case, Shumian Xin, Ke Wang, Eric Kee, Adam Pikielny, Ilya Chugunov, Cecilia Zhang, Zhihao Xia, Louise Huang, Lars Jebe, Haiting Lin, Lantao Yu, Florian Kainz, Mohammad Haque, Boris Ajdin, and Marc Levoy. The photographs in this blog are by Marc Levoy, Florian Kainz, Sophia Kainz, Adam Pikielny, and Lars Jebe.
This is the beginning of a journey for Adobe - towards an integrated mobile camera and editing experience that takes advantage of the latest advances in computational photography and AI. Our hope is that Indigo will appeal to casual mobile photographers who want a natural SLR-like look for their photos, including when viewed on large screens; to advanced photographers who want manual control and the highest possible image quality; and to anyone - casual or serious - who enjoys playing with new photographic experiences.
Since we're at the beginning of this journey, we've decided to release Project Indigo for free as part of Adobe Labs. The app runs on all Pro and Pro Max iPhones starting from series 12, and on all non-Pro iPhones starting from series 14. (That said, the app does some pretty heavy computing, so you'll have a better experience on a newer iPhone.) It requires no Adobe sign-on at present, and can be downloaded from the Apple App Store.
What's next for Project Indigo? An Android version for sure. We'd also like to add alternative "looks", maybe even personalized ones. We also plan to add a portrait mode, but with more control and higher image quality than existing camera apps, as well as panorama and video recording, including some cool computational video features we're cooking up in the lab.
One more thing. We're thinking about supporting exposure bracketing, focus bracketing, and a number of other multi-frame modes where one or more camera parameters are varied between frames. Exposure bracketing in particular would help with astrophotography. Unique to Indigo, these bursts would be combined in-camera to produce photos with extreme dynamic range or depth of field (sometimes called all-in-focus), respectively. Below are some examples. And unlike big cameras, Indigo will make these computations available for both JPEGs and DNGs. We also plan to pass these brackets of images to Lightroom, which could enable new kinds of stack-based editing.
At left is an extreme high dynamic range image constructed from six Indigo photos, each captured on a tripod using Long Exposure, and with per-frame exposure times set using pro controls to span from 1 second to 1/1000 second. The photos were manually merged in Photoshop.
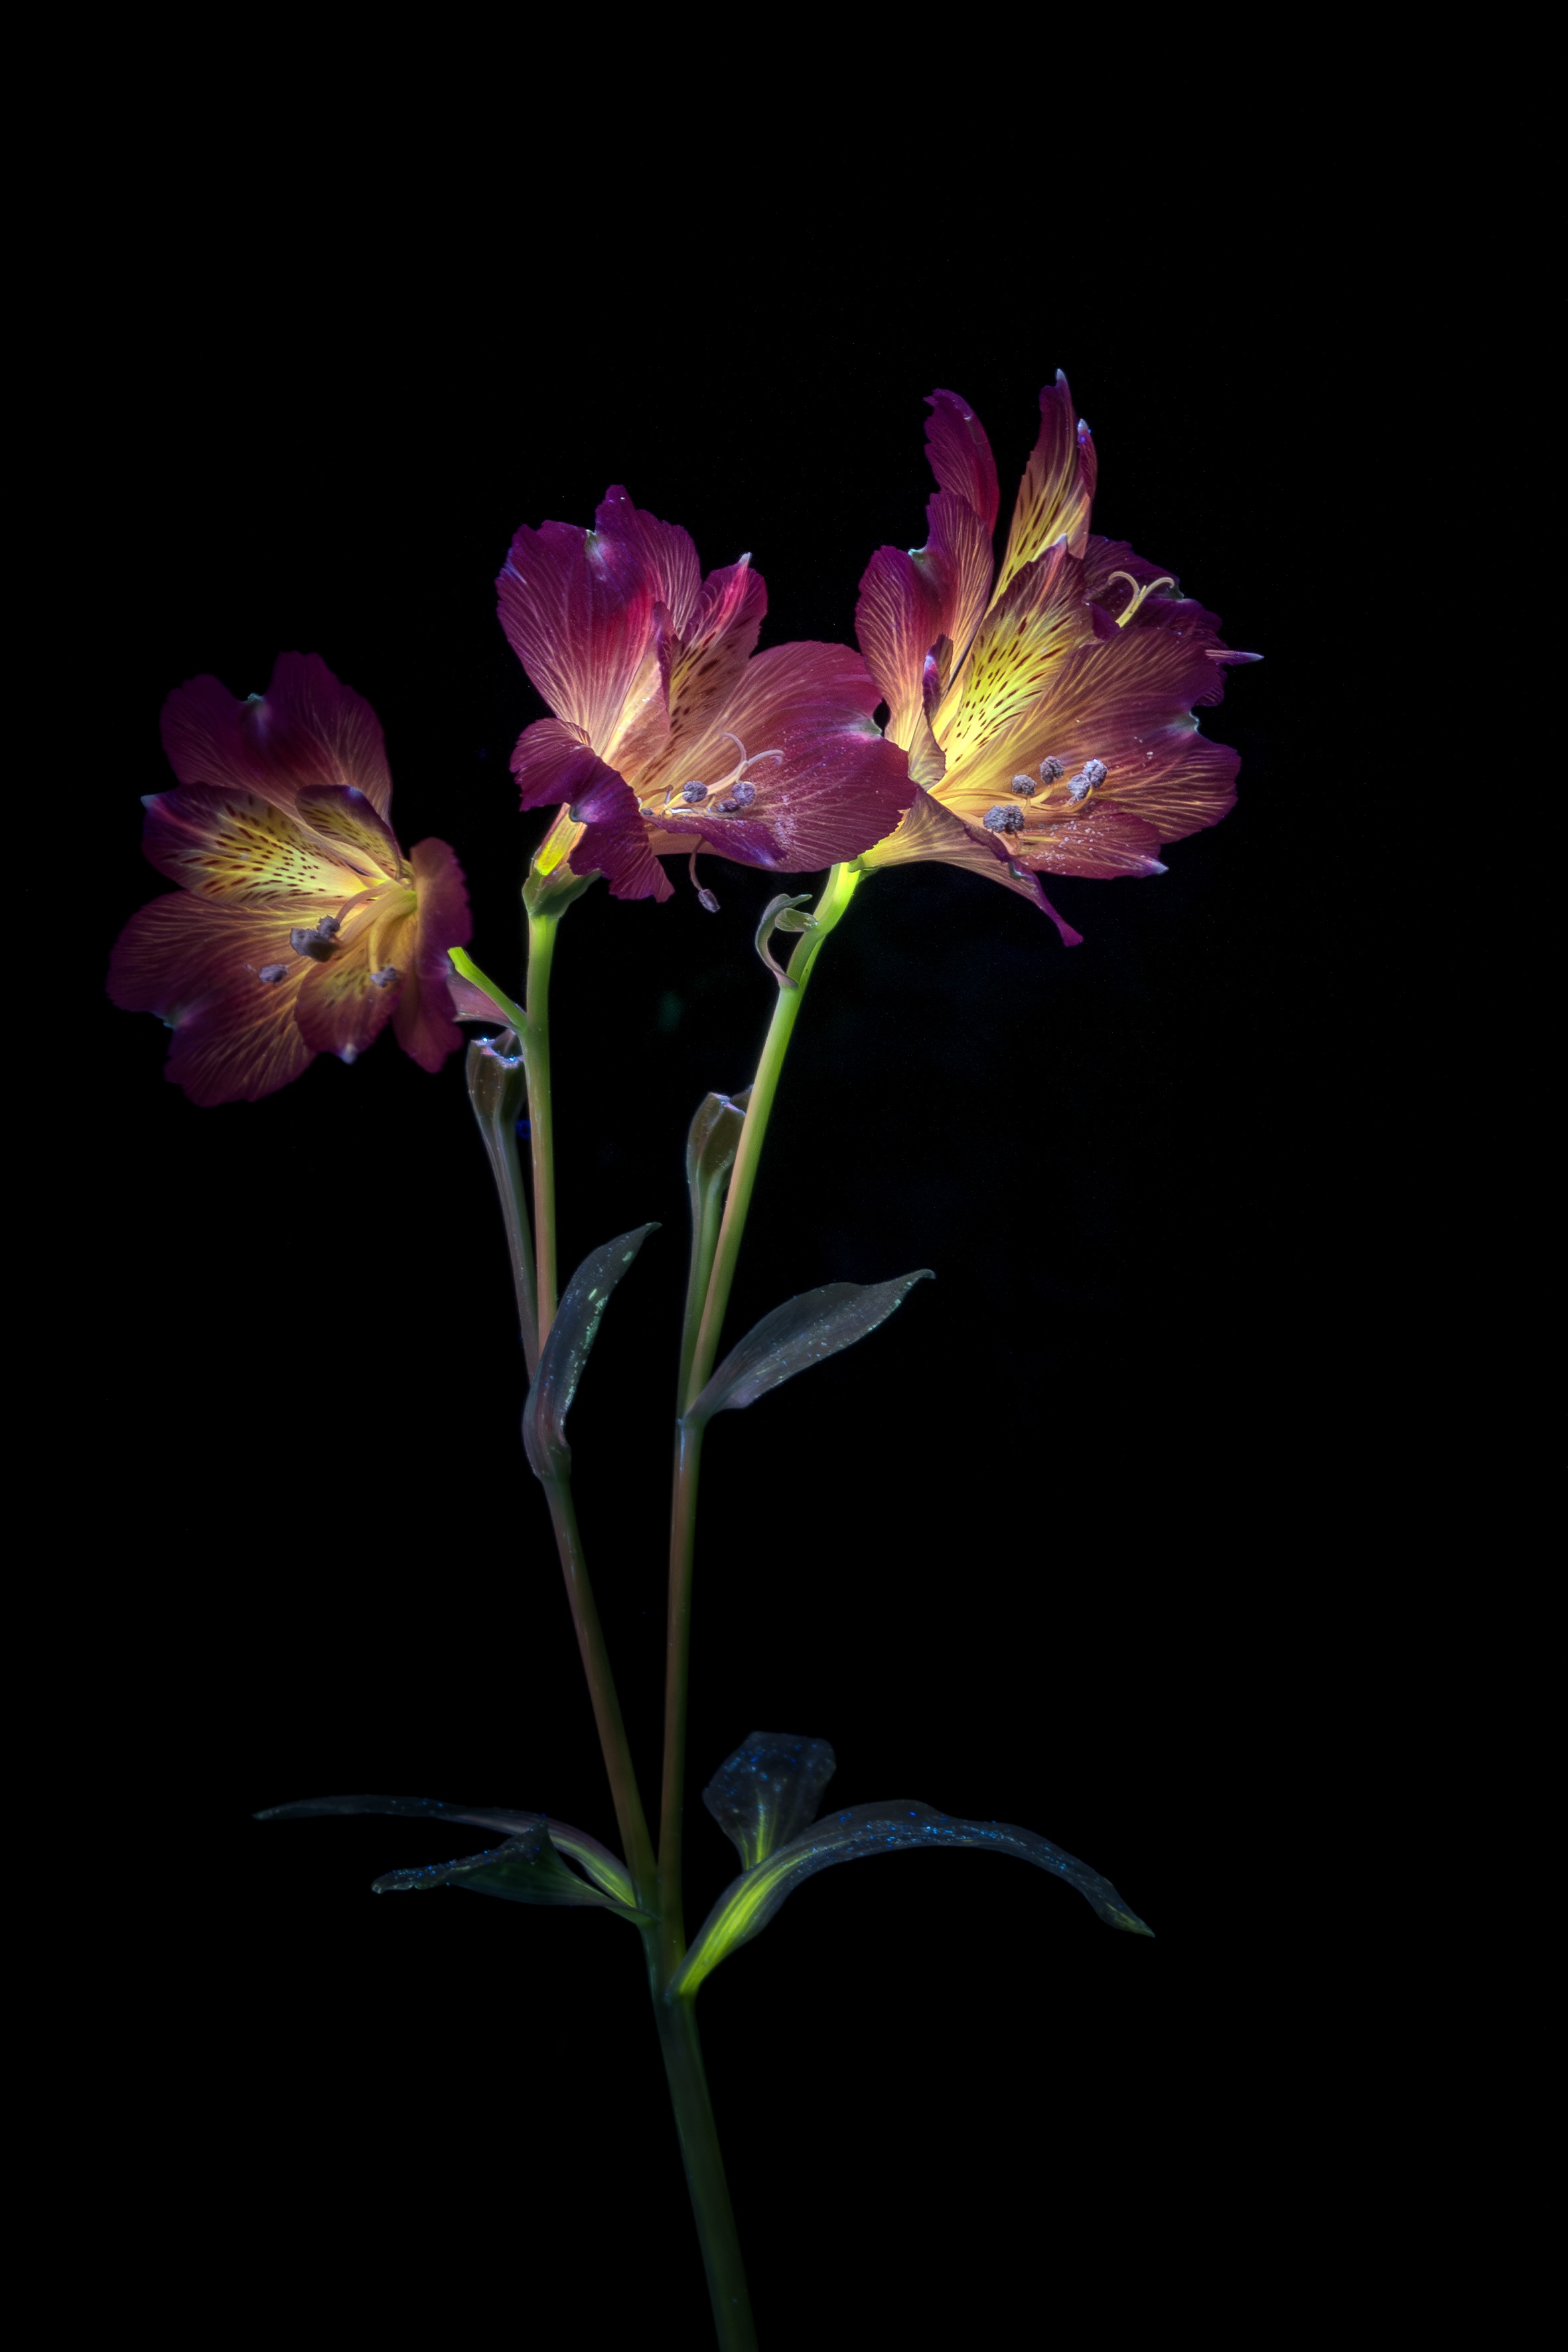
At right is a (mostly-)all-in-focus photograph of a tiny flower constructed from 41 Indigo photos, again captured on a tripod using Long Exposure, with a close-up lens in front of the phone and with per-photo focus set using pro controls to span from near to infinity. The photos were combined using third-party software and finished in Photoshop. We plan to offer these capabilities as automatic, one-press features, computed on-device in Indigo.
As with all our technologies, we're always looking for feedback from users. A good place for this is in our public forum. We'd love to see the results you get with the Project Indigo camera app, and we'd like to hear your suggestions for follow-on features. Check out our Lightroom album, then try the app for yourselves, and let us know what you think!